Description
Module Zabbix Preprocessing Assistant helps Zabbix users and administrators determine appropriate preprocessing steps by suggesting optimal configurations based on provided input data samples and desired output requirements. Users specify their input data characteristics and desired results, and the AI assistant proposes suitable preprocessing steps to achieve the requested data transformation. By leveraging this AI assistant, users can design preprocessing rules that match their specific data processing needs in a more streamlined manner.
Usage Examples
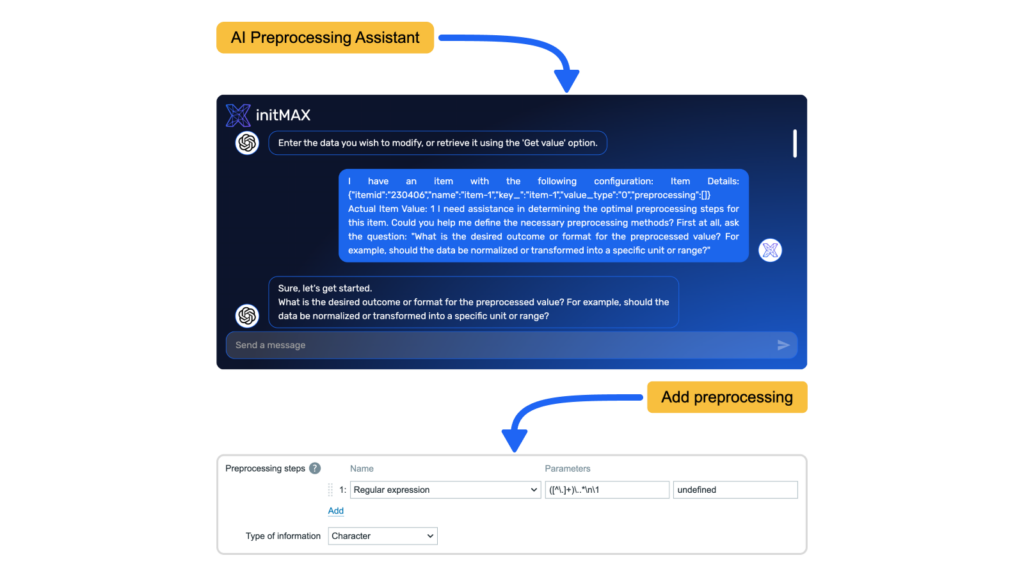
Unix timestamp transformation. The AI Preprocessing Assistant proposes two preprocessing steps (JSONPath and JavaScript) to transform data into a human readable date (DD-MM-YY). The yellow ‘Add preprocessing’ button adds these steps to the currently modified item.
What can be seen above:
- HTTP agent item polls API that provides current unix time stamp (‘Test/Get value and test’ buttons)
- ‘AI Preprocessing Assistant’ (yellow button) is initiated from preprocessing tab on the item configuration level
- Prompt (Enter the data you wish to modify, or retrieve it using the ‘Get value’ option.) is waiting for the data. User can provide it manually or use ‘Get value’ function. Only after data is provided the “magic” starts.
- In second prompt (What is the desired outcome or format for the preprocessed value? For example, should the data be normalized or transformed into a specific unit or range?) user states what is expected (typing: I need human readable date DD-MM-YY, thanks)
- Strategy is proposed(JSONPath and JavaScript), user accepts the strategy (typing: yes,please)
- Configuration is prepared and ready to be applied (grey out ‘Add preprocessing’ button turns yellow). User presses the button ‘Add preprocessing’, both preprocessing steps are added
- ‘Get value and test’ function verifies the desired outcome, ‘Update’ saves the configuration of the item with preprocessing steps
Installation
Repository setup on server
Connect to your Zabbix frontend server (perform on all frontend nodes) via SSH
Navigate to the /modules folder (typically located at /usr/share/zabbix/ or /usr/share/zabbix/ui/)
cd /usr/share/zabbix/modules/Clone repository on your server
#PRO
git clone https://git:<<YOUR-TOKEN>>@git.initmax.cz/initMAX-Public/Zabbix-UI-Modules-AI-Preprocessing-Assistant-PRO.git
Change the ownership of the directory to the user under which your Zabbix frontend is running using the chown command (cat /etc/passwd to find which user was created during installation), some examples:
chown nginx:nginx ./Zabbix-UI-Modules-AI-Preprocessing-Assistant*chown apache:apache ./Zabbix-UI-Modules-AI-Preprocessing-Assistant*chown www-data:www-data ./Zabbix-UI-Modules-AI-Preprocessing-Assistant*Frontend module initialization
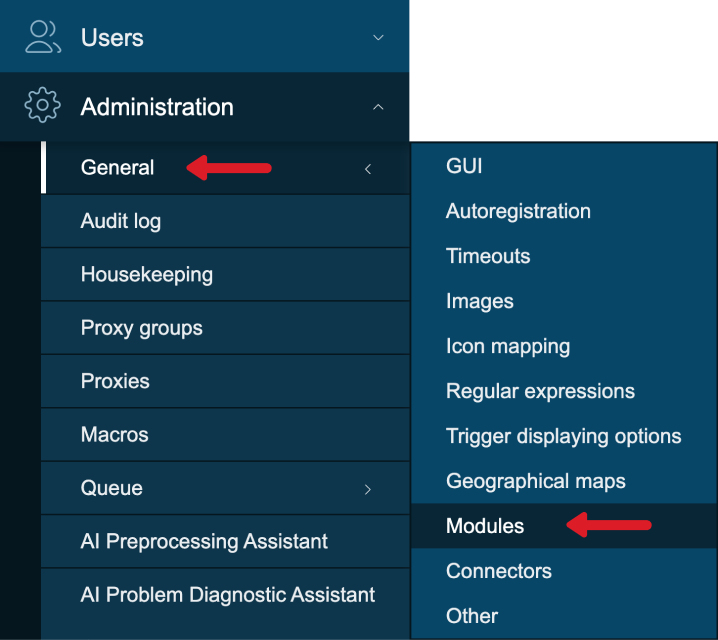
Navigate to the Zabbix frontend menu and select: Administration → General → Modules
Use the ‘Scan directory’ button on the top
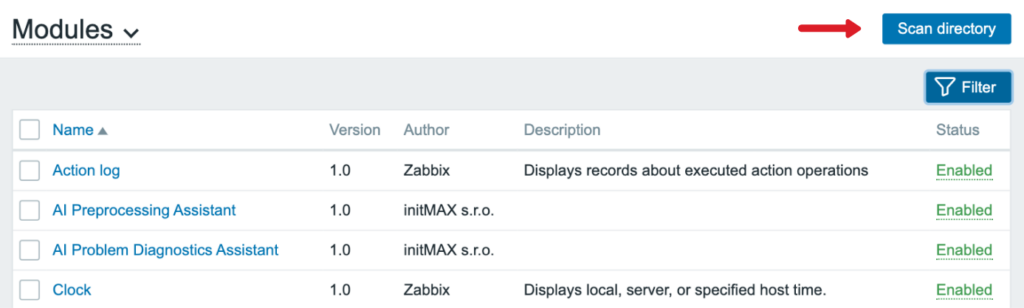
Enable the newly discovered module/widget

The module is available in the menu

Module configuration
Follow these steps to set up the AI Problem Diagnostic Assistant in your Zabbix frontend:
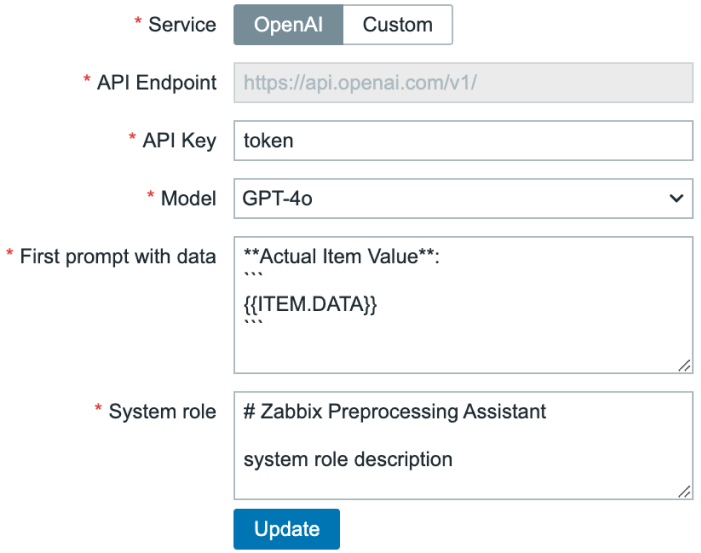
- Navigate to: Administration → AI general → AI Preprocessing Assistant
- Choose AI Service:
- Option A: OpenAI
- Enter your OpenAI API token
- Select the desired OpenAI model (e.g., GPT-4, GPT-3.5-turbo)
- Option B: Custom AI API
- Provide the custom API endpoint URL
- Enter the authentication token for the custom API
- Option A: OpenAI
- Configure First prompt with data:
- Locate the ‘PROMPT_FIRST.md’ file in the root directory of the repository
- Copy the default First prompt content from this file
- Paste the copied content into the First prompt with data field in the Zabbix interface
- Configure System Role:
- Locate the ‘PROMPT_SYSTEM_ROLE.md’ file in the root directory of the repository
- Copy the default System role content from this file
- Paste the copied content into the System role field in the Zabbix interface
- Save your configuration
- Use it and enjoy!
Where to get it?
If you’re interested in this module, you can find it in our e-shop. There you’ll learn more about the available versions and how to get the product.