In this tutorial, we will show you how to migrate a Zabbix database from MySQL to PostgreSQL on Rocky Linux 9.
At the same time, we will also show you how to turn on TimescaleDB along with some basic performance tuning.
The article assumes that if optional patches are available (float and primary keys), then they have already been applied to the database.
If you are not sure about this, then information about this status is also displayed in the frontend in the System information section, e.g. “Database history tables upgraded: No”.
We warn you in advance that you do the migration at your own risk and we bear no responsibility for any damage caused by unprofessional intervention.
Each version of Zabbix and that of the database has its own specifics, which must be taken into account when compiling the migration plan and all of the consequent activities. According to our experience, a large portion of the problems after migration (for example, with housekeeping) can only become apparent later. We therefore recommend that you contact us for a possible consultation before any interference to the production environment. We will be happy to help you with the entire process of a flawless migration and all subsequent steps.
Versions check
As the very first step before the actual migration, you need to know the specific version of the Zabbix server currently RUNNING.
That is, not what the footer shows us in the web frontend!
Most safely, we can find this in the log of the Zabbix server itself upon its startup:
cat /var/log/zabbix/zabbix_server.log | grep "Starting Zabbix Server. Zabbix"The output of this command in our case looks like this:
1933256:20240510:164211.482 Starting Zabbix Server. Zabbix 7.0.0 (revision 9bc845eca94)Another option is to find out the version of the Zabbix support library installation packages for MySQL, which is shown by the command below.
But this also may not be the currently running version!
rpm -qa | grep zabbix-server-mysqlThe output of this command looks like this:
zabbix-server-mysql-7.0.0-release1.el9.x86_64.rpmAnother way to find out the Zabbix server version is to check the version with the zabbix_server binary. However, even this information can be misleading under certain circumstances and may not be the version currently running.
zabbix_server -VThe output then looks like this:
zabbix_server (Zabbix) 7.0.0
Revision 9bc845eca94 4 June 2024, compilation time: Jun 4 2024 00:00:00
Preparation steps
MySQL triggers
Zabbix since version 6.0.11 contains database triggers and these must be taken into account during migration. With the following set of commands, we will find out if this will also apply to our database instance.
Log in to the MySQL console:
mysqlSwitch to the ‘zabbix’ database:
use zabbix; We will then call the SHOW TRIGGERS command, which will show us the database triggers used (if any):
SHOW TRIGGERS\G
If the output of this command is as follows, then you can easily skip the part with the installation of triggers in the instructions below.
Empty set (0.00 sec)You can see a sample of the output of this command in Zabbix version 6.0.11 here. At this point, you can’t avoid the trigger migration chapter mentioned below.
*************************** 1. row ***************************
             Trigger: hosts_name_upper_insert
               Event: INSERT
               Table: hosts
           Statement: set new.name_upper=upper(new.name)
              Timing: BEFORE
             Created: 2024-02-27 09:59:58.09
            sql_mode: ONLY_FULL_GROUP_BY,STRICT_TRANS_TABLES,NO_ZERO_IN_DATE,NO_ZERO_DATE,ERROR_FOR_DIVISION_BY_ZERO,NO_ENGINE_SUBSTITUTION
             Definer: zabbix@localhost
character_set_client: utf8mb4
collation_connection: utf8mb4_0900_ai_ci
  Database Collation: utf8mb4_bin
*************************** 2. row ***************************
             Trigger: hosts_name_upper_update
               Event: UPDATE
               Table: hosts
           Statement: begin
if new.name<>old.name
then
set new.name_upper=upper(new.name);
end if;
end
              Timing: BEFORE
             Created: 2024-02-27 09:59:58.10
            sql_mode: ONLY_FULL_GROUP_BY,STRICT_TRANS_TABLES,NO_ZERO_IN_DATE,NO_ZERO_DATE,ERROR_FOR_DIVISION_BY_ZERO,NO_ENGINE_SUBSTITUTION
             Definer: zabbix@localhost
character_set_client: utf8mb4
collation_connection: utf8mb4_0900_ai_ci
  Database Collation: utf8mb4_bin
*************************** 3. row ***************************
             Trigger: items_name_upper_insert
               Event: INSERT
               Table: items
           Statement: set new.name_upper=upper(new.name)
              Timing: BEFORE
             Created: 2024-02-27 10:00:00.76
            sql_mode: ONLY_FULL_GROUP_BY,STRICT_TRANS_TABLES,NO_ZERO_IN_DATE,NO_ZERO_DATE,ERROR_FOR_DIVISION_BY_ZERO,NO_ENGINE_SUBSTITUTION
             Definer: zabbix@localhost
character_set_client: utf8mb4
collation_connection: utf8mb4_0900_ai_ci
  Database Collation: utf8mb4_bin
*************************** 4. row ***************************
             Trigger: items_name_upper_update
               Event: UPDATE
               Table: items
           Statement: begin
if new.name<>old.name
then
set new.name_upper=upper(new.name);
end if;
end
              Timing: BEFORE
             Created: 2024-02-27 10:00:00.77
            sql_mode: ONLY_FULL_GROUP_BY,STRICT_TRANS_TABLES,NO_ZERO_IN_DATE,NO_ZERO_DATE,ERROR_FOR_DIVISION_BY_ZERO,NO_ENGINE_SUBSTITUTION
             Definer: zabbix@localhost
character_set_client: utf8mb4
collation_connection: utf8mb4_0900_ai_ci
  Database Collation: utf8mb4_bin
4 rows in set (0.01 sec)
Installing dependencies
First, we add the official PostgreSQL repository that we recommend for installation. The installation packages from the RedHat repositories differ substantially.
We can do this with the following command:
yum install https://download.postgresql.org/pub/repos/yum/reporpms/EL-9-x86_64/pgdg-redhat-repo-latest.noarch.rpmInstall PostgreSQL version supported by Zabbix, which you can find in the compatibility matrix on the Zabbix website:
yum install postgresql16-serverInitialize the PostgreSQL database server with the following command:
/usr/pgsql-16/bin/postgresql-16-setup initdbStart the PostgreSQL service and set it to start upon server startup:
systemctl enable postgresql-16
systemctl start postgresql-16
Install the pgloader utility, which is used for data migration:
yum install pgloaderUse the following command to check the pgloader version:
pgloader -VThe output will look like this:
pgloader version "3.6.7"Preparing for migration
Now create a temporary folder that will keep the configuration files used in the subsequent migration and open it:
mkdir /tmp/zabbix-db-migration/ && cd $_Schema parsing
For the data migration itself, you will need a file with a database schema, which you can find in the official Zabbix source code for your specific version.
It is imperative to modify this command according to your Zabbix version!
Still being in our temporary folder created for the migration, download the source code for our 7.0.0beta1 version with the following command:
wget https://cdn.zabbix.com/zabbix/sources/stable/7.0/zabbix-7.0.0.tar.gzExtract the downloaded archive containing the Zabbix source code:
tar -zxvf zabbix-7.0.0.tar.gzOpen the folder in the following path where you will find the database schemas:
cd /tmp/zabbix-db-migration/zabbix-7.0.0/database/postgresql/From the unified schema file, select only operations for creating tables and triggers, and save those in a separate file:
grep -v 'ALTER TABLE ONLY' schema.sql | grep -v INSERT | grep -v 'CREATE INDEX' | grep -v 'CREATE UNIQUE INDEX' > /tmp/zabbix-db-migration/create_tables.sqlThis file now contains not only CREATE TABLE operations, but also operations and functions for triggers, which we solve individually. So remove the part that creates triggers from this file:
sed -i '/create\ or\ replace\ function/,$d' /tmp/zabbix-db-migration/create_tables.sqlAnd from the unified schema file, select only operations related to triggers:
awk '/INSERT INTO dbversion/{p=1;next} /ALTER TABLE/{p=0} p' schema.sql > /tmp/zabbix-db-migration/triggers.sqlNow we can proceed further. From the same file with the database schema, select only index creation operations and store them in a separate file:
grep -E 'CREATE INDEX|CREATE UNIQUE INDEX' schema.sql > /tmp/zabbix-db-migration/create_index.sqlAgain, from this unified schema file, select only the ALTER operations and store them in a separate file:
grep 'ALTER TABLE ONLY' schema.sql > /tmp/zabbix-db-migration/alter_table.sqlPreparing PostgreSQL
Let’s create a database user for Zabbix, you will be prompted to enter a password:
sudo -u postgres createuser --pwprompt zabbixNext, create a Zabbix database:
sudo -u postgres createdb -O zabbix zabbixThen, create a Zabbix schema:
sudo -u postgres psql --host=127.0.0.1 --dbname=zabbix --username=zabbix -f /tmp/zabbix-db-migration/create_tables.sqlFor compatibility with the pgloader utility, temporarily set the encryption hash to ‘md5’ and change the password of the created database user so that it is regenerated in the given hash algorithm. For simplicity, ideally use the same password as you’ve entered on creation of this user.
sudo -u postgres psql -c "SET password_encryption='md5';"
sudo -u postgres psql -c "ALTER ROLE zabbix WITH PASSWORD '***********';"
Preparing MySQL
If our MySQL already uses a changed login format, then, as with PostgreSQL, for the needs of pgloader, the login method of the database user needs to be changed for Zabbix and at the same time the password must be regenerated. You can do this in the following way.
First, open the configuration file of the MySQL server. If you are using a different version, eg. MariaDB or Percona, then the location may differ.
nano /etc/my.cnf.d/mysql-server.cnfIn here, temporarily modify the following directive in the [mysqld] (server) section:
[mysqld]
...
default-authentication-plugin=mysql_native_password
Now you need to restart MySQL:
systemctl restart mysqldAnd now you can change the user login method for Zabbix and regenerate its password. Don’t forget to change the password to your own in the command below!
mysql -e "ALTER USER 'zabbix'@'localhost' IDENTIFIED WITH mysql_native_password BY '*********';"Prepare the configuration file – SQL script for pgloader, so create this file:
nano /tmp/zabbix-db-migration/pgloader.confAnd fill this file with the following content. Don’t forget to change the passwords (marked with asterisks) in this script to your own, valid passwords for both databases:
LOAD DATABASE
FROM mysql://zabbix:**********@127.0.0.1/zabbix
INTO postgresql://zabbix:**********@127.0.0.1/zabbix
WITH include no drop,
truncate,
create no tables,
create no indexes,
no foreign keys,
reset sequences,
data only,
prefetch rows = 1000,
batch rows = 1000,
batch concurrency = 1
ALTER SCHEMA 'zabbix' RENAME TO 'public';
Migration
Now you can start the migration itself. At this time, we recommend that you make a backup of the source MySQL database and make sure that you have enough free disk space.
First, stop the Zabbix server service and the Apache web server for the Zabbix frontend:
systemctl stop zabbix-server httpdCreate a folder for the migrated data from MySQL in our temporary folder:
mkdir /tmp/zabbix-db-migration/dataAnd then start pgloader with the configuration file you’ve created:
pgloader --root-dir=/tmp/zabbix-db-migration/data /tmp/zabbix-db-migration/pgloader.confIf pgloader reports any warning messages while running, then you can safely ignore them – it doesn’t matter as much. On the other hand, problems that are more serious and which you may also encounter are, for example: a small amount of available disk space, time delays between databases (timeouts), low speed of writing to the disk (low amount of iops). Even these problems can be solved, but they require further analysis and subsequent tailor-made tuning.
An example output of this command can be found here:
2024-05-10T16:55:38.010000+01:00 LOG pgloader version "3.6.7~devel"
2024-05-10T16:55:38.174002+01:00 LOG Migrating from #<MYSQL-CONNECTION mysql://[email protected]:3306/zabbix {100685C583}>
2024-05-10T16:55:38.175002+01:00 LOG Migrating into #<PGSQL-CONNECTION pgsql://[email protected]:5432/zabbix {100685C713}>
2024-05-10T16:55:38.684006+01:00 WARNING Source column "public"."history_uint"."value" is casted to type "bigint" which is not the same as "numeric", the type of current target database column "public"."history_uint"."value".
2024-05-10T16:55:38.685006+01:00 WARNING Source column "public"."item_rtdata"."lastlogsize" is casted to type "bigint" which is not the same as "numeric", the type of current target database column "public"."item_rtdata"."lastlogsize".
2024-05-10T16:55:38.686006+01:00 WARNING Source column "public"."proxy_history"."lastlogsize" is casted to type "bigint" which is not the same as "numeric", the type of current target database column "public"."proxy_history"."lastlogsize".
2024-05-10T16:55:38.686006+01:00 WARNING Source column "public"."trends_uint"."value_min" is casted to type "bigint" which is not the same as "numeric", the type of current target database column "public"."trends_uint"."value_min".
2024-05-10T16:55:38.687006+01:00 WARNING Source column "public"."trends_uint"."value_avg" is casted to type "bigint" which is not the same as "numeric", the type of current target database column "public"."trends_uint"."value_avg".
2024-05-10T16:55:38.687006+01:00 WARNING Source column "public"."trends_uint"."value_max" is casted to type "bigint" which is not the same as "numeric", the type of current target database column "public"."trends_uint"."value_max".
2024-05-10T16:56:28.778334+01:00 ERROR Database error 23505: duplicate key value violates unique constraint "changelog_pkey"
DETAIL: Key (changelogid)=(16809) already exists.
CONTEXT: COPY changelog, line 1
2024-05-10T16:56:30.691348+01:00 LOG report summary reset
table name errors rows bytes total time
--------------------------------- --------- --------- --------- --------------
fetch meta data 0 198 0.121s
Truncate 0 198 0.338s
--------------------------------- --------- --------- --------- --------------
public.history 0 3899811 133.2 MB 39.021s
public.history_uint 0 2167293 66.0 MB 26.330s
public.trends 0 502182 27.5 MB 8.498s
public.items 0 12784 4.4 MB 1.488s
public.event_tag 0 13012 326.9 kB 0.942s
public.trigger_tag 0 7365 198.8 kB 1.411s
public.triggers 0 5546 1.4 MB 2.027s
public.graphs_items 0 4186 138.6 kB 2.082s
public.history_str 0 2923 233.3 kB 2.316s
public.item_condition 0 2445 123.0 kB 2.524s
public.widget_field 0 1875 103.9 kB 2.777s
public.graphs 0 1428 154.7 kB 3.150s
public.item_rtdata 0 957 16.0 kB 3.248s
public.host_tag 0 635 17.4 kB 3.486s
public.widget 0 467 14.2 kB 3.773s
public.host_hgset 0 307 2.5 kB 3.991s
public.profiles 0 265 13.2 kB 4.305s
public.dashboard_page 0 158 1.9 kB 4.515s
public.dashboard 0 154 10.5 kB 4.839s
public.images 0 187 1.9 MB 5.049s
public.task_check_now 0 0 5.063s
public.lld_override_opdiscover 0 98 0.7 kB 5.114s
public.lld_override_opstatus 0 98 0.7 kB 5.217s
public.trigger_discovery 0 82 2.0 kB 5.339s
public.users_groups 0 64 0.5 kB 5.407s
public.user_ugset 0 61 0.3 kB 5.525s
public.graph_discovery 0 47 1.1 kB 5.643s
public.hosts_templates 0 31 0.5 kB 5.809s
public.problem 0 34 3.4 kB 6.004s
public.hstgrp 0 26 1.5 kB 6.212s
public.module 0 27 0.9 kB 6.343s
public.hgset 0 19 1.3 kB 6.497s
public.host_rtdata 0 13 0.1 kB 6.690s
public.expressions 0 10 0.5 kB 6.691s
public.escalations 0 15 0.7 kB 6.847s
public.permission 0 7 0.0 kB 6.810s
public.conditions 0 6 0.1 kB 6.961s
public.usrgrp 0 6 0.2 kB 6.958s
public.regexps 0 5 0.2 kB 7.101s
public.graph_theme 0 4 0.9 kB 7.071s
public.opmessage_grp 0 4 0.0 kB 7.248s
public.httpstepitem 0 3 0.0 kB 7.275s
public.scripts 0 3 0.3 kB 7.423s
public.sysmaps_links 0 3 0.4 kB 7.411s
public.acknowledges 0 1 0.0 kB 7.573s
public.interface_snmp 0 2 0.1 kB 7.510s
public.proxy 0 2 0.1 kB 7.738s
public.ugset 0 2 0.1 kB 7.531s
public.dchecks 0 1 0.0 kB 7.727s
public.autoreg_host 0 0 7.722s
public.config_autoreg_tls 0 1 0.0 kB 7.899s
public.connector_tag 0 0 7.852s
public.corr_condition_group 0 0 7.925s
public.corr_condition_tagpair 0 0 8.054s
public.corr_operation 0 0 8.049s
public.dashboard_user 0 0 8.200s
public.dhosts 0 1 0.0 kB 8.190s
public.dservices 0 1 0.2 kB 8.298s
public.globalmacro 0 1 0.0 kB 8.291s
public.group_discovery 0 0 8.472s
public.history_log 0 0 8.467s
public.httpstep 0 1 0.1 kB 8.693s
public.httptest 0 1 0.1 kB 8.688s
public.httptest_tag 0 0 8.849s
public.icon_mapping 0 0 8.821s
public.lld_override_ophistory 0 0 9.102s
public.lld_override_opperiod 0 0 8.981s
public.lld_override_optag 0 0 9.132s
public.lld_override_optrends 0 0 9.350s
public.maintenances 0 1 0.0 kB 9.347s
public.maintenances_hosts 0 1 0.0 kB 9.557s
public.opcommand 0 0 9.548s
public.opcommand_hst 0 0 9.736s
public.opgroup 0 1 0.0 kB 9.738s
public.opmessage_usr 0 0 9.954s
public.optemplate 0 1 0.0 kB 9.950s
public.proxy_dhistory 0 0 10.057s
public.report 0 0 10.101s
public.report_user 0 0 10.120s
public.scim_group 0 0 10.198s
public.service_alarms 0 0 10.219s
public.service_problem_tag 0 0 10.271s
public.service_tag 0 0 10.329s
public.services_links 0 0 10.363s
public.sla_excluded_downtime 0 0 10.401s
public.sla_service_tag 0 0 10.487s
public.sysmap_element_url 0 0 10.484s
public.sysmap_url 0 0 10.618s
public.sysmap_usrgrp 0 0 10.537s
public.sysmaps_link_triggers 0 0 10.622s
public.task 0 0 10.677s
public.task_close_problem 0 0 10.752s
public.task_remote_command 0 0 10.763s
public.task_result 0 0 10.812s
public.token 0 0 10.864s
public.user_scim_group 0 0 10.940s
public.userdirectory_idpgroup 0 0 10.955s
public.userdirectory_media 0 0 11.072s
public.userdirectory_usrgrp 0 0 11.029s
public.valuemap_mapping 0 30621 861.6 kB 11.359s
public.trends_uint 0 345750 11.3 MB 3.151s
public.item_tag 0 19823 598.5 kB 0.772s
public.item_preproc 0 11373 603.2 kB 0.888s
public.functions 0 9445 268.0 kB 1.304s
public.item_discovery 0 5629 129.7 kB 1.377s
public.hostmacro 0 4612 360.1 kB 1.518s
public.events 0 3494 252.6 kB 1.644s
public.alerts 0 3083 844.7 kB 1.838s
public.trigger_depends 0 1819 32.0 kB 2.011s
public.auditlog 0 5350 642.1 kB 2.329s
public.event_recovery 0 1362 27.6 kB 2.490s
public.item_rtname 0 917 60.6 kB 2.691s
public.media_type_param 0 555 22.0 kB 2.867s
public.hosts 0 318 133.3 kB 3.229s
public.hosts_groups 0 307 3.7 kB 3.413s
public.history_text 0 211 3.7 MB 3.957s
public.media_type_message 0 154 41.1 kB 4.150s
public.event_suppress 0 143 3.5 kB 4.421s
public.lld_macro_path 0 134 4.5 kB 4.481s
public.problem_tag 0 150 3.6 kB 4.600s
public.lld_override_operation 0 98 2.9 kB 4.726s
public.lld_override 0 95 3.7 kB 4.842s
public.lld_override_condition 0 85 3.6 kB 4.946s
public.users 0 63 7.8 kB 5.092s
public.ids 0 51 1.3 kB 5.177s
public.item_parameter 0 43 1.7 kB 5.288s
public.group_prototype 0 28 0.9 kB 5.371s
public.role_rule 0 27 0.8 kB 5.505s
public.interface 0 24 1.1 kB 5.670s
public.media_type 0 31 256.8 kB 5.707s
public.hgset_group 0 19 0.1 kB 5.649s
public.host_discovery 0 11 0.2 kB 5.789s
public.operations 0 10 0.2 kB 5.792s
public.opmessage 0 8 0.1 kB 5.806s
public.rights 0 7 0.1 kB 5.872s
public.sessions 0 6 0.5 kB 5.985s
public.actions 0 5 0.3 kB 5.883s
public.sysmaps_elements 0 5 0.8 kB 5.978s
public.housekeeper 0 4 0.1 kB 5.993s
public.role 0 4 0.1 kB 5.966s
public.httptestitem 0 3 0.0 kB 6.161s
public.sysmaps 0 3 0.2 kB 6.102s
public.ugset_group 0 3 0.0 kB 6.098s
public.dashboard_usrgrp 0 2 0.0 kB 6.088s
public.media 0 3 0.1 kB 6.262s
public.proxy_rtdata 0 2 0.0 kB 6.239s
public.config 0 1 0.7 kB 6.237s
public.ha_node 0 1 0.1 kB 6.223s
public.changelog 1 0 6.382s
public.connector 0 0 6.371s
public.corr_condition 0 0 6.354s
public.corr_condition_tag 0 0 6.365s
public.corr_condition_tagvalue 0 0 6.487s
public.correlation 0 0 6.505s
public.dbversion 0 1 0.0 kB 6.513s
public.drules 0 1 0.0 kB 6.500s
public.event_symptom 0 0 6.610s
public.globalvars 0 1 0.0 kB 6.631s
public.history_bin 0 0 6.634s
public.host_inventory 0 1 0.3 kB 6.640s
public.httpstep_field 0 0 6.735s
public.httptest_field 0 0 6.747s
public.icon_map 0 0 6.771s
public.interface_discovery 0 0 6.767s
public.lld_override_opinventory 0 0 6.868s
public.lld_override_opseverity 0 0 6.883s
public.lld_override_optemplate 0 0 6.908s
public.maintenance_tag 0 0 6.906s
public.maintenances_groups 0 0 7.003s
public.maintenances_windows 0 1 0.0 kB 7.016s
public.opcommand_grp 0 0 7.036s
public.opconditions 0 0 7.031s
public.opinventory 0 0 7.129s
public.optag 0 0 7.147s
public.proxy_autoreg_host 0 0 7.178s
public.proxy_history 0 0 7.191s
public.report_param 0 0 7.224s
public.report_usrgrp 0 0 7.305s
public.script_param 0 0 7.244s
public.service_problem 0 0 7.348s
public.service_status_rule 0 0 7.366s
public.services 0 0 7.318s
public.sla 0 0 7.411s
public.sla_schedule 0 0 7.473s
public.sysmap_element_trigger 0 0 7.455s
public.sysmap_shape 0 1 0.1 kB 7.407s
public.sysmap_user 0 0 7.582s
public.sysmaps_element_tag 0 0 7.602s
public.tag_filter 0 0 7.517s
public.task_acknowledge 0 0 7.653s
public.task_data 0 0 7.574s
public.task_remote_command_result 0 0 7.725s
public.timeperiods 0 1 0.0 kB 7.643s
public.trigger_queue 0 0 7.726s
public.userdirectory 0 0 7.770s
public.userdirectory_ldap 0 0 7.744s
public.userdirectory_saml 0 0 7.785s
public.valuemap 0 944 62.8 kB 7.835s
--------------------------------- --------- --------- --------- --------------
COPY Threads Completion 0 4 51.236s
Reset Sequences 0 1 0.110s
Install Comments 0 0 0.000s
--------------------------------- --------- --------- --------- --------------
Total import time 1 7071507 255.7 MB 51.346sWhen the pgloader successfully completes, return the hashing algorithm to the more secure value ‘SCRAM-SHA-256’ and regenerate the database user’s password again. Replace the asterisks in the following command with your chosen password:
sudo -u postgres psql -c "SET password_encryption='SCRAM-SHA-256';"
sudo -u postgres psql -c "ALTER ROLE zabbix WITH PASSWORD '************';"
Next, create a schema for indexes:
sudo -u postgres psql --host=127.0.0.1 --dbname=zabbix --username=zabbix -f /tmp/zabbix-db-migration/create_index.sqlAs well as the schema for the alter table:
sudo -u postgres psql --host=127.0.0.1 --dbname=zabbix --username=zabbix -f /tmp/zabbix-db-migration/alter_table.sqlAnd finally the schema for triggers:
sudo -u postgres psql --host=127.0.0.1 --dbname=zabbix --username=zabbix -f /tmp/zabbix-db-migration/triggers.sqlAfter successful migration, we recommend running a VACUUM to clean up the database:
sudo -u postgres vacuumdb --dbname=zabbix --analyze --username=postgres --jobs=$(grep -c processor /proc/cpuinfo)Functionality testing
First, remove MySQL support for Zabbix and the MySQL frontend:
yum remove zabbix-server-mysql zabbix-web-mysqlInstall the dependencies needed to run the Zabbix server with PostgreSQL, including the frontend.
Warning: By reinstalling the Zabbix server, the configuration in the zabbix_server.conf file will be lost! We recommend you a backup prior to the installation!
yum install zabbix-server-pgsql zabbix-web-pgsql zabbix-apache-confLet’s open the Zabbix server configuration file:
nano /etc/zabbix/zabbix_server.confAnd here modify the database access configuration directive to the new access credentials for PostgreSQL. Replace the asterisks with the current password of the ‘zabbix’ user:
DBPassword=*******Now remove the old MySQL frontend configuration file:
rm /etc/zabbix/web/zabbix.conf.phpRestart the Zabbix server and the Apache web server services:
systemctl restart zabbix-server httpdCheck Zabbix logfile to ensure everything is up and running, and without any issues.
nano /var/log/zabbix/zabbix_server.logUse the web browser to connect to the Zabbix frontend URL and set up the frontend again, this time for PostgreSQL.
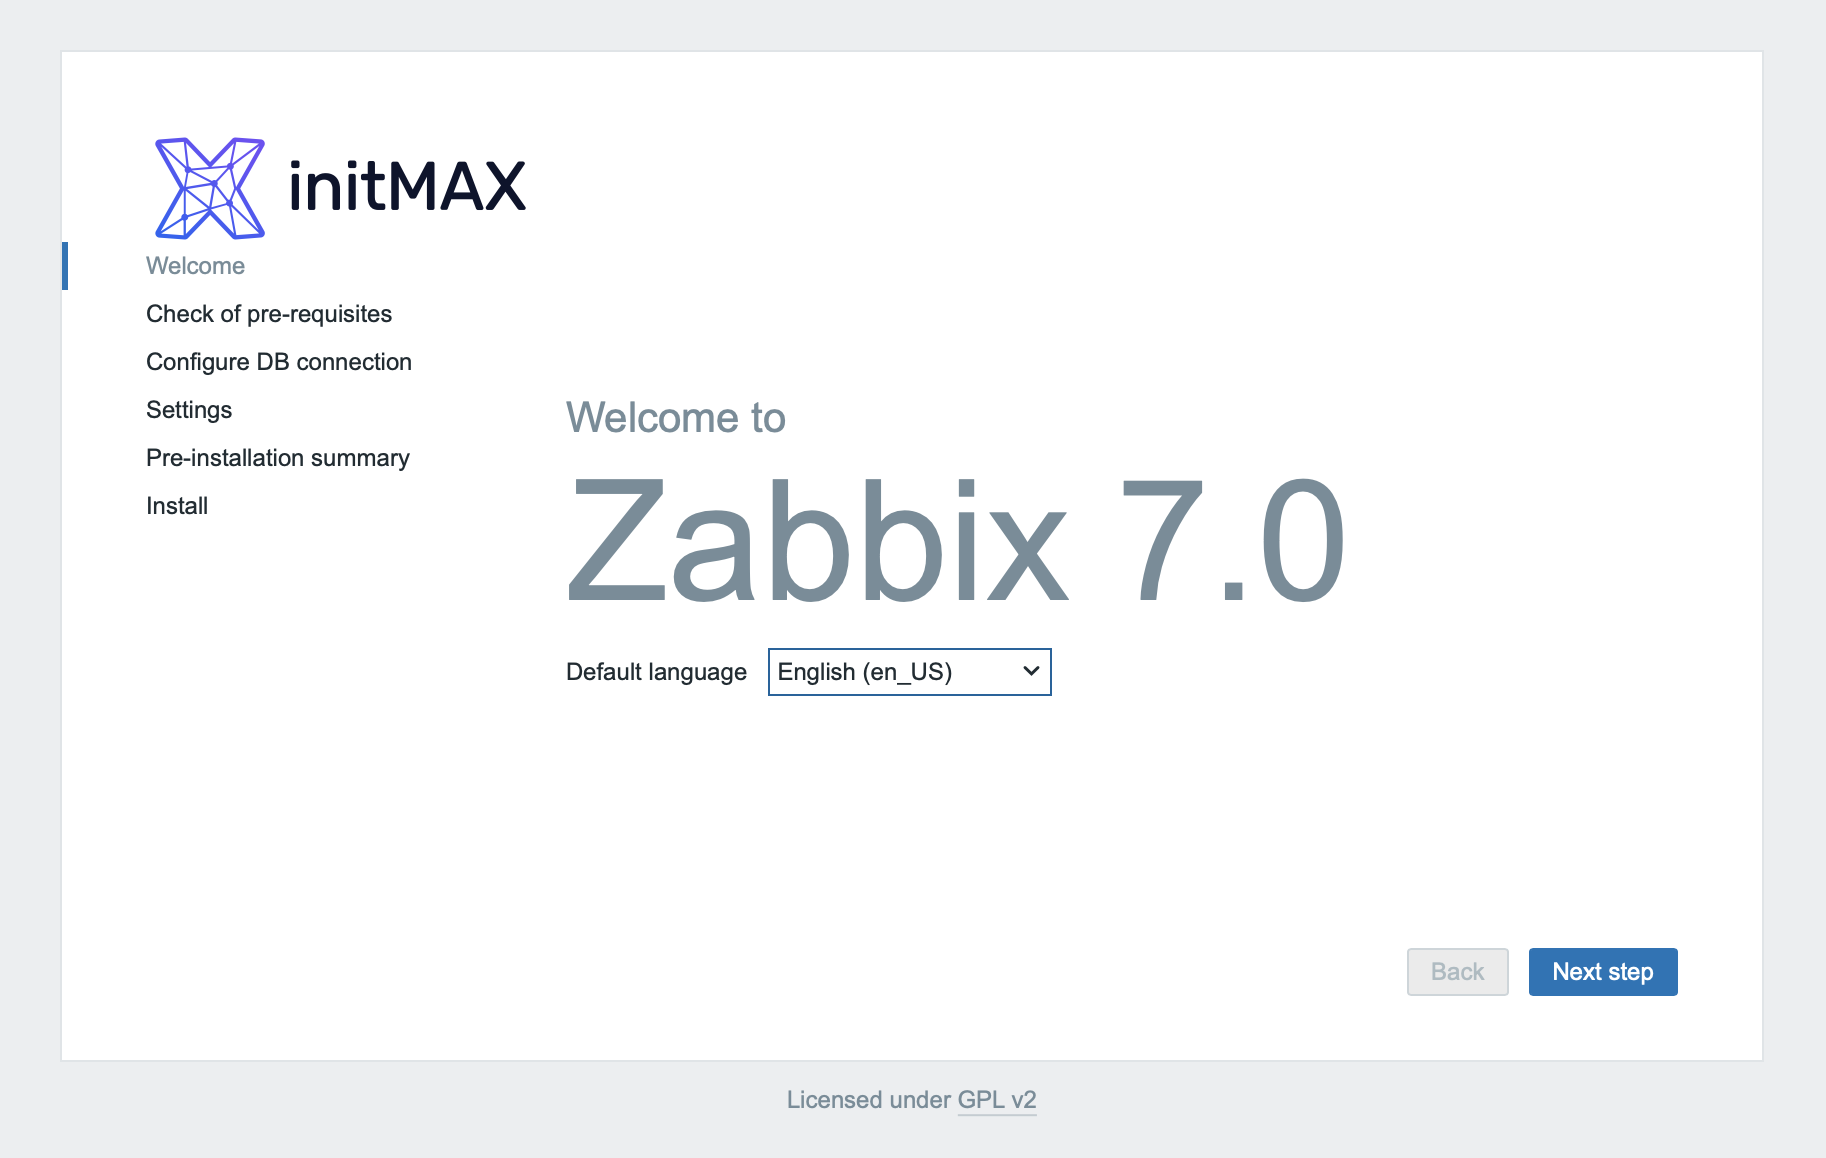
First, you will be greeted by the initial language selection screen:
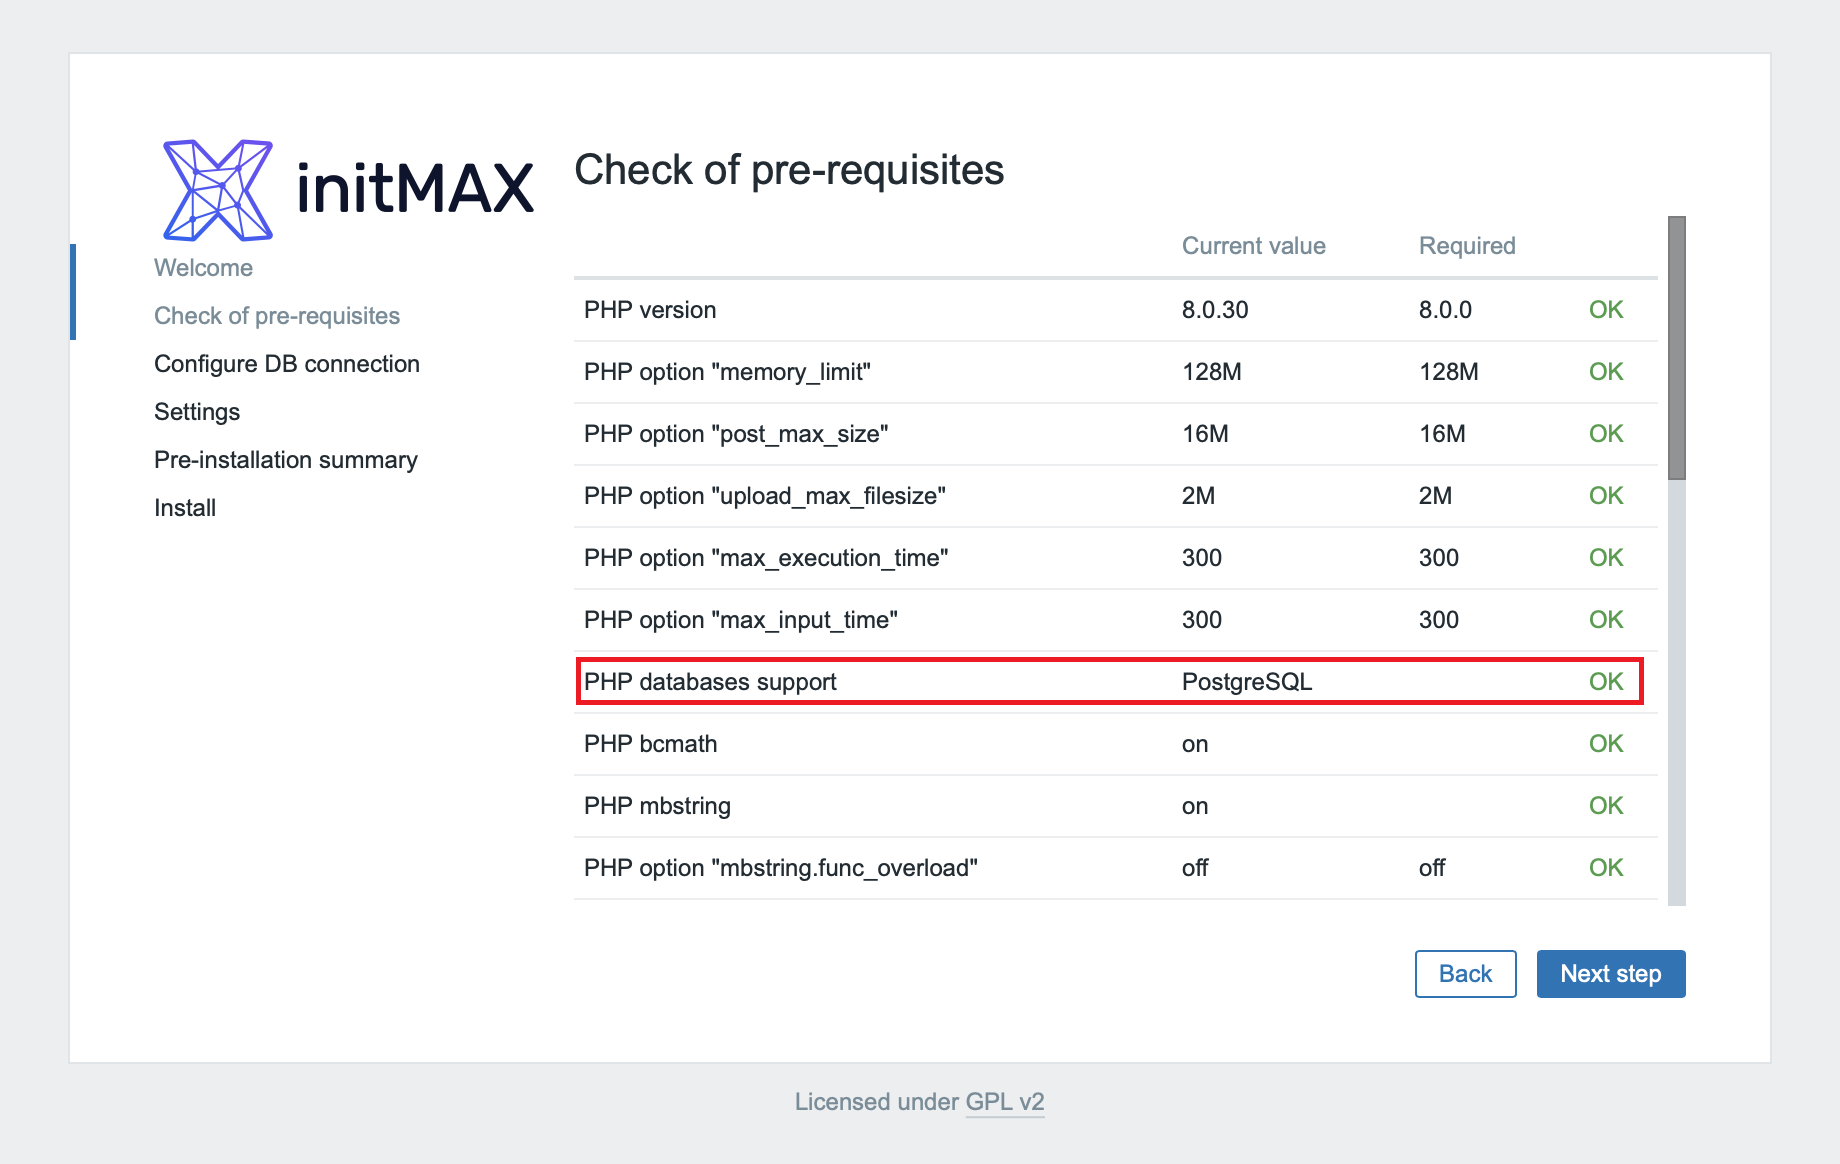
Next is a check of the required versions and settings, where we can already see the PostgreSQL support installed:
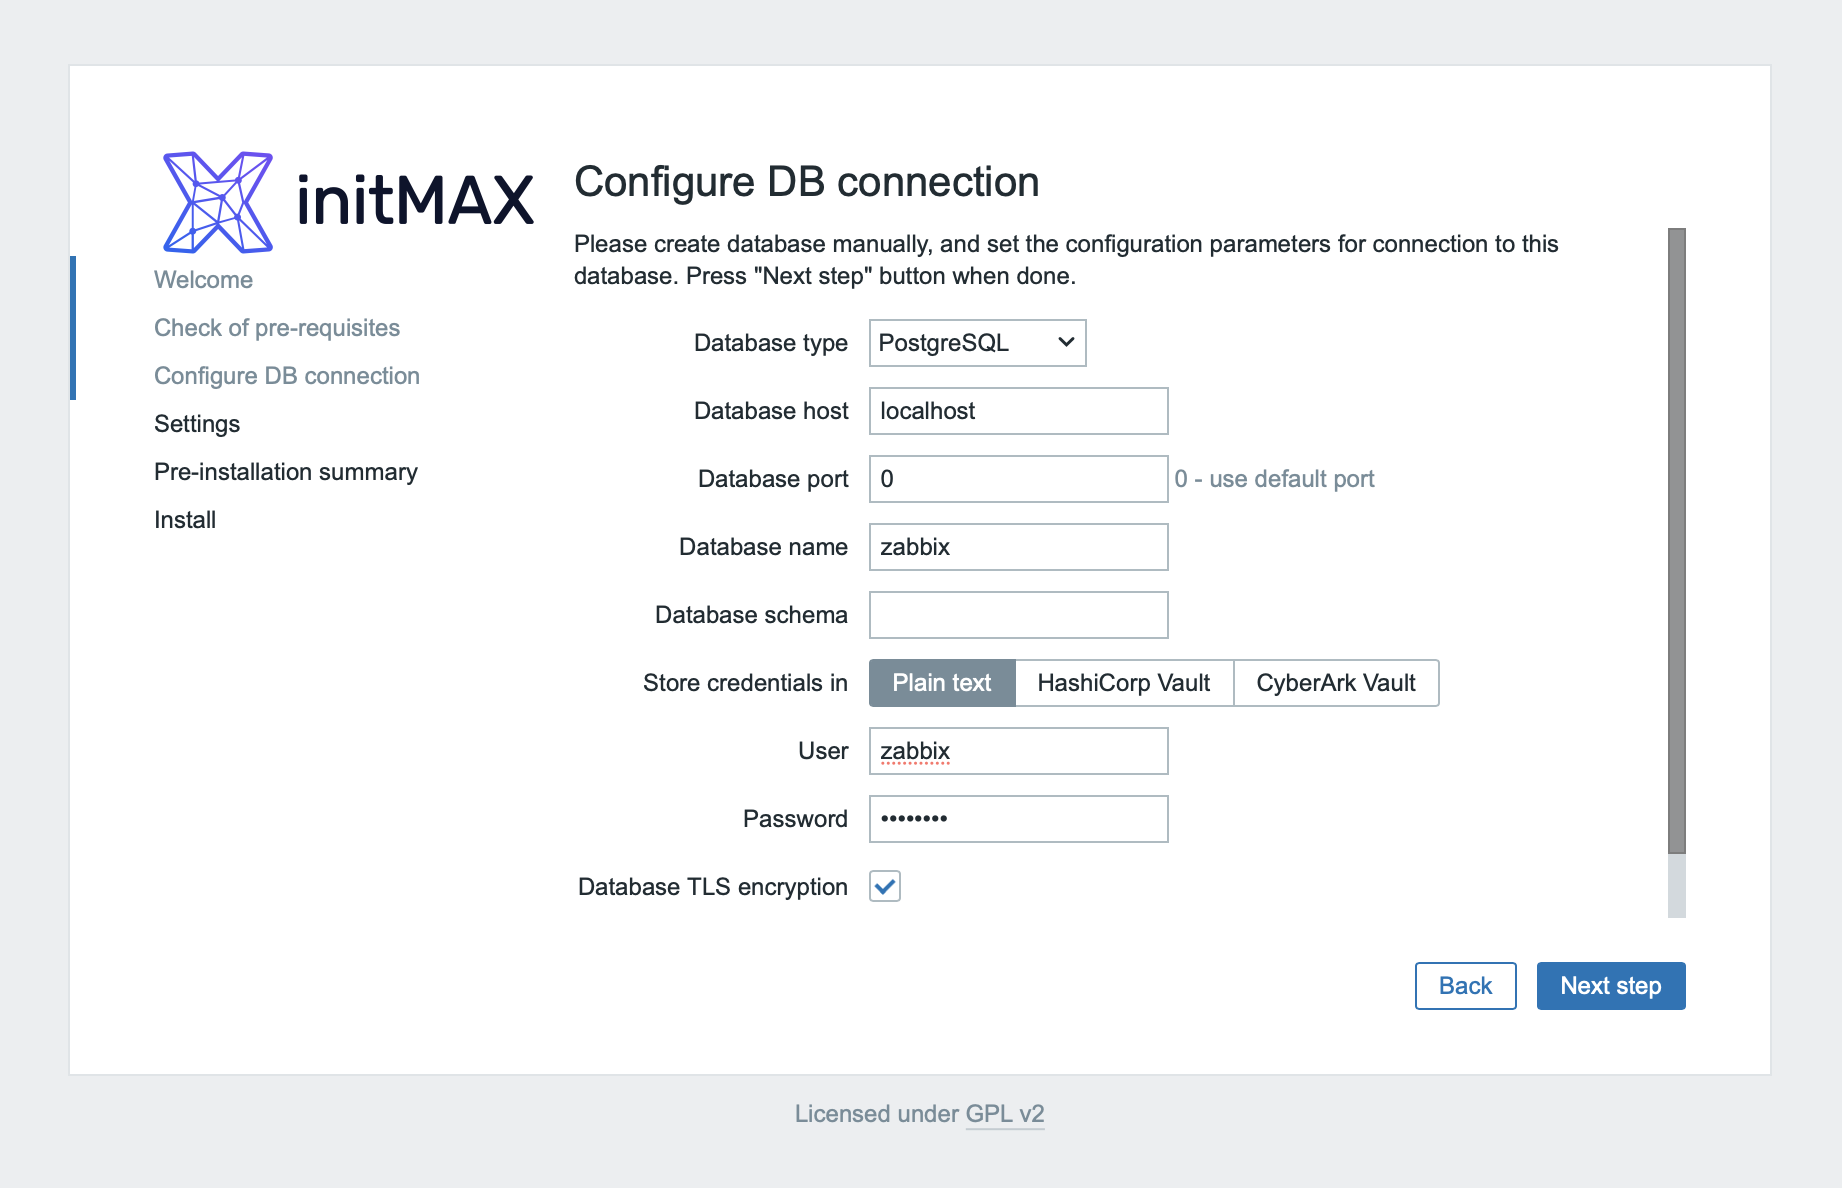
In the next step, you will set up the database, where you fill in the login data created in the previous steps:
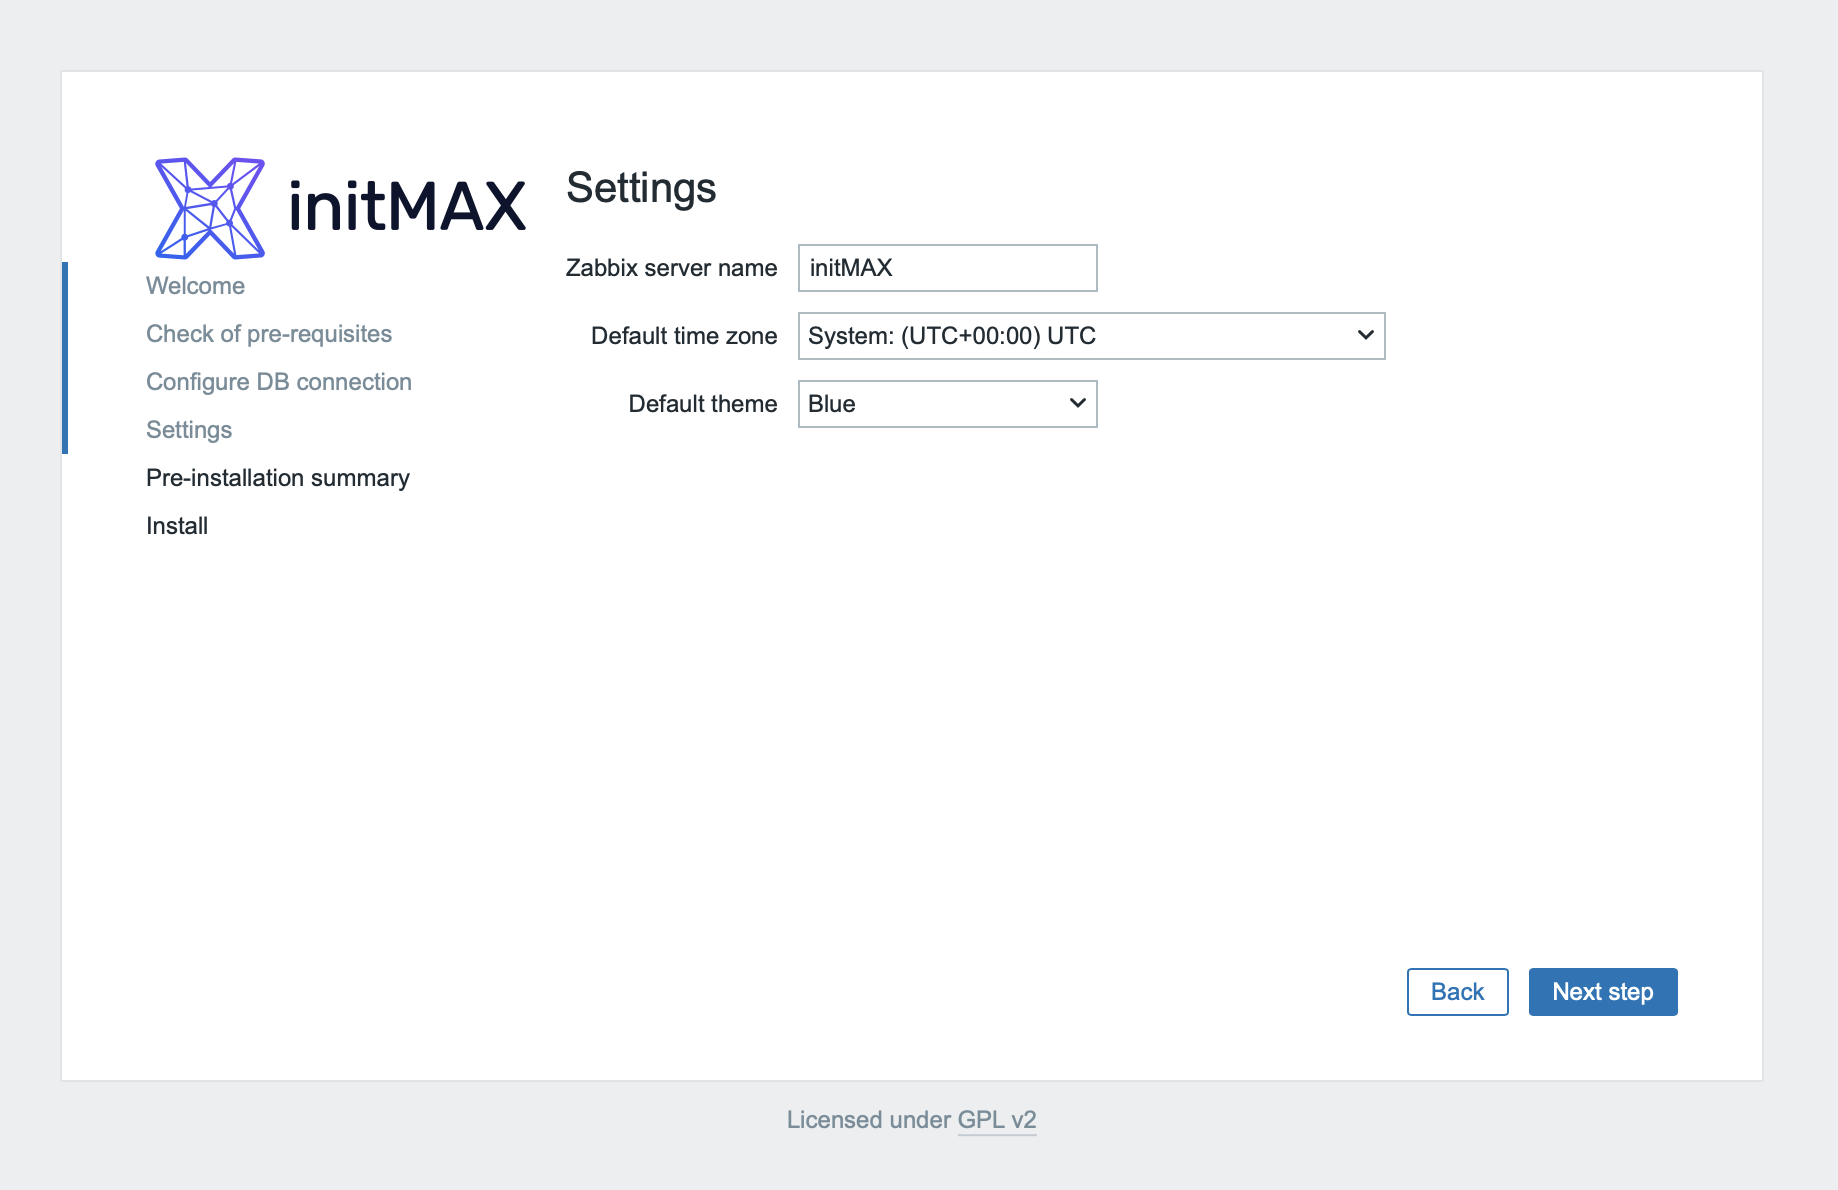
Select the name of the Zabbix server, the time zone and the default theme:
All that remains is to check that you’ve set up everything correctly and to confirm these choices:
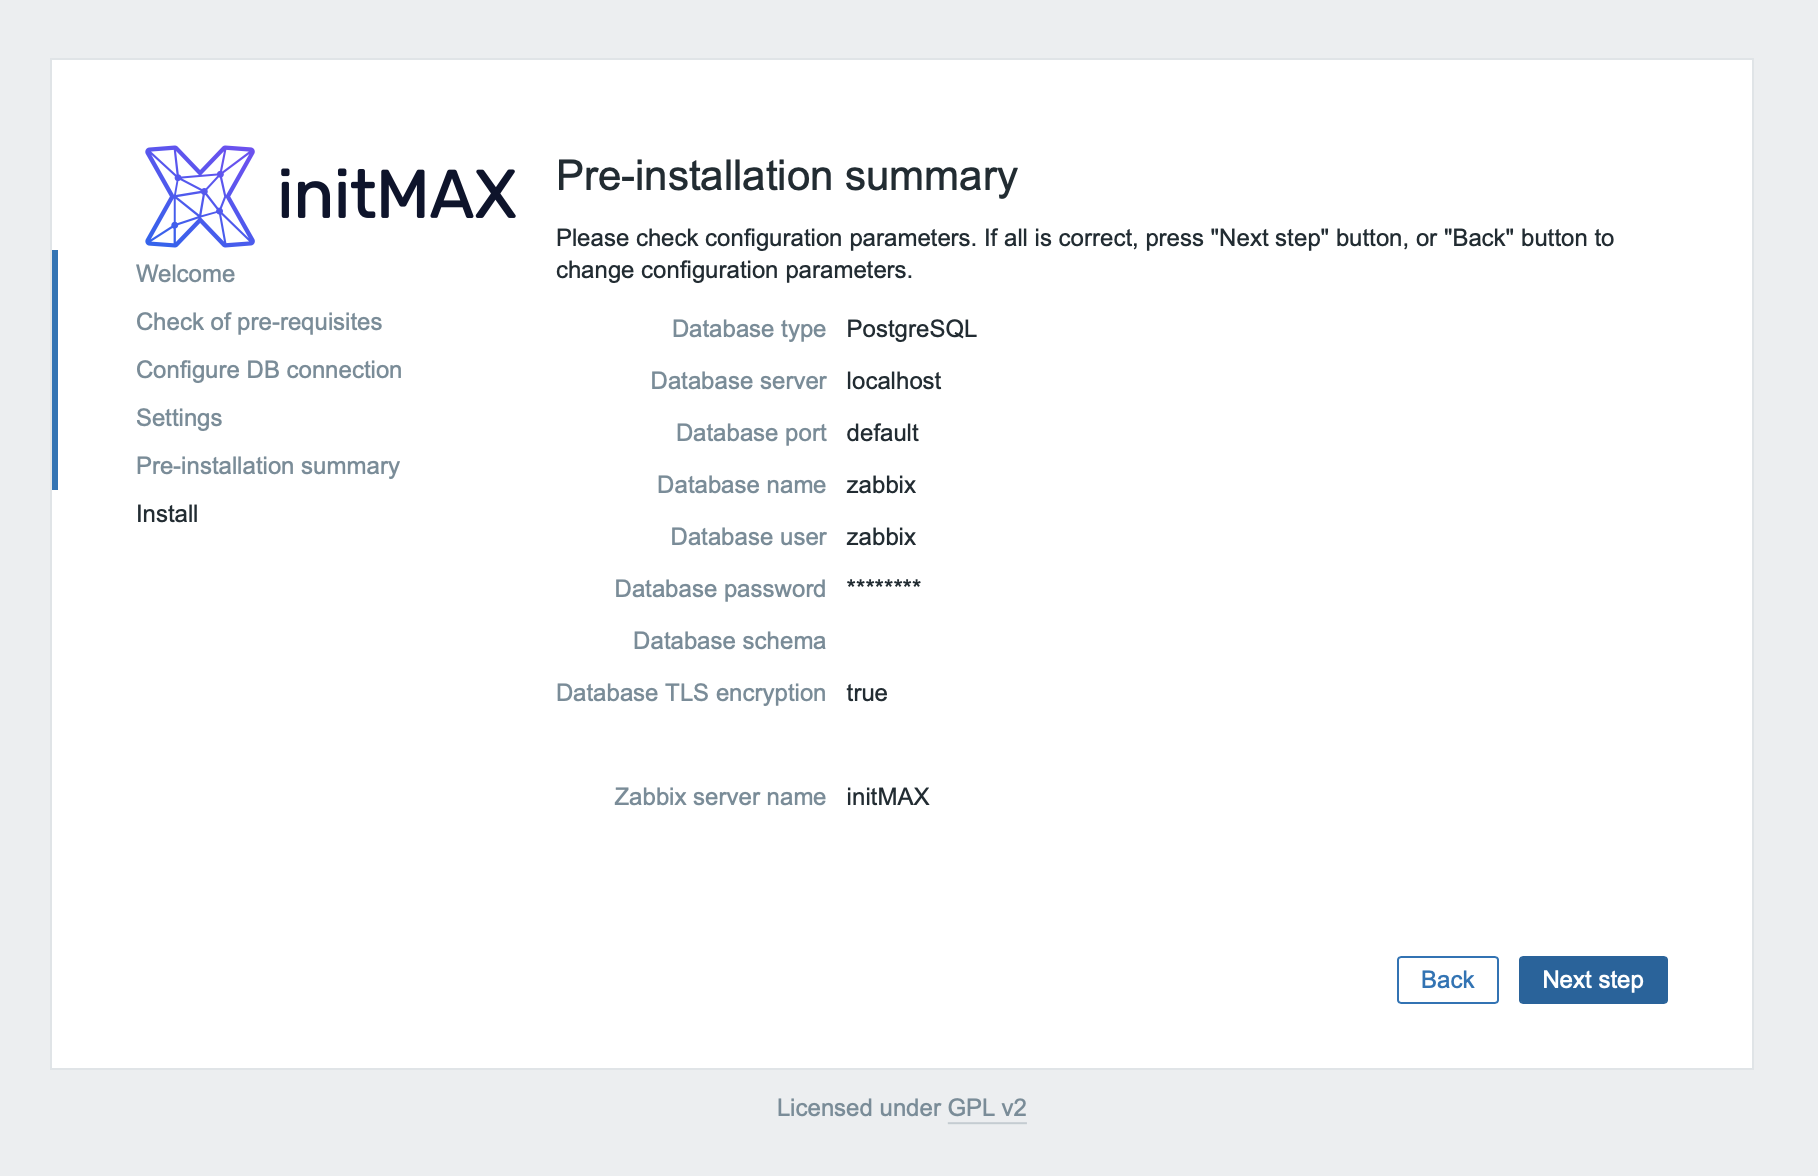
And now you have successfully connected Zabbix frontend to PostgreSQL!
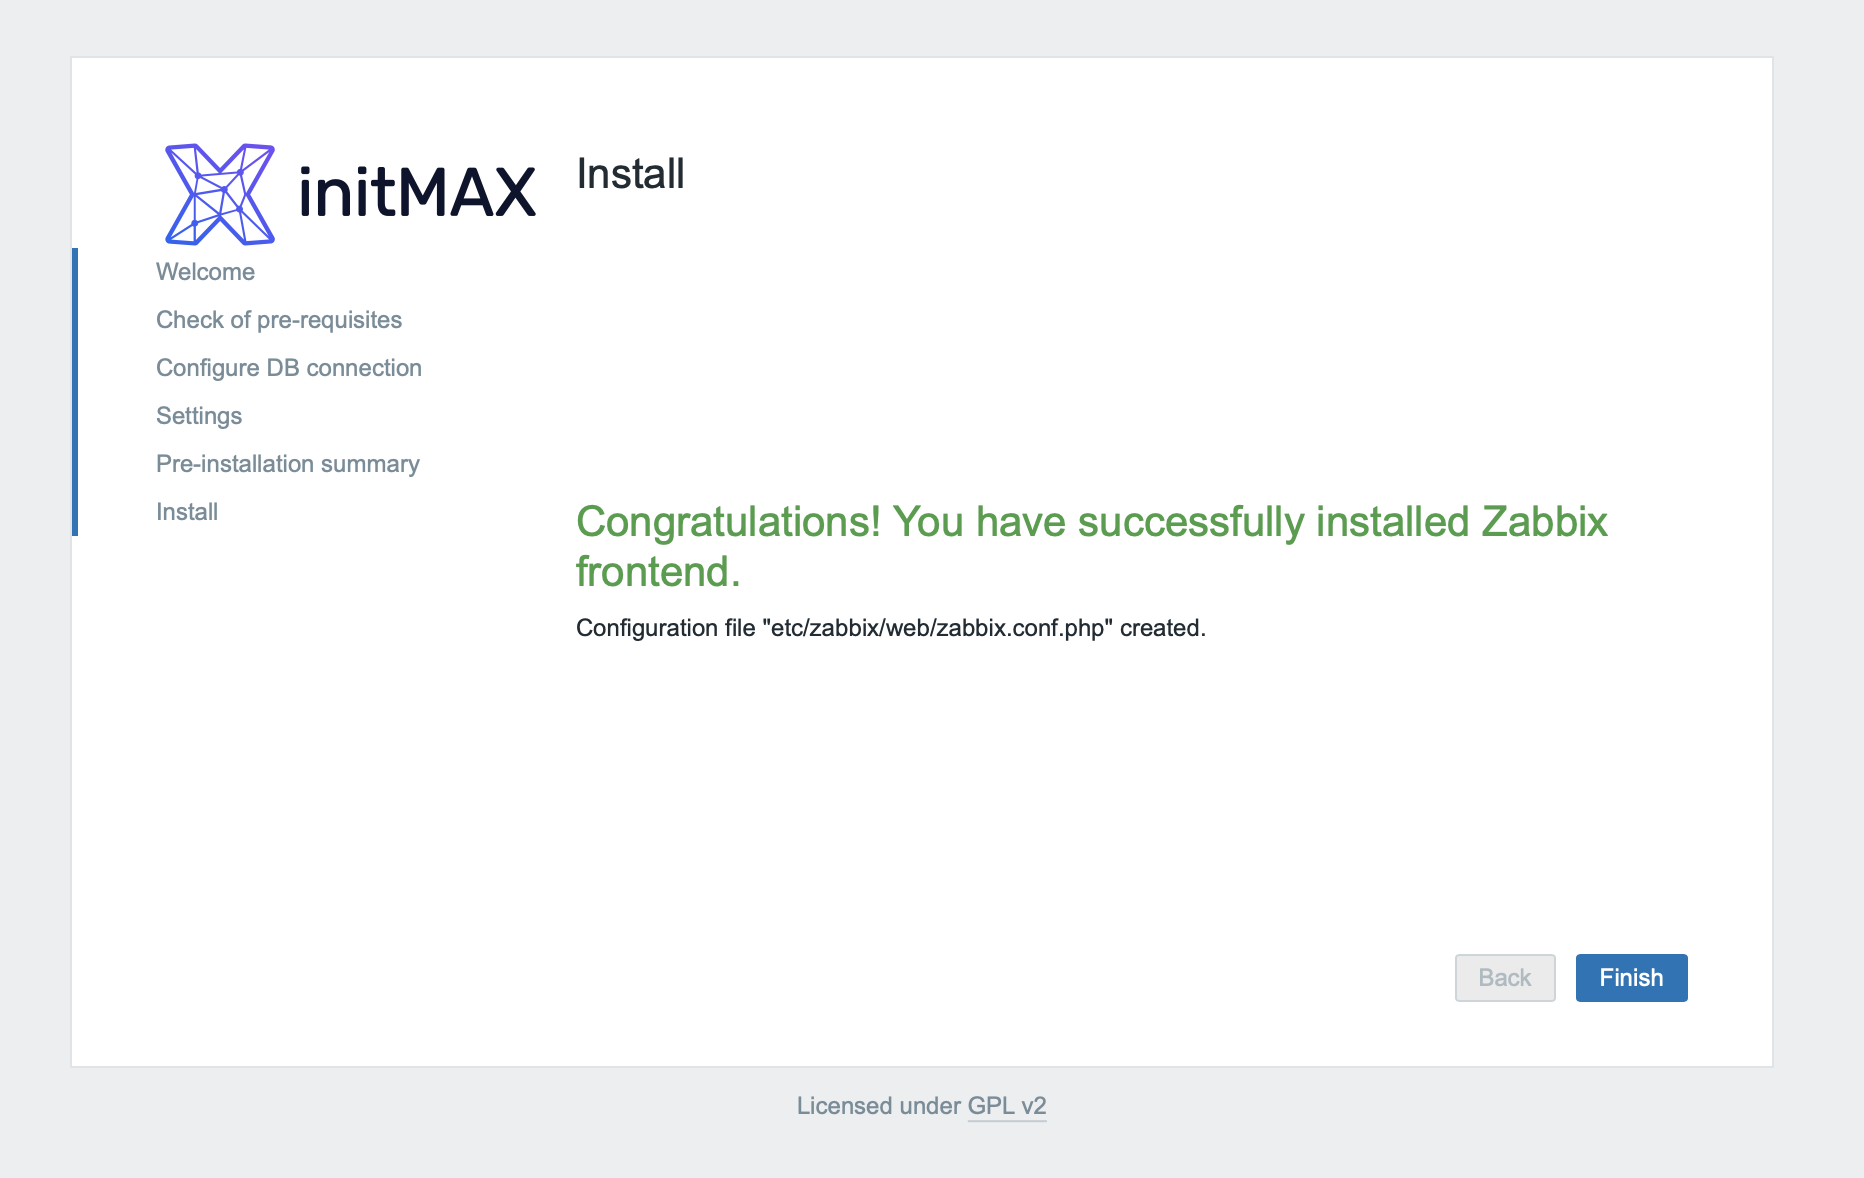
At this point you can stop the MySQL server:
systemctl stop mysqldAnd now MySQL can be completely uninstalled. The data (in the standard path /var/lib/mysql) will not be deleted, but we recommend deleting it, for example, after 14 days of functional operation with PostgreSQL.
yum remove mysqlTimescaleDB
Installation and tuning
After you’ve successfully migrated from MySQL to PostgreSQL, you are also offered the opportunity to increase the performance of Zabbix even further using TimescaleDB.
Given that you already have an unzipped the file with the source code at your disposal, which also contains the database installation schemas for TimescaleDB, you can proceed with the installation straight away.
Let’s start by adding the official repository:
tee /etc/yum.repos.d/timescale_timescaledb.repo <<EOL
[timescale_timescaledb]
name=timescale_timescaledb
baseurl=https://packagecloud.io/timescale/timescaledb/el/$(rpm -E %{rhel})/\$basearch
repo_gpgcheck=1
gpgcheck=0
enabled=1
gpgkey=https://packagecloud.io/timescale/timescaledb/gpgkey
sslverify=1
sslcacert=/etc/pki/tls/certs/ca-bundle.crt
metadata_expire=300
EOL
Install necessary packages:
yum install timescaledb-2-postgresql-16 timescaledb-2-loader-postgresql-16Run the timescaledb-tune utility and as a parameter pass it a higher value of the maximum number of connections (–max-conns), let’s set it to 125 for these testing purposes.
This utility is used to adjust default PostgreSQL settings towards performance and modify PostgreSQL parameters to work with TimescaleDB.
At the same time, this utility will help you select the current and valid PostgreSQL configuration file using the installation wizard and will also set up the automatic loading of TimescaleDB libraries.
Please answer “yes” to all questions.
timescaledb-tune --pg-config /usr/pgsql-16/bin --max-conns=125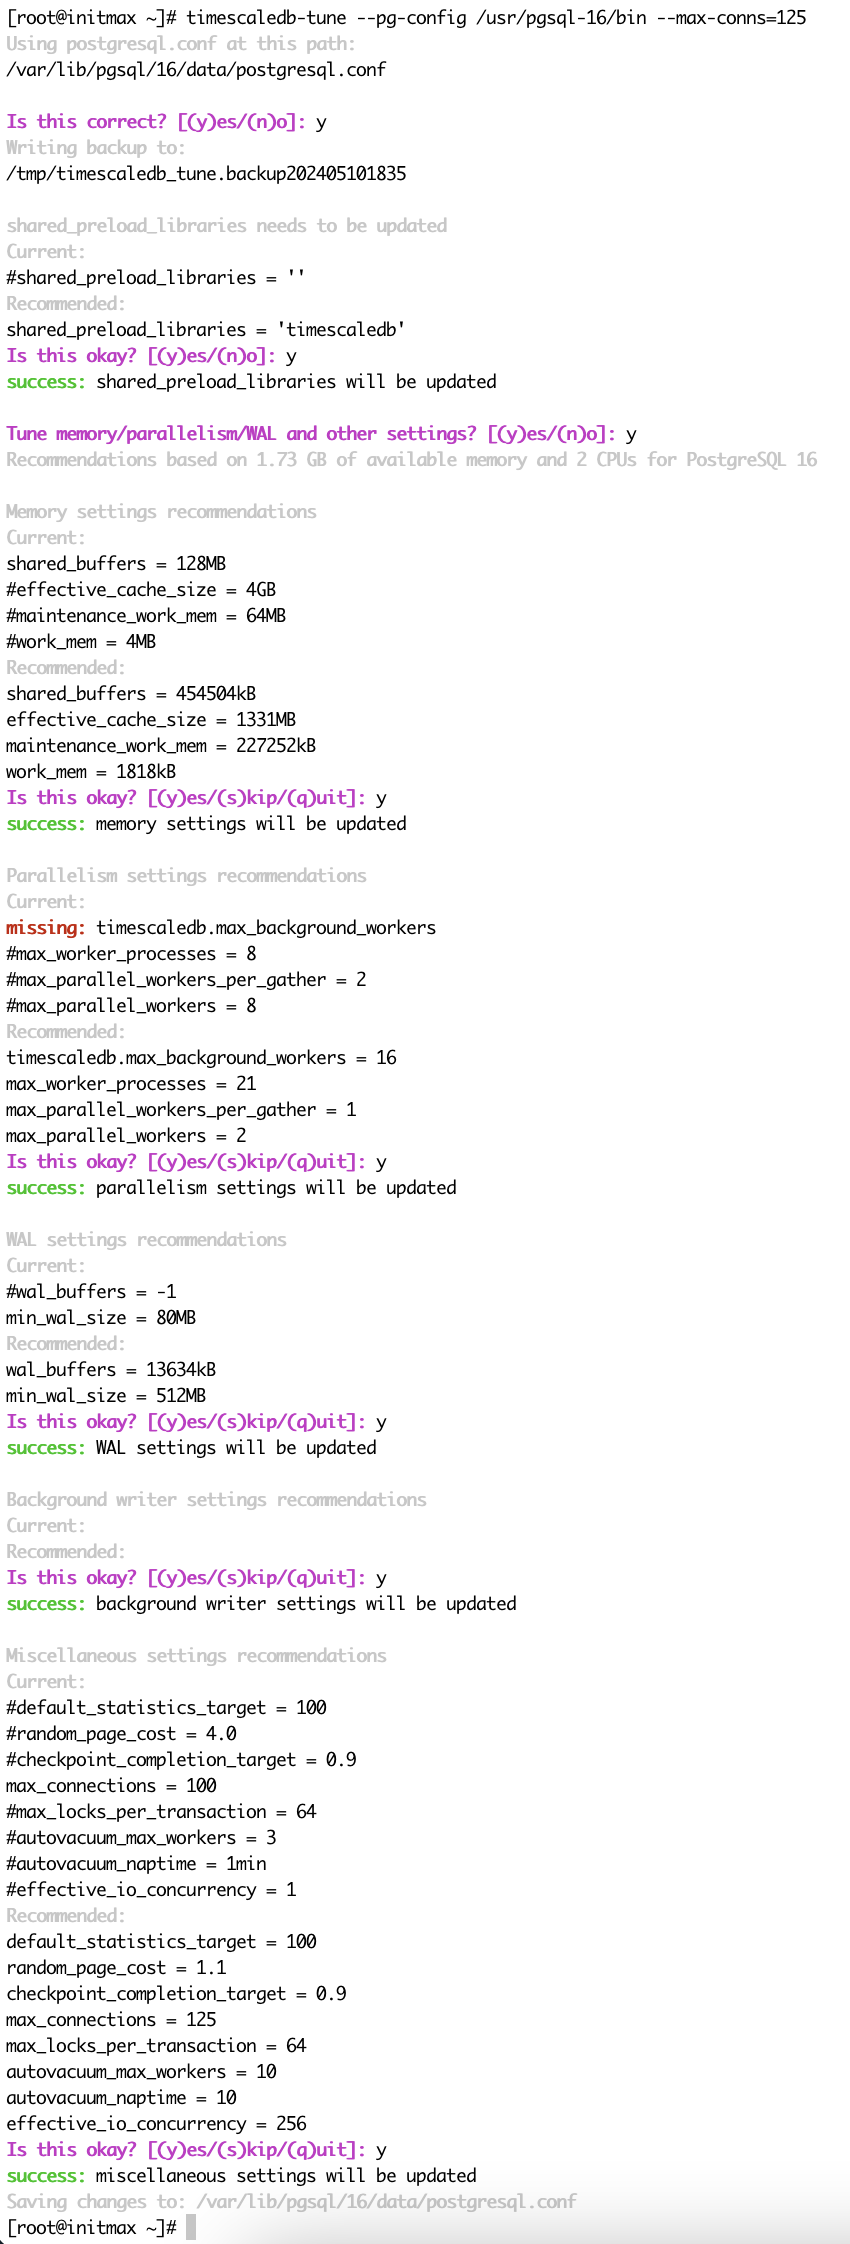
Next, shut down the Zabbix server and restart the PostgreSQL system service:
systemctl stop zabbix-server
systemctl restart postgresql-16
Activate TimescaleDB for the Zabbix database:
echo "CREATE EXTENSION IF NOT EXISTS timescaledb CASCADE;" | sudo -u postgres psql --dbname=zabbixAnd load the data from the extracted database schema file:
sudo -u postgres psql --host=127.0.0.1 --dbname=zabbix --username=zabbix -f /tmp/zabbix-db-migration/zabbix-7.0.0/database/postgresql/timescaledb/schema.sql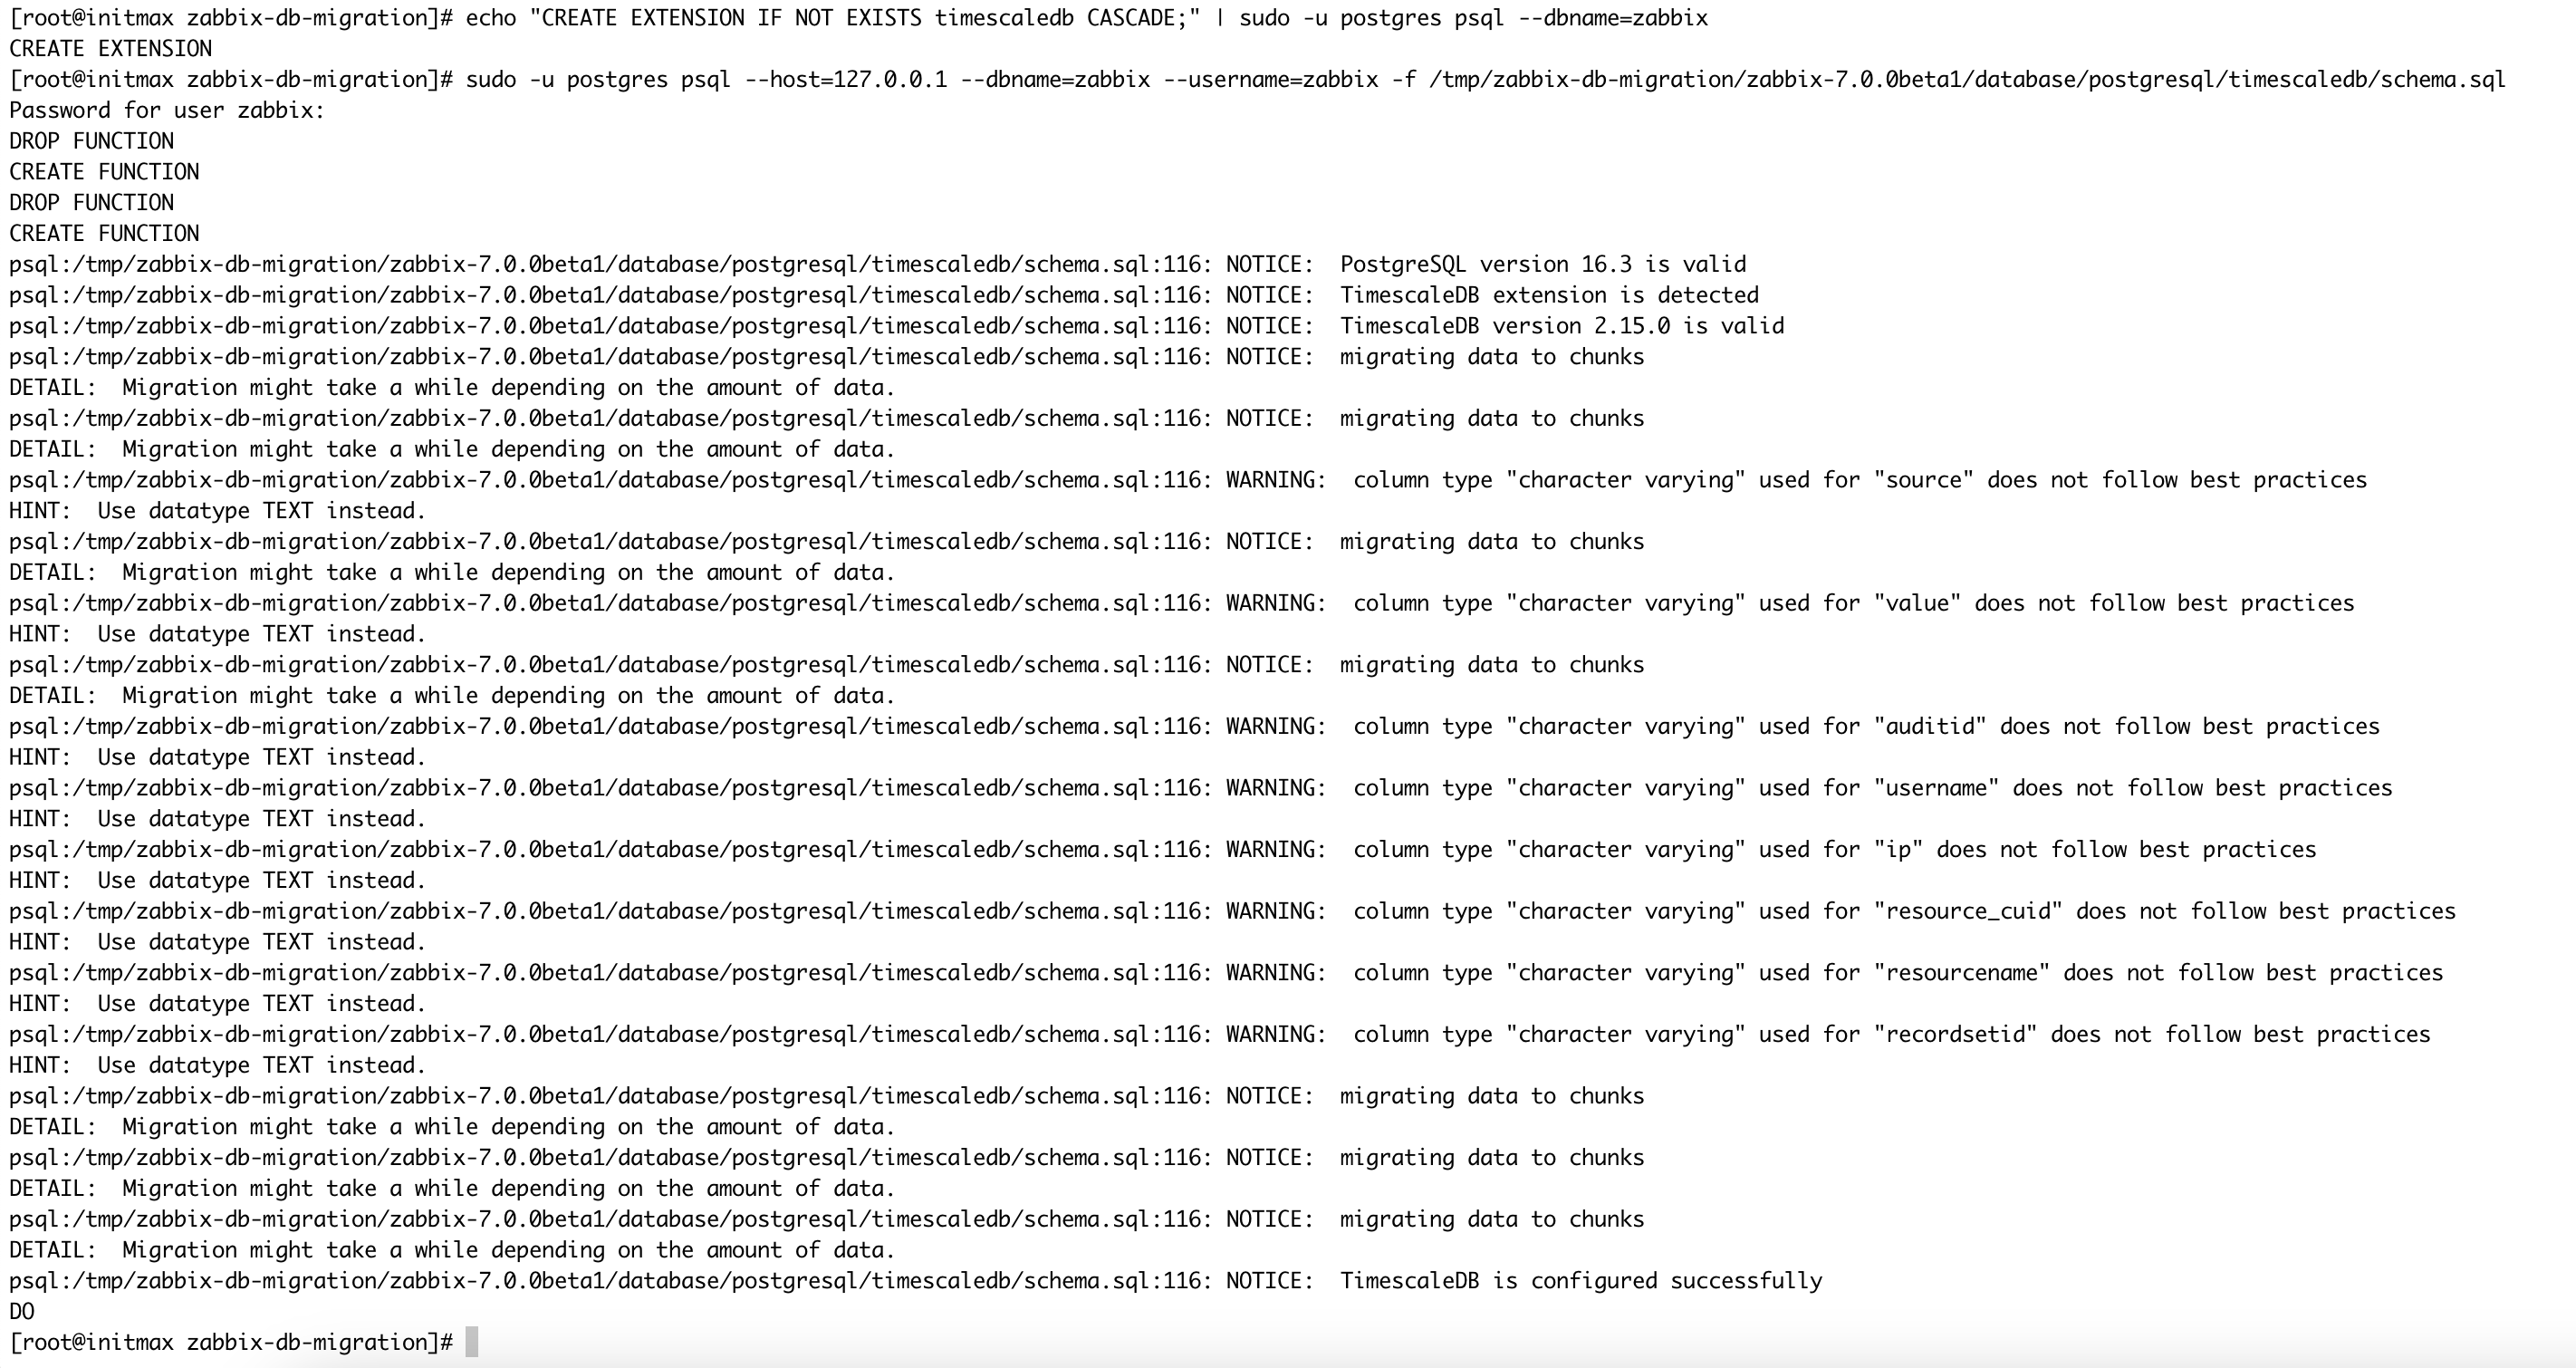
You can now restart the Zabbix server service:
systemctl start zabbix-serverCompatibility
In case you see a message in the log file that the TimescaleDB version is too new, then it is not a big problem. Zabbix cannot respond quickly enough to the latest versions of TimescaleDB to set it as supported in its code, but compatibility is guaranteed by Zabbix and verified by us.
If we want to fix this, then just open the Zabbix server configuration file in the path /etc/zabbix/zabbix_server.conf and modify the following configuration parameter accordingly:
AllowUnsupportedDBVersions=1Save the file with this new setting and restart the Zabbix server system service:
systemctl restart zabbix-serverAnd that’s all! You have now learned how to migrate the Zabbix database from MySQL to PostgreSQL, you have also managed to get the powerful TimescaleDB up and running and you have basic performance tuning. The next steps should lead you towards backing up and monitoring the database.

Give us a Like, share us, or follow us 😍
So you don’t miss anything: