In this article, we will show you how to update Zabbix to the latest version 6.0 and use its full potential, with all the new features it brings.

Preparation tasks
- Read release notes for current version [ Official release notes for Zabbix 6.0 ]
- Read upgrade notes thoroughly [ Official upgrade notes for Zabbix 6.0 ]
- Check and possibly optimize the performance of the current database according to the vendor’s recommendations, taking into account the requirements of your Zabbix instance
- Check that the versions of the OS and all dependant components match the compatibility matrix of the new Zabbix version
- Backup configuration files of Zabbix server and Zabbix proxy
- Backup Zabbix server database or Zabbix proxy database
- Backup any possible custom adjustments that were made manually at the Zabbix level
Version check
First, check the version of the Operating System, as well as the versions of all components on which the running of Zabbix and its components depends, so that it exactly matches the official compatibility matrix for Zabbix 6.0.
httpd -V
php-fpm -v
mysql -V
cat /etc/redhat-release
Backup of Zabbix configuration files
Before we proceed with the next steps, please back up all Zabbix server and Zabbix Proxy configuration files, just to be safe.
Alternatively, consider backing up your web server configuration files as well.
cp /etc/zabbix/zabbix_server.conf /<backup directory>/
cp /etc/zabbix/zabbix_agentd.conf /<backup directory>/
cp /usr/share/zabbix/alertscripts/* /<backup directory>/
cp /usr/share/zabbix/externalscripts/* /<backup directory>/
cp -R /usr/share/zabbix/ /<backup directory>/
cp /etc/httpd/conf/httpd.conf /<backup directory>/
cp /etc/httpd/conf.d/zabbix.conf /<backup directory>/
cp /etc/zabbix/web/zabbix.conf.php /<backup directory>/
Stopping services
First, stop the Zabbix server so that it doesn’t write anything to the database.
systemctl stop zabbix-serverIf we use SQLite as the Zabbix proxy backend, then also stop all the individual Zabbix proxies, as their databases will have to be deleted after the update.
systemctl stop zabbix-proxyIf we want the data and active configuration from the Zabbix server to be preserved on the Zabbix proxy servers, then before we start the update we recommend changing the Zabbix proxy configuration and convert it to a MySQL or PostgreSQL database. This procedure is described in detail in the official Zabbix documentation.
After this, it will no longer be necessary to stop the individual Zabbix proxy servers for the duration of the Zabbix server update, and we can let them collect and store data even when the Zabbix server is unavailable for a time being.
The services of individual Zabbix proxies will need to be stopped directly before updating the zabbix-proxy repositories and packages.
Database backup
Then start a database backup (the following examples refer to MySQL only).
If the database is small (up to tens of GB) and you do not use partitioning, then the backup will not take that long.
If this is the case, backup the entire Zabbix database:
screen -S backup
mysqldump -uroot -p zabbix --extended-insert --single-transaction | bzip2 -9 > /<backup directory>/zabbix_db_backup-$(date "+%Y-%m-%d_%H.%M.%S").sql.bz2
When the database is larger or if you use partitioning, then first backup the configuration tables from the database only:
mysqldump –uroot -p zabbix --ignore-table=zabbix.history \
--ignore-table=zabbix.history_uint --ignore-table=zabbix.history_str \
--ignore-table=zabbix.history_log --ignore-table=zabbix.history_text \
--ignore-table=zabbix.trends --ignore-table=zabbix.trends_uint > zabbix_config_dump-$(date "+%Y-%m-%d_%H.%M.%S")sql
And then backup the rest of the data, with the help of innobackupex, which also backs up the transaction logs and thus allows us to make incremental backups:
screen -S backup
innobackupex -p<password> /<backup directory>/
innobackupex -p<password> --apply-log --use-memory=4G /<backup directory>/`date`/
To significantly speed up the update process, it is also possible to delete all previous Zabbix events, the following example is for MySQL:
mysql -uroot -p zabbix
mysql> DELETE from events where source > 0 limit 10000;
OS upgrade
In this step, we will update the Operating System from CentOS 8.5, which is no longer supported, to the currently supported Rock Linux 8.
Below we can see the running of the preparation script, which will take care of the entire process of migration to Rocky Linux for us.
curl https://raw.githubusercontent.com/rocky-linux/rocky-tools/main/migrate2rocky/migrate2rocky.sh -o migrate2rocky.sh
chmod u+x migrate2rocky.sh
./migrate2rocky.sh -r
Database upgrade
Download installation packages for repositories of the new MySQL version and delete installation cache.
rpm -i https://repo.mysql.com//mysql80-community-release-el8-3.noarch.rpm
dnf clean all
Replace current repository settings with the content of the newly created configuration file, so ‘dnf’ takes it into account.
cat /etc/yum.repos.d/mysql-community.repo.rpmnew > /etc/yum.repos.d/mysql-community.repoStop service of the database server MySQL:
systemctl stop mysqld.serviceAnd now we can start the update from new repositories.
dnf upgradeAfter successful actualization of MySQL start the database server and check its current version.
systemctl start mysqld.service
mysql -V
Zabbix server upgrade
After you’ve successfully backed up everything and upgraded all versions of dependent components according to the official compatibility matrix of the new Zabbix version, you can move on to upgrading Zabbix and all of its components.
First, download the installation packages for the repositories of the new version of Zabbix and delete the installation cache.
rpm -Uvh https://repo.zabbix.com/zabbix/6.0/rhel/8/x86_64/zabbix-release-6.0-1.el8.noarch.rpm
dnf clean all
Now install the zabbix-web-service package in the version for Zabbix 6.0 and set it to start automatically after system startup:
dnf install zabbix-web-service
systemctl enable zabbix-web-service --now
Next, open the Zabbix server configuration file and edit the lines as you see below, save the file and close it.
nano /etc/zabbix/zabbix_server.confStartReportWriters=1
WebServiceURL=http://localhost:10053/reportYou can now update all other Zabbix components, also on all Zabbix Proxies (individually):
dnf upgrade zabbix*After successfully completing the update of the Zabbix server and all of the dependencies, restart the service:
systemctl start zabbix-serverIf a SQLite database is used as the backend for the Zabbix proxy, then first delete the contents of the current database with the following command:
rm /tmp/zabbix_proxy.dbOtherwise, after successfully completing the Zabbix proxy upgrade, this service can also be restarted:
systemctl start zabbix-proxyAll activities of the entire update process, including the database scheme update, can be found in the log file of the Zabbix server:
tail -f /var/log/zabbix/zabbix_server.logOr alternatively for Zabbix proxies in the file:
tail -f /var/log/zabbix/zabbix_proxy.logDatabase update for primary keys
As of Zabbix version 6.0, primary keys are used for tables as part of a significant increase in database performance.
You can learn more at the following link from the official documentation: https://www.zabbix.com/documentation/6.0/en/manual/appendix/install/db_primary_keys
For this we first stop the Zabbix server.
systemctl stop zabbix-serverNext, we will install the MySQL shell and a new package containing database scripts for Zabbix, which also contains this update itself.
dnf install mysql-shell zabbix-sql-scriptsNow apply an SQL patch to the database, which is designed to prepare exactly for this update, it will rename the individual tables.
Attention! In newer versions of Zabbix, this path is different, that is /usr/share/zabbix-sql-scripts/ !
mysql -uzabbix -p zabbix < /usr/share/doc/zabbix-sql-scripts/mysql/history_pk_prepare.sqlNow allow the database server to create local files. Set this variable with the following command:
mysql -p -e "set global local_infile=ON;"Connect to the Zabbix database using the previously installed mysql shell utility.
mysqlsh --mysql -u root -h localhost -DzabbixThe resulting shell should look like the image below.

While still connected to the Zabbix database using mysql shell, run the following SQL script:
CSVPATH="/var/lib/mysql-files";

util.exportTable("history_old", CSVPATH + "/history.csv", { dialect: "csv" });
util.importTable(CSVPATH + "/history.csv", {"dialect": "csv", "table": "history" });

util.exportTable("history_uint_old", CSVPATH + "/history_uint.csv", { dialect: "csv" });
util.importTable(CSVPATH + "/history_uint.csv", {"dialect": "csv", "table": "history_uint" });

util.exportTable("history_str_old", CSVPATH + "/history_str.csv", { dialect: "csv" });
util.importTable(CSVPATH + "/history_str.csv", {"dialect": "csv", "table": "history_str" });

util.exportTable("history_log_old", CSVPATH + "/history_log.csv", { dialect: "csv" });
util.importTable(CSVPATH + "/history_log.csv", {"dialect": "csv", "table": "history_log" });

util.exportTable("history_text_old", CSVPATH + "/history_text.csv", { dialect: "csv" });
util.importTable(CSVPATH + "/history_text.csv", {"dialect": "csv", "table": "history_text" });
This completes the database schema updates and you can restart the Zabbix server.
systemctl start zabbix-serverPost-upgrade tasks
- Check that the Zabbix server and database server are running correctly, and have the correct version
- Check that all Zabbix proxies are running and have the correct version
- Check Zabbix server and Zabbix proxy performance (log files, unsupported items, queues, monitoring scripts, etc.).
- Check if your servers have been equipped with the latest versions of the official templates from Zabbix. [ Zabbix GIT ]
Configuration of Zabbix reporting
To use the reporting functions, you need to install Google Chrome.
First, download the installation package, and manually install it:
wget https://dl.google.com/linux/direct/google-chrome-stable_current_x86_64.rpm
dnf localinstall google-chrome-stable_current_x86_64.rpm
In the Zabbix frontend configuration, adjust the “Frontend URL” parameter to the currently valid value, this setting can be found in the following path in the menu:
Administration -> General -> OtherYou can see an example of the settings in the image below.
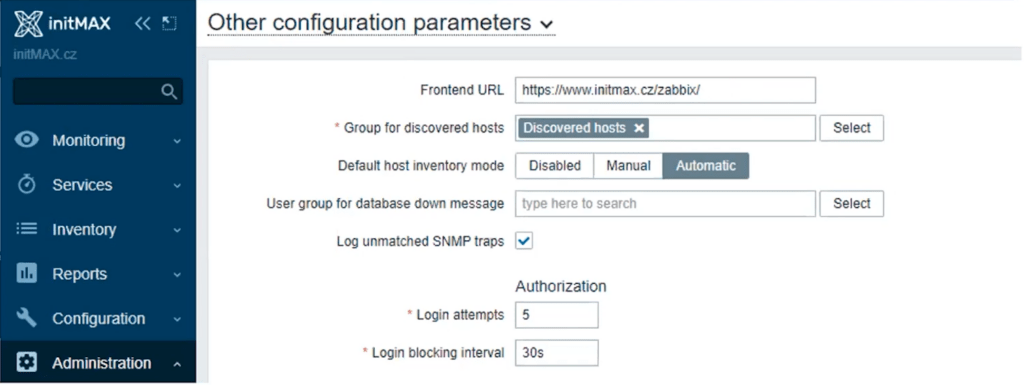
And that’s all! Now you can start using your freshly updated Zabbix in version 6.0 with all its new functionalities.
Give us a Like, share us, or follow us 😍
So you don’t miss anything: