In this article, we will show you how to update Zabbix to the latest version 6.2, to take full advantage of all the improvements and technical news it brings.

Preparation tasks
- Read the release notes [ Official release notes for Zabbix 6.2 ]
- Read the upgrade notes document thoroughly [ Official upgrade notes for Zabbix 6.2 ]
- Check and possibly optimize the performance of the current database according to the vendor’s recommendations and taking into account the requirements of the Zabbix instance
- Check that the versions of all components match the compatibility matrix of the new Zabbix version
- Backup configuration files of Zabbix server and Zabbix proxy
- Backup Zabbix server or Zabbix proxy database
- Backup any possible custom adjustments that were made manually at the Zabbix level
Version check
First, check the versions of all components on which the running of Zabbix and its components depends, so that they exactly match the official compatibility matrix for Zabbix 6.2.
php-fpm -v
mysql -V
Backup of Zabbix configuration files
Before proceeding with the next steps, it is always very important to back up all configuration files of the Zabbix server and Zabbix Proxy.
Also consider backing up the configuration files of the web server, if necessary.
Backup all of Zabbix configuration files using the commands below:
cp /etc/zabbix/zabbix_server.conf /<backup directory>/
cp /etc/zabbix/zabbix_agentd.conf /<backup directory>/
cp /usr/share/zabbix/alertscripts/* /<backup directory>/
cp /usr/share/zabbix/externalscripts/* /<backup directory>/
cp -R /usr/share/zabbix/ /<backup directory>/
cp /etc/httpd/conf/httpd.conf /<backup directory>/
cp /etc/httpd/conf.d/zabbix.conf /<backup directory>/
cp /etc/zabbix/web/zabbix.conf.php /<backup directory>/
Stopping the servicies
First, we stop the Zabbix server so it no longer writes anything to the database.
systemctl stop zabbix-serverIf you are using SQLite as the Zabbix proxy backend, then also stop services of all the individual Zabbix proxies.
Because if this is the case, then you need to delete their databases after the update.
systemctl stop zabbix-proxyIf we want the data and active configuration from the Zabbix server to be preserved on the Zabbix proxy servers, then before we start the update we recommend changing the Zabbix proxy configuration and convert it to a MySQL or PostgreSQL database. This procedure is described in detail in the official Zabbix documentation.
After this, it will no longer be necessary to stop the individual Zabbix proxy servers for the duration of the Zabbix server update, and we can let them collect and store data even when the Zabbix server is unavailable for a time being.
The services of individual Zabbix proxies will need to be stopped directly before updating the zabbix-proxy repositories and packages.
Database backup
Then start a database backup (the following examples refer to MySQL only).
If the database is small (up to tens of GB) and you do not use partitioning, then the backup will not take that long.
If this is the case, backup the entire Zabbix database:
screen -S backup
mysqldump -uroot -p zabbix --extended-insert --single-transaction | bzip2 -9 > /<backup directory>/zabbix_db_backup-$(date "+%Y-%m-%d_%H.%M.%S").sql.bz2
When the database is larger or if you use partitioning, then first backup the configuration tables from the database only:
mysqldump –uroot -p zabbix --ignore-table=zabbix.history \
--ignore-table=zabbix.history_uint --ignore-table=zabbix.history_str \
--ignore-table=zabbix.history_log --ignore-table=zabbix.history_text \
--ignore-table=zabbix.trends --ignore-table=zabbix.trends_uint > zabbix_config_dump-$(date "+%Y-%m-%d_%H.%M.%S")sql
And then backup the rest of the data, with the help of innobackupex, which also backs up the transaction logs and thus allows us to make incremental backups:
screen -S backup
innobackupex -p<password> /<backup directory>/
innobackupex -p<password> --apply-log --use-memory=4G /<backup directory>/`date`/
To significantly speed up the update process, it is also possible to delete all previous Zabbix events, the following example is for MySQL:
mysql -uroot -p zabbix
mysql> DELETE from events where source > 0 limit 10000;
PHP upgrade
The new version of Zabbix 6.2 also requires PHP between versions 7.4.0 and 8.2.x to run (Zabbix supports PHP version 8.2.x from version 6.2.8).
According to our experience, we recommend installing PHP 8.0, in PHP versions newer than 7.6 there is already support for PCRE2, which is used by Zabbix.
The upgrade is then simply performed by changing the settings of the dnf packaging system at the OS level.
dnf module switch-to php:8.0 -yDatabase upgrade
First, delete the current version of MariaDB.
dnf remove mariadb-*Next, download a helper script for installing a specific version of the MariaDB repositories:
cd /tmp
curl -LsS -O https://downloads.mariadb.com/MariaDB/mariadb_repo_setup
Run this script with the --mariadb-server-version parameter, in which we define a specific version of MariaDB supported by Zabbix.
In case of Zabbix 6.2, it is MariaDB version 10.7:
bash mariadb_repo_setup --mariadb-server-version=10.7Now reset the module stream of the dnf packaging system so that it realizes the change in the source of installed packages for the given software (in our case for MariaDB):
dnf -y module reset mariadbWhen this is done, you can proceed to the actual installation of the correct version of MariaDB.
Afterwards, start the service and set it to start automatically after system startup.
dnf install MariaDB-server MariaDB-client MariaDB-backup -y
systemctl enable mysqld.service --now
After successfully updating the MariaDB packages, run the provided update script, which checks for compatibility issues and possibly corrects the internal tables and schemas against the changes between versions:
mysql_upgradeAll that remains is to check the current version of MariaDB.
mysql -VZabbix server upgrade
After you’ve successfully backed up everything and updated all versions of dependant components according to the official compatibility matrix of the new Zabbix version, you can move on to updating Zabbix and all its components.
First, download the installation packages for the repositories of the new version of Zabbix and delete the installation cache.
rpm -Uvh https://repo.zabbix.com/zabbix/6.2/rhel/8/x86_64/zabbix-release-6.2-1.el8.noarch.rpm
dnf clean all
After this, you have the repositories of the new version available.
So first update all other Zabbix components, and then repeat this process on all Zabbix Proxies individually:
dnf upgrade zabbix* -yNext, we install the zabbix-web-service package in the version for Zabbix 6.2 and set it to start automatically after startup:
dnf install zabbix-web-service -y
systemctl enable zabbix-web-service --now
Now, open the Zabbix server configuration file.
nano /etc/zabbix/zabbix_server.confand edit the lines as you can see below, save the file and close it.
StartReportWriters=1
WebServiceURL=http://localhost:10053/report
And finally, after successfully completing the upgrade of the Zabbix server and all its components, restart the service.
systemctl start zabbix-serverIf a SQLite database is used as the backend for the Zabbix proxy, then delete contents of the current database with the following command:
rm /tmp/zabbix_proxy.dbOtherwise, this service can also be restarted now:
systemctl start zabbix-proxyThe entire update process, including any modifications to the structure of the database schema, can also be found in the log file of the Zabbix server:
tail -f /var/log/zabbix/zabbix_server.logOr in case of Zabbix proxies refer to their corresponding log file at this path:
tail -f /var/log/zabbix/zabbix_proxy.logDatabase update for primary keys
As of Zabbix version 6.0, primary keys are used for tables as part of a significant increase in database performance.
You can learn more at the following link from the official documentation: https://www.zabbix.com/documentation/6.0/en/manual/appendix/install/db_primary_keys
Preparations
For this we first stop the Zabbix server.
systemctl stop zabbix-serverNext, we will install the new package containing database scripts for Zabbix, which also contains this update itself.
dnf install zabbix-sql-scriptsNow apply an SQL patch to the database, which is designed to prepare exactly for this update, it will rename the individual tables.
Attention! In newer versions of Zabbix, this path is different, that is /usr/share/zabbix-sql-scripts/ !
mysql -uzabbix -p zabbix < /usr/share/doc/zabbix-sql-scripts/mysql/history_pk_prepare.sqlOn database server, manually set a physical path where the database data is located.
First, connect to the server using the mysql command, and then find out what the server has set in this variable right now:
SELECT @@secure_file_priv;
If the resulting value is empty (as in the example above), then exit the mysql console and make the necessary adjustments at the OS level.
If the path does not exist, then create it first and then set the correct permissions:
mkdir /var/lib/mysql-files/
chown mysql:mysql /var/lib/mysql-files/
Next, open the configuration file of the database server:
nano /etc/my.cnf.d/server.cnfAnd modify the value of the following configuration directive to the desired path (below is an example of the default value).
secure_file_priv = "/var/lib/mysql-files/"Save the file and restart the database server service.
systemctl restart mysqlNow we can verify that the database server really takes the new path into account.
Again, connect to the database console with the mysql command and run the following query.
SELECT @@secure_file_priv;
After these actions done, we can proceed to the actual application of the database schema update patch.
Applying the patch
Once again, connect to the DB server using the mysql command and set the necessary max_statement_time variable to infinity (zero) and select the ‘zabbix‘ database for further operations.
mysql
mysql> SET @@max_statement_time=0;
mysql> use zabbix;
Still connected to ‘zabbix’ database run the following SQL script, which will prepare the tables for the subsequent schema change.
SELECT * INTO OUTFILE '/var/lib/mysql-files/history.csv' FIELDS TERMINATED BY ',' ESCAPED BY '"' LINES TERMINATED BY '\n' FROM history_old;
LOAD DATA INFILE '/var/lib/mysql-files/history.csv' IGNORE INTO TABLE history FIELDS TERMINATED BY ',' ESCAPED BY '"' LINES TERMINATED BY '\n';

SELECT * INTO OUTFILE '/var/lib/mysql-files/history_uint.csv' FIELDS TERMINATED BY ',' ESCAPED BY '"' LINES TERMINATED BY '\n' FROM history_uint_old;
LOAD DATA INFILE '/var/lib/mysql-files/history_uint.csv' IGNORE INTO TABLE history_uint FIELDS TERMINATED BY ',' ESCAPED BY '"' LINES TERMINATED BY '\n';

SELECT * INTO OUTFILE '/var/lib/mysql-files/history_str.csv' FIELDS TERMINATED BY ',' ESCAPED BY '"' LINES TERMINATED BY '\n' FROM history_str_old;
LOAD DATA INFILE '/var/lib/mysql-files/history_str.csv' IGNORE INTO TABLE history_str FIELDS TERMINATED BY ',' ESCAPED BY '"' LINES TERMINATED BY '\n';

SELECT * INTO OUTFILE '/var/lib/mysql-files/history_log.csv' FIELDS TERMINATED BY ',' ESCAPED BY '"' LINES TERMINATED BY '\n' FROM history_log_old;
LOAD DATA INFILE '/var/lib/mysql-files/history_log.csv' IGNORE INTO TABLE history_log FIELDS TERMINATED BY ',' ESCAPED BY '"' LINES TERMINATED BY '\n';

SELECT * INTO OUTFILE '/var/lib/mysql-files/history_text.csv' FIELDS TERMINATED BY ',' ESCAPED BY '"' LINES TERMINATED BY '\n' FROM history_text_old;
LOAD DATA INFILE '/var/lib/mysql-files/history_text.csv' IGNORE INTO TABLE history_text FIELDS TERMINATED BY ',' ESCAPED BY '"' LINES TERMINATED BY '\n';
This completes the preparation for updating the database schema.
You can then restart the Zabbix server, which will make the necessary changes to the database upon its startup.
systemctl start zabbix-serverAfter completing the update, changing the schema and successfully starting the Zabbix server, the temporary tables created by the script above can be deleted from the Zabbix database.
You can do this using following commands:
mysql
use zabbix;
DROP TABLE history_old;
DROP TABLE history_uint_old;
DROP TABLE history_str_old;
DROP TABLE history_log_old;
DROP TABLE history_text_old;
Post-upgrade tasks
- Check that the Zabbix server and database server are running correctly, and have the correct version
- Check that all Zabbix proxies are running and have the correct version
- Check Zabbix server and Zabbix proxy performance (log files, unsupported items, queues, monitoring scripts, etc.).
- Check if your servers have been equipped with the latest versions of the official templates from Zabbix. [ Zabbix GIT ]
Configuration of Zabbix reporting
To use the reporting functions, you need to install Google Chrome.
First, download the installation package, and manually install it:
wget https://dl.google.com/linux/direct/google-chrome-stable_current_x86_64.rpm
dnf localinstall google-chrome-stable_current_x86_64.rpm
In the Zabbix frontend configuration, adjust the “Frontend URL” parameter to the currently valid value, this setting can be found in the following path in the menu:
Administration -> General -> OtherYou can see an example of the settings in the image below.
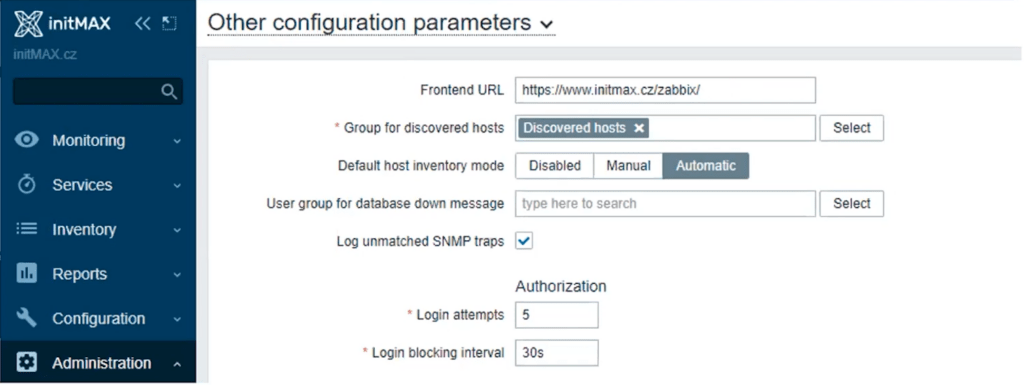
And finally, that’s it! Now you can start using your upgraded Zabbix version 6.2 with all its new fixes and technological improvements.
Give us a Like, share us, or follow us 😍
So you don’t miss anything: