Today we will discuss the authentication options in Zabbix, we will look at examples of their settings, and discuss the advantages and possible downsides of using individual methods.
Authentication options in Zabbix
By default, Zabbix uses internal authentication for all users. However, a combination of internal accounts and accounts from LDAP (Microsoft Active Directory and OpenLDAP), SAML 2.0 or SCIM can be used. We can even use HTTP authentication (for example, Basic Authentication or NTLM/Kerberos) to verify the username and password, but compared to other methods, however it is not possible to use JIT in this case.
In the following chapters, we will take a closer look at the basic authentication settings compared to LDAP (Active Directory), SAML (Azure) and SCIM (Azure).
Our examples need to first turn on LDAP authentication and then enable JIT provisioning.
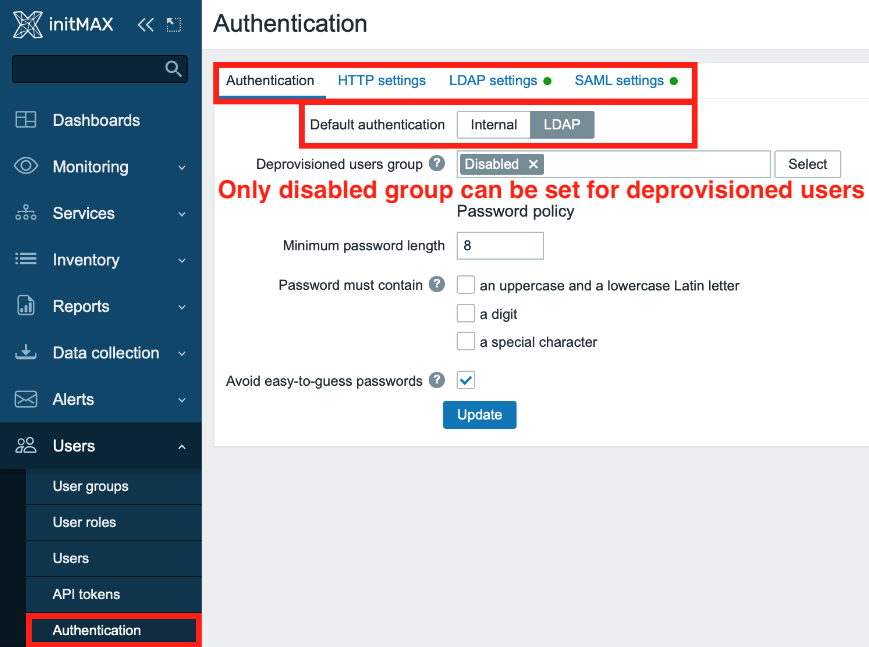
In the section Users -> Authentication -> Authentication set the Default authentication option to LDAP.
For the item Deprovisioned user groups then select the Disabled group.
LDAP (Active Directory)
Basic settings
First, in the Users -> Authentication -> LDAP settings section, check the Enable LDAP authentication and Enable JIT provisioning checkboxes.
You can enable case-sensitive login, i.e. users with the same first and last name can be distinguished by case-sensitive login name, if required.
You can also set a lower or higher frequency with which provisioning takes place than the default value (1 hour).
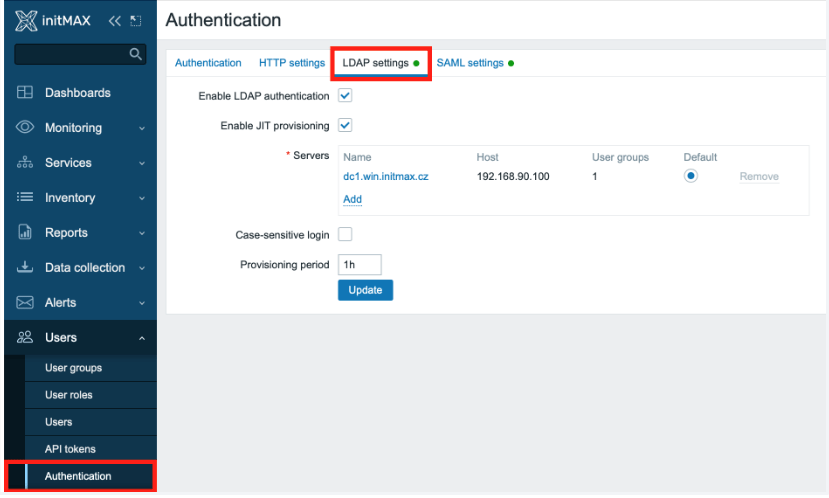
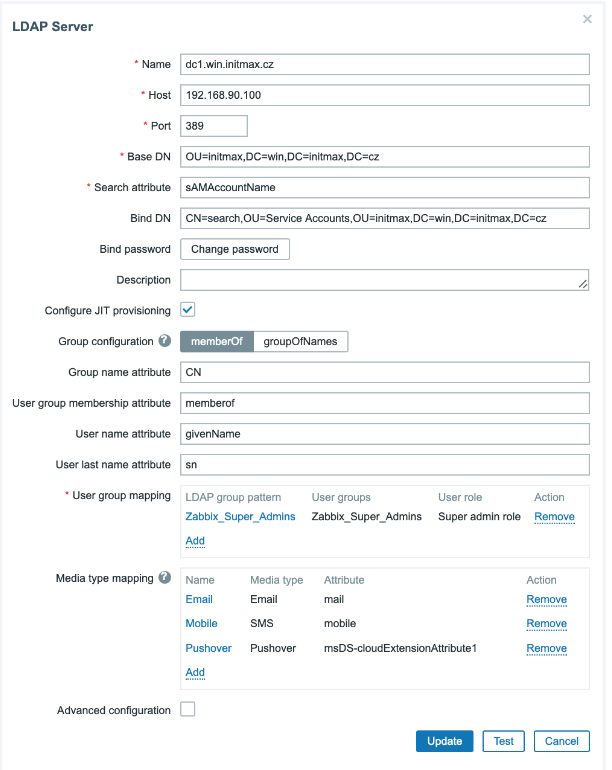
Next, add an LDAP server and set up JIT provisioning by clicking on the Add link located in the Servers section.
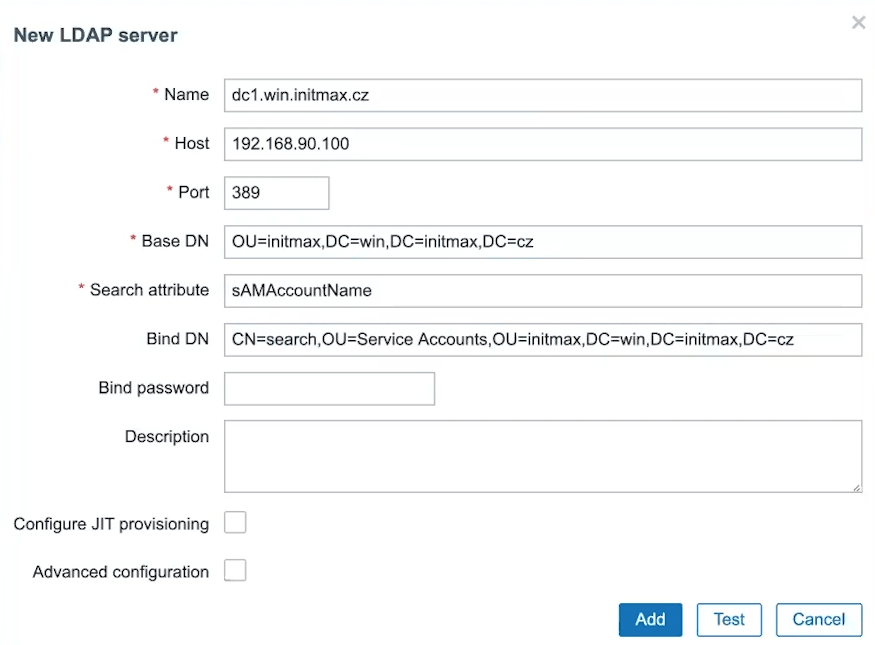
In the following dialog, fill in all the data about the LDAP server, logging in to it (e.g. using a service account) and the data needed to browse the structure of the target LDAP server.
First, set the name of the LDAP server, its IP address or hostname, the port of the LDAP service (standard 389 for ldap and 636 for ldaps). And yes, you can have more than one LDAP server defined.
Now choose the path where Zabbix should search for users and groups in LDAP (BaseDN) and the LDAP attribute to be searched for (Search attribute), this is by default sAMAccountName.
Fill in the path in LDAP to the user who is authorized to connect to LDAP (BindDN) and his password (Bind password).
Note: For security reasons, we recommend disabling anonymous bind at the LDAP server level and strictly using ldaps (tcp/636).
JIT
Now proceed to the setting of the JIT provisioning itself by ticking the Configure JIT provisioning checkbox, which expands the menu of configuration options.
First, in the Group configuration item, we choose how to search for groups at the LDAP level. In this case, we will select the memberOf method, so that Zabbix searches for users and their membership in groups.
Next, fill in the name of the attribute that determines the name of the group (Group name attribute), usually it is CN, i.e. CommonName.
In the User group membership attribute item, add the attribute determining group membership.
Note that in the example below, this entry is correctly populated with the value of memberof, although the hint Zabbix offers has the value of memberOf
Edit: This bug was officially reported and fixed in issue [ZBX-22597] resolved issue with LDAP group membership mapping not matching case-insensitive entries. As of version 6.4.2, this is no longer the case and the help offers the correct value that we recommend above.
Other items are attributes specifying the user’s first name (User name attribute) and his last name (User last name attribute).
In the case of Active Directory, these values are givenName for first name and sn for last name.
Attribute mapping
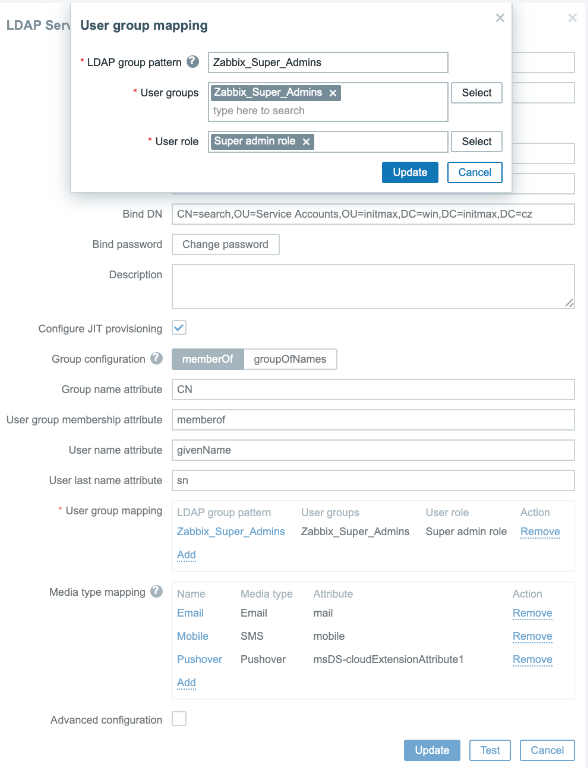
In the “User group mapping” section, select an already existing group at the Zabbix level, to which LDAP users will be mapped.
The group must be named the same in Zabbix and in LDAP, and in our case it is the Zabbix_Super_Admins group.
Then assign this group the desired user role whose permissions the group will inherit, such as the Super admin role here.
Note: Wildcards are allowed for both settings (eg *).
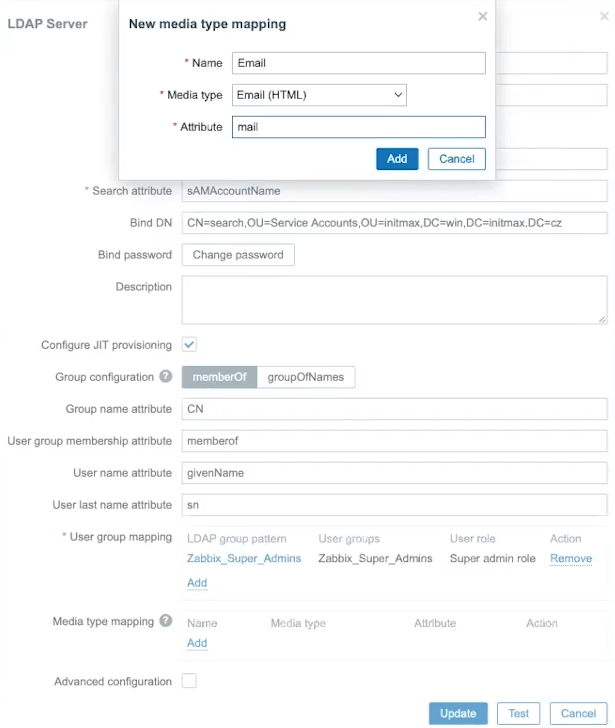
The following item Media type mapping maps attributes from objects in LDAP for the needs of filling media types of individual users.
Below you can see an example mapping email address:
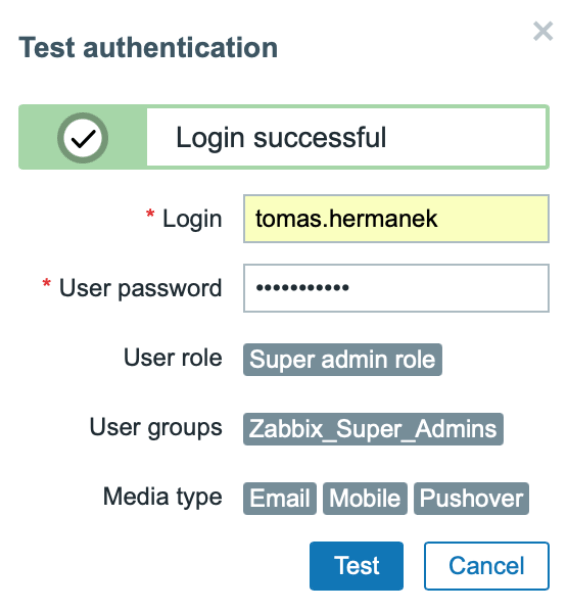
Before saving the configuration, you can test the functionality of the entire setting using the Test button.
At this point, you have LDAP login setup including JIT provisioning of users done.
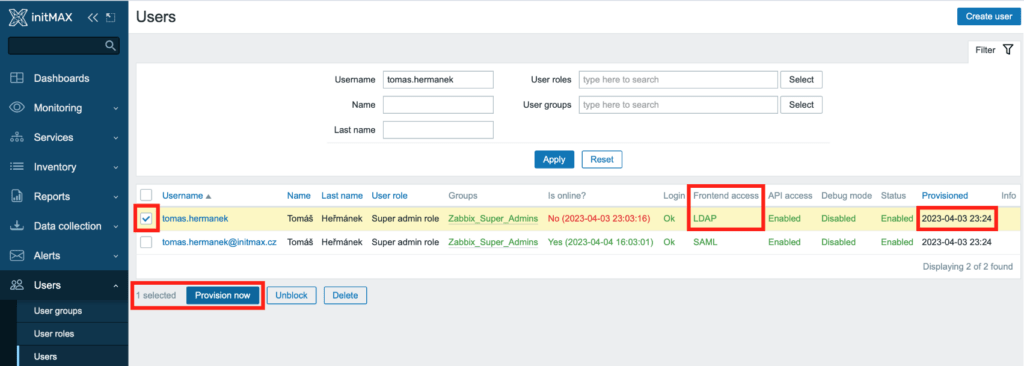
You can save the configuration and log in with our LDAP credentials.
If you use “bind” user to connect to the LDAP server and set LDAP as the default authentication method (as it is the case here), then one-time provisioning can also be performed.
For example, if you know about changes made at the LDAP level and do not want to wait the predefined frequency of automatic provisioning.
You can perform one-time, immediate provisioning in the Users -> Users section. Here, under the list of users is the Provision now button.
SAML (Azure AD/Microsoft Entra ID)
Basic settings
The very first step is to create a new application in Azure, in the section Enterprise applications -> All applications -> New application, see the following screenshot.
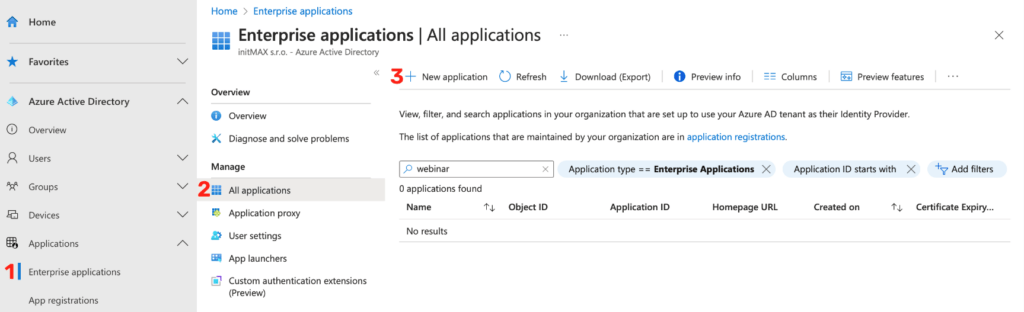
Here click on the Create your own application button.

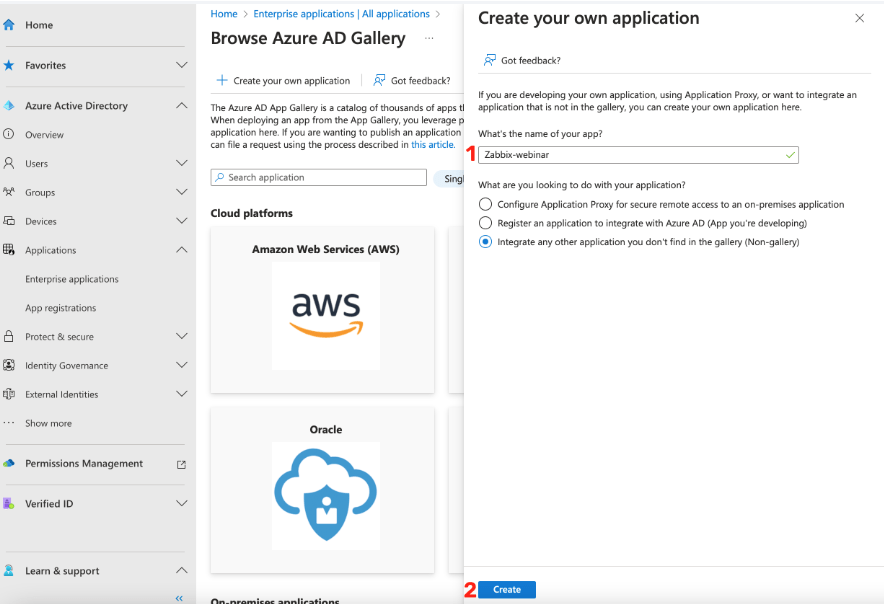
A dialog will appear where you select the option that the application is not part of the menu, give the new application a name and confirm our choices with the Create button.
In the newly created application, select the Single sign-on SAML method.
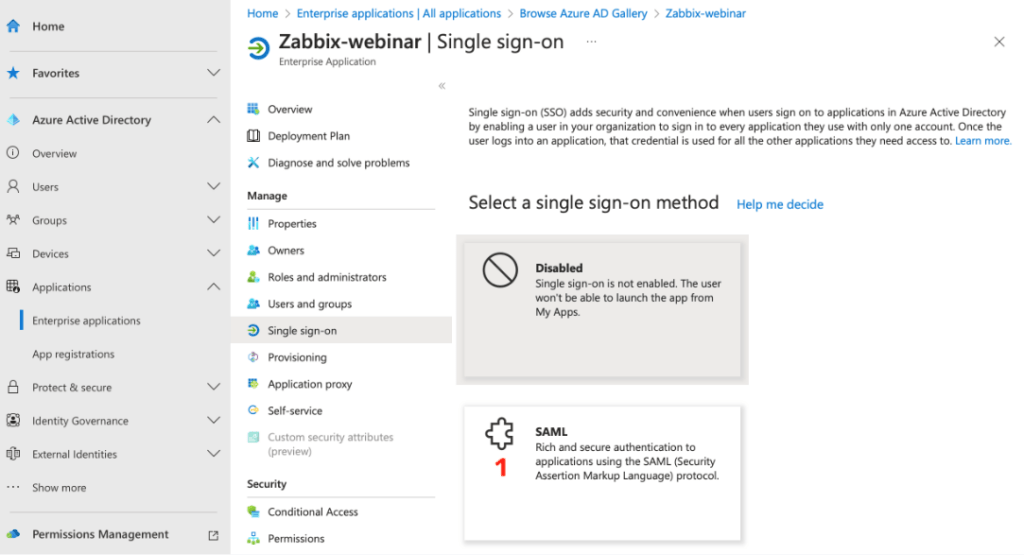
This will take you to the SAML setup options, where we click on the Edit link in the first Basic SAML Configuration option.
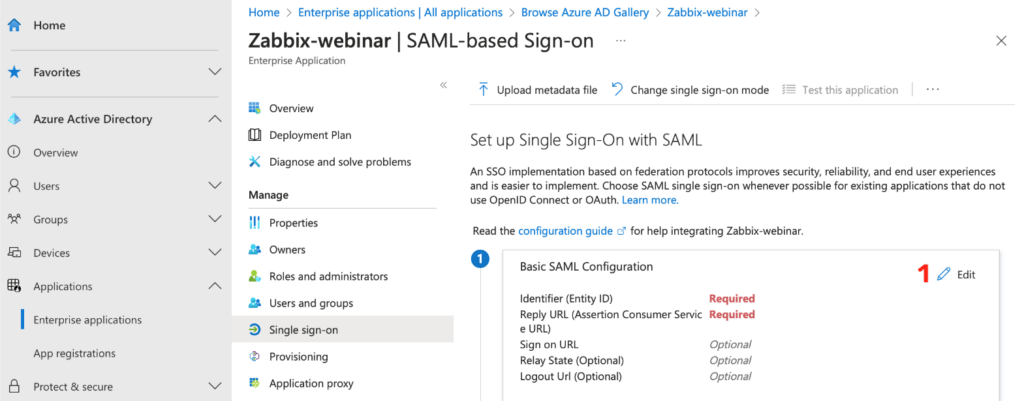
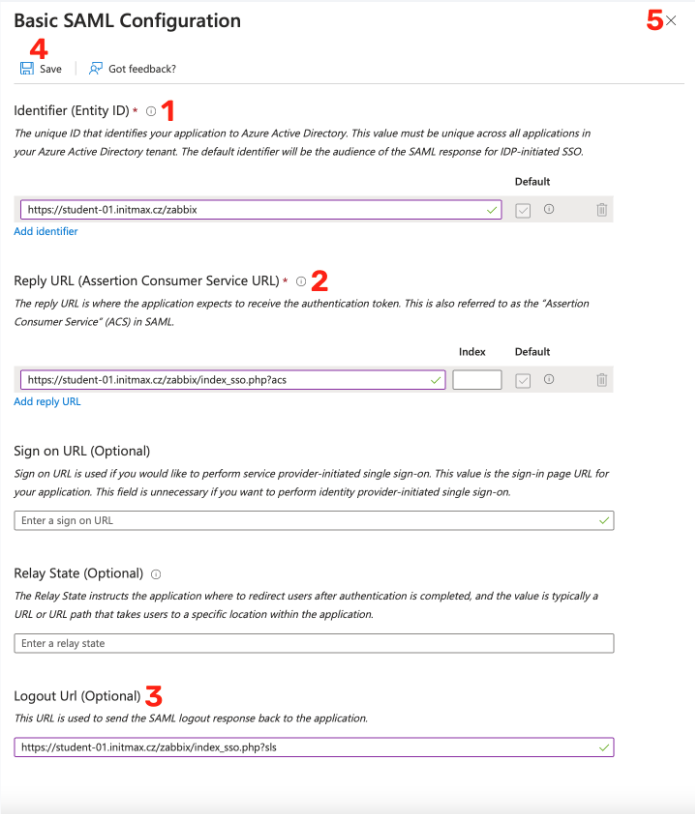
Here it is necessary for you to fill in the Identity ID, which is the URL address of the Zabbix frontend. In our case, https://student-01.initmax.cz/zabbix.
Next is “Reply URL“, which is the place where Zabbix expects the authentication token, i.e. https://student-01.initmax.cz/zabbix/index_sso.php?acs.
Optionally, you can also fill in the Logout URL, which is the following for our sample Zabbix: https://student-01.initmax.cz/zabbix/index_sso.php?sls.
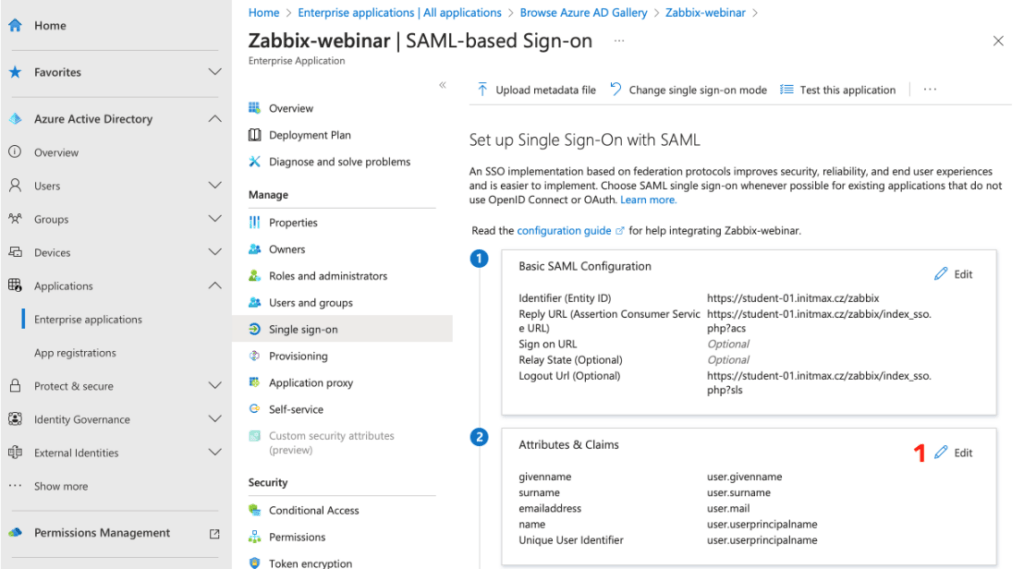
Save the settings using the Save button and you can close the dialog window.
A popup window will appear offering to test your setup, you need to skip this step for now and choose No, I'll test later since the setup isn’t complete yet.

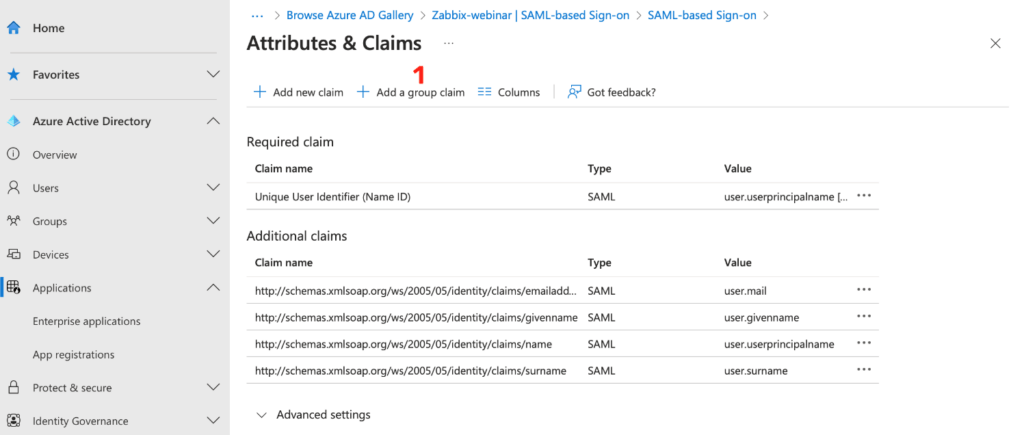
Users and groups attributes
In the Attributes & Claims section, select the Edit link.
Create the settings for the group here using the Add a group claim button.
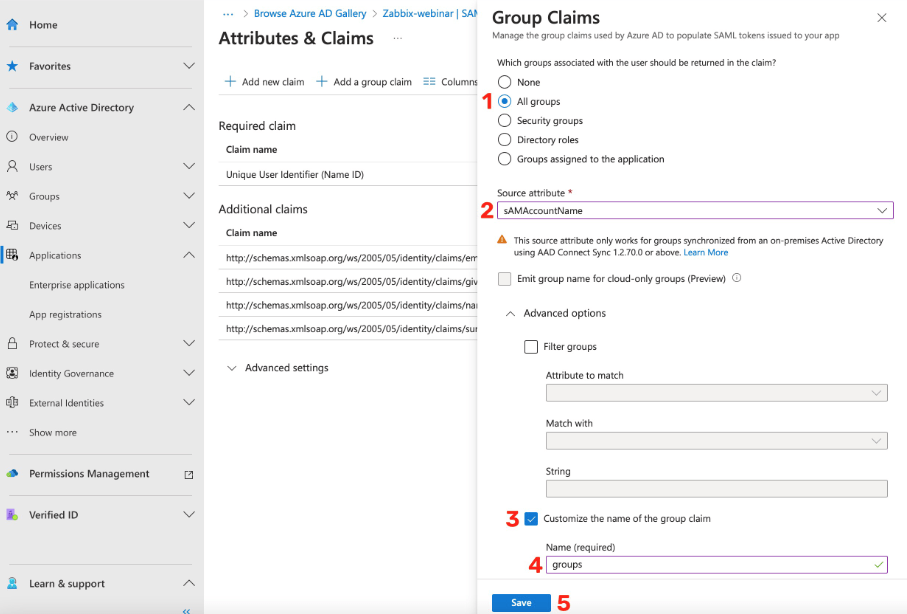
In the group settings dialog box, select All groups and select sAMAccountName as the Source attribute.
In the advanced settings options, check the checkbox, to customize the name for your new “group claim” and fill in the value of your choice, e.g. groups.
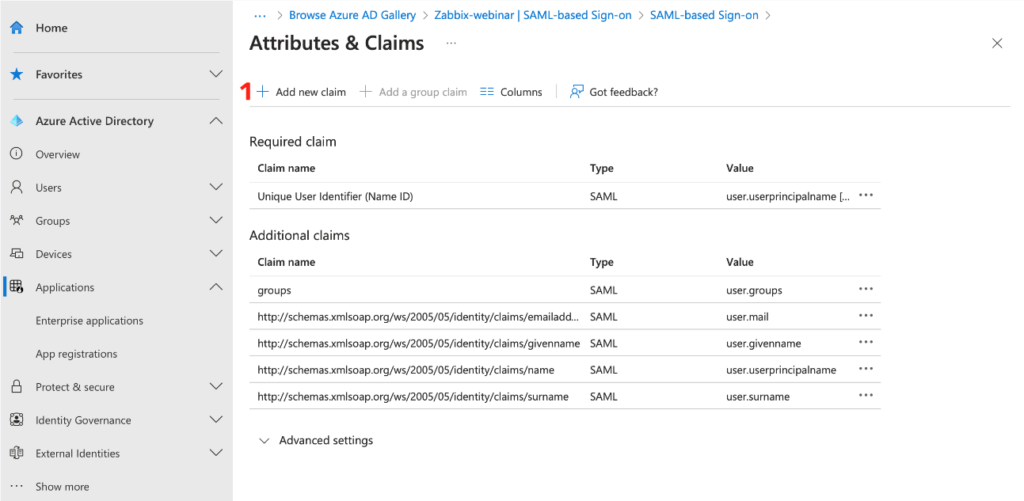
Next, you need to create a new claim for username, for first and last name, and for media.
Create a new claim using the Add new claim button.
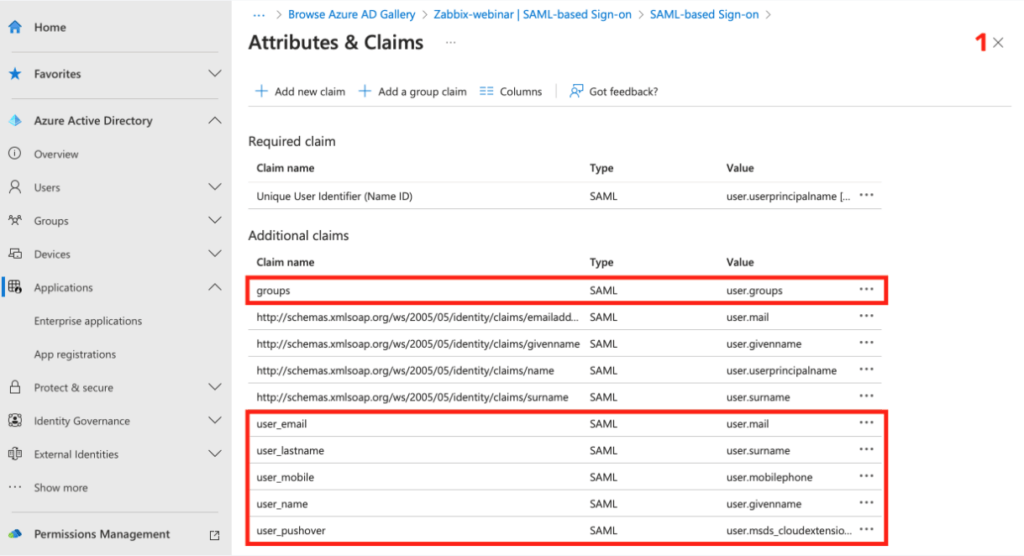
In this image you can see an example of parsing the resource attribute user.mail for media type Email.
This attribute is very important for you, as in this example we’re using the user’s email address as a login name for Zabbix.

Here you can see an example of setting claims even for optional attributes, such as the user’s first and last name, his phone number and pushover ID.
After setting all required claims, you can close the settings window.
After that download the Base64 certificate that contains the login token.
For this purpose there’s a Download link in the SAML Certificates section, as you can see in the image below.
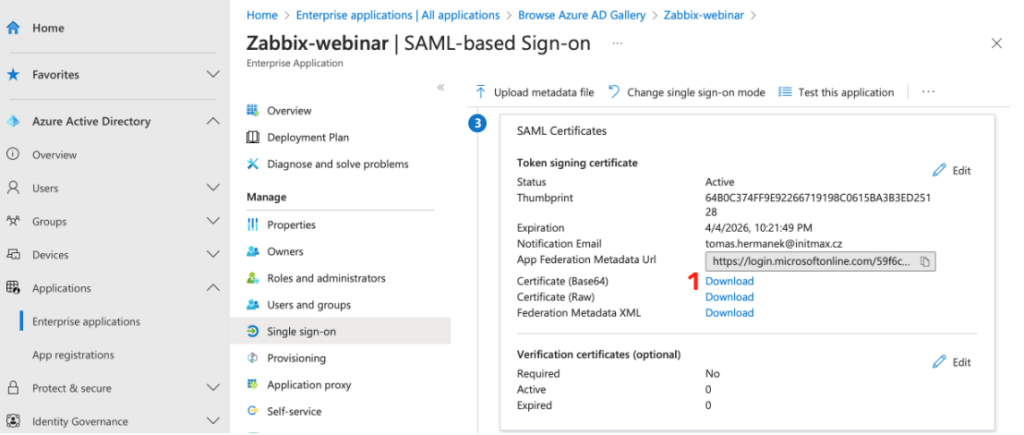
Make sure that you have successfully downloaded the certificate with the login token and you can proceed to Zabbix settings.
Zabbix
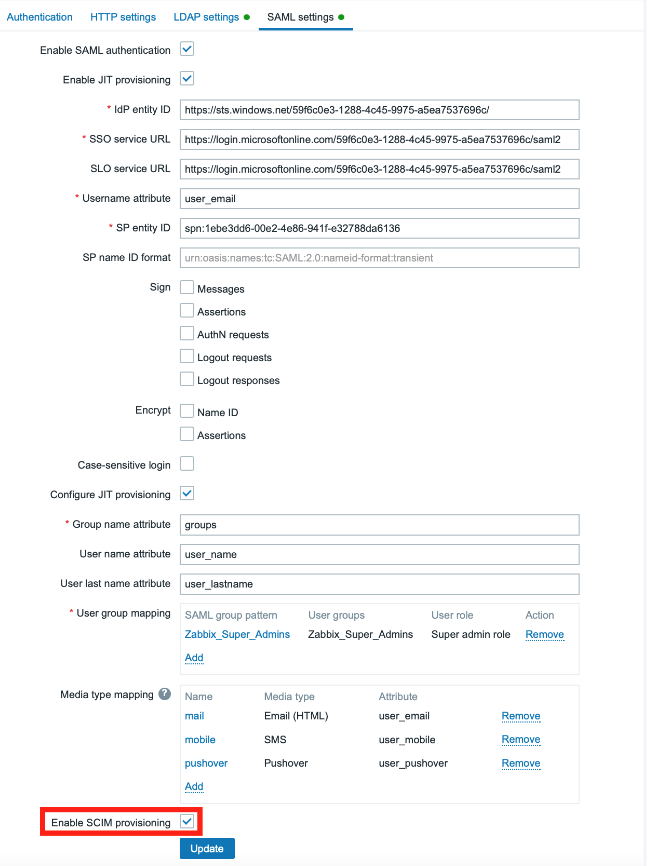
First, in the Users -> Authentication -> SAML settings section, check the Enable SAML authentication checkbox.
You can enable case-sensitive login, i.e. users with the same first and last name can be distinguished by case-sensitive login name, if required.
You can also set a lower or higher frequency with which provisioning takes place than the default value (1 hour).
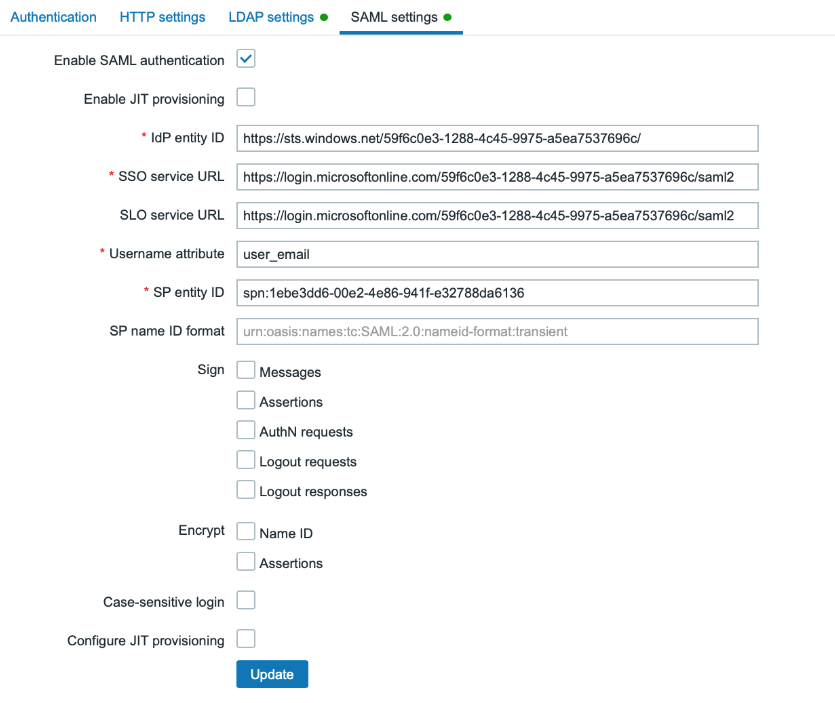
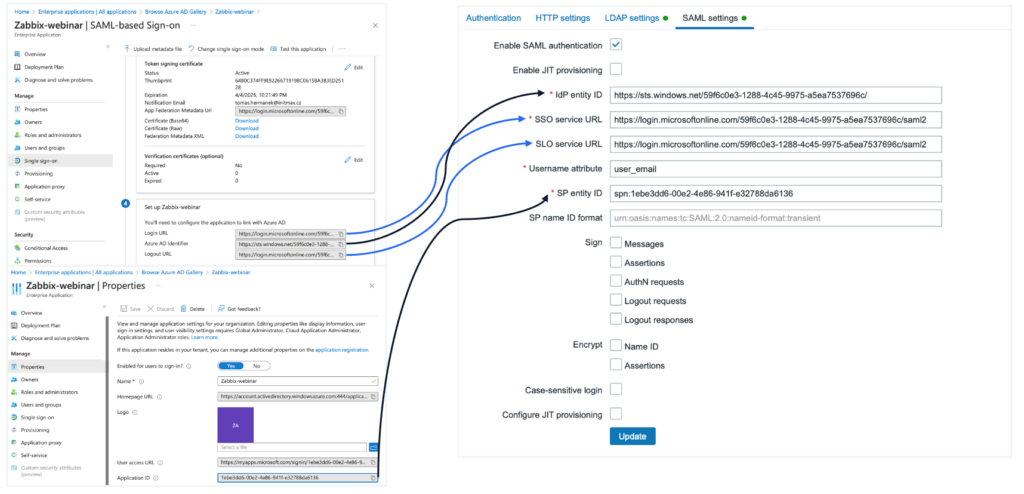
Correct values for all required SAML settings can be found in corresponding sections of the MS Azure web interface.
The IdP entity ID is named Azure AD Identifier at the Azure level, the value for the SSO service URL can be found in Azure under the name Login URL, and the SLO service URL is then the Logout URL.
The value of the Username attribute item is the name of the claim you’ve created for the user’s e-mail, in our case user_email .
Fill in the SPN for the SP entity ID with the value of the Application ID from Azure. You can find this value in the Properties menu of our created application.
Copy this value to clipboard and before inserting it into the SP entity ID item, it is necessary for you to prepend it with the prefix spn: otherwise this setting will not work!
You’re done with the SAML setup for now and you can save it using the Update button.
However, the login does not work as of now, because Zabbix does not yet have a certificate containing the authentication token that you have already downloaded from MS Azure.
You have to physically place it to the Zabbix server. So connect to the Zabbix server using SSH and first create a folder for certificates:
For Zabbix version 7.0 and earlier:
mkdir /usr/share/zabbix/conf/certs/Starting from Zabbix version 7.2:
mkdir /usr/share/zabbix/ui/conf/certs/Copy you certificate there under the name AZURE.cer (for example), and set the correct permissions:
For Zabbix version 7.0 and earlier:
chmod 644 /usr/share/zabbix/conf/certs/AZURE.cerStarting from Zabbix version 7.2:
chmod 644 /usr/share/zabbix/ui/conf/certs/AZURE.cerNext, open the Zabbix front-end configuration file in the following path:
nano /etc/zabbix/web/zabbix.conf.phpHere, in the SAML authentication section, edit the configuration directive $SSO['IDP_CERT'] with the value of relative path to our certificate, in our case as follows:
// Used for SAML authentication.
// Uncomment to override the default paths to SP private key, SP and IdP X.509 certificates, and to set extra settings.
//$SSO['SP_KEY'] = 'conf/certs/sp.key';
//$SSO['SP_CERT'] = 'conf/certs/sp.crt';
$SSO['IDP_CERT'] = 'conf/certs/AZURE.cer';
//$SSO['SETTINGS'] = [];
JIT
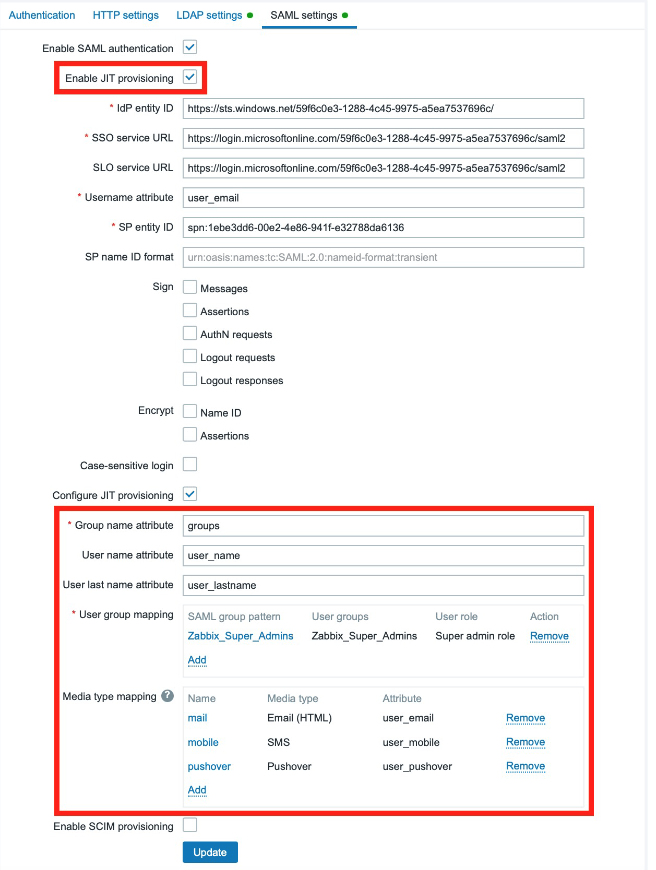
You can now proceed to the JIT provisioning setup, again in the section Users -> Authentication -> SAML settings, check the checkboxes Enable JIT provisioning and Configure JIT provisioning.
The provisioning settings will open. Fill in the required items with the names of our claims, created earlier at the Azure level.
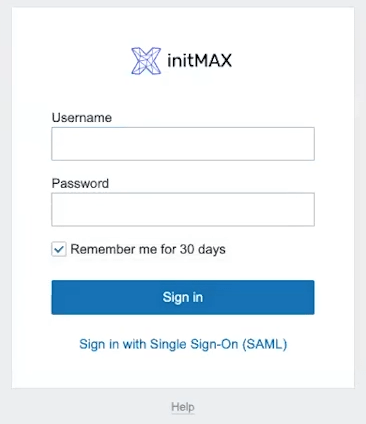
After saving this setting, it is possible to log in under your credentials using SSO, for this purpose use the Sign in with Single Sign-On (SAML) link on the login screen, which redirects us to the Microsoft login page, or logs us in directly.
You can verify that provisioning really works for a specific user in the Users -> Users section.
The Provisioned column will contain the date and time the last provisioning successfully took place.
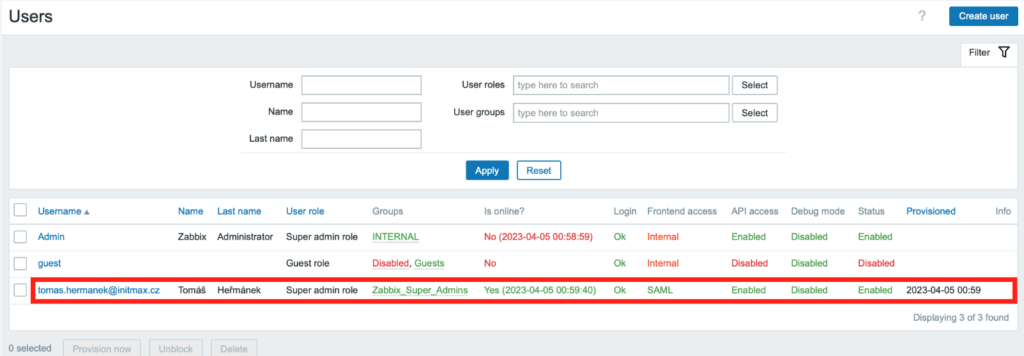
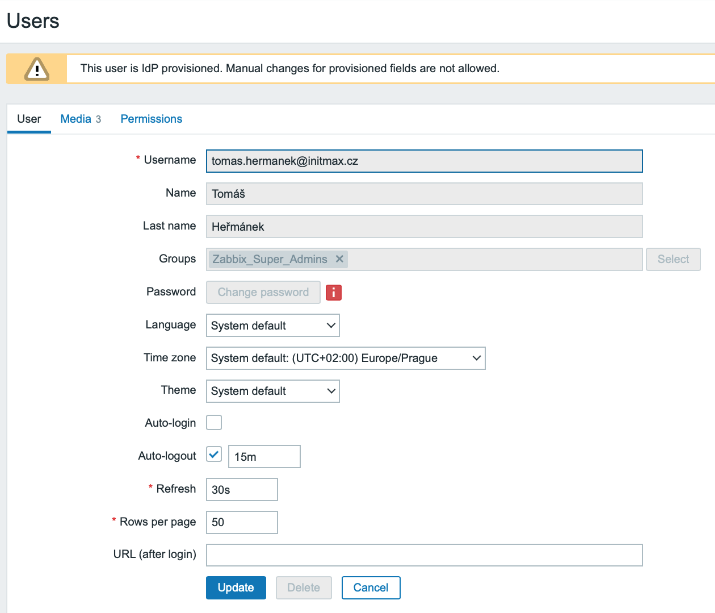
After clicking on a specific user, you will find that all the fields are grayed out, as these setting are managed centrally, in Azure AD.
SCIM (Azure AD/Microsoft Entra ID)
Basic settings
To set up SCIM, you first need to enable it. You can do this by checking the Enable SCIM provisioning checkbox in the same SAML settings section.
So again in the Users -> Authentication -> SAML settings section.
Next, you need to create an API token with super admin privileges.
In the Users -> API tokens section, click the Create API token button and in the token settings dialog box, choose the name of the token and select the local privileged user Admin as the owner.
Next, disable the predefined expiration period of this token by unchecking the Set expiration date and time checkbox.
Check the Enabled checkbox to enable it and finish this setup by clicking the Add button.
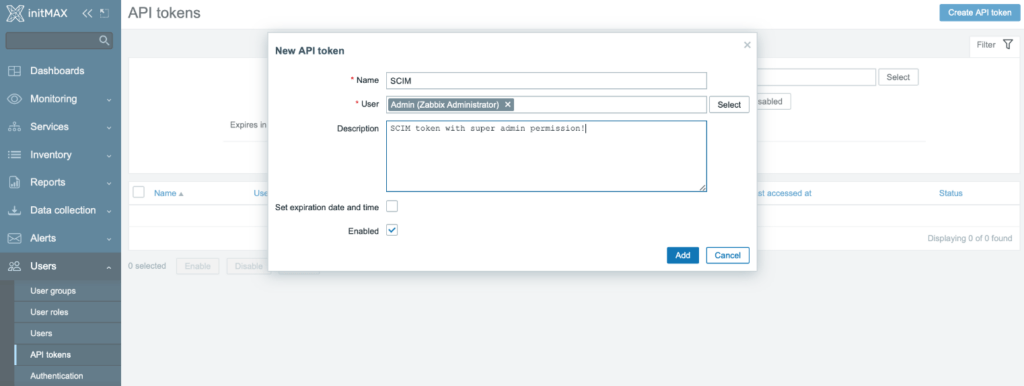
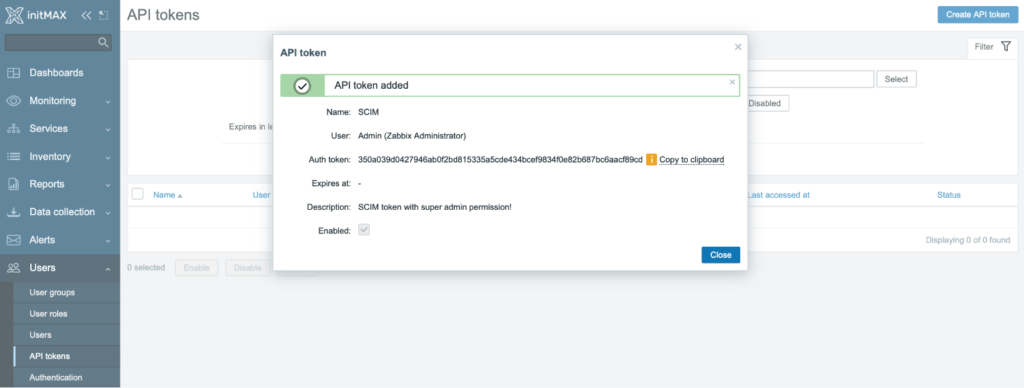
After creating a token, a status window appears with a description of the token and the token itself, copy it to the clipboard and save it for later use.
Provisioning settings
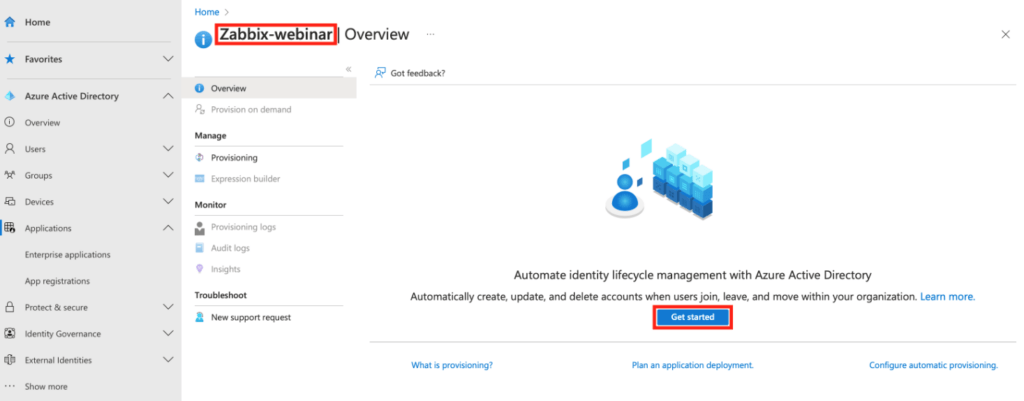
Now go back to Azure web interface and in our previously created application go to the Provisioning section, where you need to click on the Get started button.
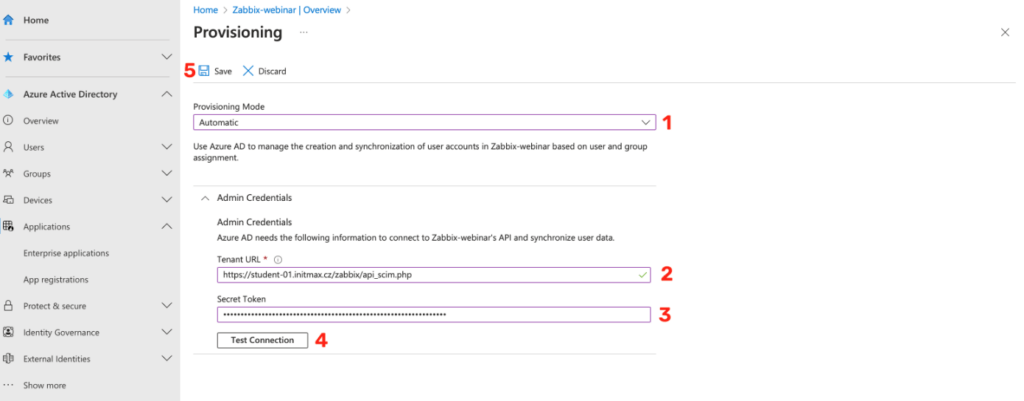
In the provisioning settings, select the Automatic mode and fill in the Tenant URL in the Admin Credentials section, in our case the URL of the SCIM API in Zabbix.
Specifically, https://student-01.initmax.cz/zabbix/api_scim.php and in the Secret Token field insert your saved token from the previous steps.
You can test the connection using the Test Connection button and if everything is fine, save the configuration.
Attributes mapping
After saving the configuration, the user and group mapping setup options will appear.
Here, select Provision Azure Active Directory Users option.
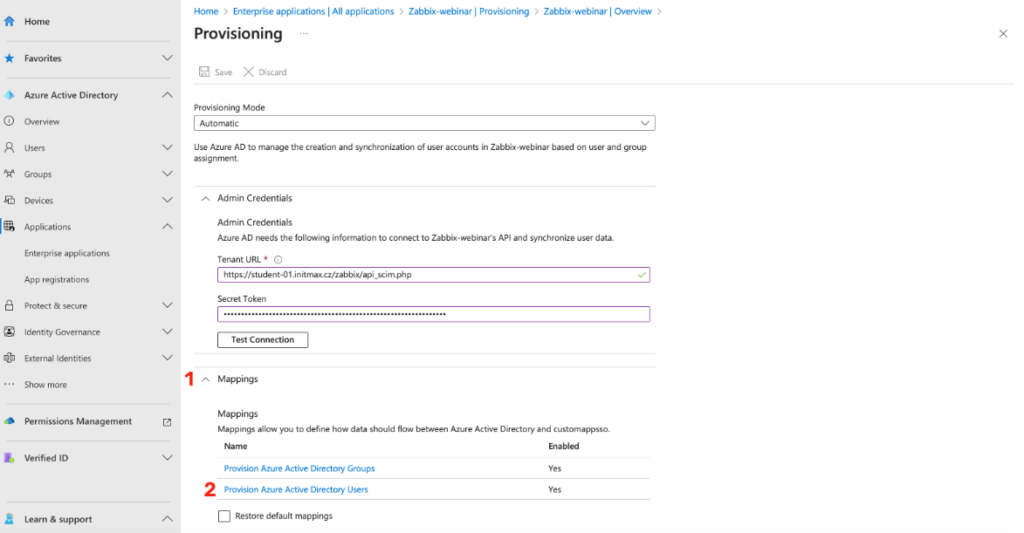
You will be taken to the Attribute Mapping section where you need to add your custom attributes.
In order to be able to edit and add your own attributes, it is necessary to check the checkbox Show advanced options, which is located at the very bottom of this page.
Then click on the link Edit attribute list for customappsso.
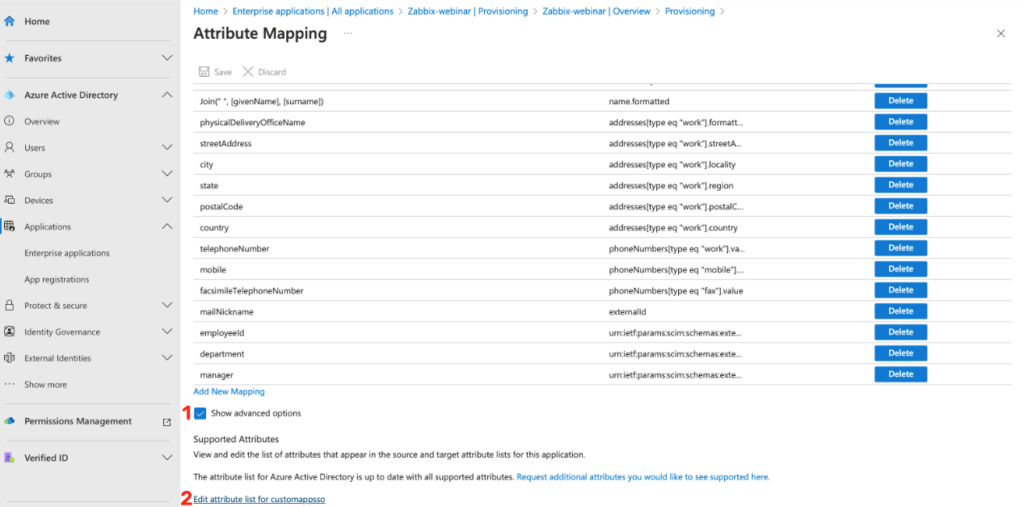
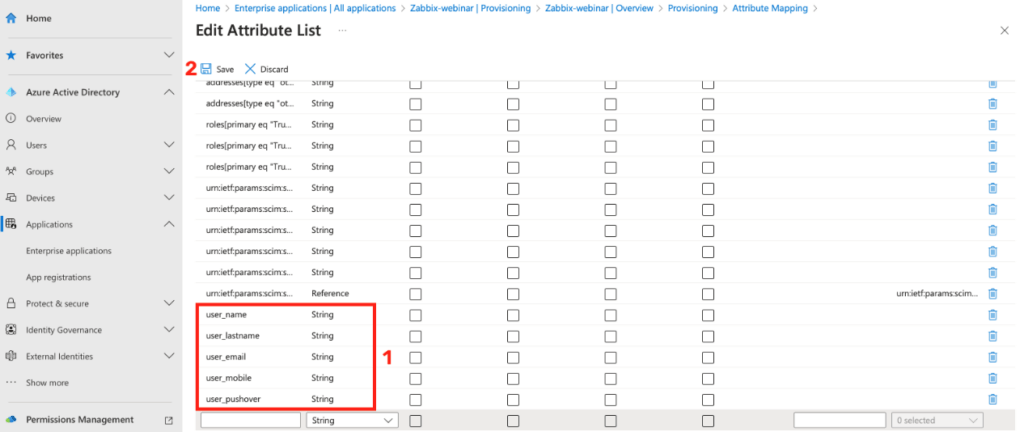
This will take you to the list of all the attributes of your application and here you will add the same attributes as in the previous cases.
When finished, save the user mapping configuration using the Save button.
You can see the already added attributes in the image below.
Saving atribute list gets us back to Attribute Mapping, where it is necessary to create correct mapping for these attributes.
To do so click on the Add New Mapping link.
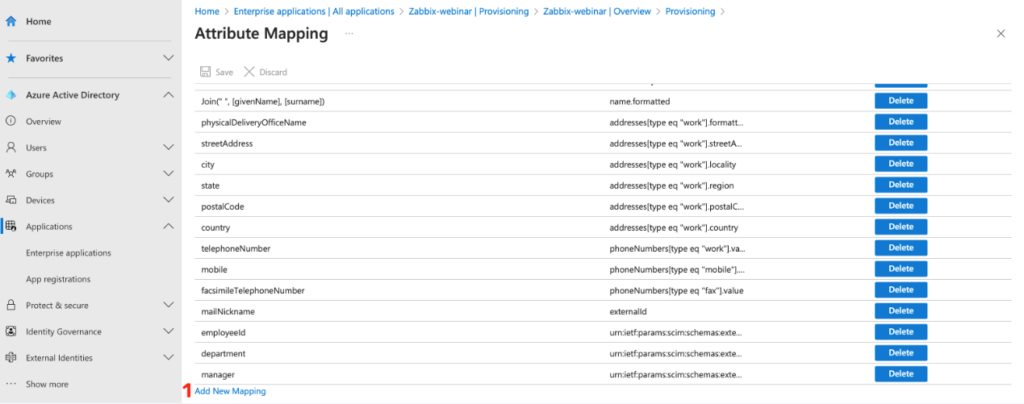
For all your attributes, create a mapping to their specific counterpart in AD, just like in the previous cases.
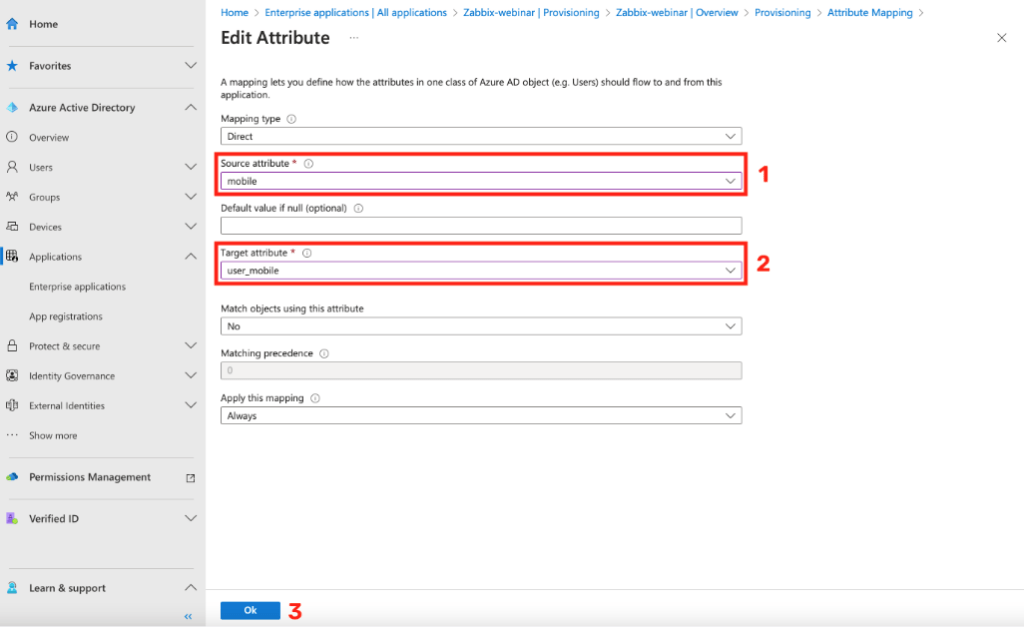
Below you can see an example for mapping the user_mobile attribute.
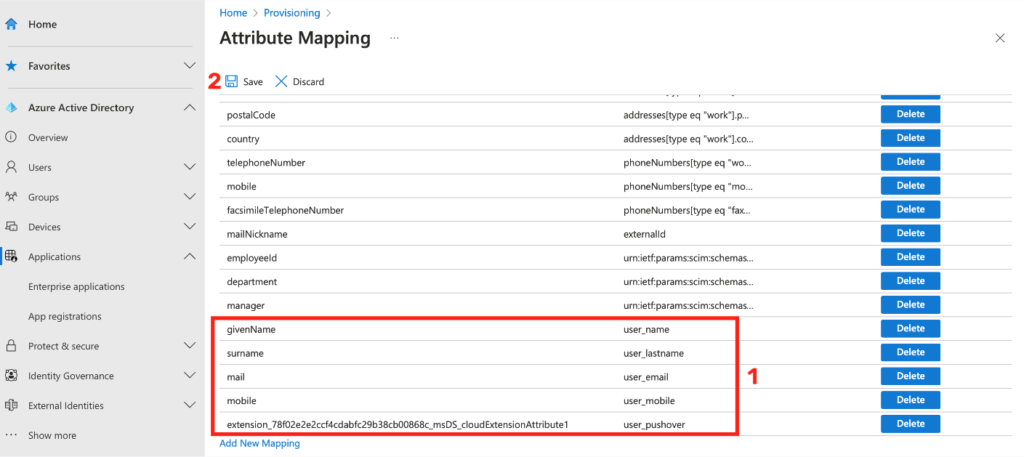
Here you can see a list of all filled attributes with their correctly set source attribute.
After setting the mapping for all required attributes, click the Save button and close the dialog box.
The last step to set up a functional SCIM is to start the provisioning itself.
Go back to the Overview section on the home page of your newly created provisioning and click the Start provisioning button here.

This completes the SCIM provisioning setup.
It is worth noting that SCIM provisioning still has certain limitations.
For example, at the Zabbix level, users can be created, but they can no longer be updated or assigned a specific media.
However, according to internal information directly from Zabbix, the Zabbix developers will soon improve this and these these functions will be implemented.
Edit (8. 3. 2024): This has already been fixed in Zabbix version 7.0 – read more in our article New Zabbix 7.0 LTS is almost here.
Give us a Like, share us, or follow us 😍
So you don’t miss anything: