This time we will show you how to update Zabbix to the latest version 6.4, including the upgrade of PHP and PostgreSQL!

Preparation steps
- Read the release notes [ Official release notes for Zabbix 6.4 ]
- Read the upgrade notes document thoroughly [ Official upgrade notes for Zabbix 6.4 ]
- Check and possibly optimize the performance of the current database according to the vendor’s recommendations and taking into account the requirements of the Zabbix instance
- Check that the versions of all components match the compatibility matrix of the new Zabbix version
- Backup configuration files of Zabbix server and Zabbix proxy
- Backup Zabbix server or Zabbix proxy database
- Backup any possible custom adjustments that were made manually at the Zabbix level
Version check
First, check the versions of all components on which the running of Zabbix and its components depends, so that they exactly match the official compatibility matrix for Zabbix 6.4.
php-fpm -v
postgres -V
Backup of Zabbix configuration files
Before proceeding with the next steps, it is always very important to back up all configuration files of the Zabbix server and Zabbix Proxy.
Also consider backing up the configuration files of the web server, if necessary.
Backup all of Zabbix configuration files using the commands below:
cp /etc/zabbix/zabbix_server.conf /<backup directory>/
cp /etc/zabbix/zabbix_agentd.conf /<backup directory>/
cp /usr/share/zabbix/alertscripts/* /<backup directory>/
cp /usr/share/zabbix/externalscripts/* /<backup directory>/
cp -R /usr/share/zabbix/ /<backup directory>/
cp /etc/httpd/conf/httpd.conf /<backup directory>/
cp /etc/httpd/conf.d/zabbix.conf /<backup directory>/
cp /etc/zabbix/web/zabbix.conf.php /<backup directory>/
Stopping the servicies
First, we stop the Zabbix server so it no longer writes anything to the database.
systemctl stop zabbix-serverIf you are using SQLite as the Zabbix proxy backend, then also stop services of all the individual Zabbix proxies.
Because if this is the case, then you need to delete their databases after the update.
systemctl stop zabbix-proxyIf we want the data and active configuration from the Zabbix server to be preserved on the Zabbix proxy servers, then before we start the update we recommend changing the Zabbix proxy configuration and convert it to a MySQL or PostgreSQL database. This procedure is described in detail in the official Zabbix documentation.
After this, it will no longer be necessary to stop the individual Zabbix proxy servers for the duration of the Zabbix server update, and we can let them collect and store data even when the Zabbix server is unavailable for a time being.
The services of individual Zabbix proxies will need to be stopped directly before updating the zabbix-proxy repositories and packages.
PHP upgrade
The new version of Zabbix 6.4 also requires PHP between versions 7.4.0 and 8.2.x to run (Zabbix supports PHP version 8.2.x from version 6.2.8).
According to our experience, we recommend installing PHP 8.0, in PHP versions newer than 7.6 there is already support for PCRE2, which is used by Zabbix.
The upgrade is then simply performed by changing the settings of the dnf packaging system at the OS level.
dnf module switch-to php:8.0 -yDatabase upgrade
First, stop the currently running PostgreSQL service.
systemctl stop postgresql-11Next, install a specifically supported version, in our case PostgreSQL version 15:
dnf install -y postgresql15-serverYou can now proceed to initialize the database of the new version of PostgreSQL:
/usr/pgsql-15/bin/postgresql-15-setup initdbAfter the successful installation of all dependencies, run the supplied update script, which checks for compatibility issues and, if necessary, corrects internal tables and schemas against changes between versions (under the postgres user):
su - postgres
/usr/pgsql-15/bin/pg_upgrade -b /usr/pgsql-11/bin -B /usr/pgsql-15/bin -d /var/lib/pgsql/11/data -D /var/lib/pgsql/15/data -k
Transfer the database server permission configuration from the old version to the new one:
cat /var/lib/pgsql/11/data/pg_hba.conf > /var/lib/pgsql/15/data/pg_hba.confIf need be, also transfer the configuration of the database server itself (check the compatibility of individual configuration directives between versions in advance):
cat /var/lib/pgsql/15/data/postgresql.conf > /var/lib/pgsql/15/data/postgresql.confIt is now possible to disable the automatic startup of the old service with the following command:
systemctl disable postgresql-11.serviceAnd start a new version of the PostgreSQL database server, including its automatic start after system startup.
systemctl enable postgresql-15.service --nowAfter successfully starting the Zabbix server, we recommend you to run VACUUM and reindexdb, like so:
su - postgres
/usr/pgsql-15/bin/vacuumdb --all --analyze-in-stages
reindexdb
In the next step, delete the old PostgreSQL cluster.
./delete_old_cluster.sh
rm -rf 11 delete_old_cluster.sh
You can now remove the old versions of the packages.
dnf remove postgresql11-*And in the last step, you can safely delete the folder containing configuration files of the old version:
rm -rf /usr/pgsql-11/Zabbix server upgrade
After you’ve successfully backed up everything and updated all versions of dependant components according to the official compatibility matrix of the new Zabbix version, you can move on to updating Zabbix and all its components.
First, download the installation packages for the repositories of the new version of Zabbix and delete the installation cache.
rpm -Uvh https://repo.zabbix.com/zabbix/6.4/rhel/8/x86_64/zabbix-release-6.4-1.el8.noarch.rpm
dnf clean all
After this, you have the repositories of the new version available.
So first update all other Zabbix components, and then repeat this process on all Zabbix Proxies individually:
dnf upgrade zabbix* -yIn Zabbix version 6.4, the configuration file for the Apache web server is now separated from the zabbix-web-service package and now exists as a separate package named zabbix-apache-conf.
In the case you’re using Apache as a web server for running the front-end, install this newly created package.
At the same time, it is necessary to update the package for zabbix-web-service to the latest version 6.4, which will then enable automatic start after system startup.
dnf install zabbix-web-service zabbix-apache-conf -y
systemctl enable zabbix-web-service
Next, open the Zabbix server configuration file at the following path:
nano /etc/zabbix/zabbix_server.confAnd in here, edit the following lines as you can see below, save the file and close it.
DBHost=127.0.0.1
DBPassword=<database_password>
StartReportWriters=1
WebServiceURL=http://localhost:10053/report
After successfully completing the update of the Zabbix server and all of its components, you can finally start the service:
systemctl start zabbix-serverIf a SQLite database is used as the backend for the Zabbix proxy, then delete contents of the current database with the following command:
rm /tmp/zabbix_proxy.dbOtherwise, this service can also be started now:
systemctl start zabbix-proxyThe entire update process, including any modifications to the structure of the database schema, can also be found in the log file of the Zabbix server:
tail -f /var/log/zabbix/zabbix_server.logOr in case of Zabbix proxies refer to their corresponding log file at this path:
tail -f /var/log/zabbix/zabbix_proxy.logDatabase update for float64 and primary keys
As of Zabbix major version 6.0, primary keys are used for tables as part of a significant increase in database performance. This also has a very positive effect on the functionality of HA.
In case of using HA mode (i.e. Patroni), the key-value data are mirrored in the distributed storage. Based on the information existing in this storage, all instances of the cluster are talking to each other. Upon this communication, they can make a group decision on, for example, which replica to promote as production one, if the primary instance fails. This helps the entire logic of the cluster function in the subsequent determination of the quorum, and the decision on which node is the most critical at a given time, so this way significantly mitigates the possibility of a “split-brain” scenario.
You can learn more at the following link from the official documentation: https://www.zabbix.com/documentation/6.4/en/manual/appendix/install/db_primary_keys.
Preparations
For this first stop the Zabbix server.
systemctl stop zabbix-serverNext, install the new package containing database scripts for Zabbix, which also contains this update itself.
dnf install zabbix-sql-scriptsNow apply an SQL patch to the database, which is designed to prepare exactly for this update, it will rename the individual tables.
Attention! In older versions of Zabbix, this path is different, that is /usr/share/doc/zabbix-sql-scripts/ !
cat /usr/share/zabbix-sql-scripts/postgresql/double.sql | sudo -u zabbix psql zabbix
cat /usr/share/zabbix-sql-scripts/postgresql/history_pk_prepare.sql | sudo -u zabbix psql zabbix
Run the following SQL script at the ‘zabbix’ database level.
It exports the current tables with historical data and inserts this data into the new tables.
INSERT INTO history SELECT * FROM history_old ON CONFLICT (itemid,clock,ns) DO NOTHING;
INSERT INTO history_uint SELECT * FROM history_uint_old ON CONFLICT (itemid,clock,ns) DO NOTHING;
INSERT INTO history_str SELECT * FROM history_str_old ON CONFLICT (itemid,clock,ns) DO NOTHING;
INSERT INTO history_log SELECT * FROM history_log_old ON CONFLICT (itemid,clock,ns) DO NOTHING;
INSERT INTO history_text SELECT * FROM history_text_old ON CONFLICT (itemid,clock,ns) DO NOTHING;
With this, you’ve completed the preparation for updating the database schema.
Restart the Zabbix server, which will make all the needed changes in the database, upon its startup.
systemctl start zabbix-serverAfter completing the update, changing the schema and successfully starting the Zabbix server, the temporary tables created by the script above can be deleted from the Zabbix database.
You can do this using following commands:
sudo -u zabbix psql zabbix

DROP TABLE history_old;
DROP TABLE history_uint_old;
DROP TABLE history_str_old;
DROP TABLE history_log_old;
DROP TABLE history_text_old;
TimescaleDB installation (optional)
The following steps will guide you through PostgreSQL installation, including the TimescaleDB extension.
These tasks are completely optional, but they can highly increase the performance of the entire Zabbix monitoring stack.
Before the actual installation begins, stop the Zabbix server so that it is no longer able to write anything into the database:
systemctl stop zabbix-server.serviceNow install the official TimescaleDB repositories according to the official documentation at this link: https://docs.timescale.com/self-hosted/latest/install/
After successfull installation of the repositories, you can proceed to the actual installation of the TimescaleDB extension:
dnf install timescaledb-2-postgresql-15Next, you can move to setting the optimal parameters for running PostgreSQL with TimescaleDB using the timescaledb-tune command.
As parameters of this command, choose the path to PostgreSQL main configuration file and at the same time increase the limit of the maximum number of incoming connections to the database, which is by default too low for monitoring needs.
timescaledb-tune --pg-config=/usr/pgsql-15/bin/pg_config --max-conns=100Restart PostgreSQL service to apply new parameters:
systemctl restart postgresql-15.serviceNext, create TimescaleDB extension with the following command:
echo "CREATE EXTENSION IF NOT EXISTS timescaledb CASCADE;" | sudo -u postgres psql zabbixThen all you have to do is run the official SQL scripts supplied directly by Zabbix, which will prepare the necessary tables and schemas for you.
Attention! In older versions of Zabbix, this path is different, that is /usr/share/doc/zabbix-sql-scripts/ !
cat /usr/share/zabbix-sql-scripts/postgresql/timescaledb.sql | sudo -u zabbix psql zabbixAs a final step, restart the Zabbix server service:
systemctl start zabbix-server.serviceNote: If an error regarding database incompatibility occurs after restarting the Zabbix server, then just edit the following directive in the configuration file of the Zabbix server.
In this version of Zabbix, this is not a compatibility bug, the Zabbix source code itself is just a missing TimescaleDB version number!
For a correct version of the database always consult with the official compatibility matrix in the Zabbix documentation for the specific version of Zabbix.
AllowUnsupportedDBVersions=1You can now restart the zabbix-server service.
systemctl restart zabbix-server.servicePost-upgrade tasks
- Check that the Zabbix server and database server are running correctly, and have the correct version
- Check that all Zabbix proxies are running and have the correct version
- Check Zabbix server and Zabbix proxy performance (log files, unsupported items, queues, monitoring scripts, etc.).
- Check if your servers have been equipped with the latest versions of the official templates from Zabbix. [ Zabbix GIT ]
Configuration of Zabbix reporting
To use the reporting functions, you need to install Google Chrome.
First, download the installation package, and manually install it:
wget https://dl.google.com/linux/direct/google-chrome-stable_current_x86_64.rpm
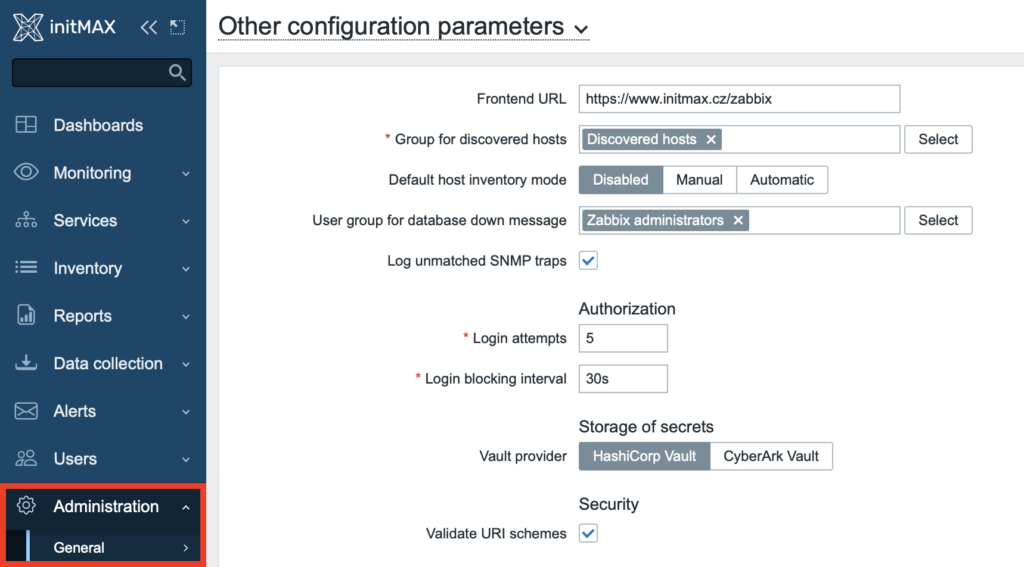
dnf localinstall google-chrome-stable_current_x86_64.rpmIn the Zabbix frontend configuration, adjust the “Frontend URL” parameter to the currently valid value, this setting can be found in the following path in the menu:
Administration -> General -> OtherYou can see an example of the settings in the image below.
And that’s all folks! You can now start using your freshly updated Zabbix in version 6.4 with all its fixes and innovations.
Give us a Like, share us, or follow us 😍
So you don’t miss anything: