This guide will take you through the five basic steps to connect Zabbix with Microsoft Teams. You will learn how to create an incoming webhook in Teams, configure the media type in Zabbix, and customize notifications to suit your needs. We’ll also briefly cover updating outdated webhooks to ensure your Teams notifications function without interruption.
Please note that the free Teams plan does not support the MS Teams Workflow feature.
If you see the message in your MS Teams: “Important: You must update your Webhook URL for this connection in order for your notifications to keep posting into Microsoft Teams“, this guide will walk you through the new integration option, replacing the old connector version with MS Teams Workflow.
Checking the notification in MS Teams
This section is only for Zabbix users who already have the MS Teams integration set up. If you don’t have it, skip this step and proceed to the next.
- Check if you see the message in MS Teams: “Important: You must update your Webhook URL for this connection in order for your notifications to keep posting into Microsoft Teams.”
- This message means that you need to update the webhook URL to maintain notification functionality.

Settings in MS Teams
- Click on the menu in the left part of the screen marked with three dots.
- In the search field, type “Workflows.”
- From the list, select the official version (you’ll recognize it by the icon) and click “Add.”
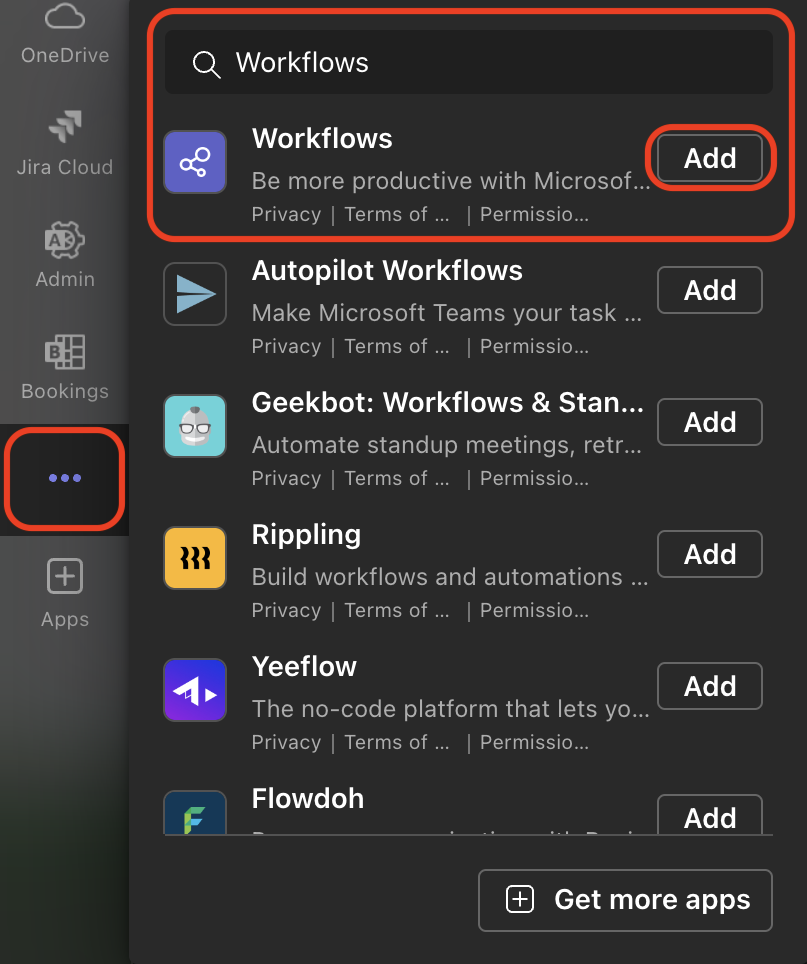
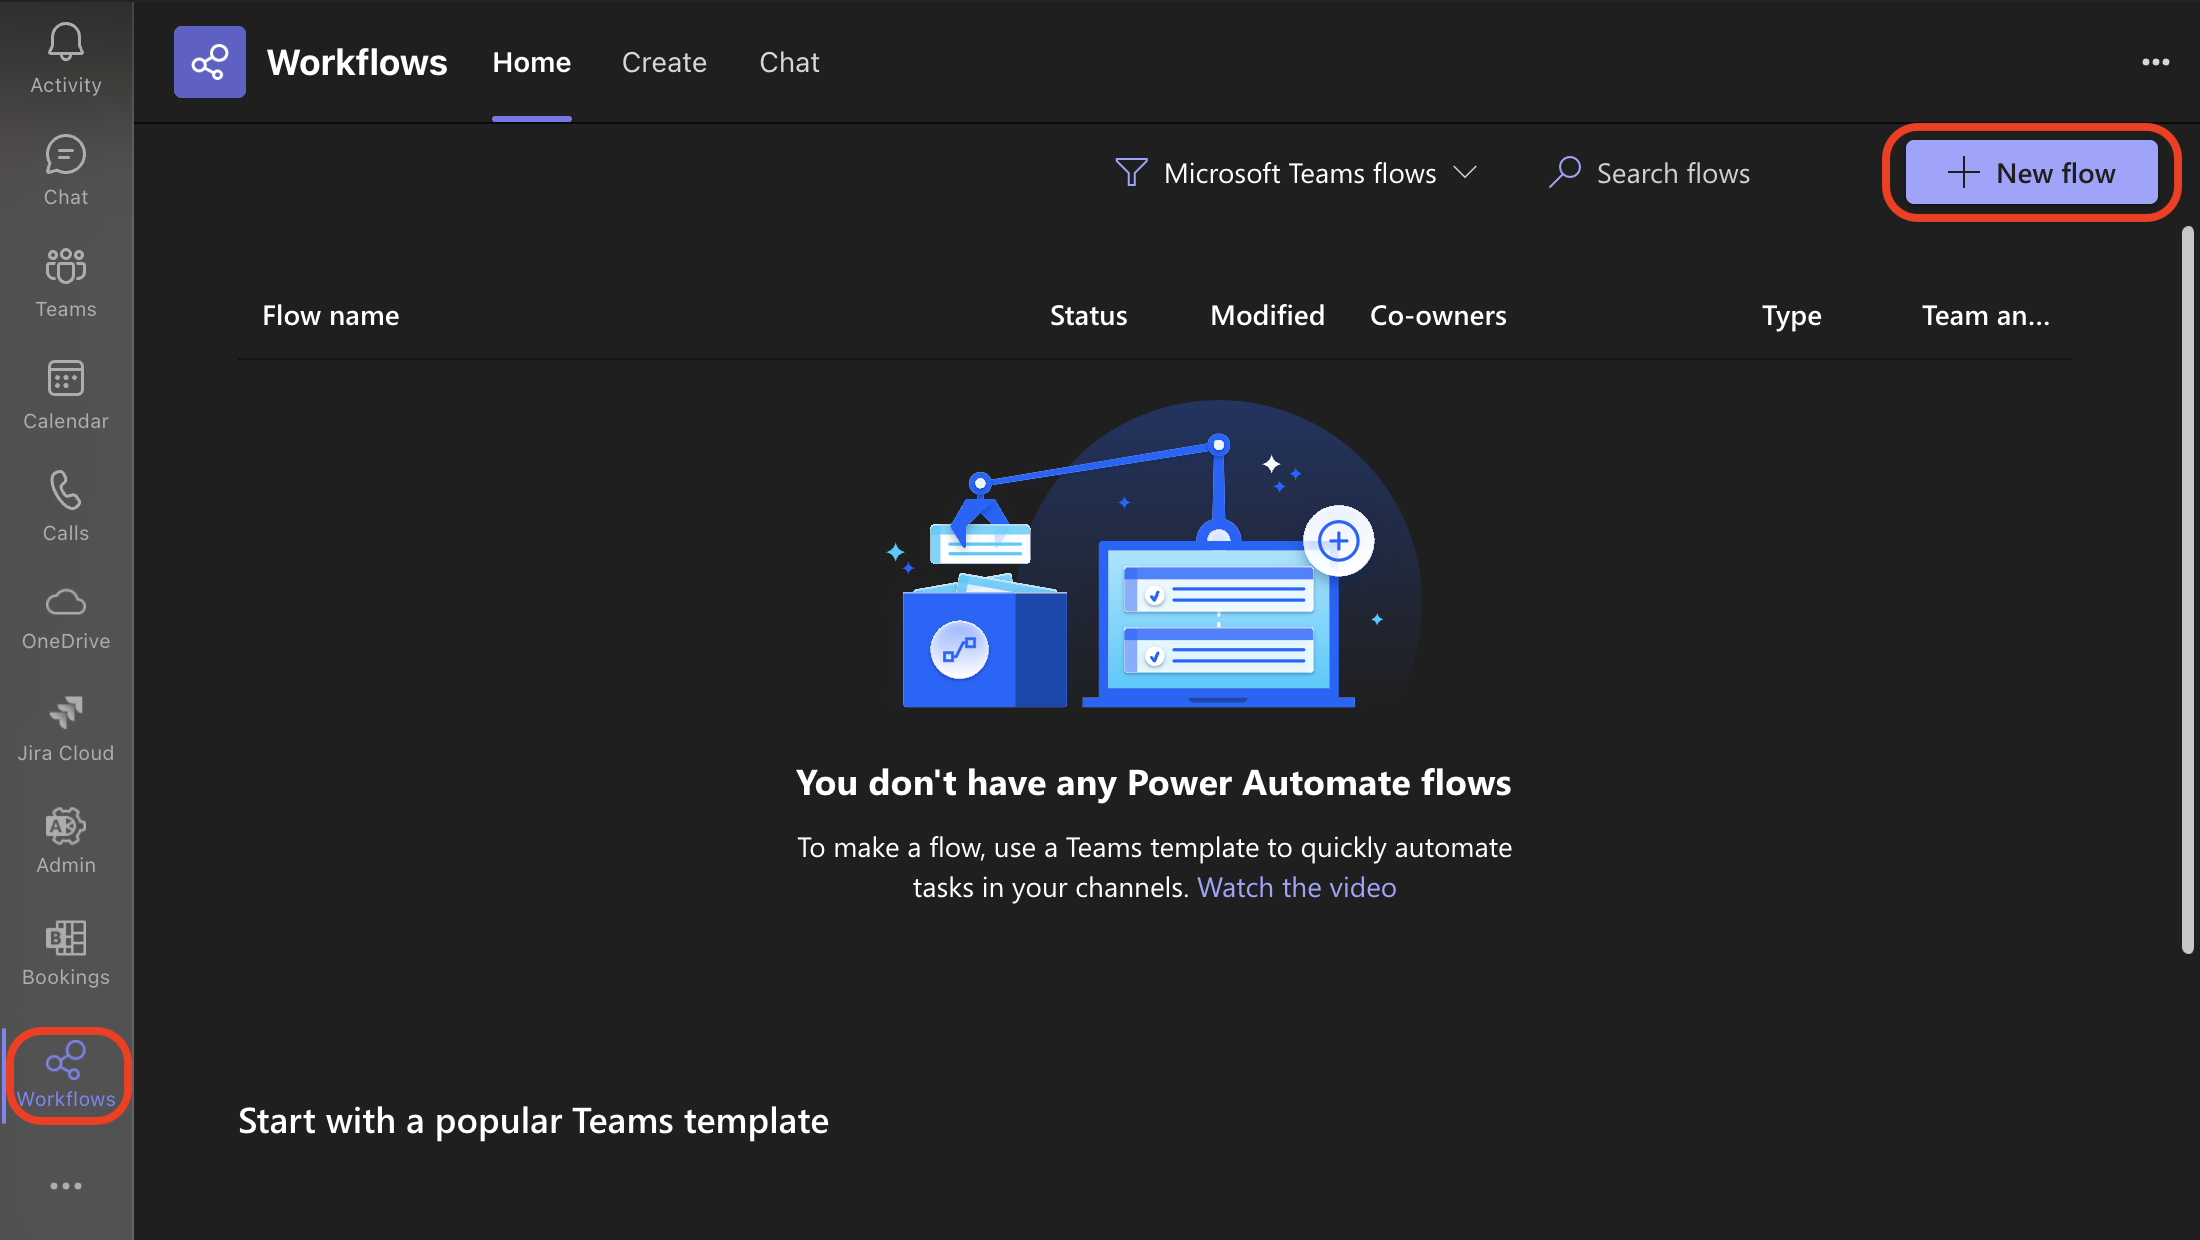
- A new button named “Workflows” will appear in the menu on the left, and we click on it.
- In the Workflows window, click on “+ New flow.”
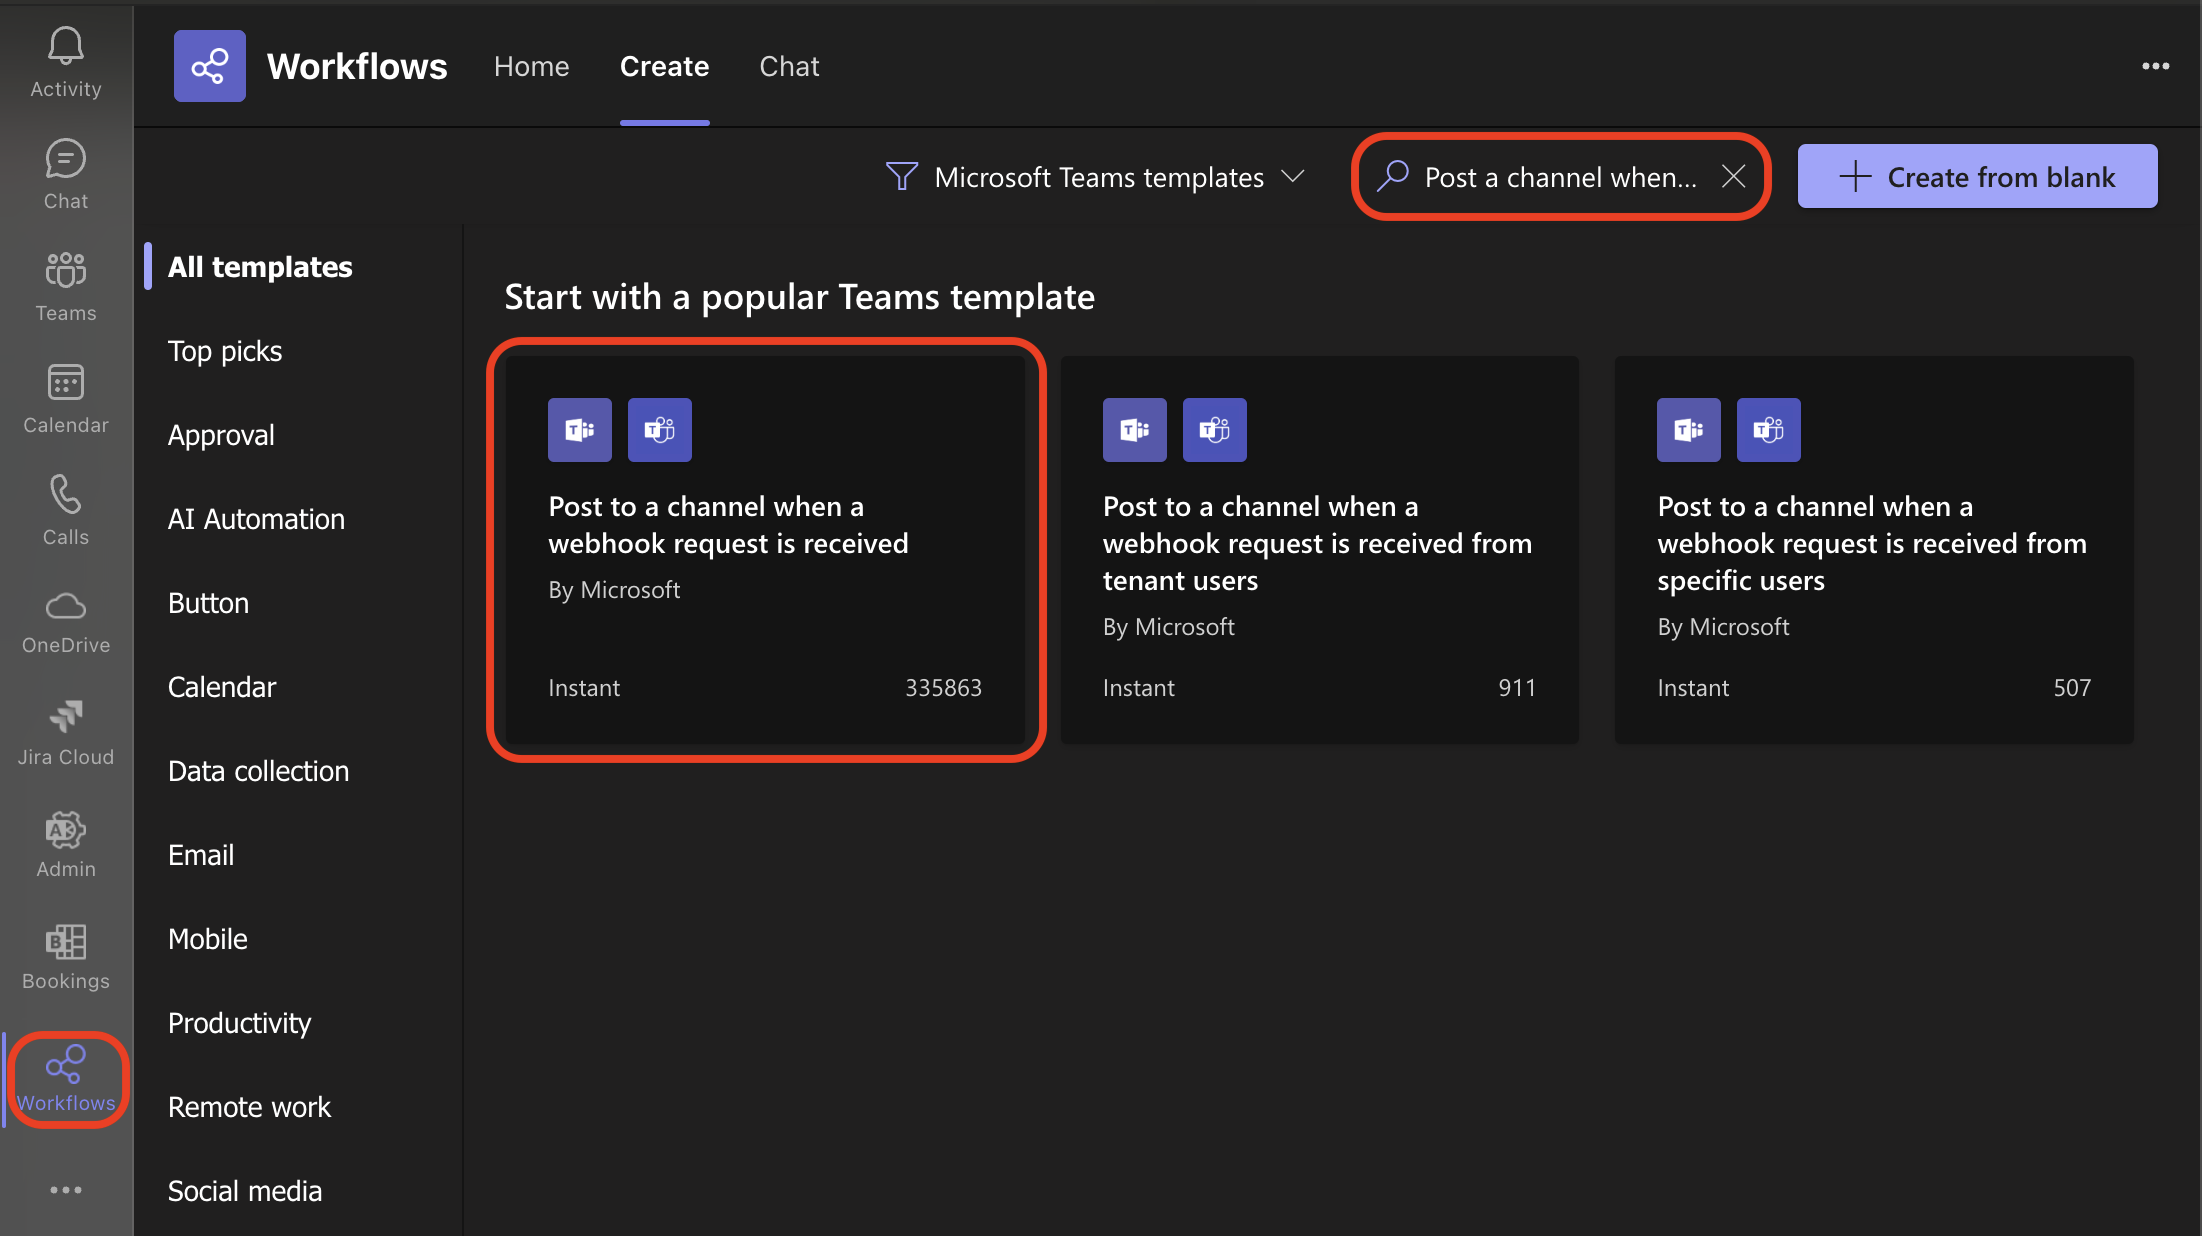
- In the Workflows window, click on the search bar and enter: “Post a channel when a webhook request is received.”
- In the search results, click on the first result that isn’t associated with any user, as shown in the image.
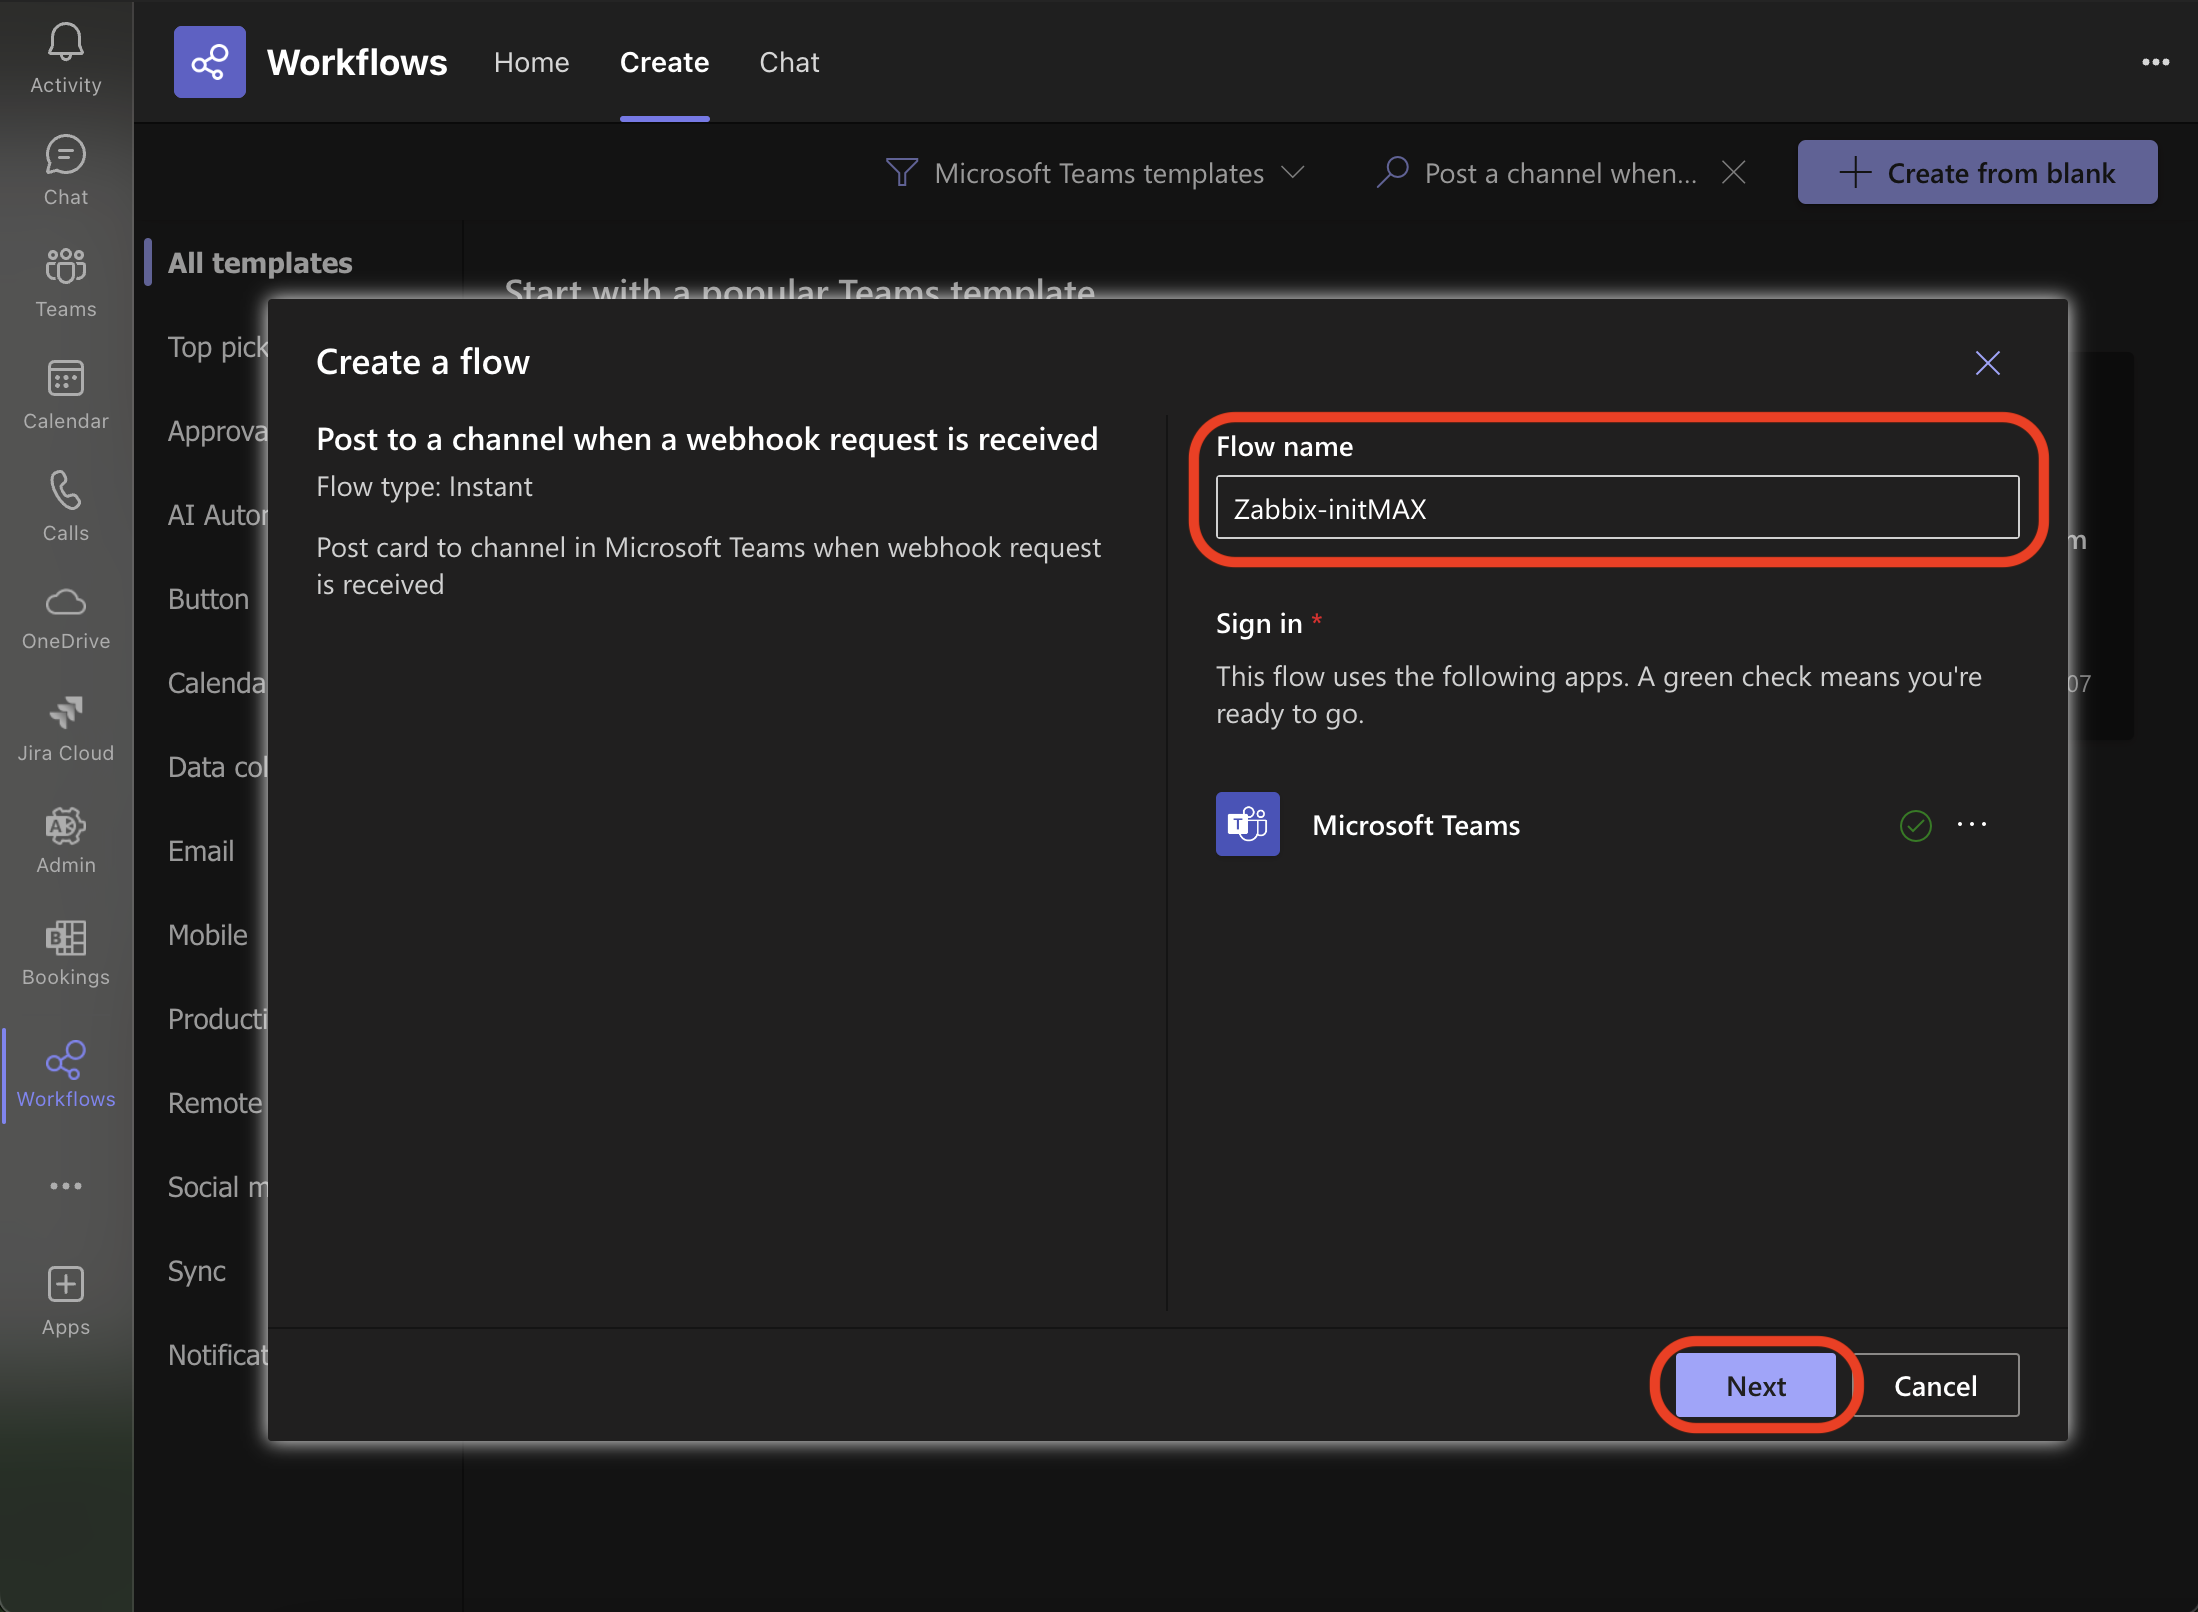
- In the newly opened pop-up window, enter the name of your application to easily identify it in the future.
- After entering the name, click “Next” to continue.
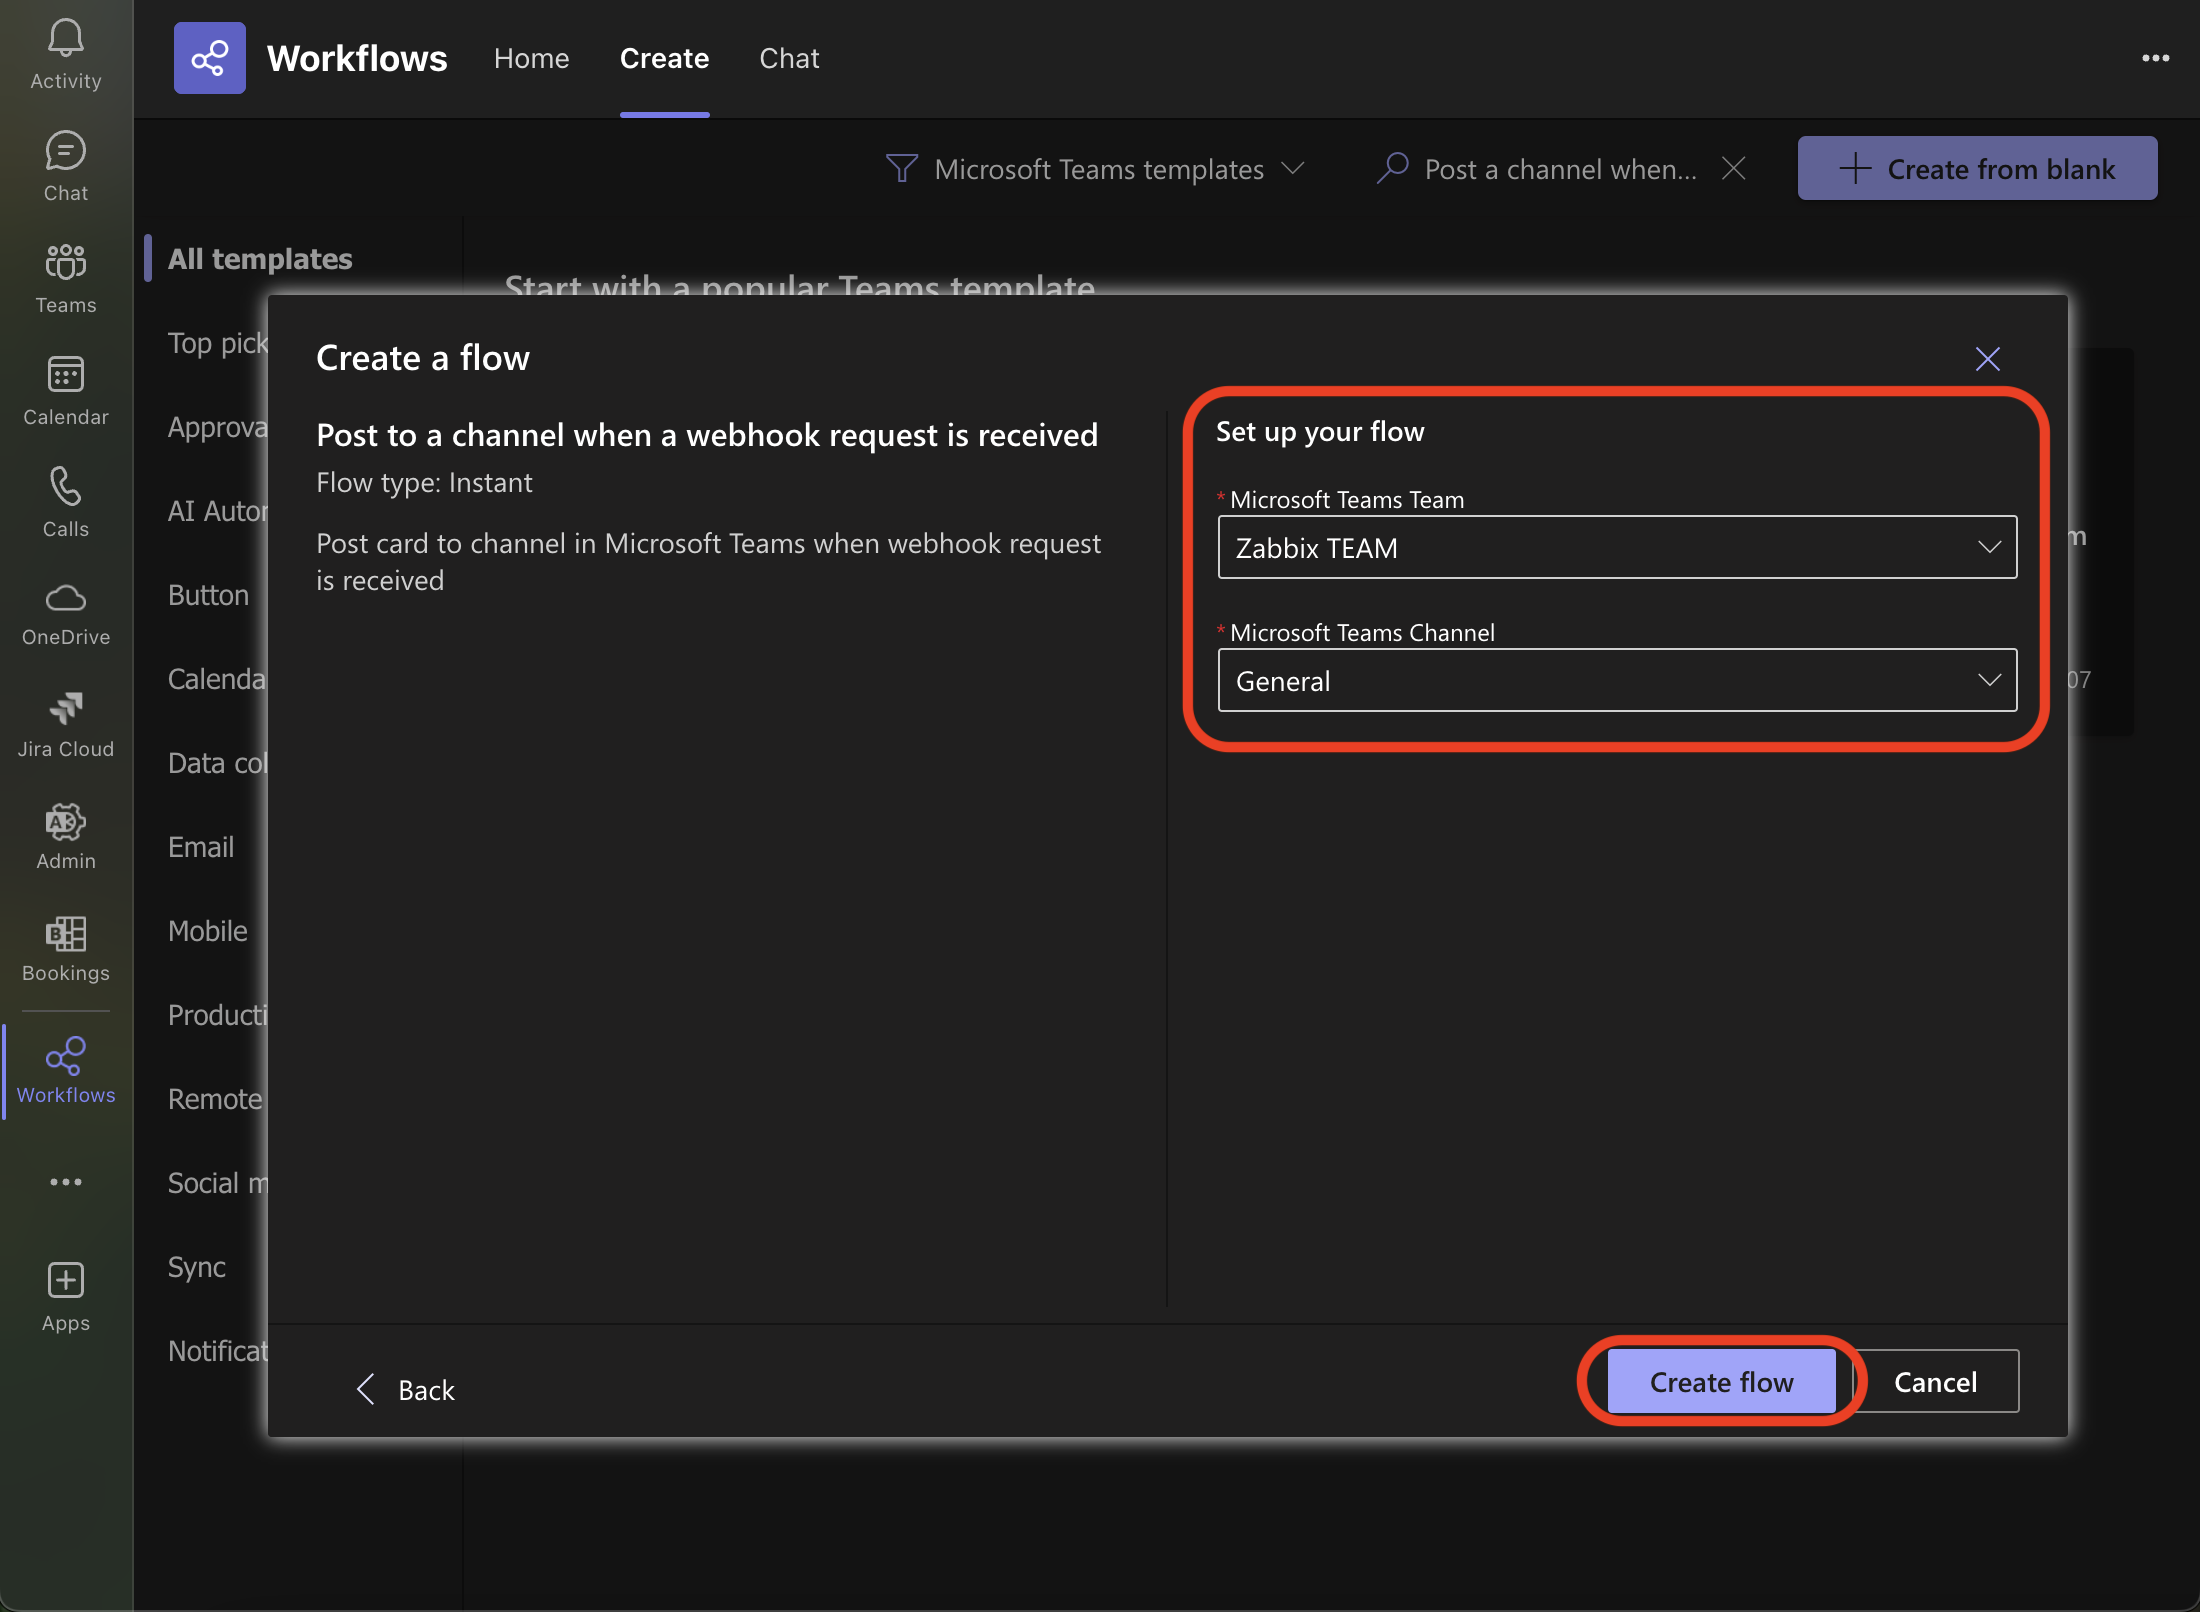
- On the next page, select the Teams group where you want to send notifications, or choose the same group you’re already using for the old webhook setup.
- Within our Teams group, select the specific channel.
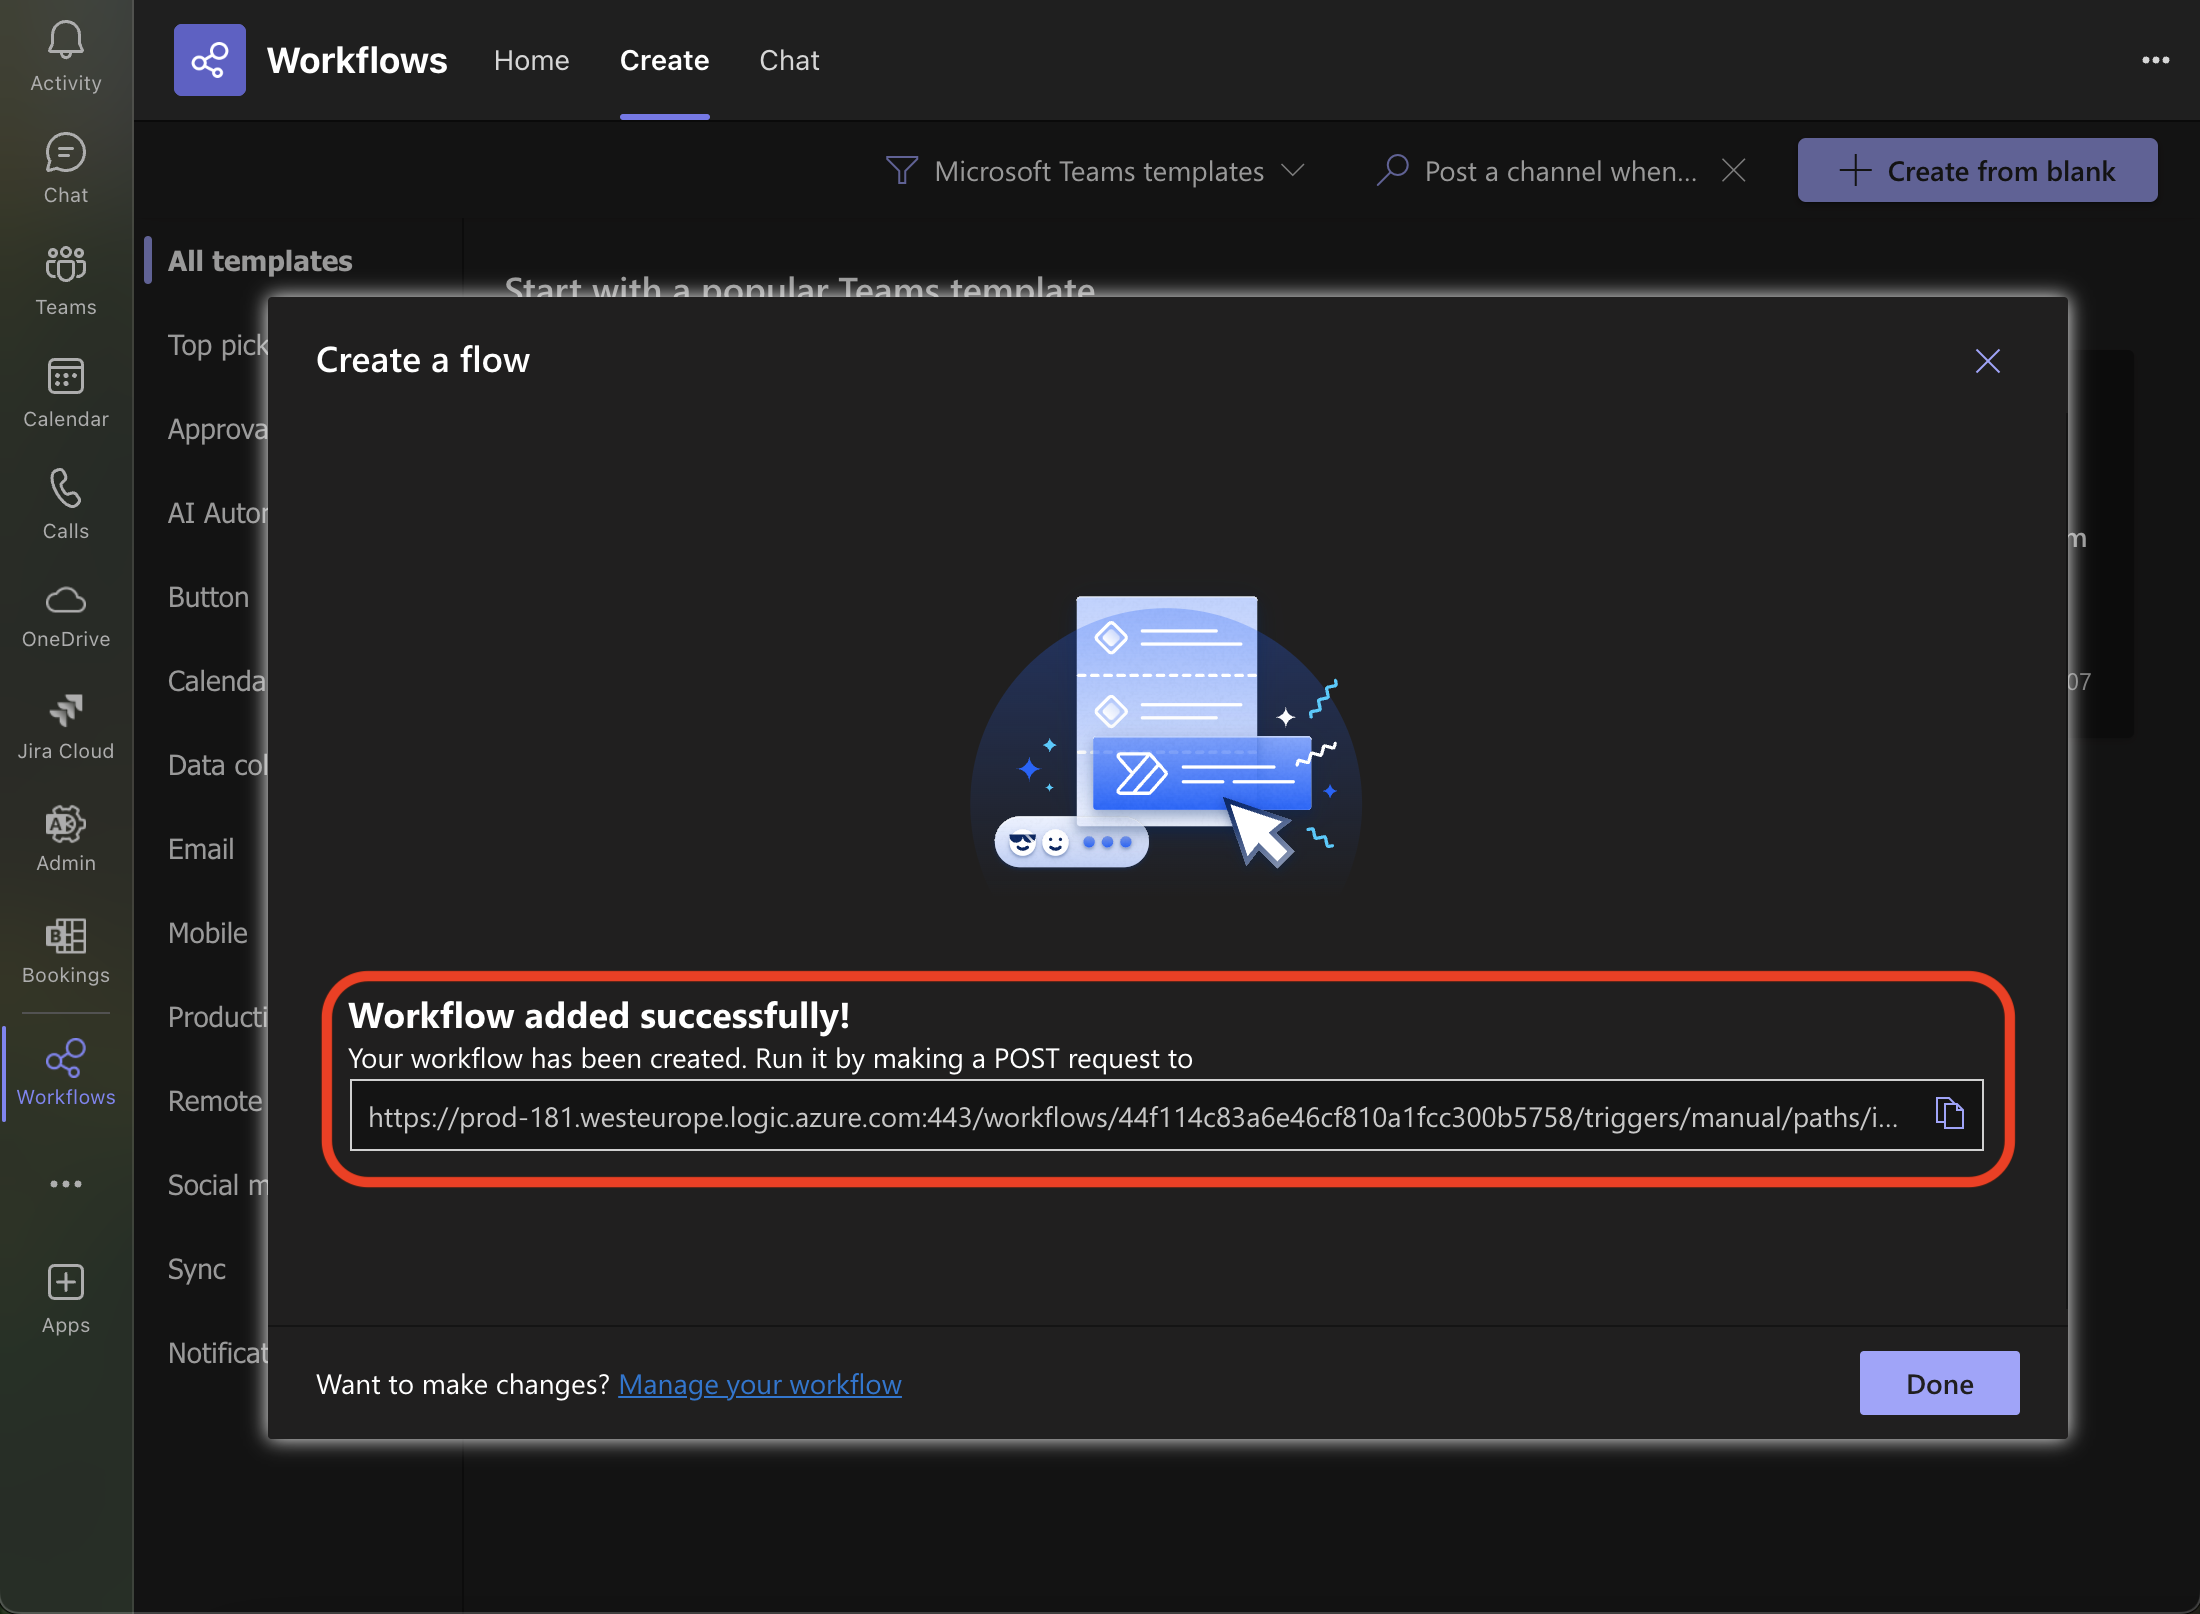
- On the final page, copy the generated URL, which will be used in Zabbix.
- We recommend keeping the Teams page open for now and noting the URL outside of Zabbix and Teams for safekeeping.
Setting the Zabbix URL
In the Zabbix web interface, go to Administration → Macros.
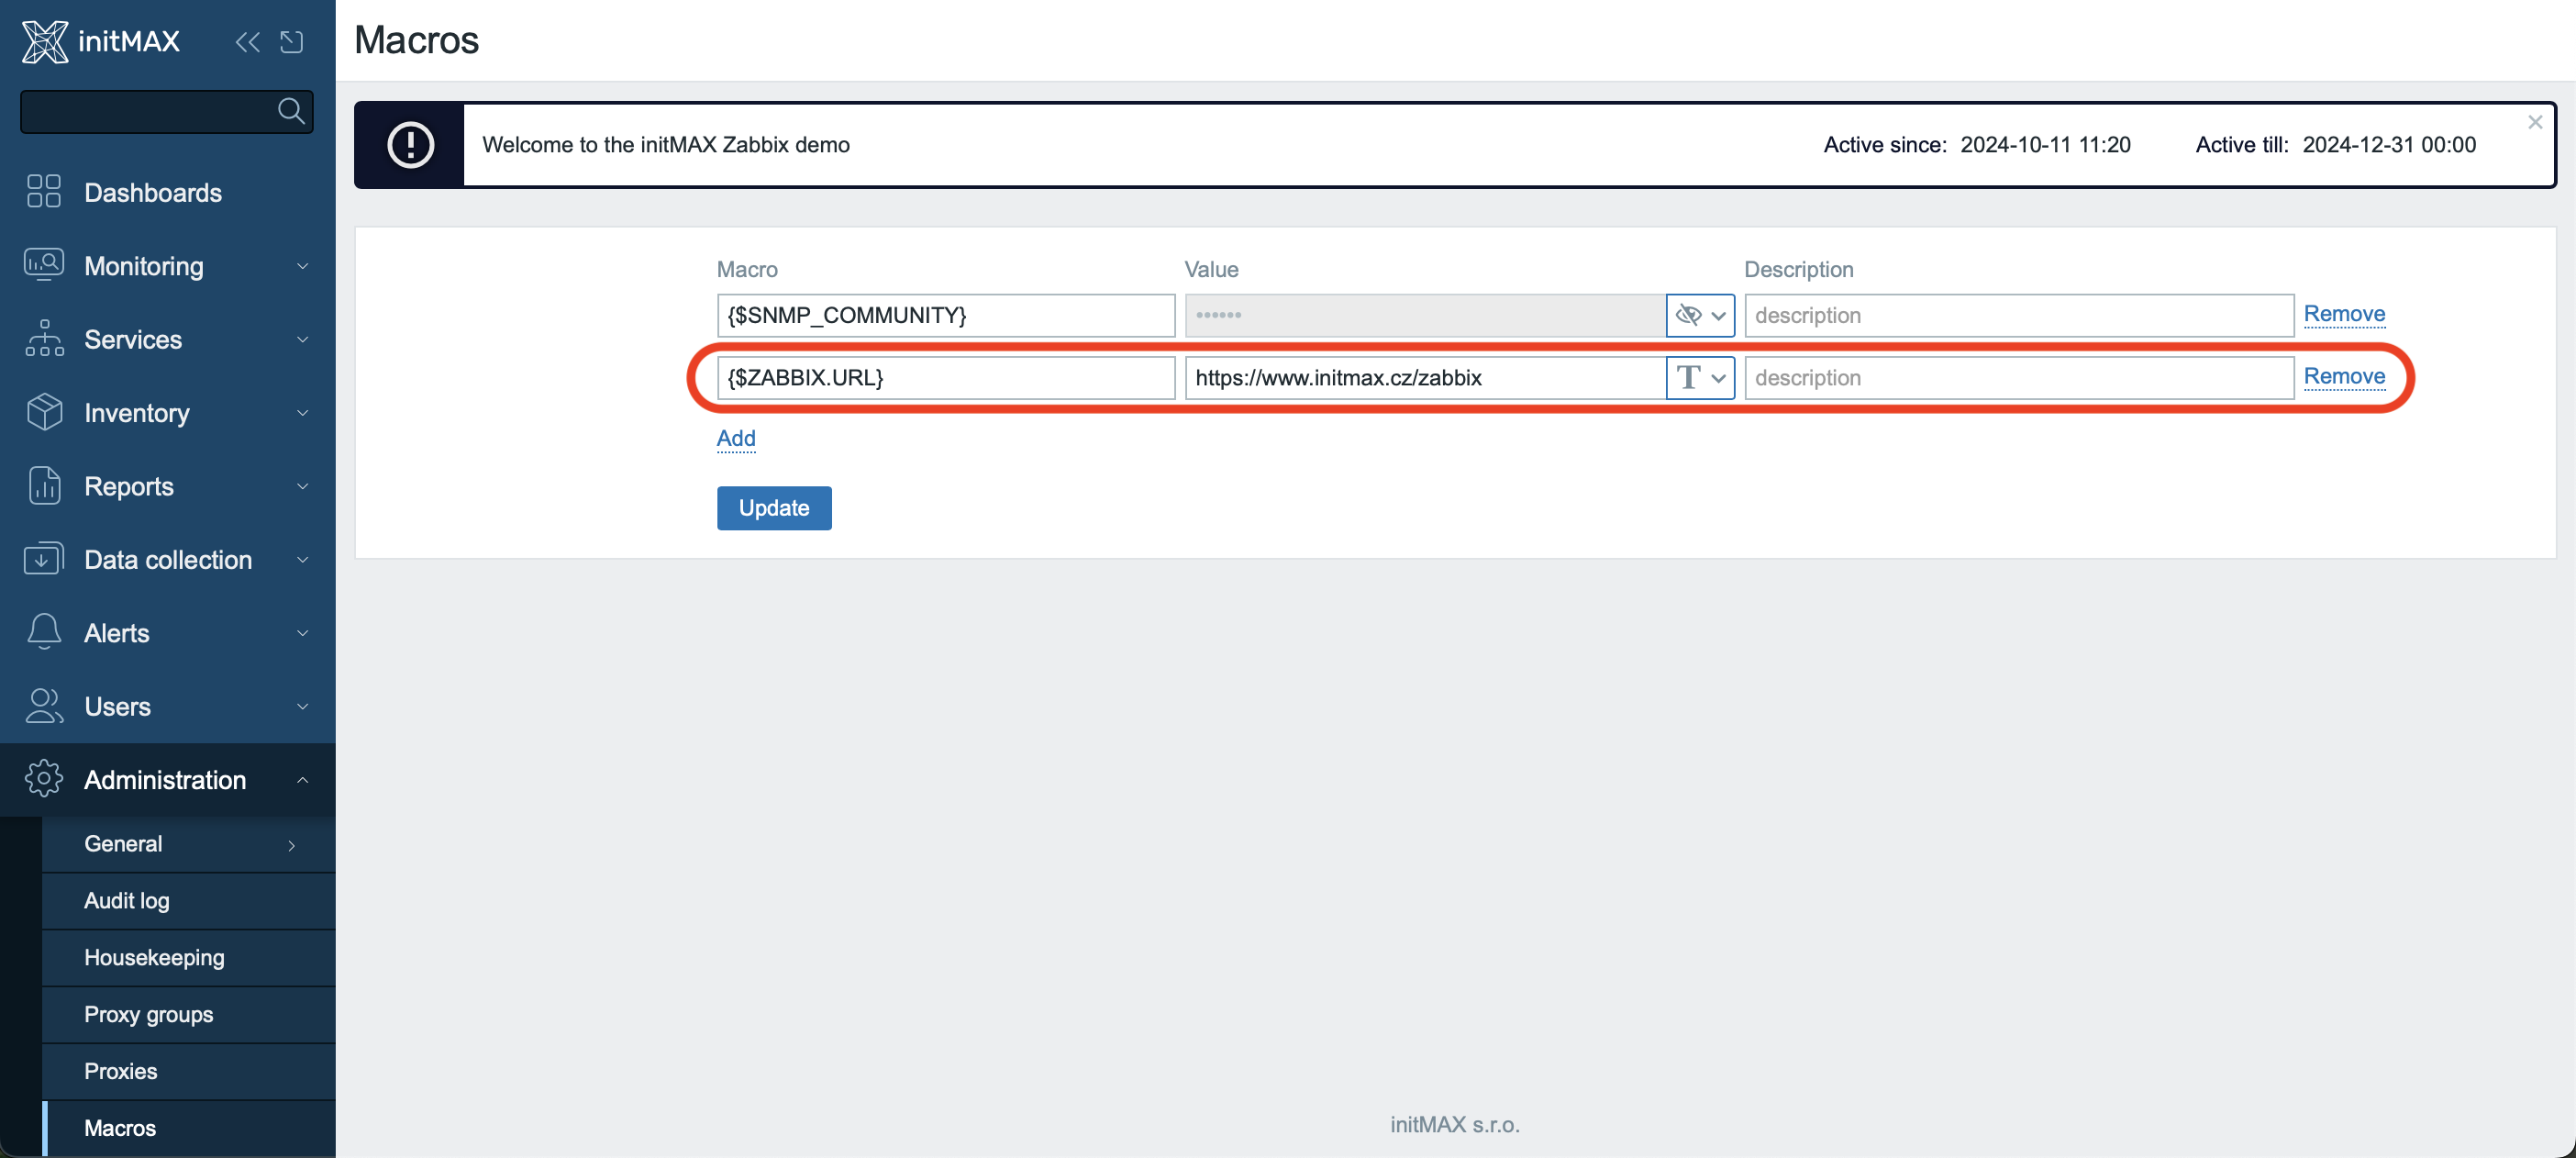
Set the global macro {$ZABBIX.URL} with the URL of the Zabbix frontend interface. Ensure the URL includes the protocol (http or https). This URL will be part of your event as a link to the problem.
Importing the Media Type
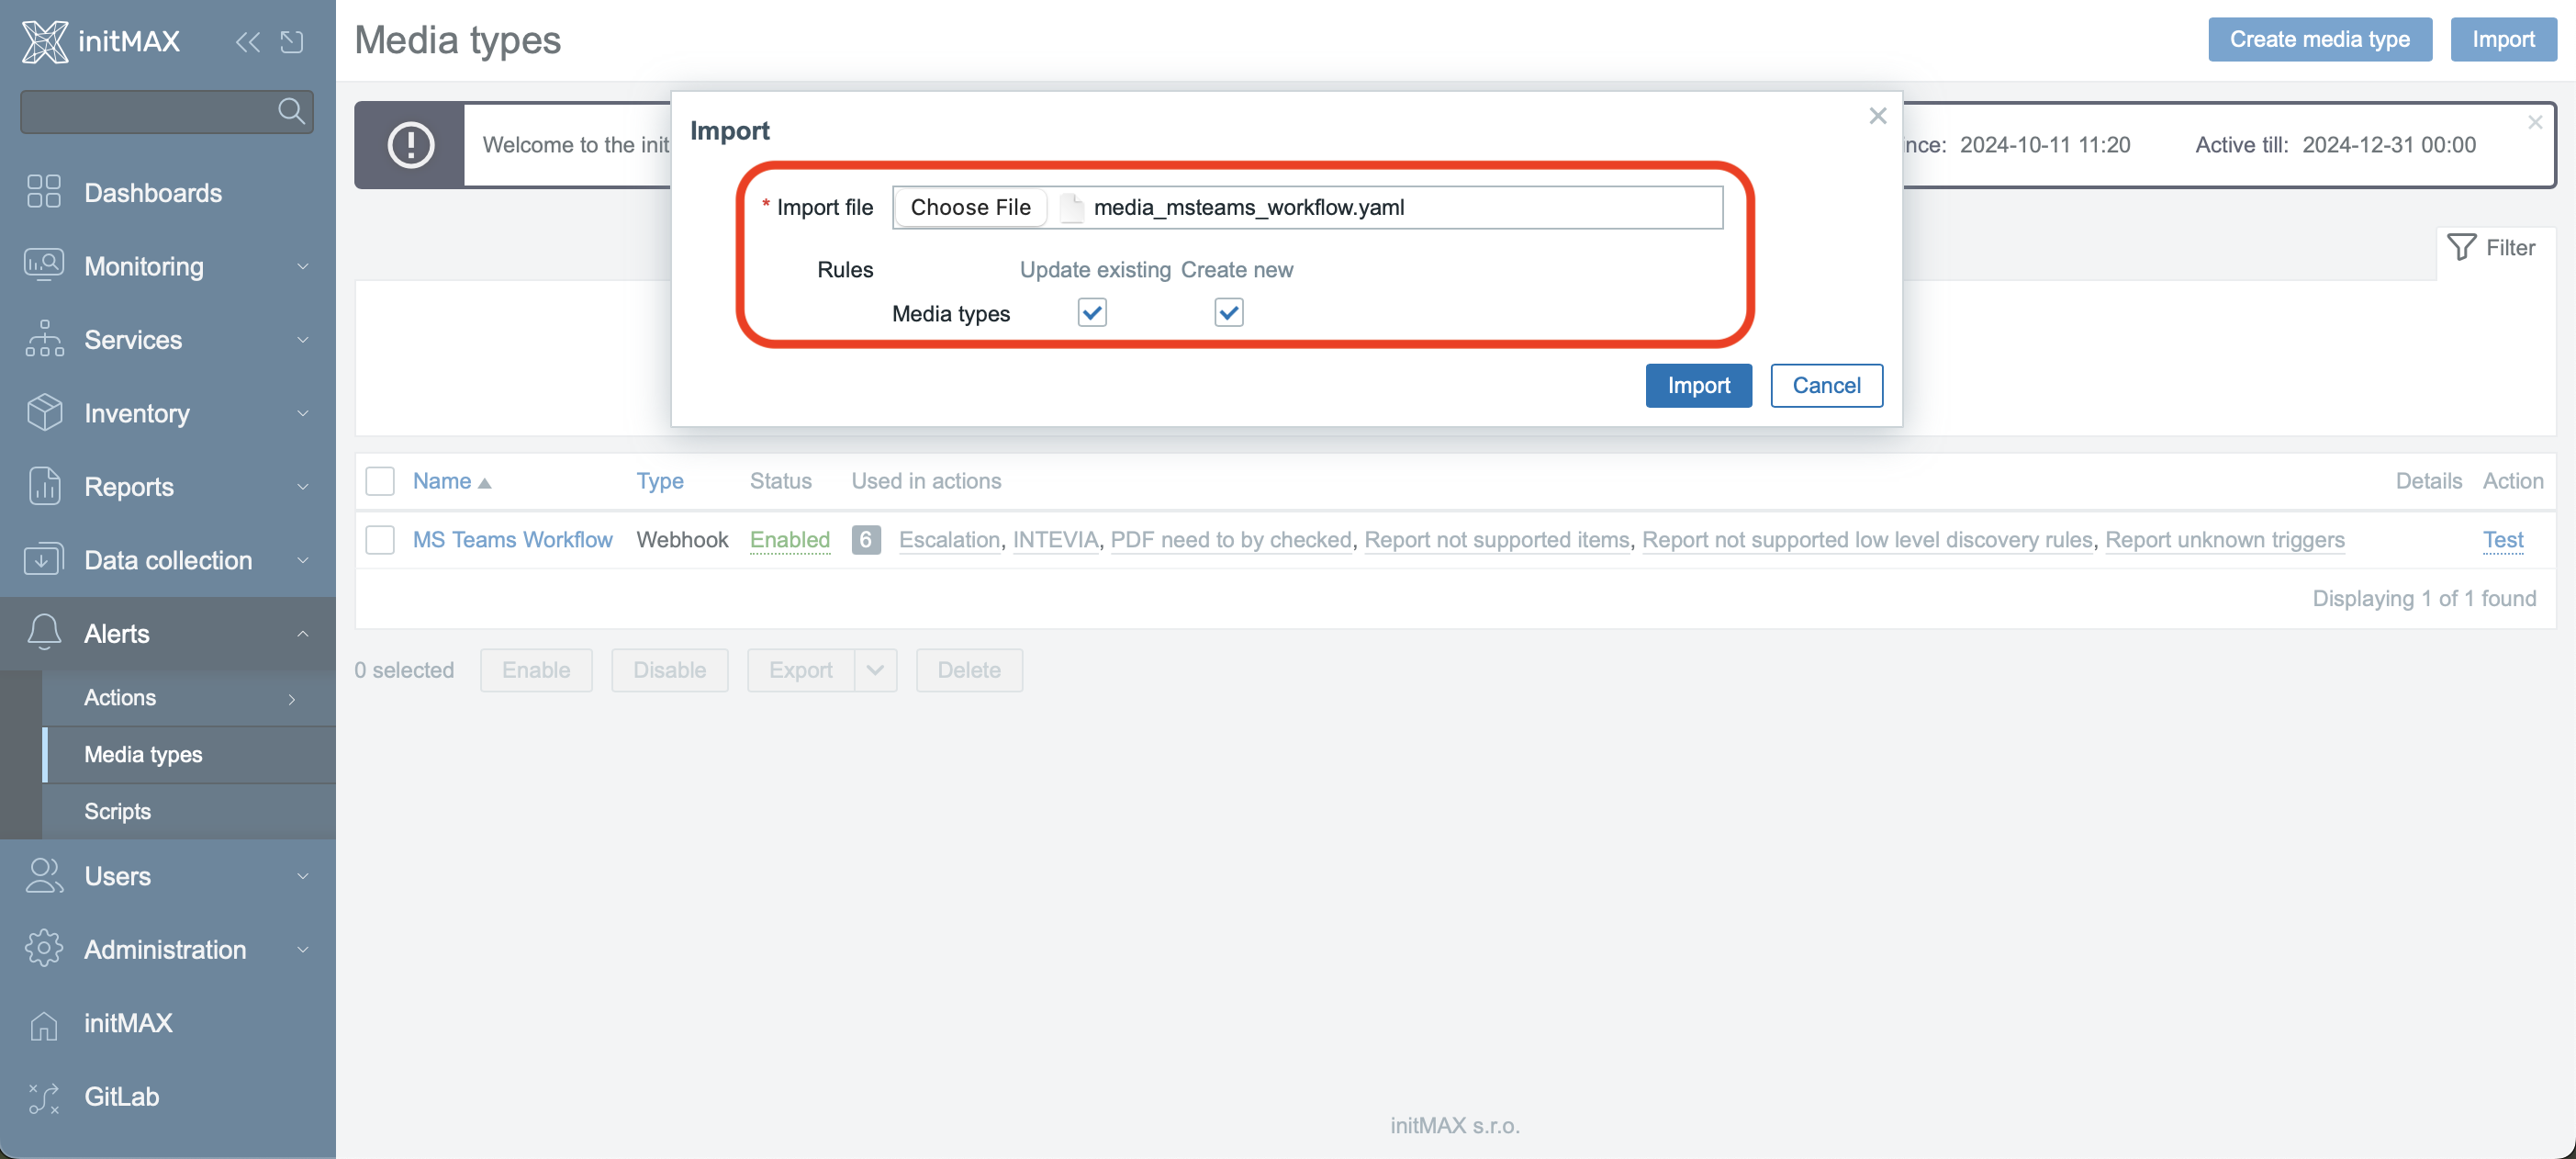
Go to Alerts → Media types and import the file media_msteams_workflow.yaml. It’s possible that the template is already in your Zabbix, but to be sure, re-import it as it may contain updates. Make sure to switch to the specific version in the upper left corner, where you can select your version of Zabbix.
Configuring the MS Teams Workflow Media Type
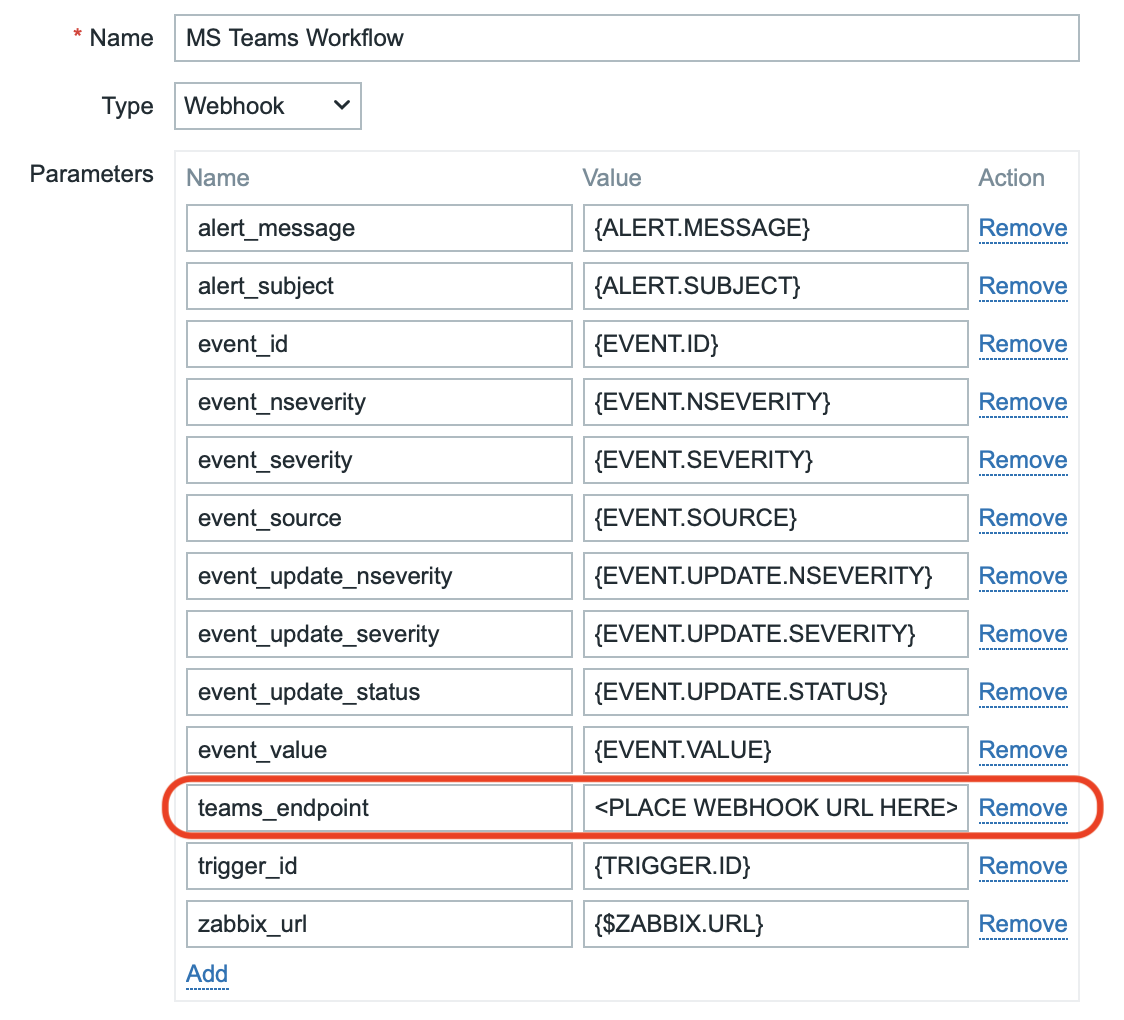
Open the settings for the new media type MS Teams Workflow and replace the placeholder <PLACE WEBHOOK URL HERE> with the workflow endpoint URL obtained in the last step in the “Settings in MS Teams” section.
Don’t forget to save the settings.
Testing Our Configuration
To test our configuration, use the built-in Test button at the Media level.
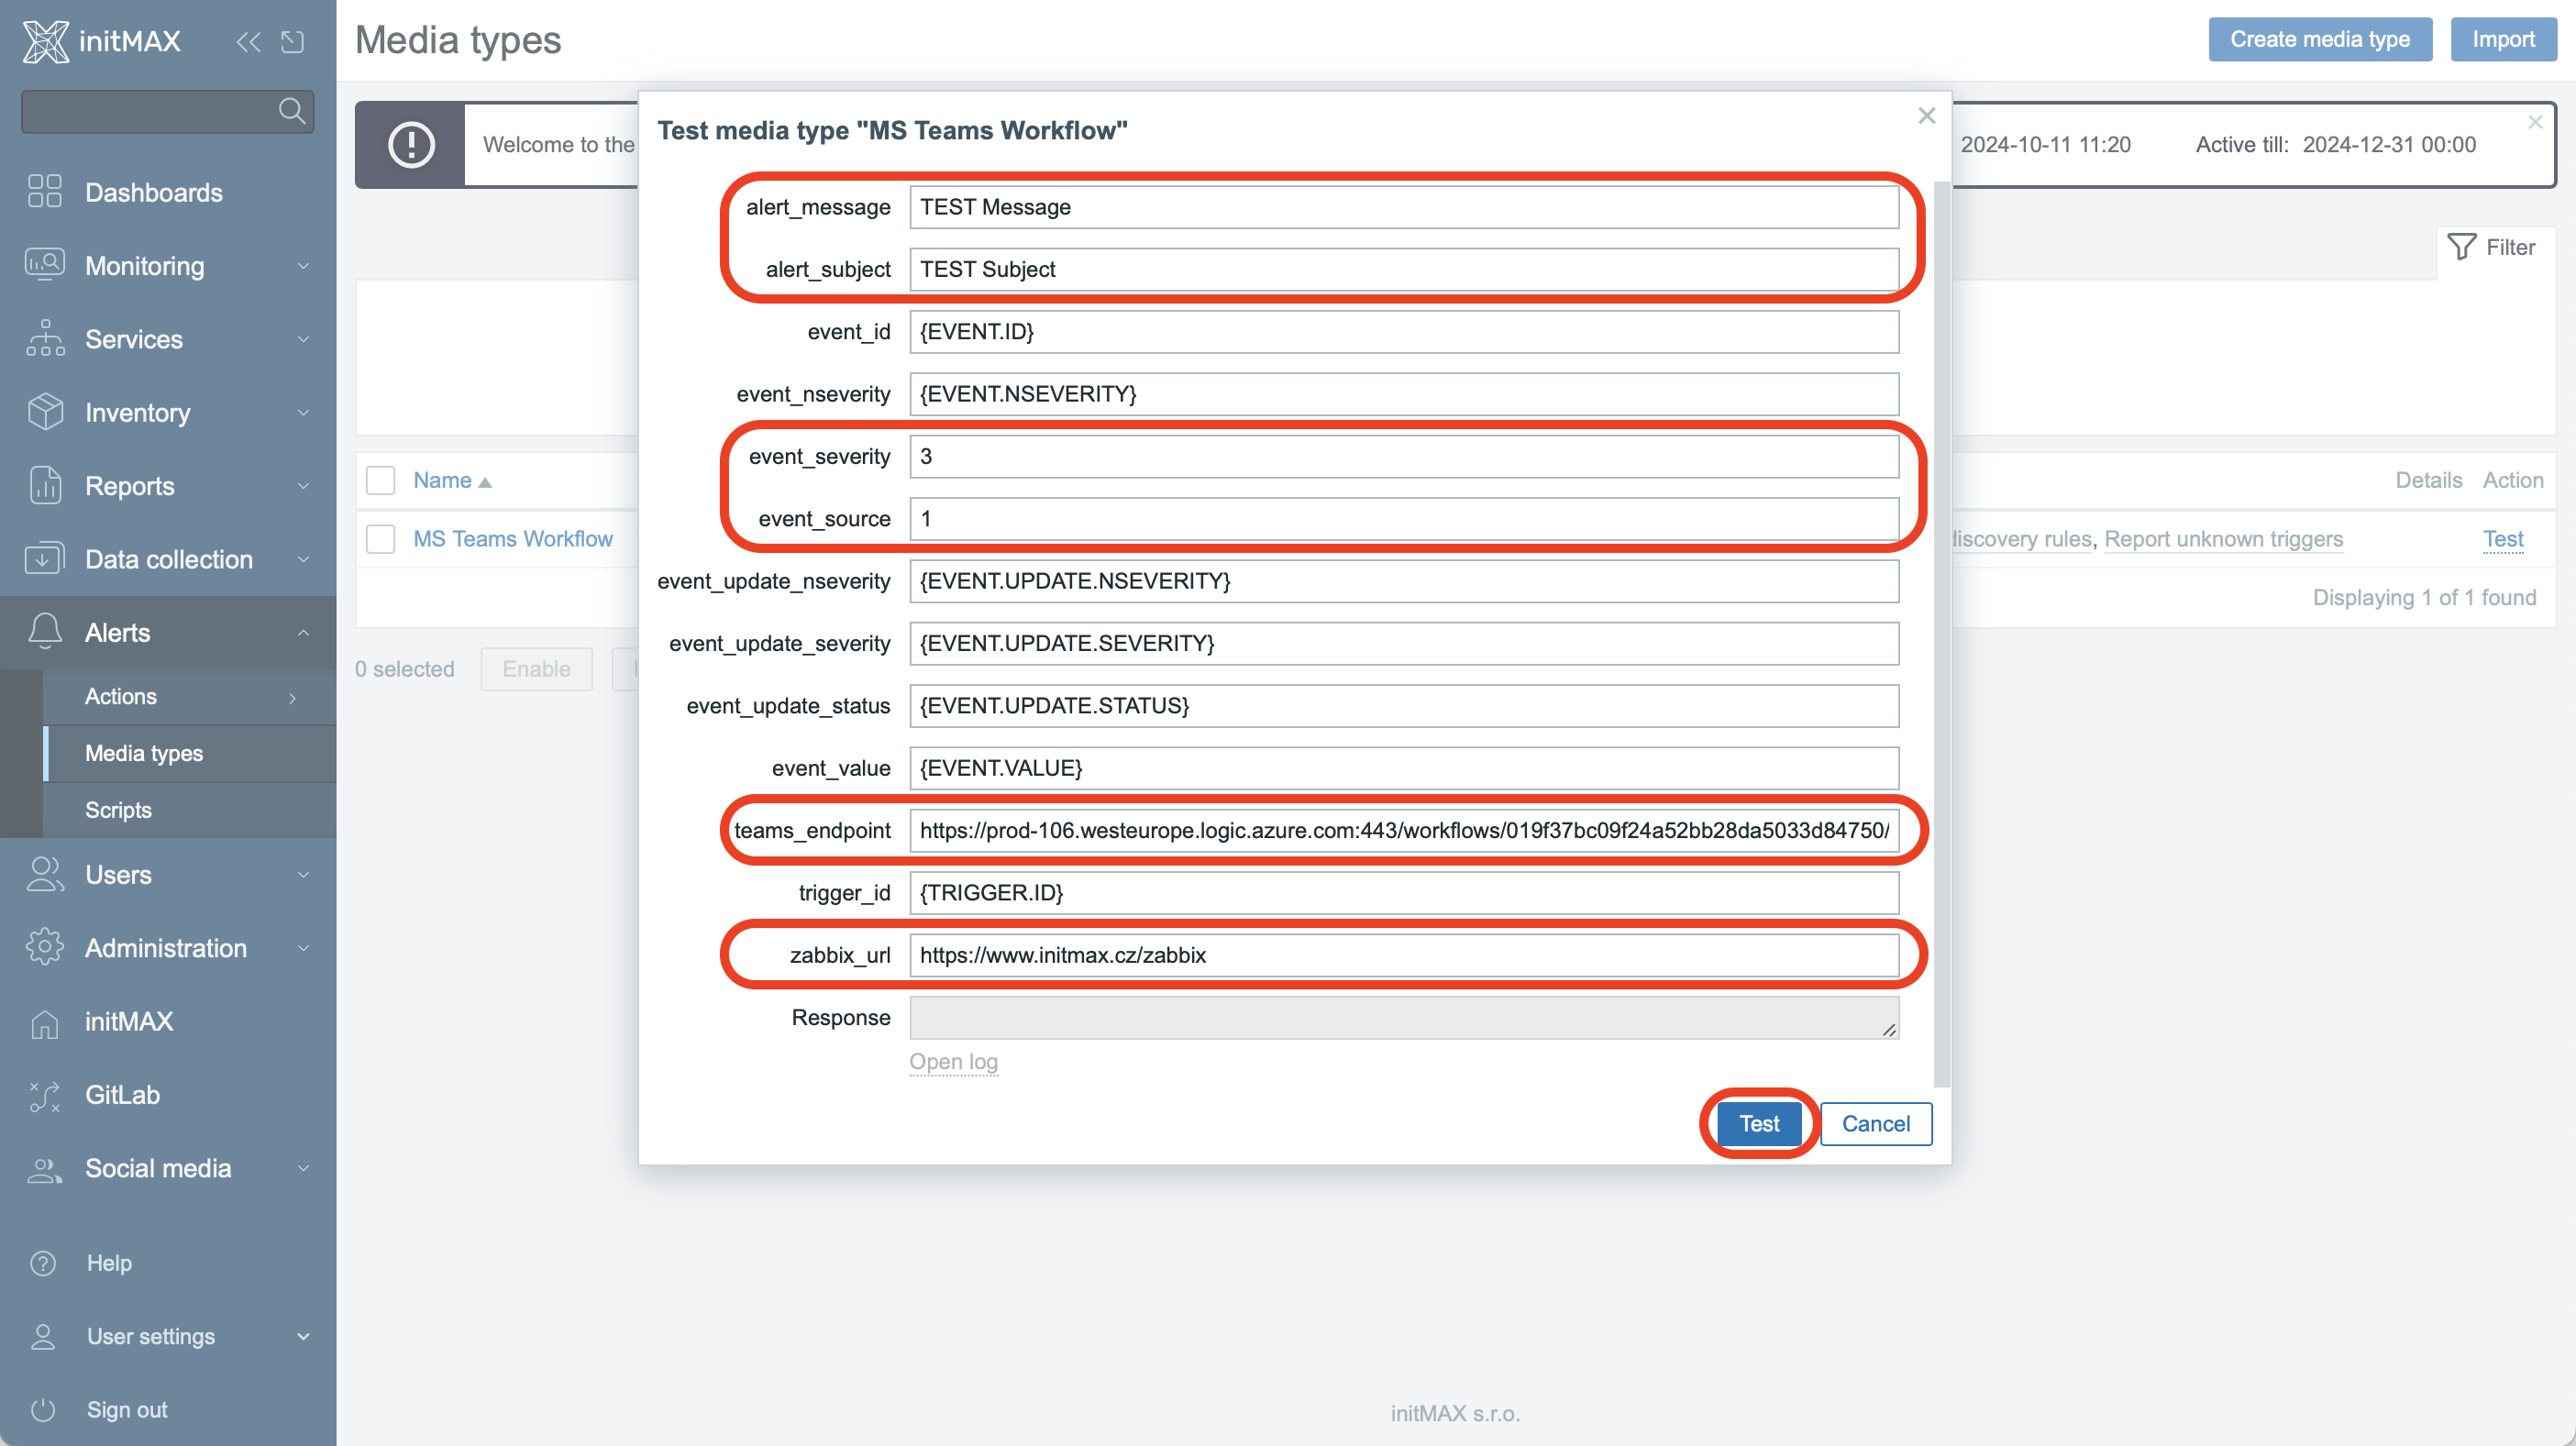
You’ll need to fill in the basic parameters (these are test data), and the teams_endpoint section will be filled in automatically.
- alert_message = TEST Message
- alert_subject = TEST Subject
- event_severity = 3 (You can enter any value here; 3 is used as an example, as event_severity can take numbers based on severity levels. Possible values: 0 – Not classified, 1 – Information, 2 – Warning, 3 – Average, 4 – High, 5 – Disaster.)
- event_source = 1 (Possible values: 0 – Trigger, 1 – Discovery, 2 – Autoregistration, 3 – Internal, 4 – Service.)
- zabbix_url = https://www.initmax.cz/zabbix (Enter the same URL you specified in the macro; unfortunately, Zabbix cannot interpret the macro in this section, so we fill it in manually.)
After filling in the parameters, submit the form by clicking the Test button.
After submitting, you will see a confirmation message, and the result will appear in the Response section. You should see “OK” returned.
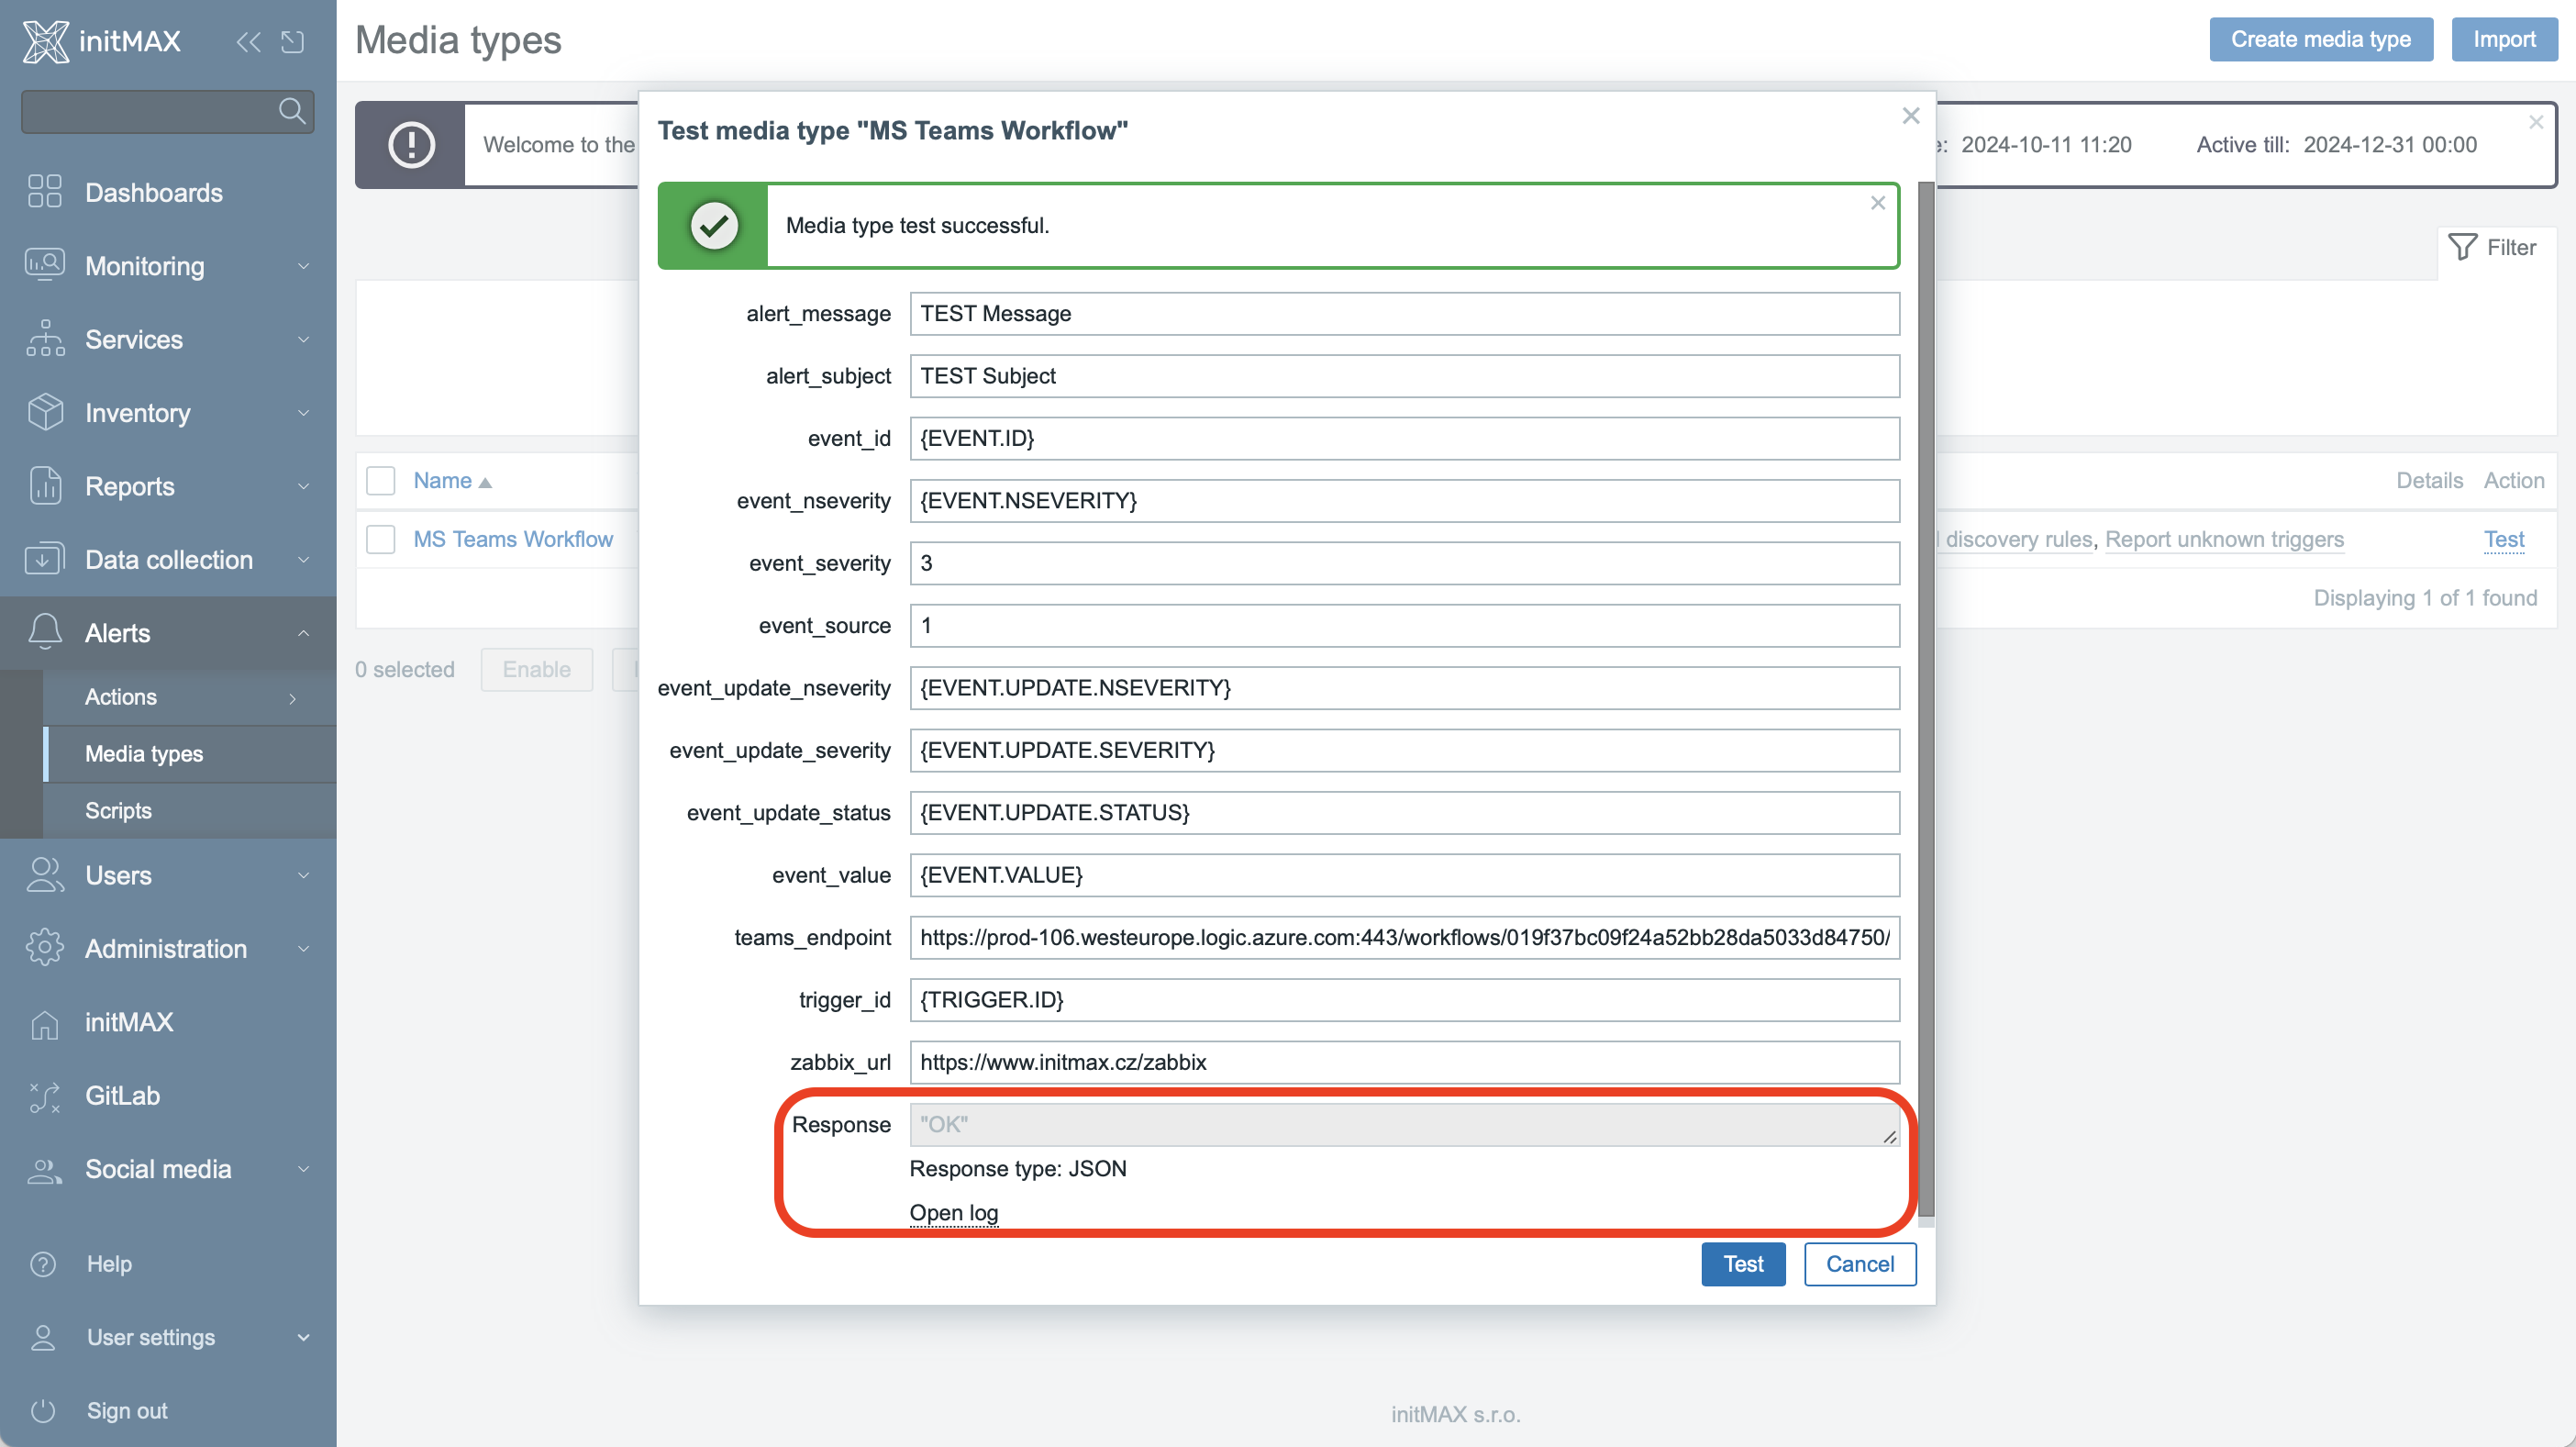
If you received an “OK” message, everything is set up correctly. If not, you’ll see details about the issue in this section or at the top of the pop-up window. There’s also a useful section available under the Open log button.
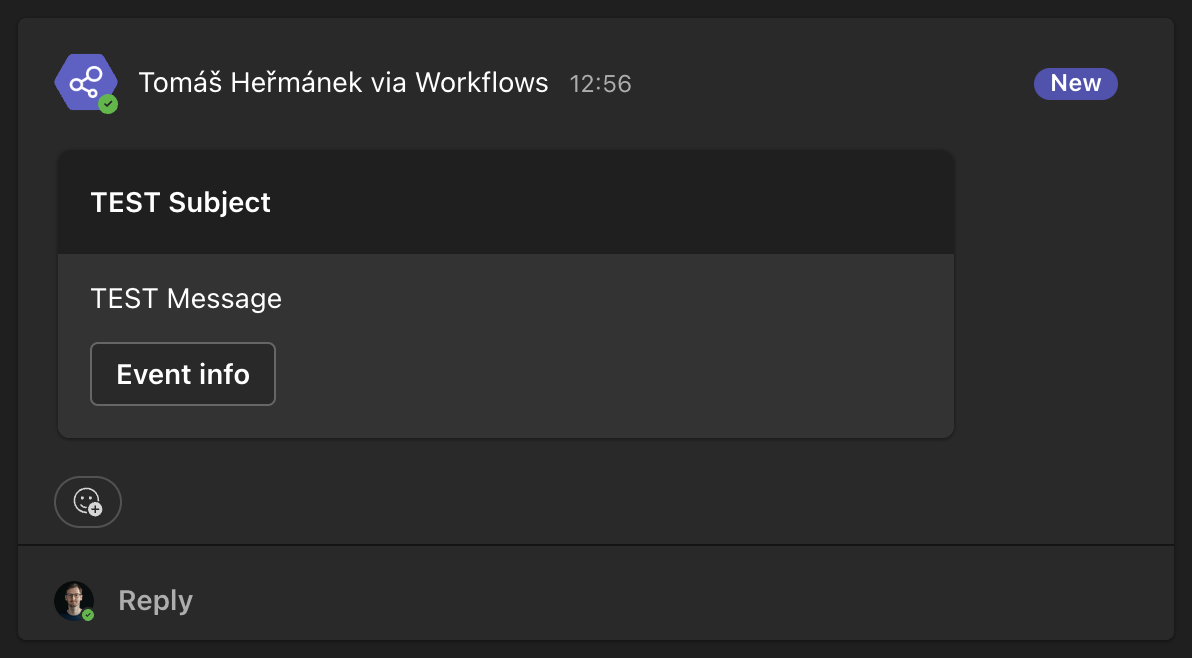
Now, we can check our Teams group for the new message created by Zabbix using the Microsoft Teams – Workflows functionality.
Finalization and Final Tips
To use the configuration, you need to create or adjust the corresponding action. Don’t forget to add the notification address to the media for users who will receive notifications—this is usually a shared account. This is not covered in this guide, as it is a standard notification setup without any special requirements.
In the Send to field, you can enter any value. The image shows the original and new settings for our user used for notifications. Also, remember to adjust the corresponding actions.

Using the http_proxy parameter for the media type in Zabbix allows requests to be routed through a proxy server. This parameter is useful if your Zabbix server does not have direct internet access (e.g., due to security restrictions) and connects to external services (such as Microsoft Teams webhooks) through a proxy server.
You can customize the content and appearance of the message in Microsoft Teams at the message template level within the media type settings in Zabbix, or by directly modifying the JavaScript code. For example, you can set different colors for varying severity levels. For more detailed documentation, refer to the Microsoft website.

Give us a Like, share us, or follow us 😍
So you don’t miss anything: