This guide explains how to integrate Zabbix with WhatsApp for sending notifications using the WhatsApp Cloud API webhook. The steps are valid for Zabbix version 7.0 and WhatsApp Cloud API version 22, which supports named template parameters. The guide focuses on the free version of WhatsApp Cloud API, including its limitations, and also highlights the benefits of the paid, verified version, offering higher limits, better support, and advanced features.
Meta Developer Account
- If you already have a Facebook account, go to developers.facebook.com and log in with your personal account.
- If you don’t have a Facebook account yet, create one at facebook.com using your email or phone number.
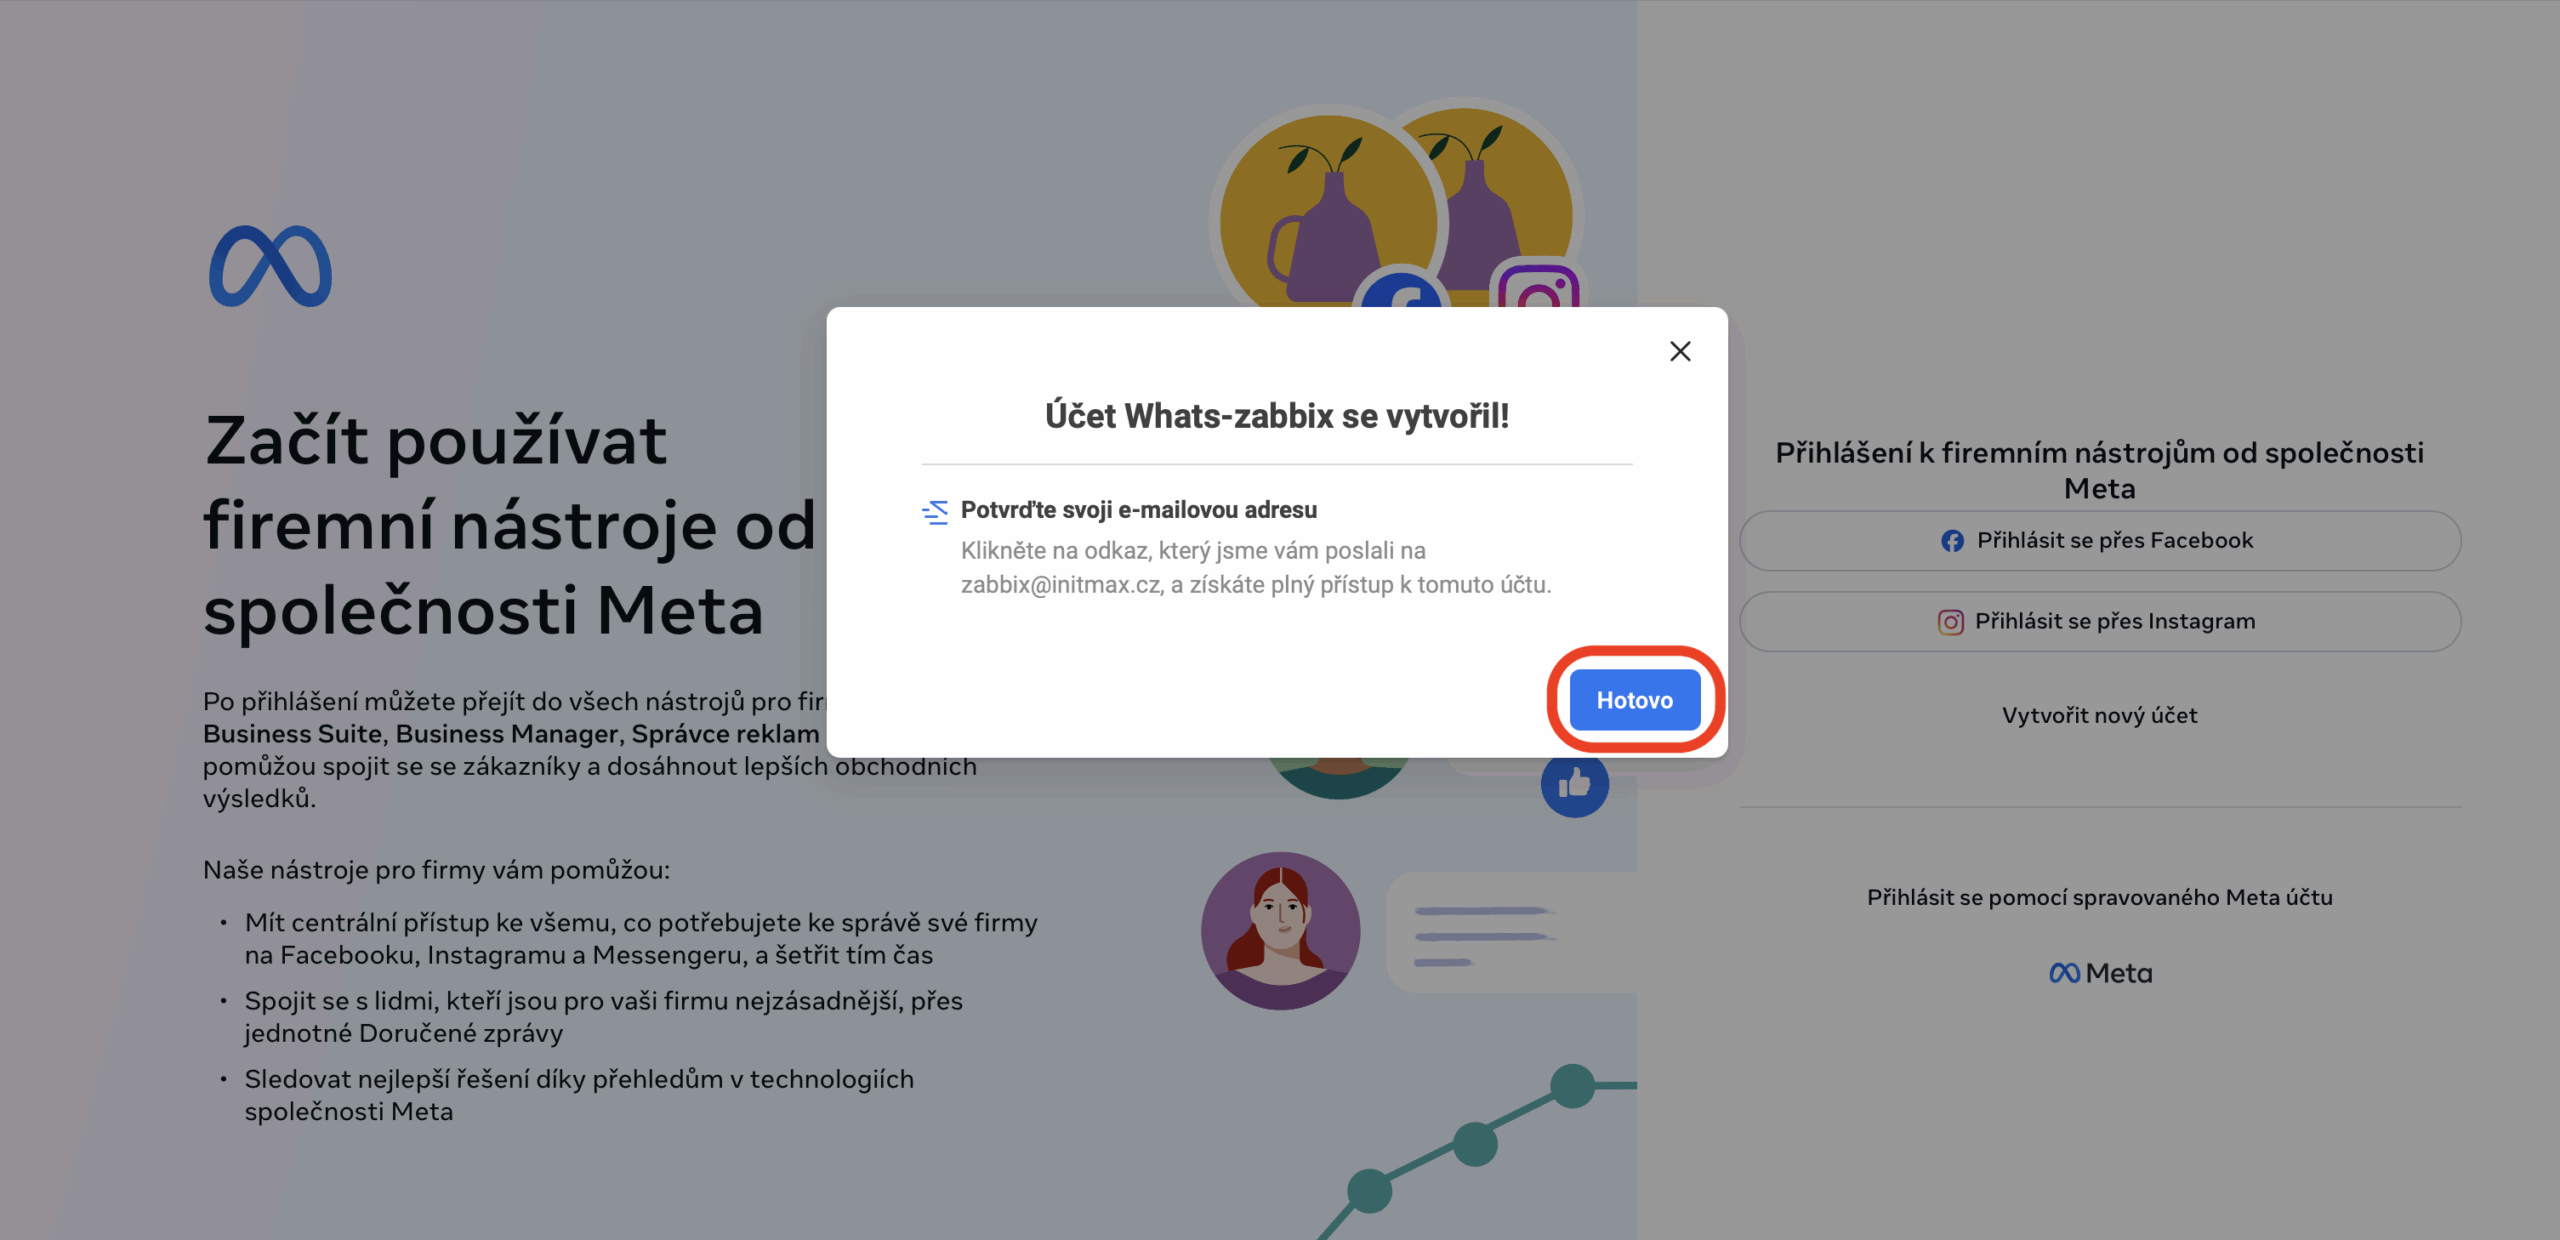
- Then go to developers.facebook.com, click “Get Started”, verify your email and phone, and accept the terms to create your Meta Developer account.
Creating an App with the WhatsApp Product
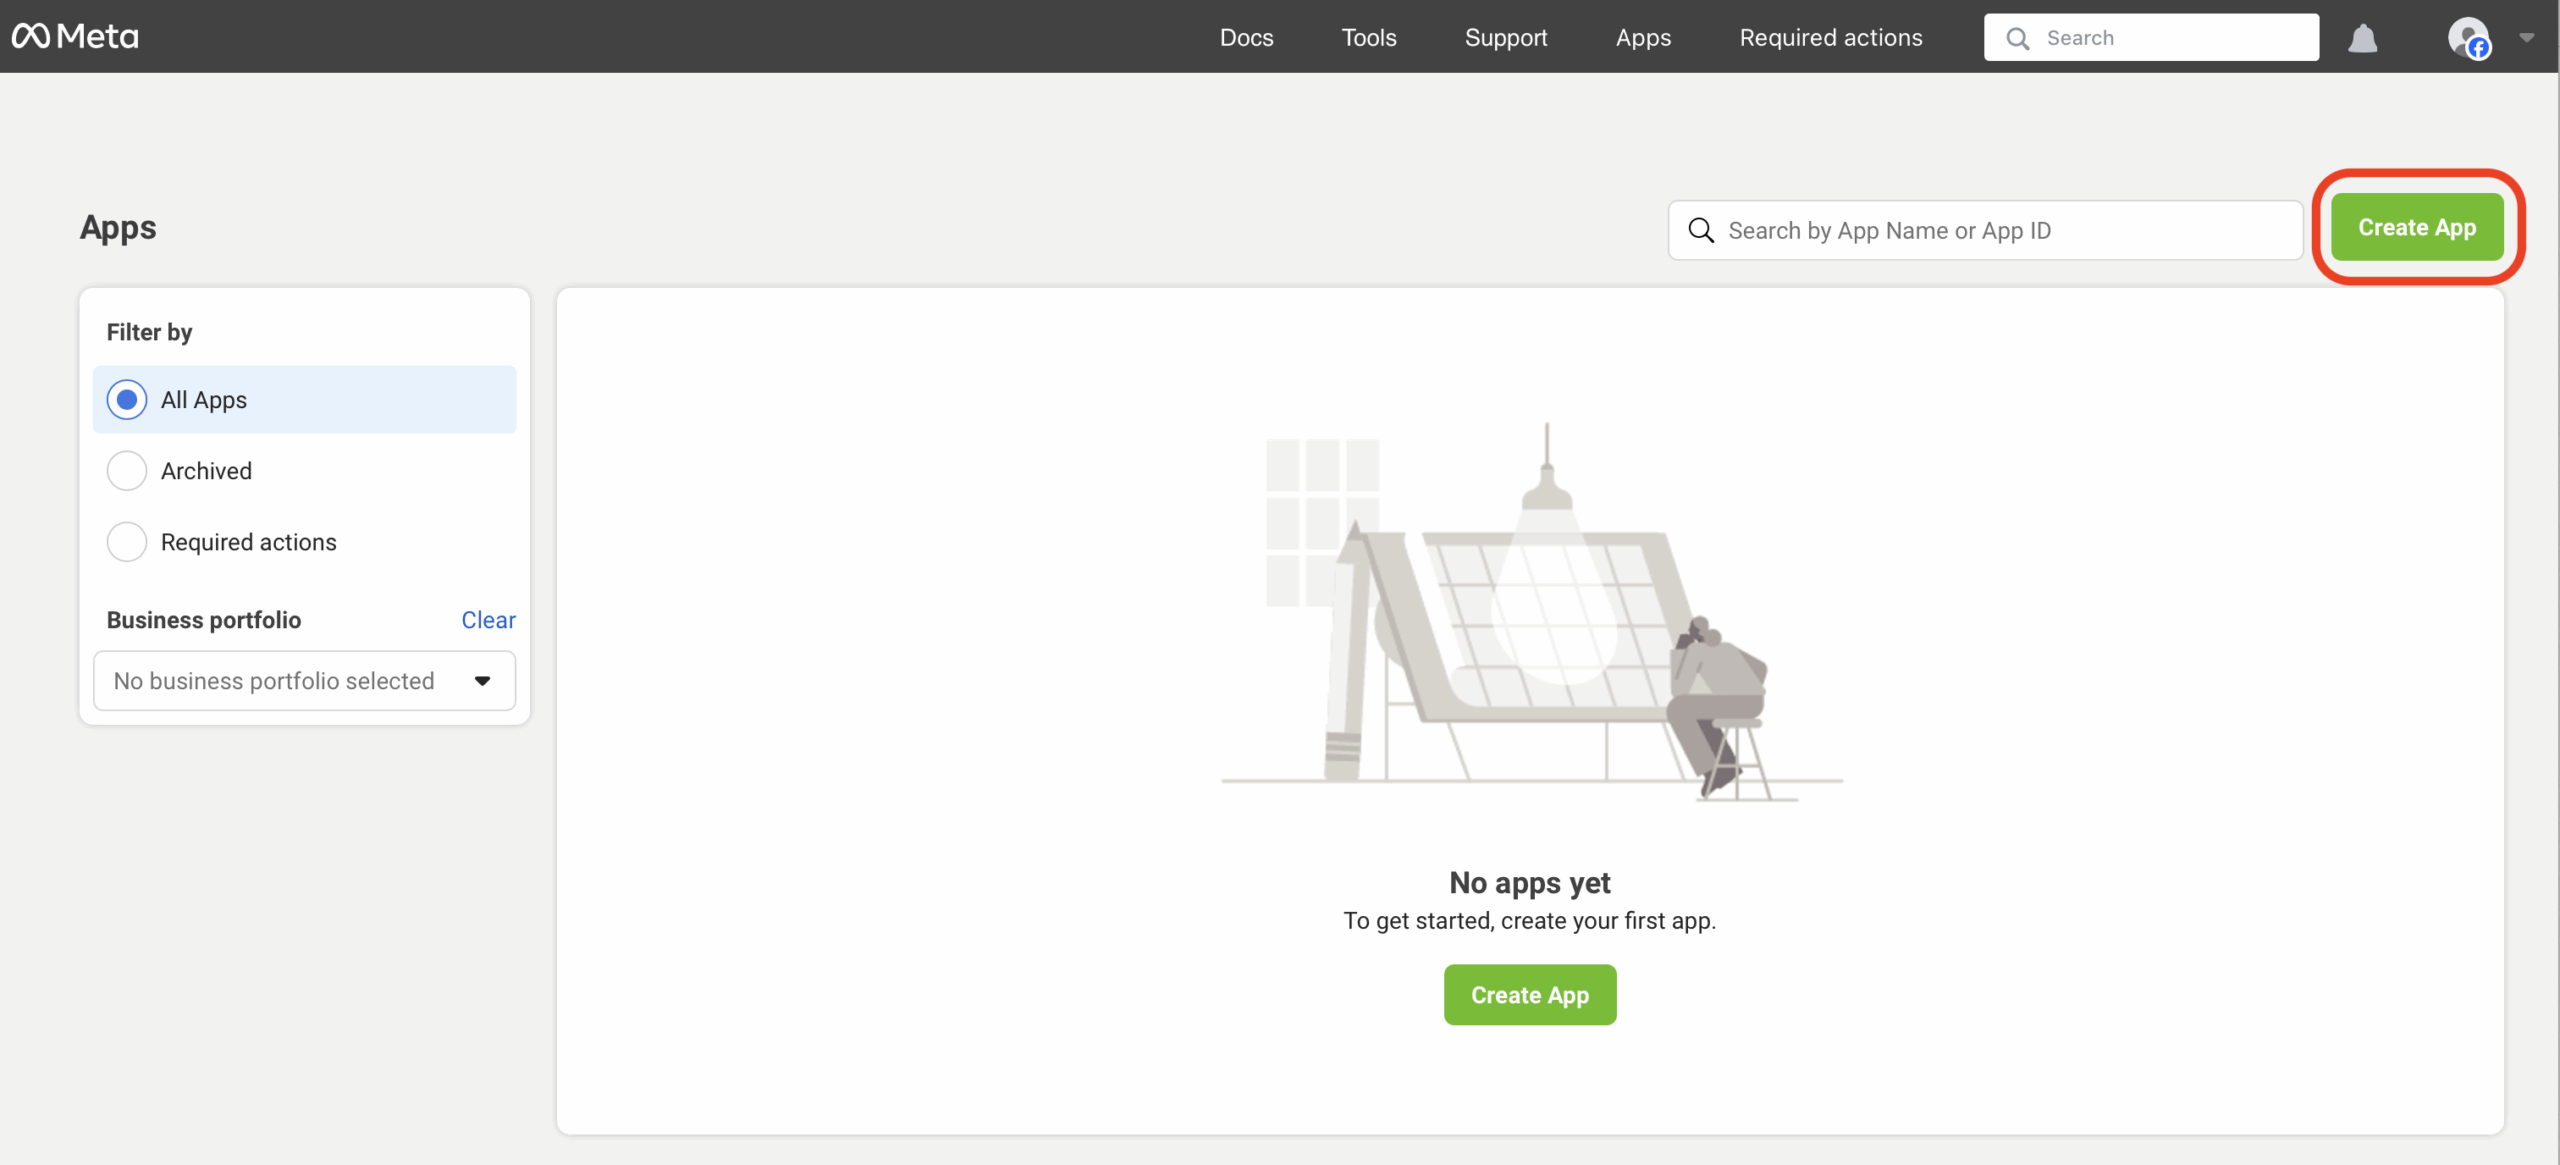
Click My Apps.
Then click Create App.
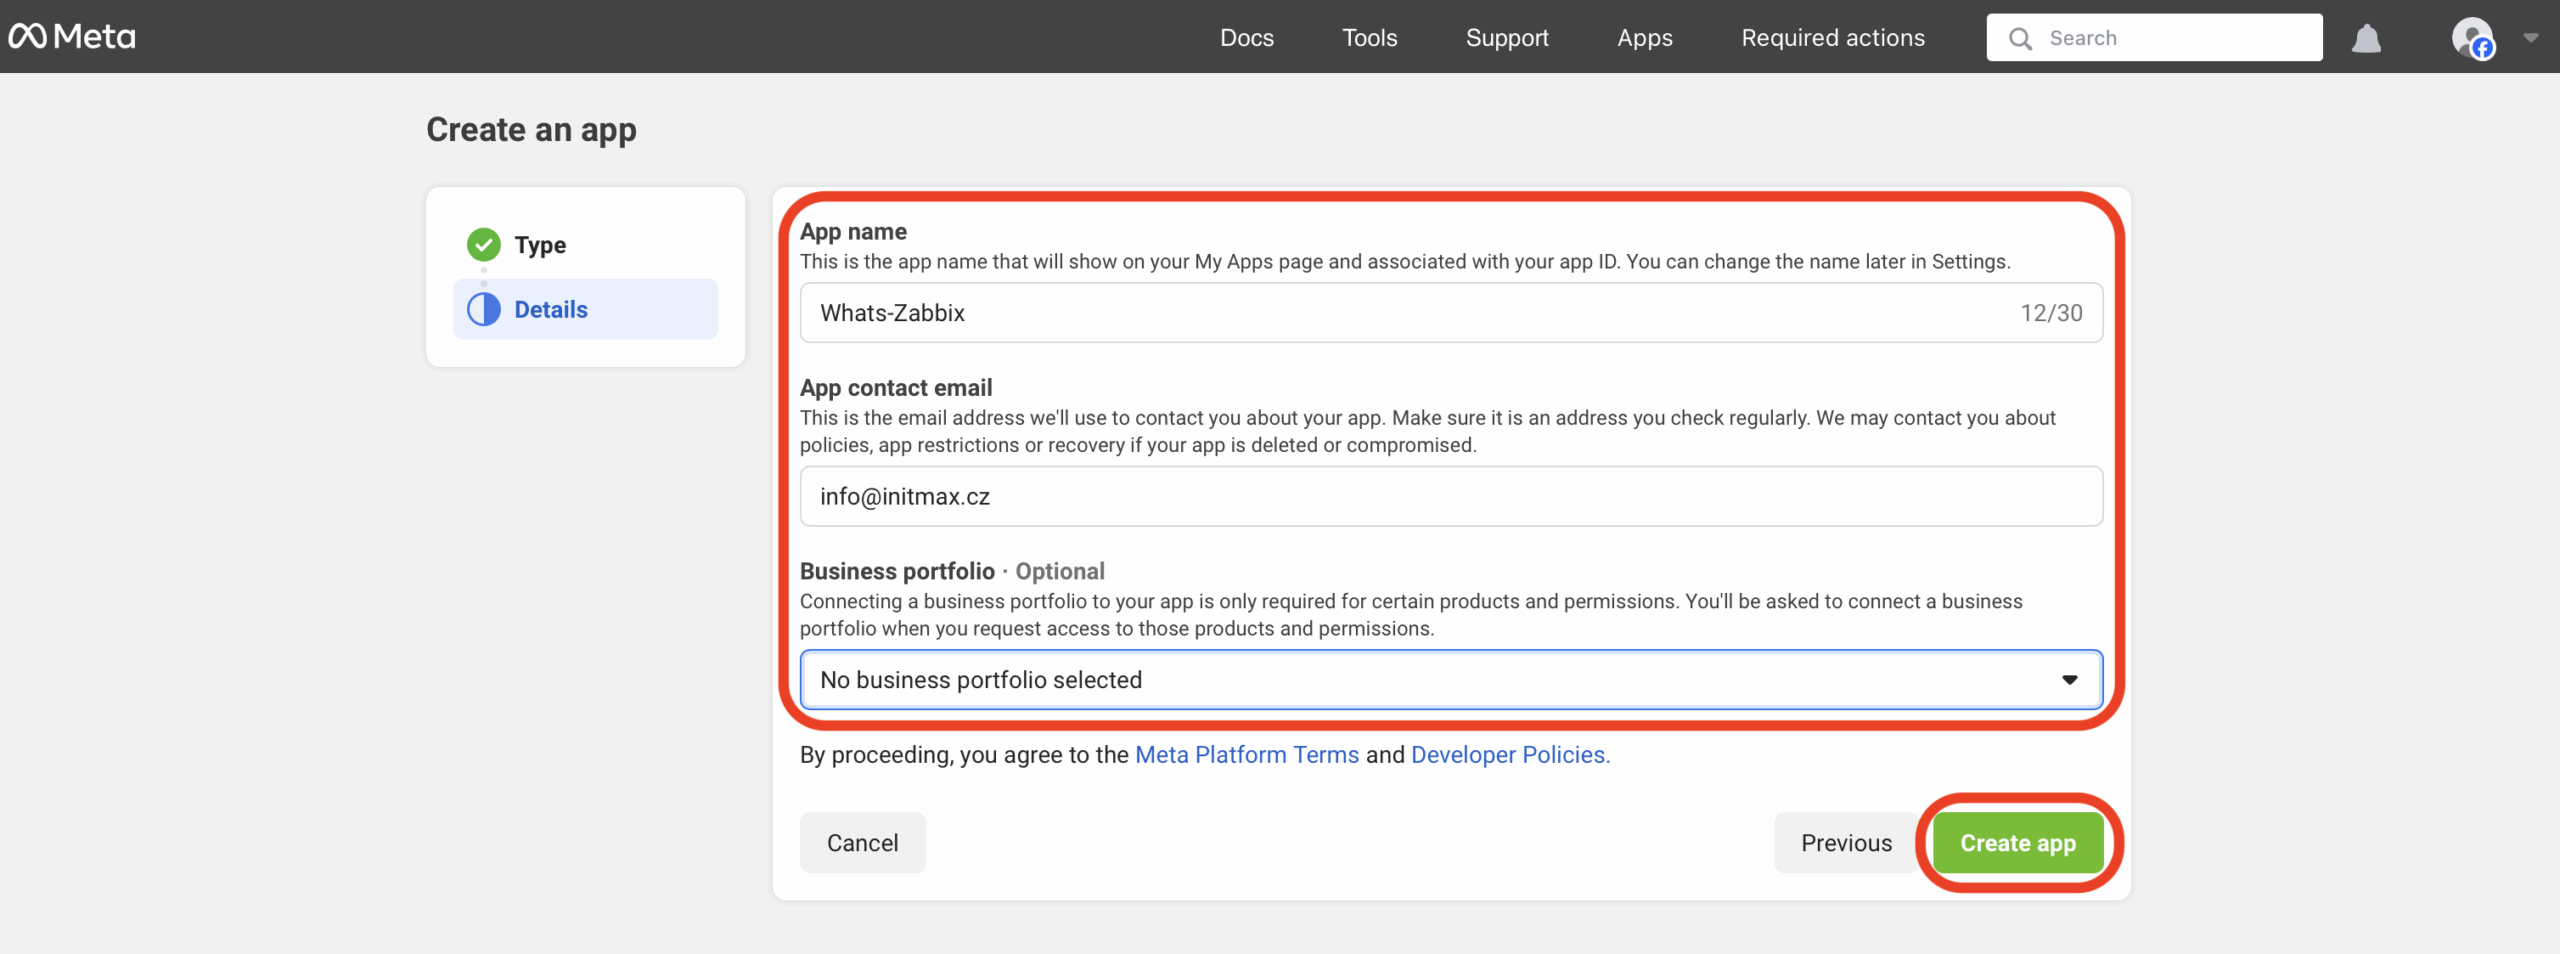
Enter the App name (e.g., Whats-Zabbix).
Enter the App contact email (an existing email address).

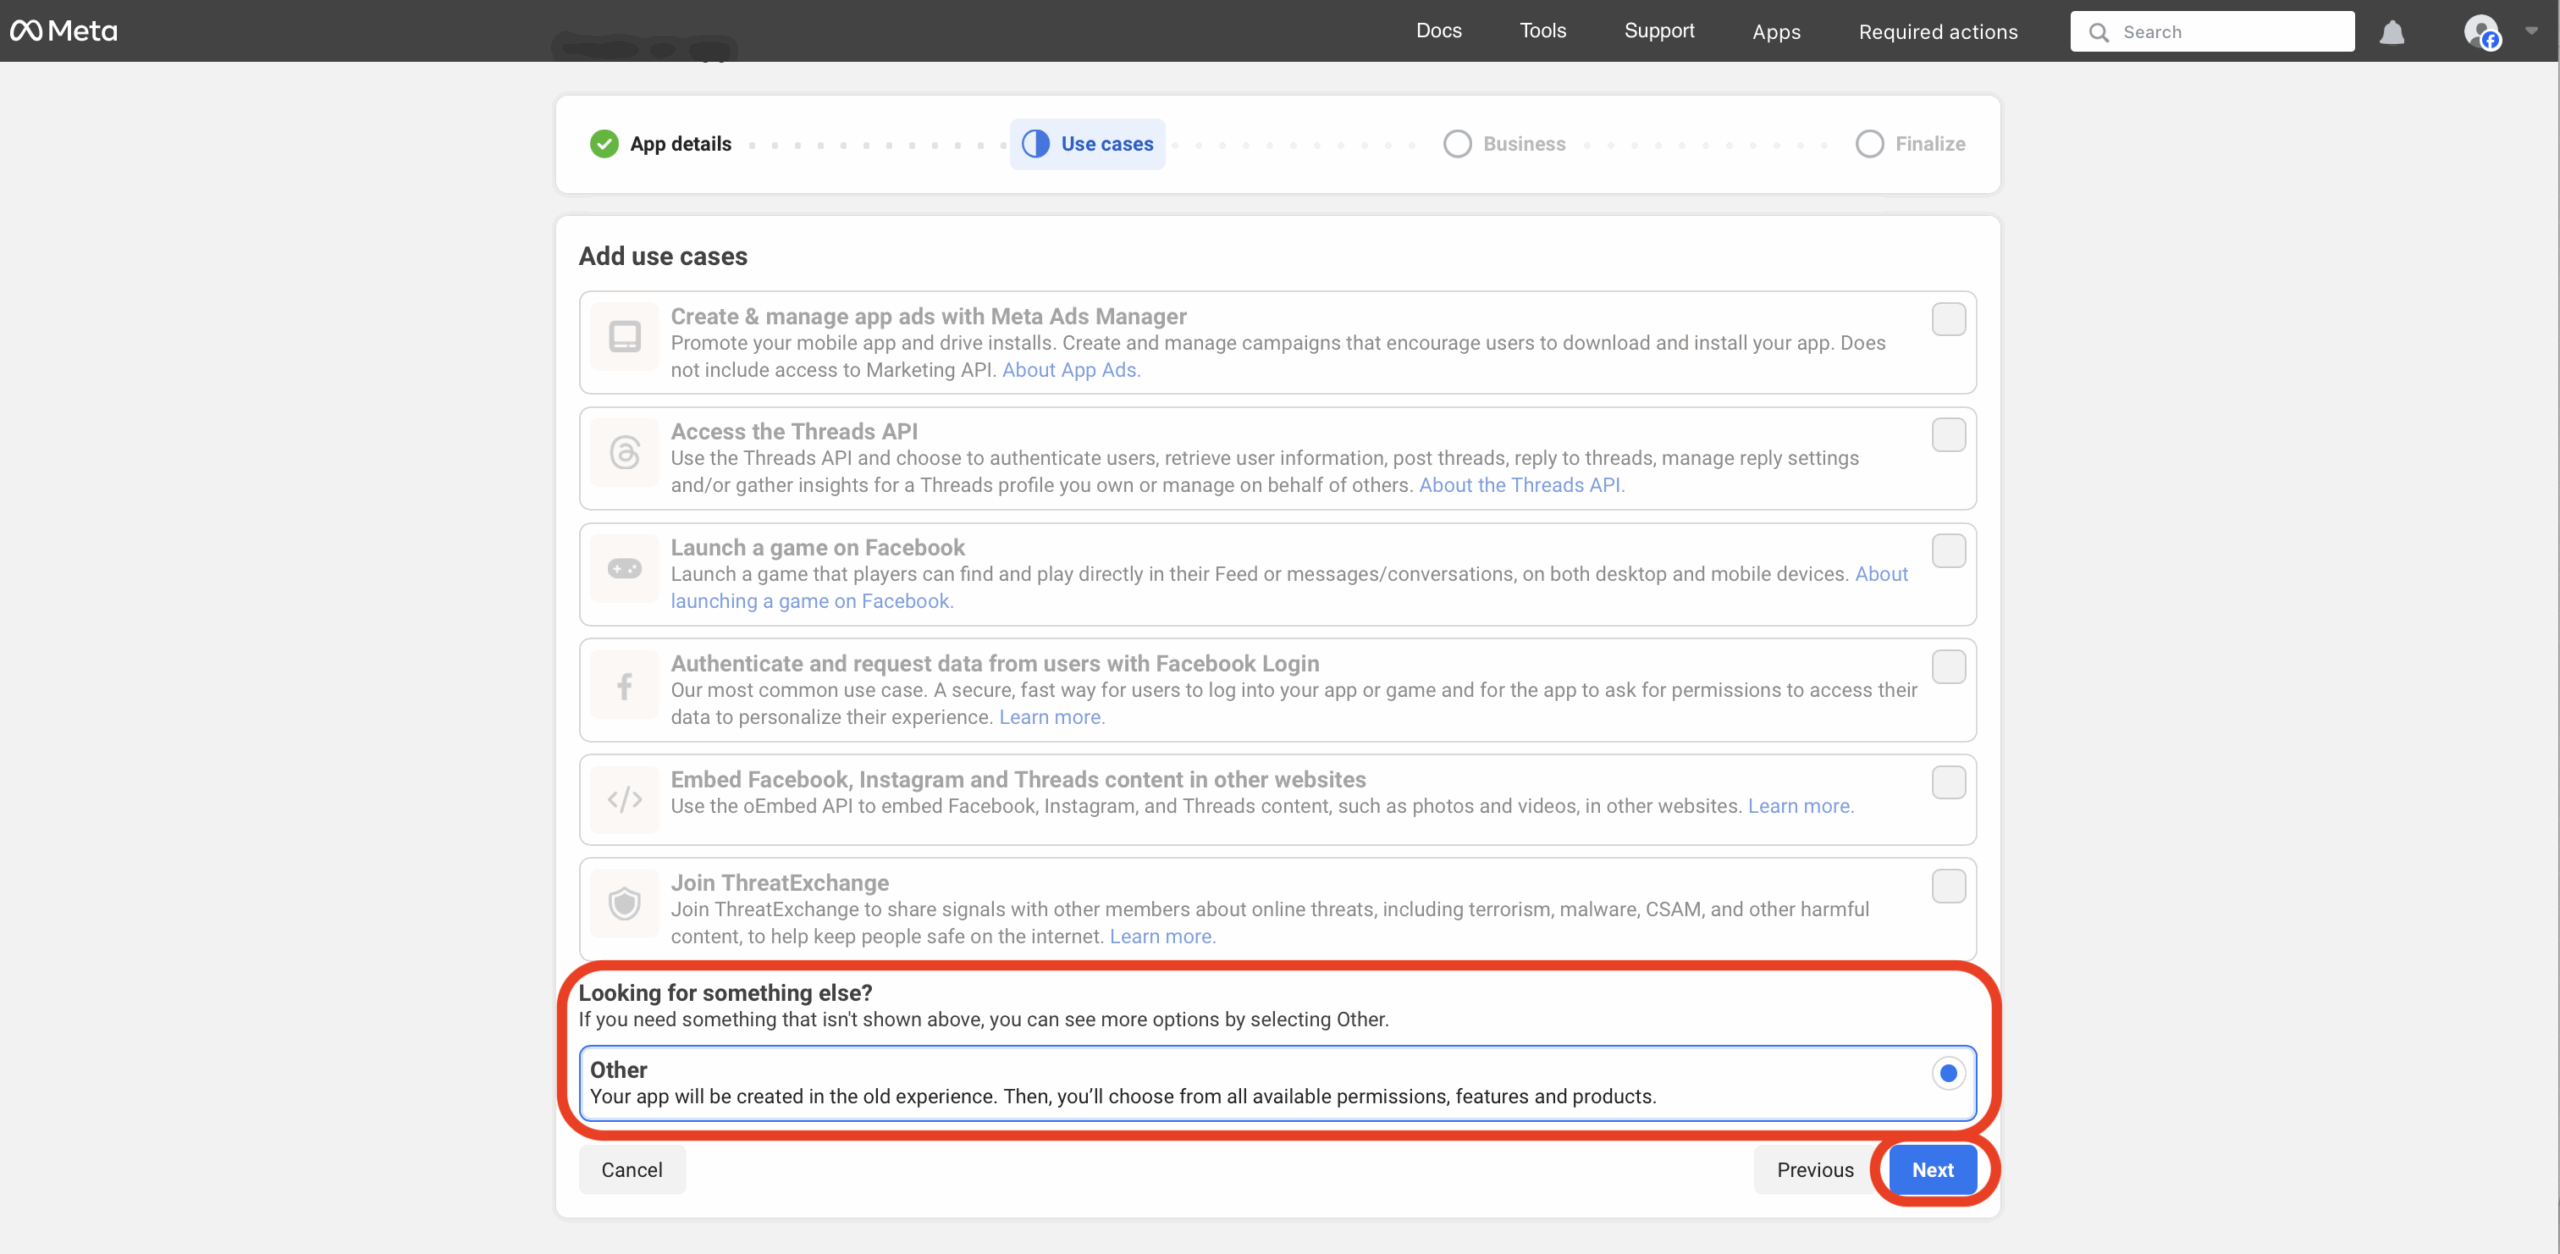
For the use-case, select the option “Other”.
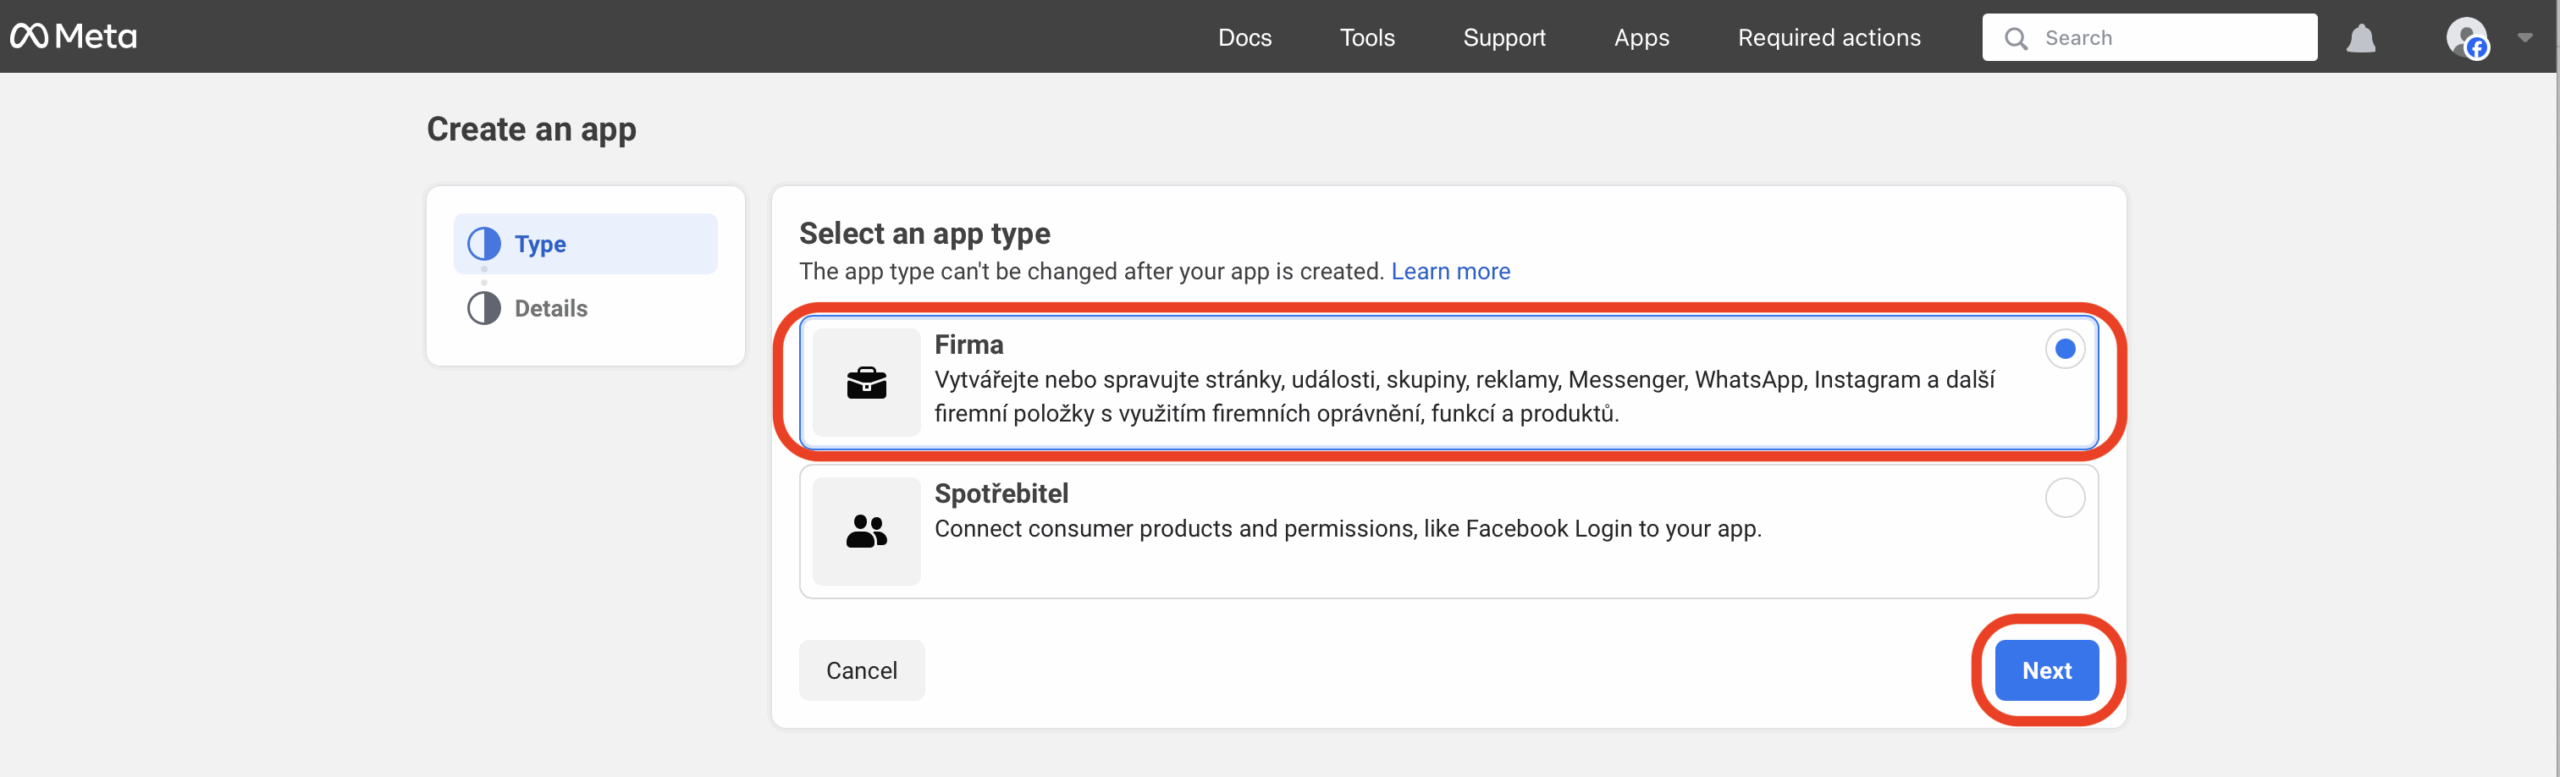
To access the WhatsApp section, select the “Business” app type. („Firma“ in Czech).
Fill in the App name and App contact email again; leave the Bussines portfolio empty for now.
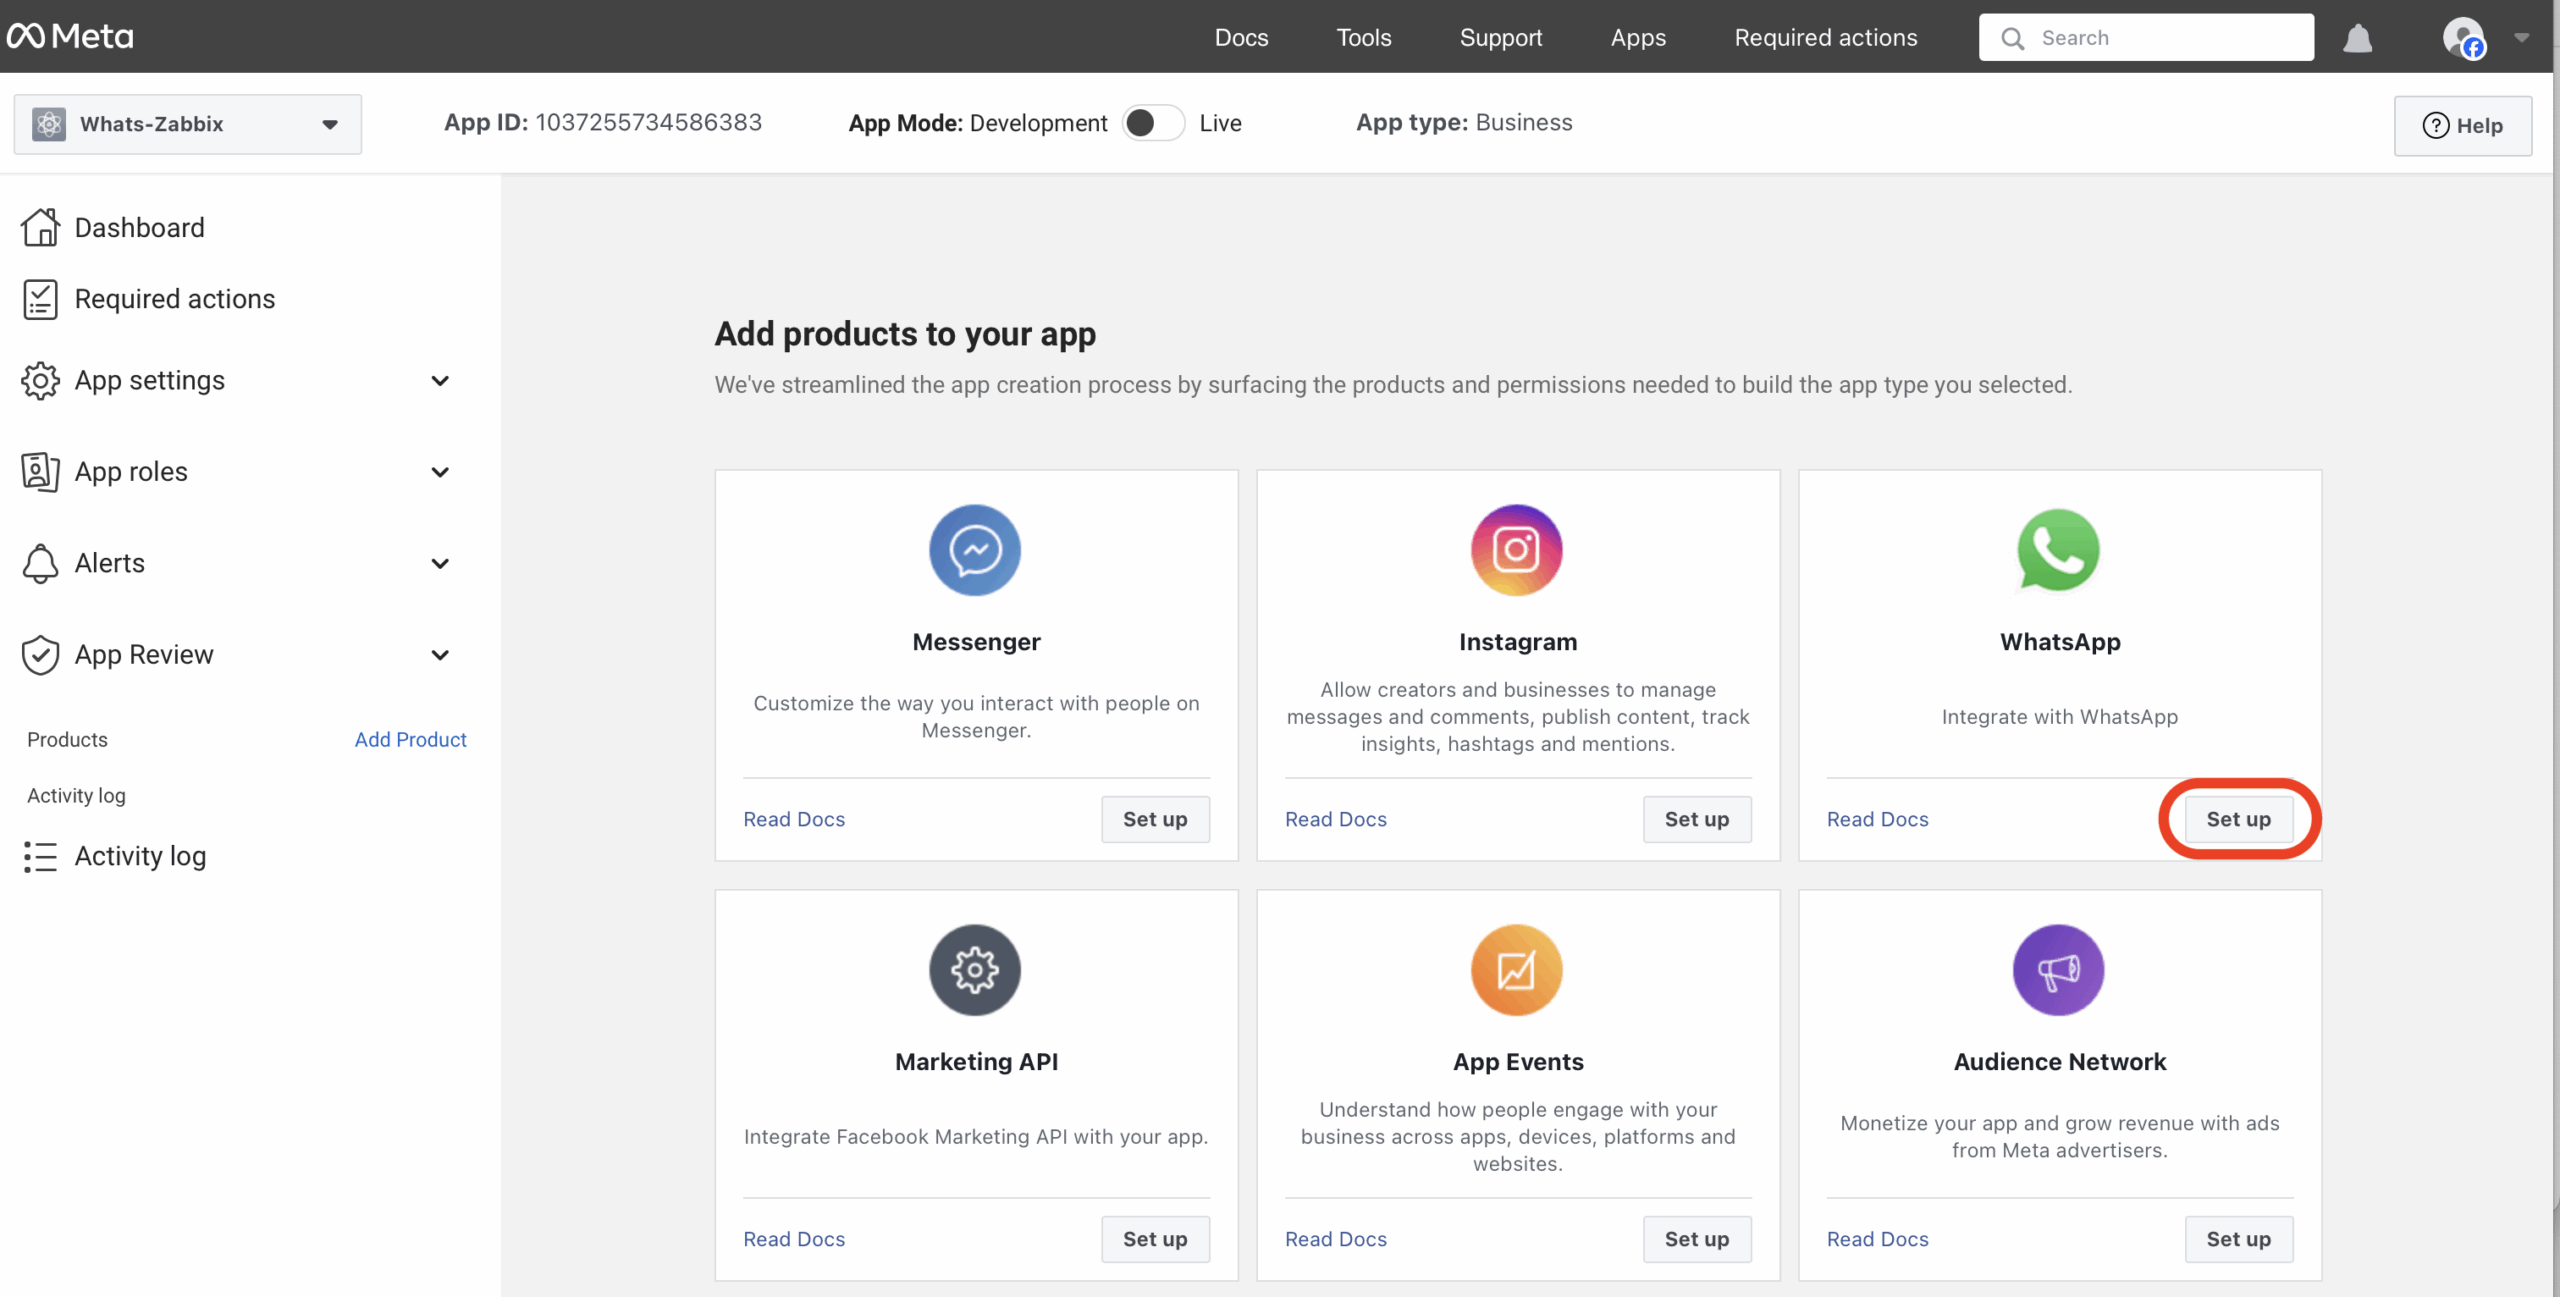
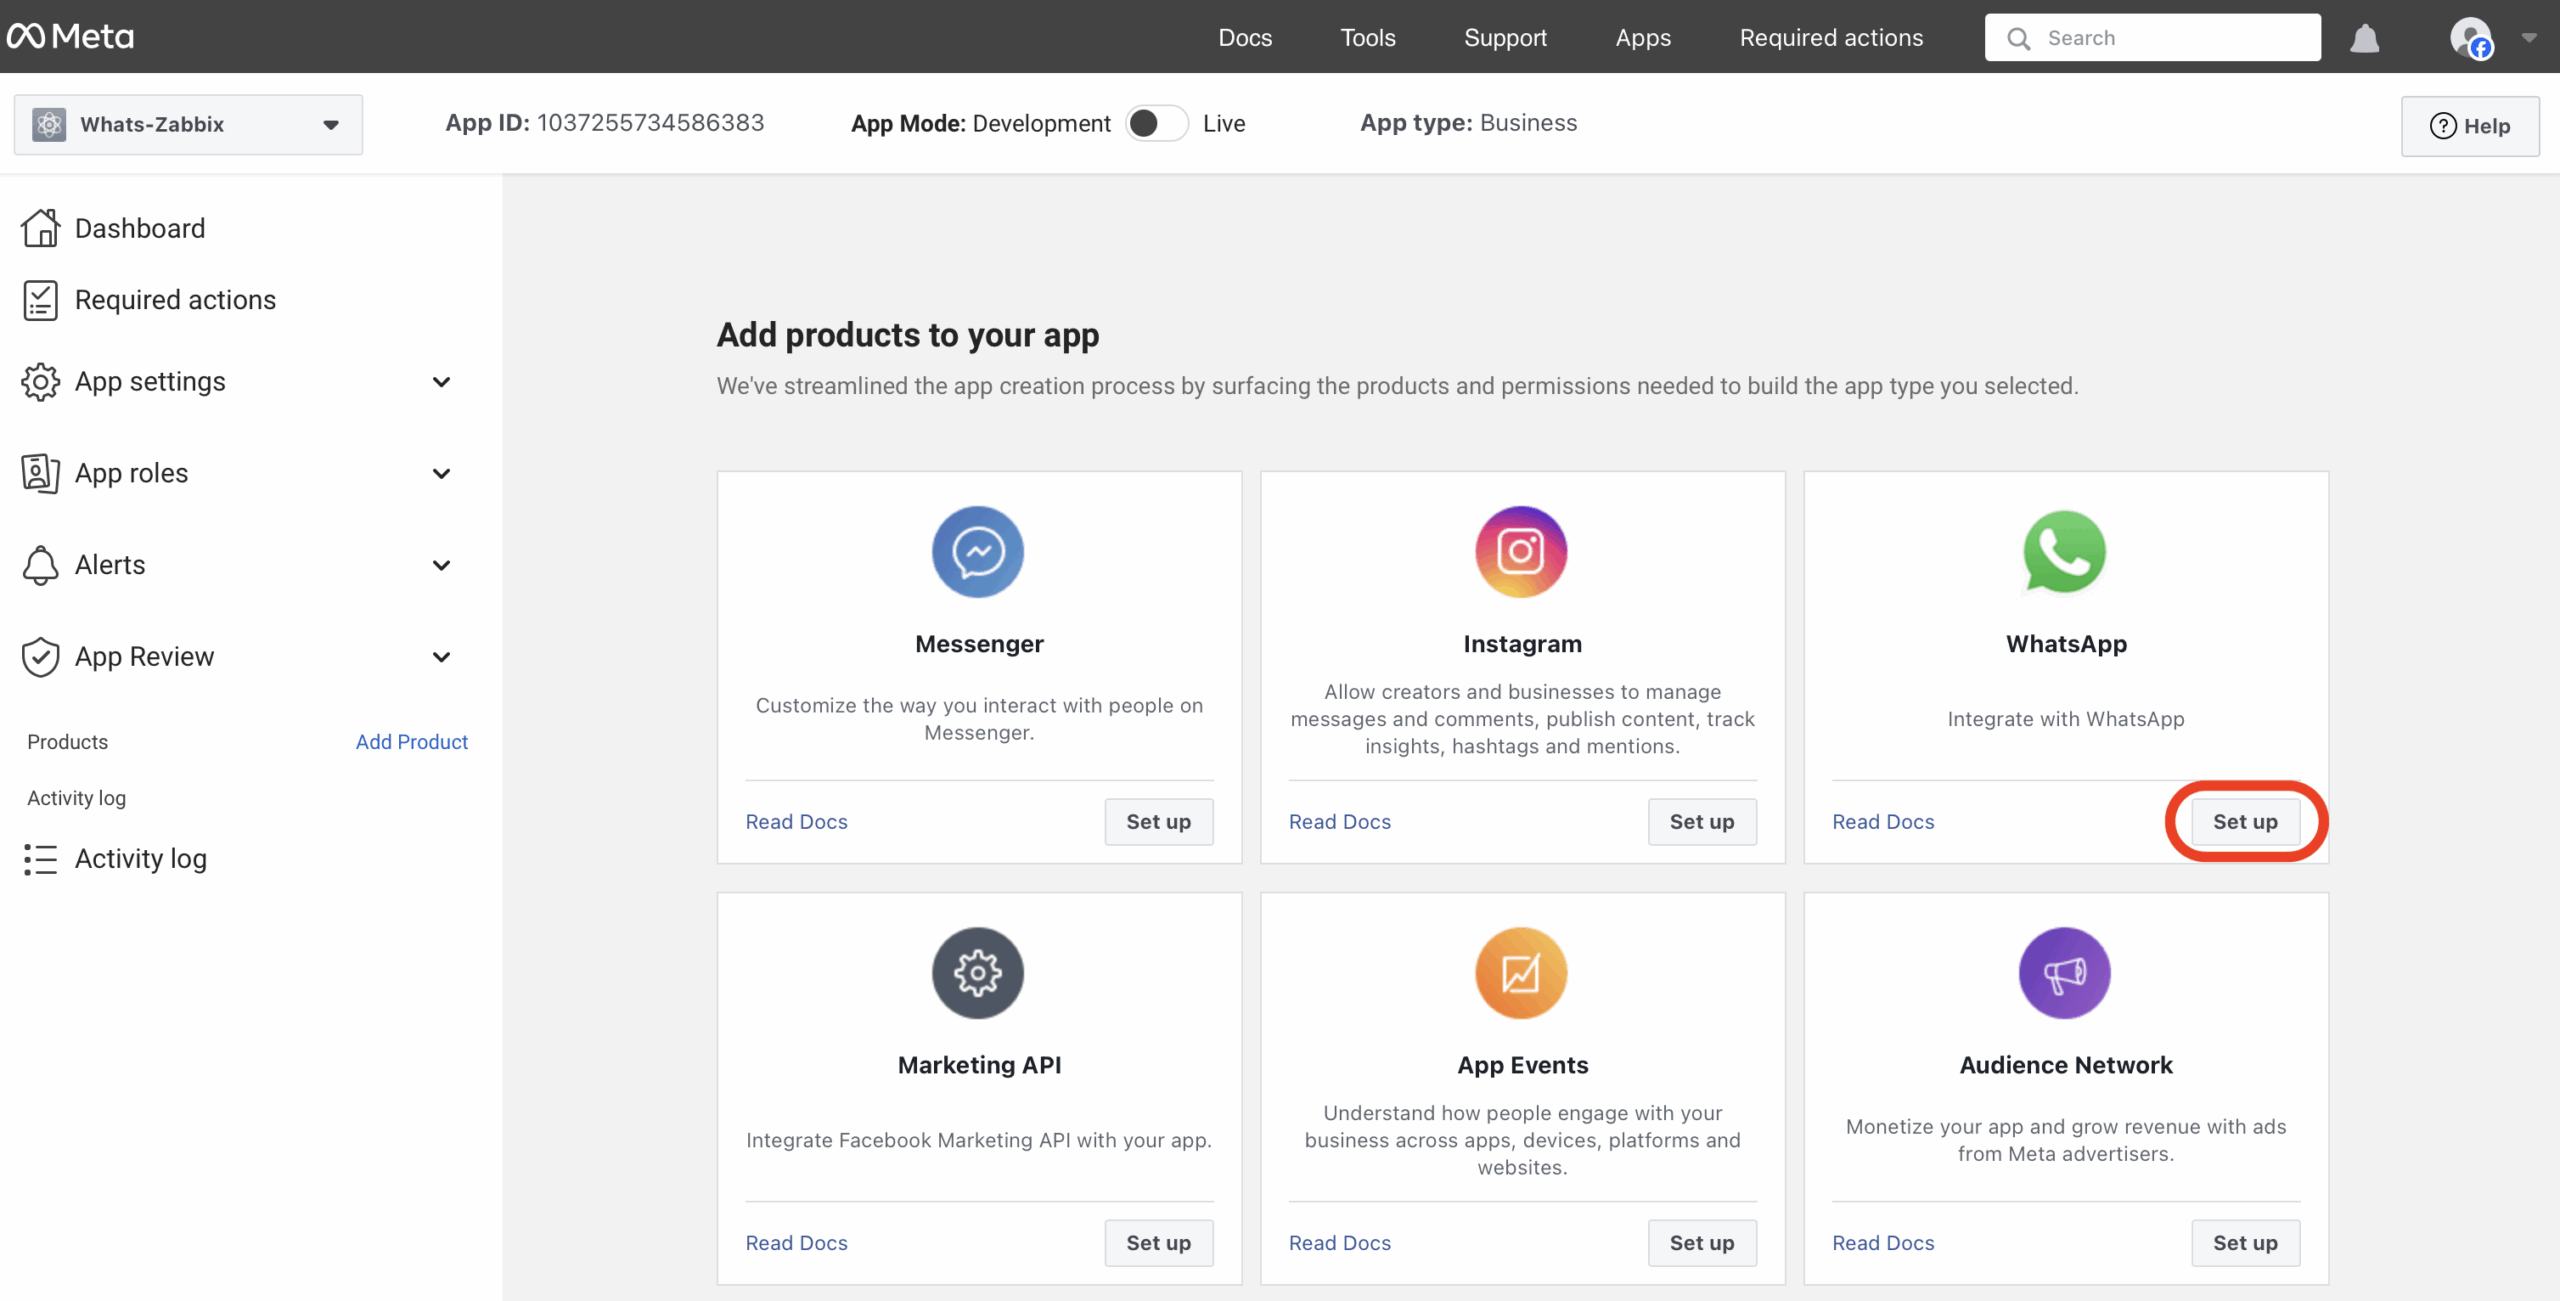
After creating the app skeleton, add the WhatsApp product, which is our primary focus.
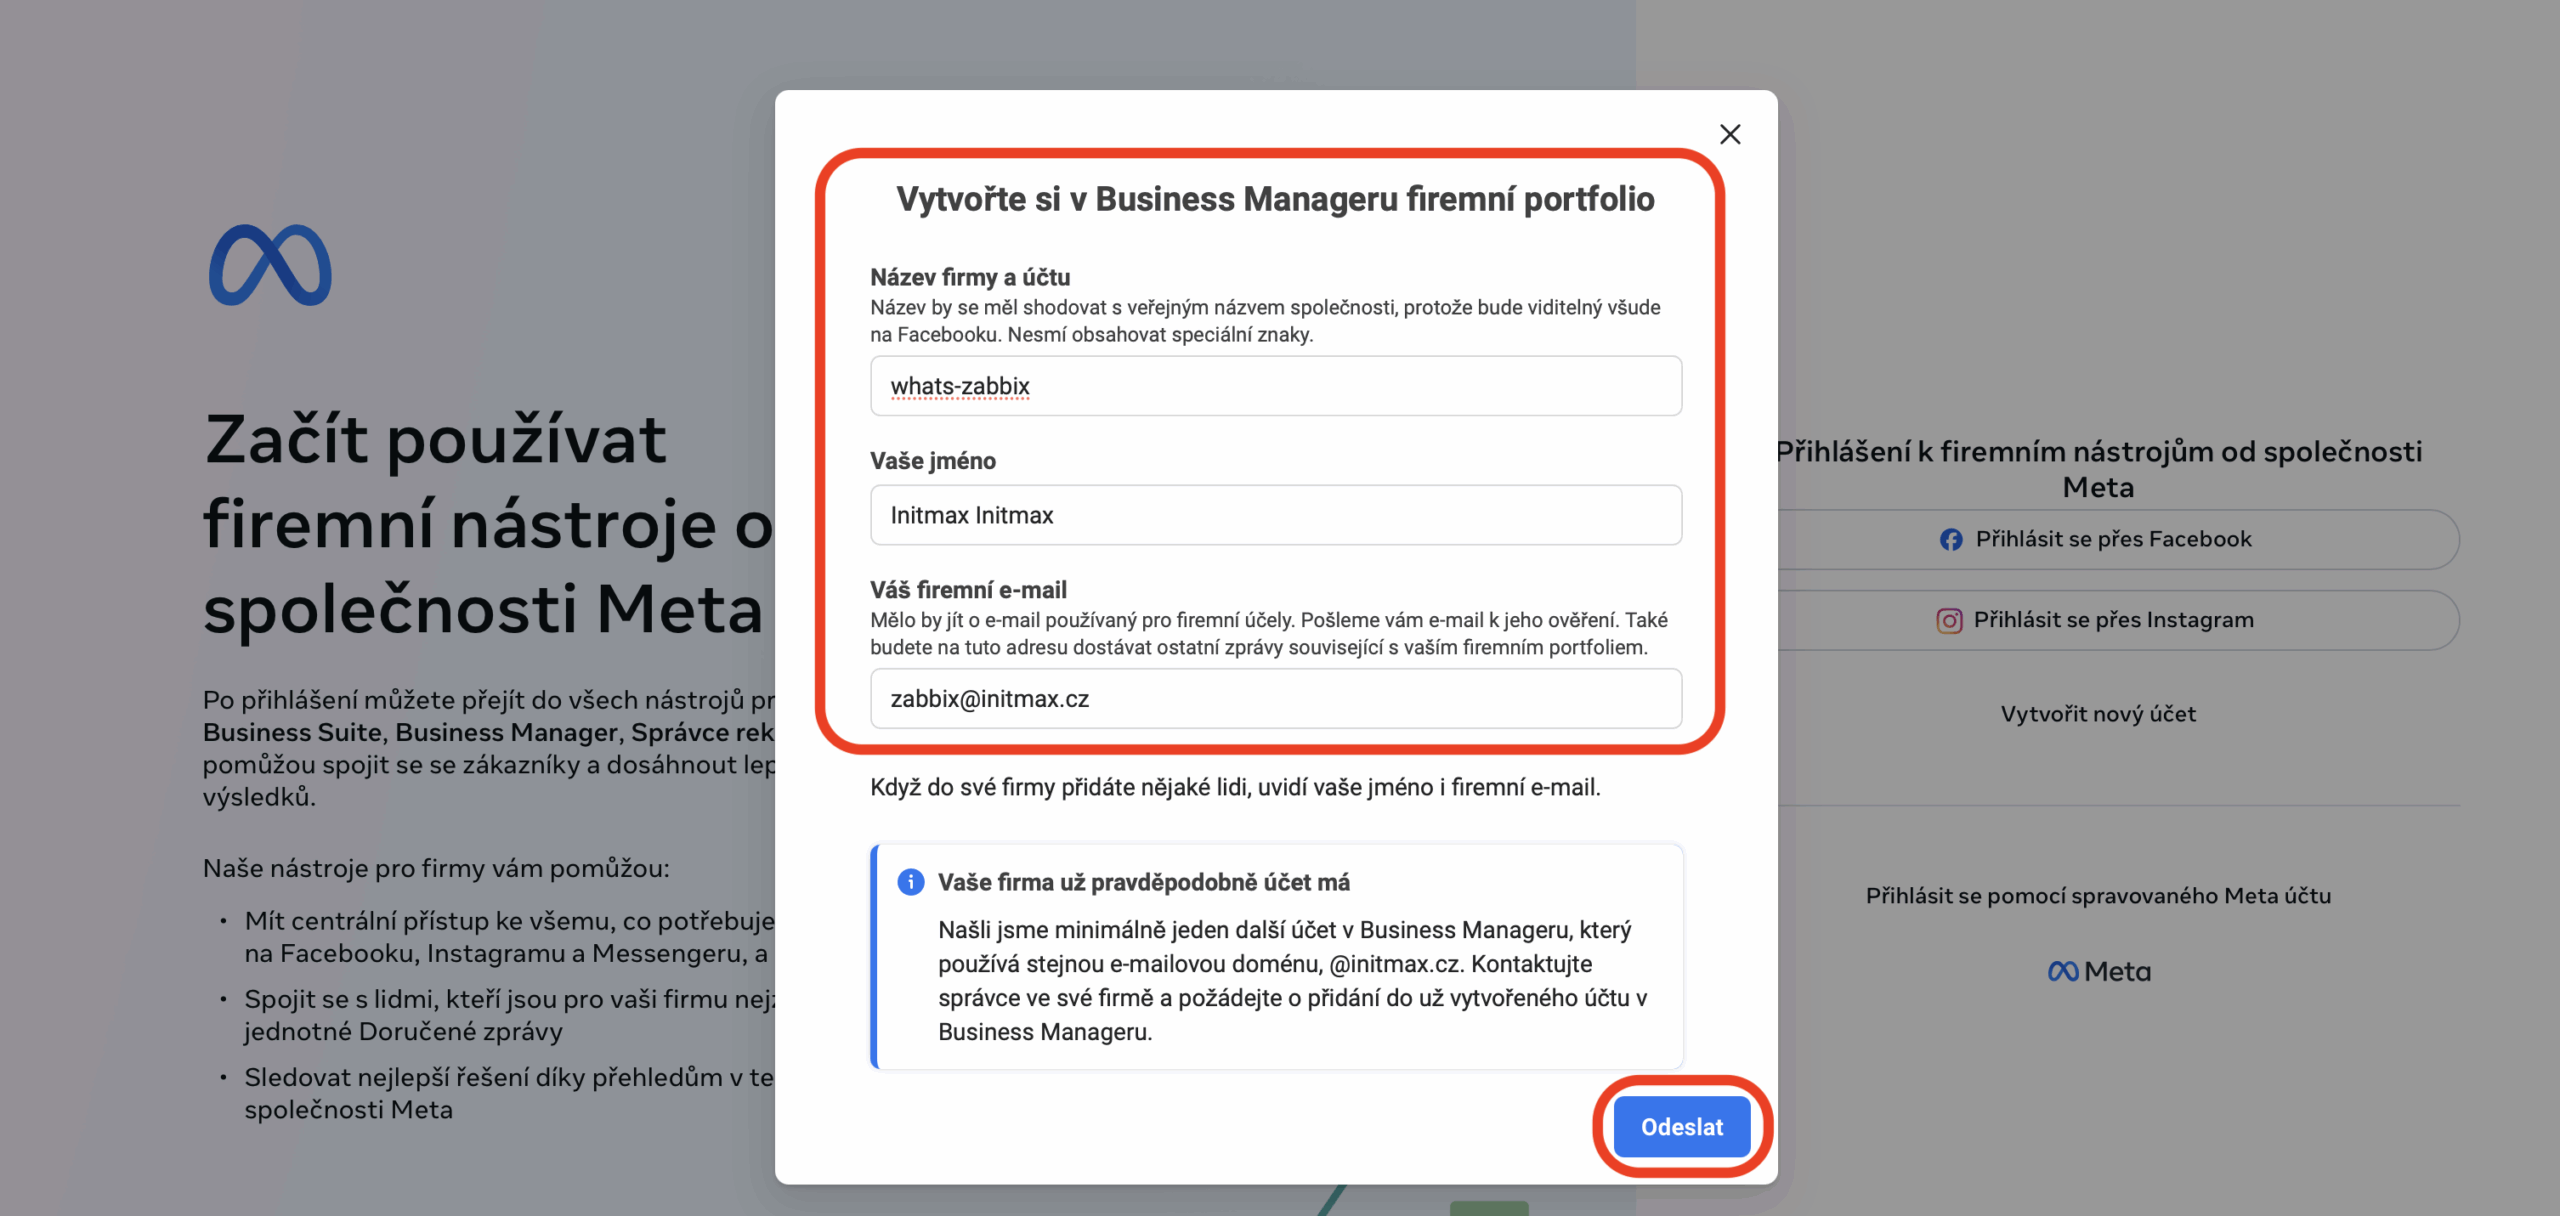
We probably don’t have a suitable existing portfolio, so we’ll create one. If a suitable portfolio already exists, you can select it and skip this step.
In the portfolio creation step, enter your company and account name, your name, and your company email.
(Apologies, we were unable to provide an English version screenshot.)
In the next step, just wait for confirmation. If your account is very new, you may need to wait up to one hour before the portfolio can be created.
Now, if we look again in our app under WhatsApp > API Setup, we’ll see our newly created portfolio—confirm it.

Immediately afterward, our WhatsApp application details will appear.
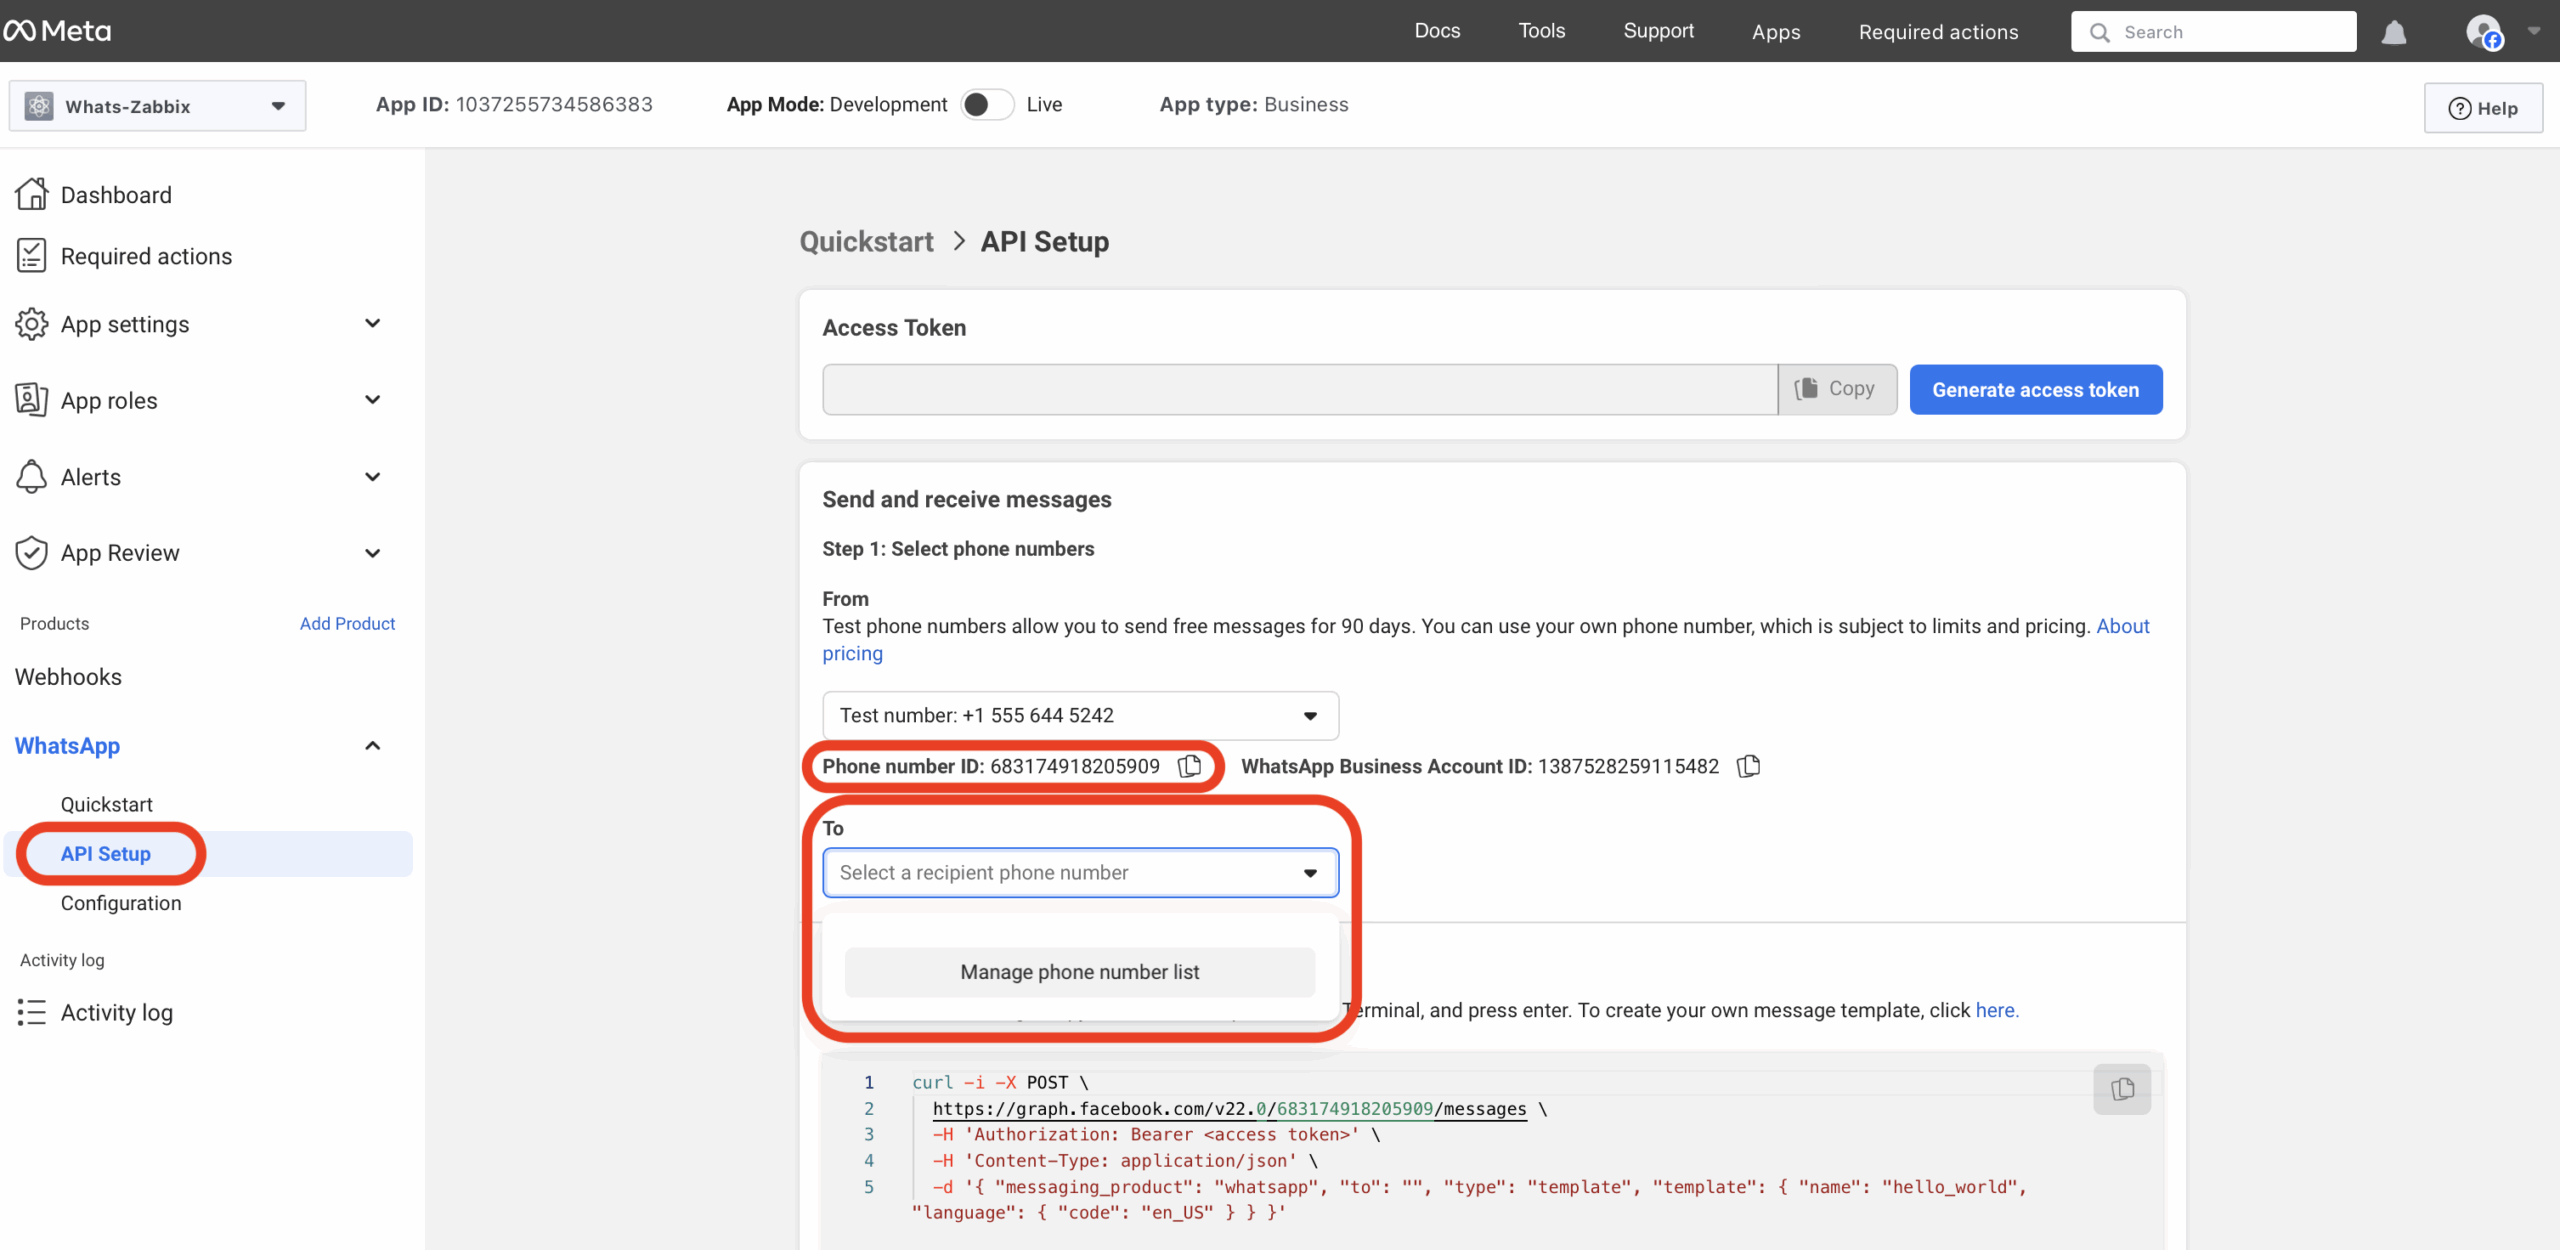
Adding Phone Numbers for Notifications
Since we’re using the free version of the app, phone numbers for notifications must be added in advance (up to 5 numbers maximum). If we were using our own verified phone number, this step would be unnecessary, but the app would no longer be free.
The phone number generated by Meta is intended primarily for testing purposes, but it’s fully suitable for our notification use-case. The only limitation is that its validity must be renewed every 90 days. This restriction doesn’t apply to your own verified phone numbers.
Note down the Phone number ID—you’ll need it later when creating a Media Template in Zabbix.
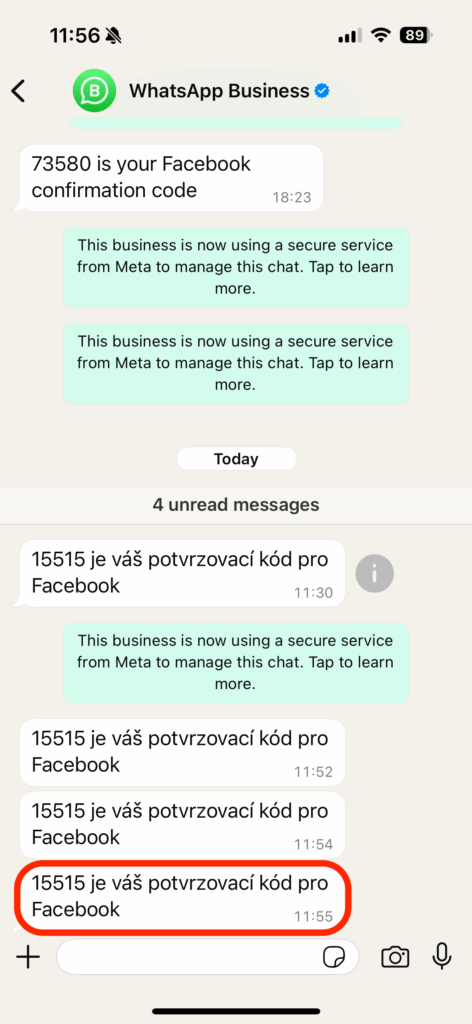
Next, enter your WhatsApp phone number. You’ll receive a message containing a numeric verification code in the WhatsApp application on that phone number.
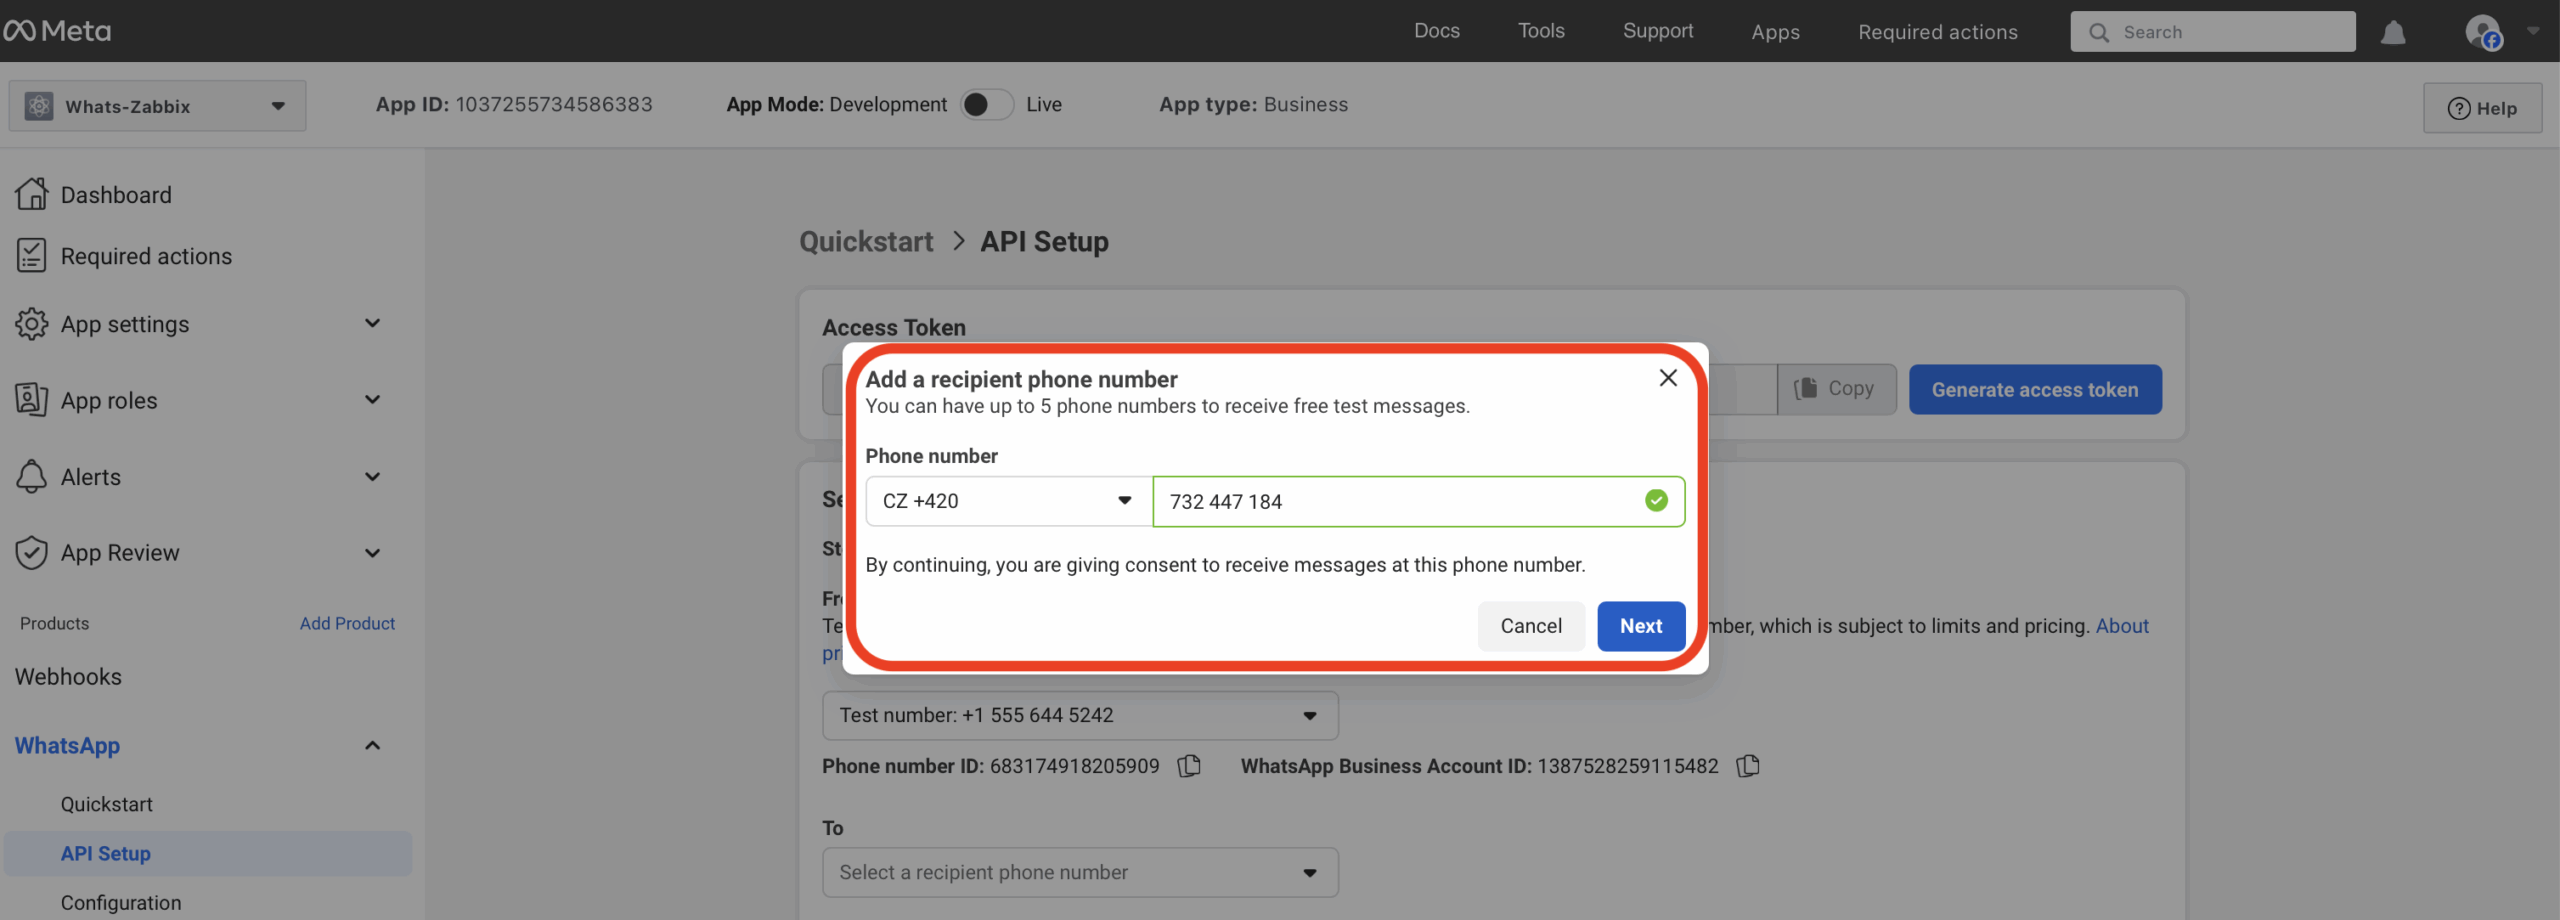
After a moment, you’ll receive the verification code in WhatsApp—enter this code into the form. Repeat this step for any additional phone numbers. Remember, these numbers must be added and verified before you can use them for notifications from Zabbix.
Sending the First Test Message
We’re now ready to send our first test message using the built-in application testing form. However, for this initial test, we still need one crucial item—a temporary access token.
You can generate this token right here, but please note: this token is valid for only 1 hour. Don’t use it as a permanent token in Zabbix!
First, click the “Generate access token” button.

In the newly opened pop-up window, confirm the login with your user account.
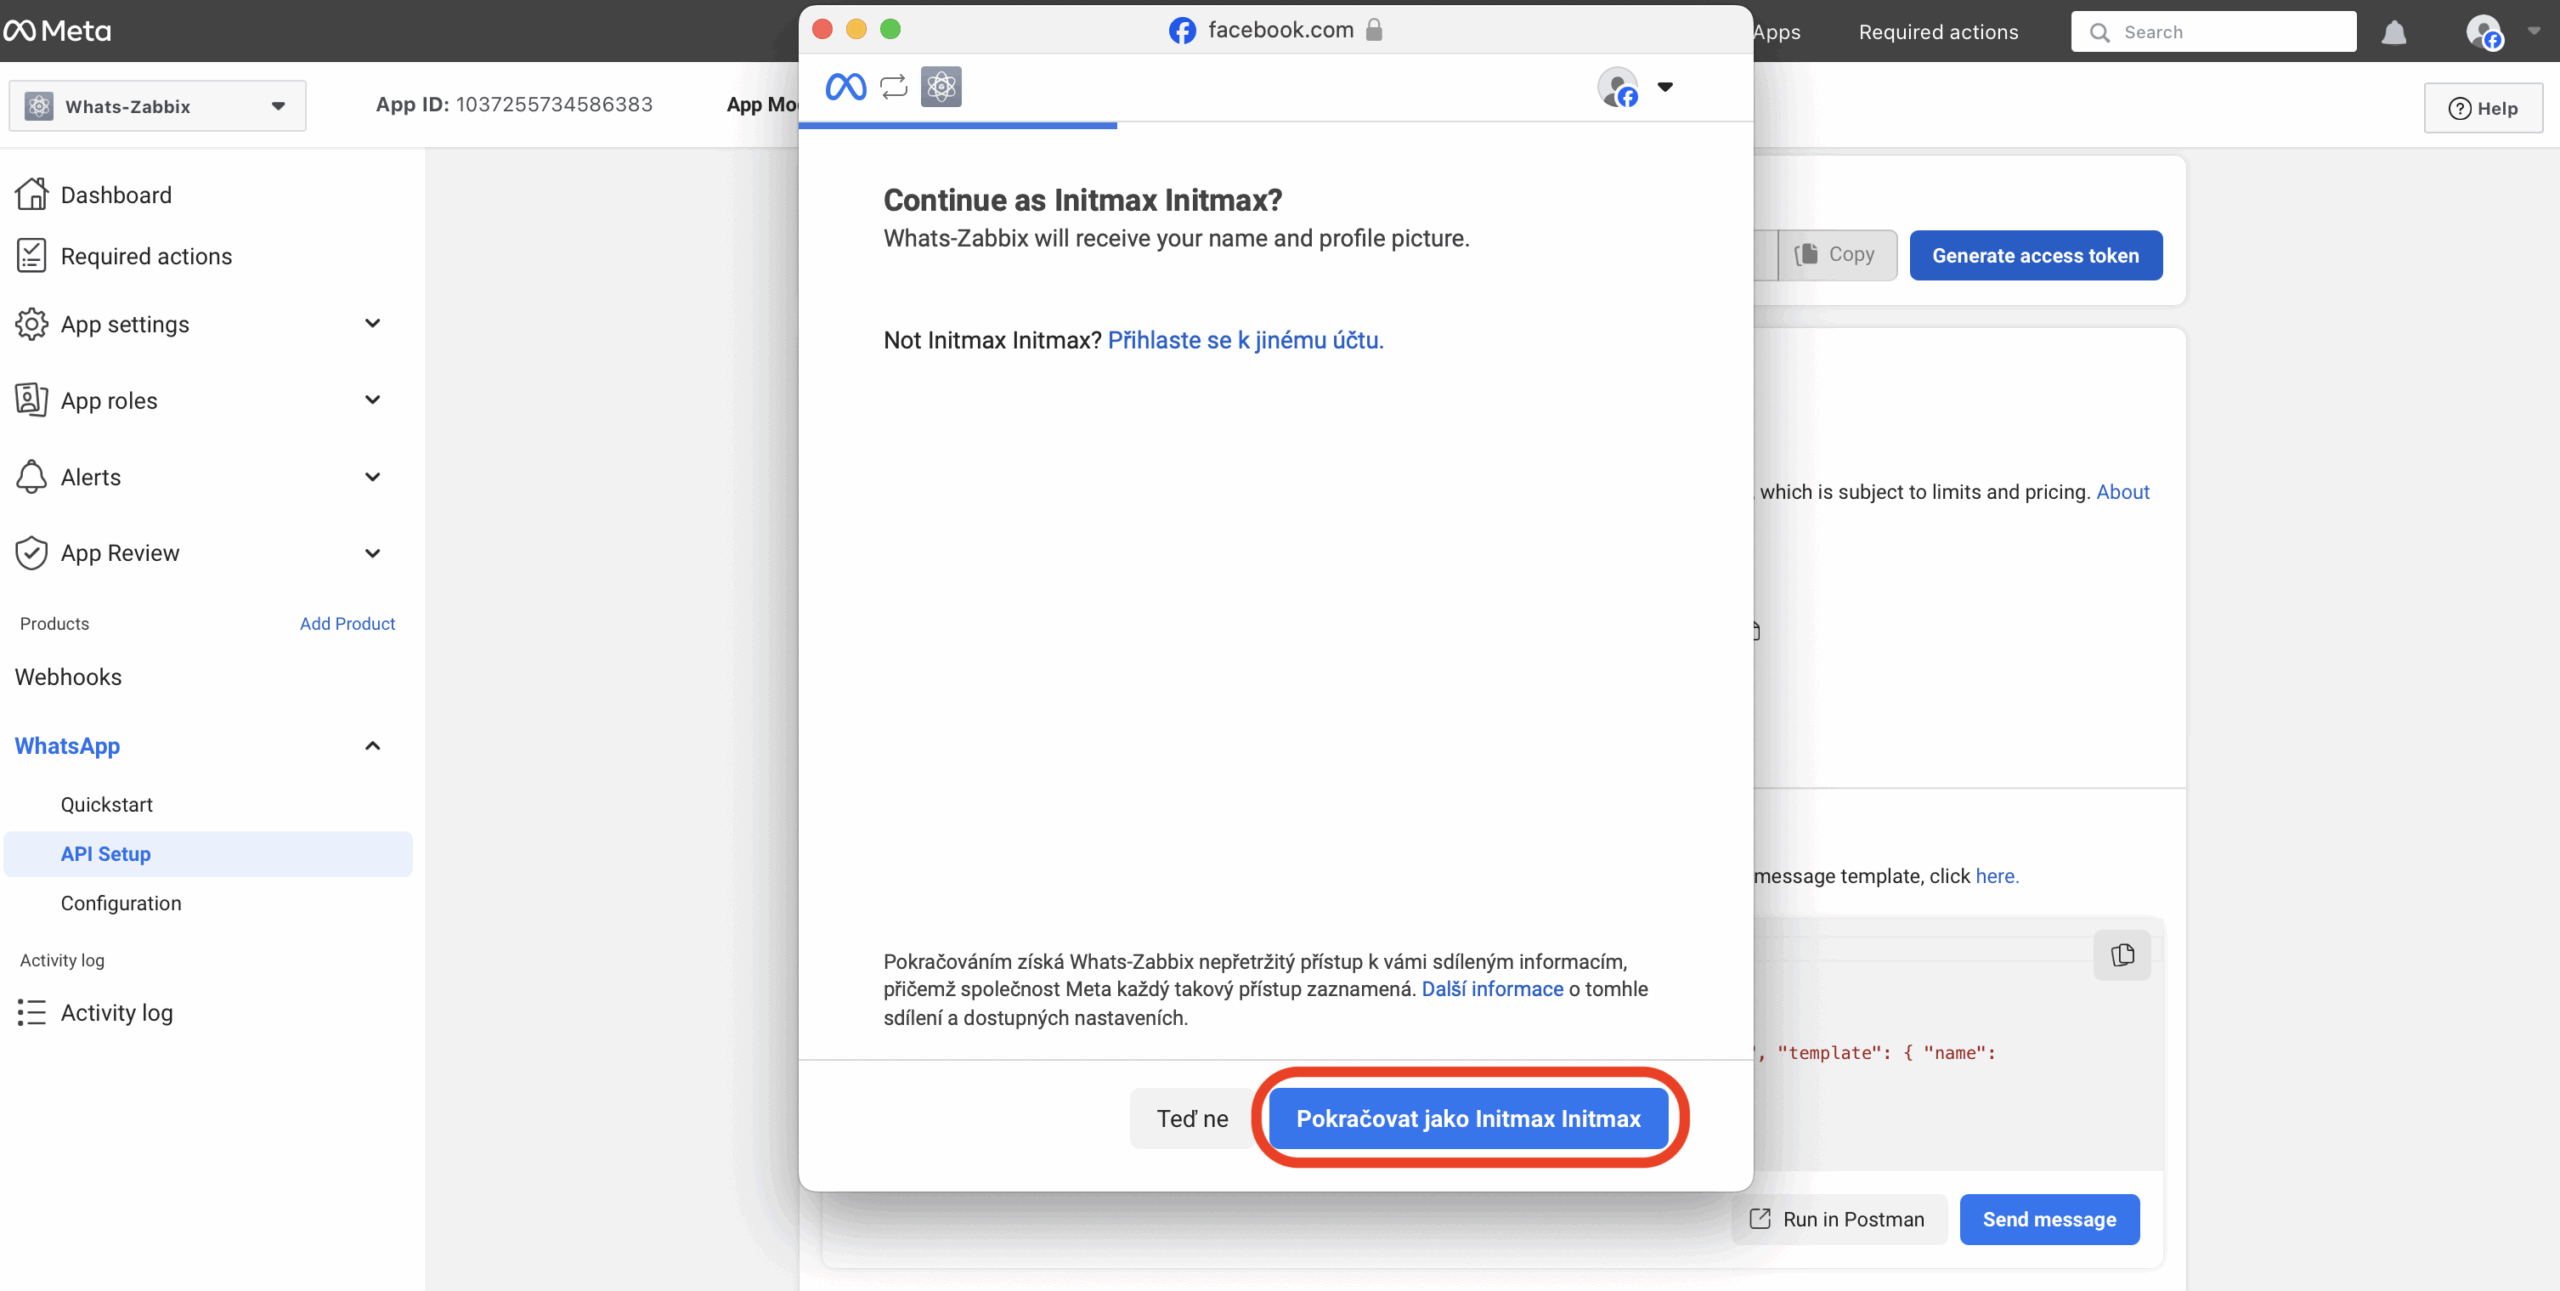
On the next page, confirm granting access permissions to our app.
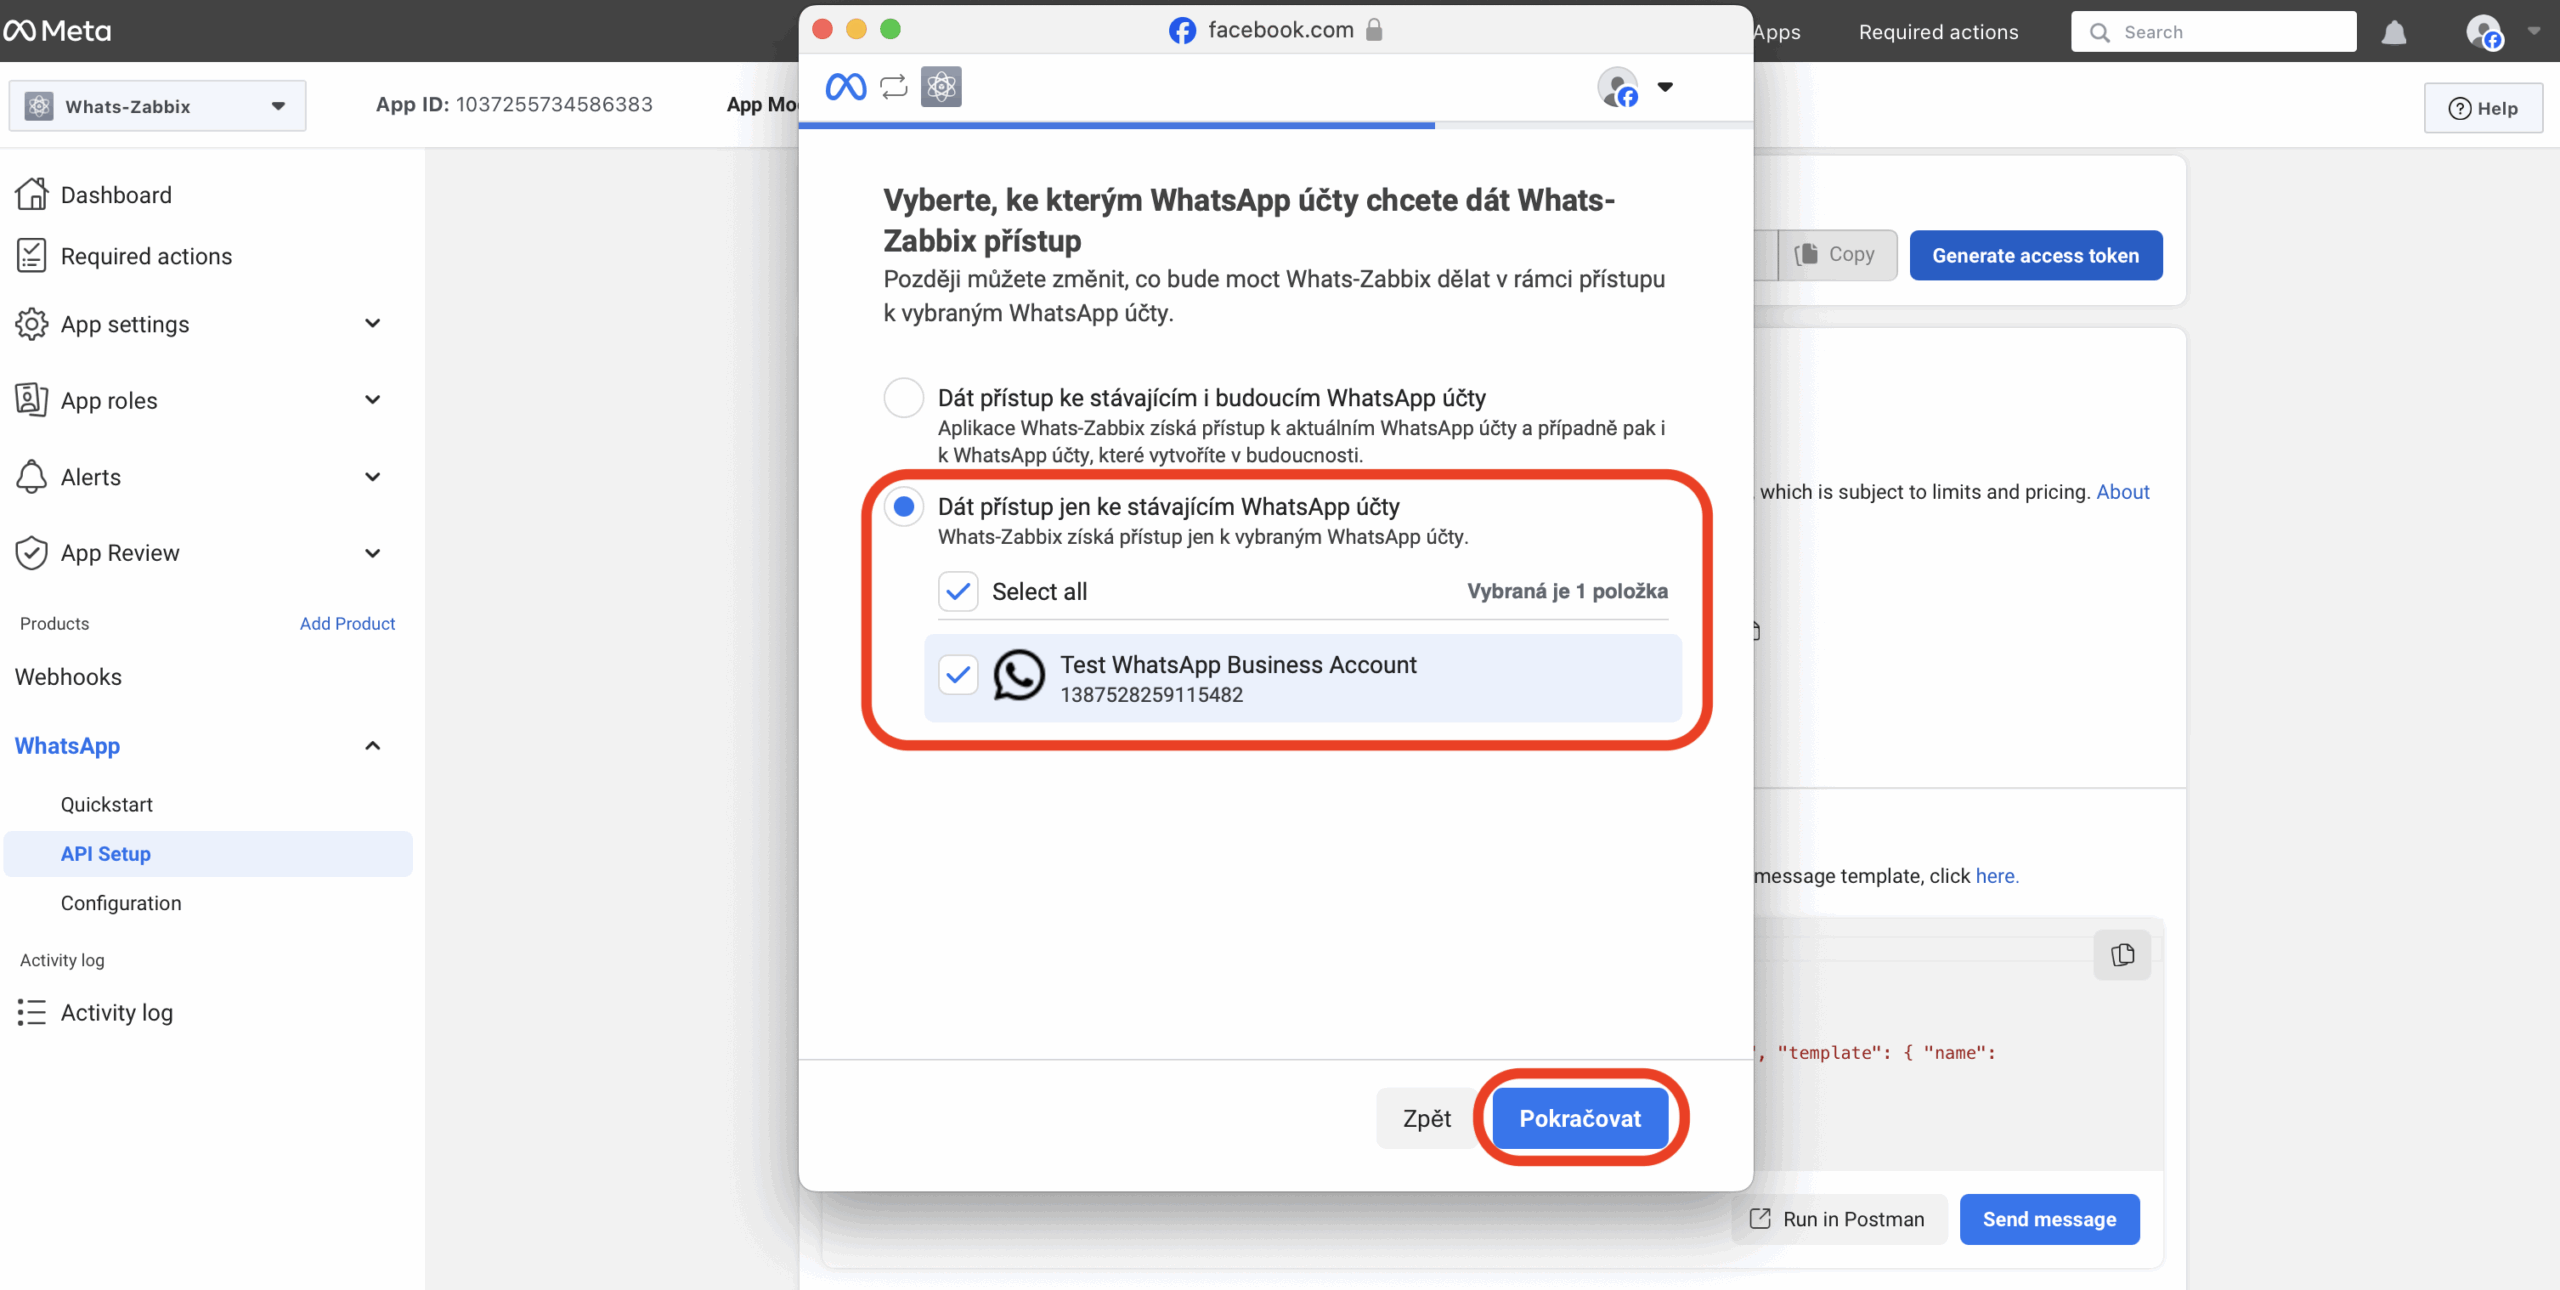
Approve the summary of permissions.
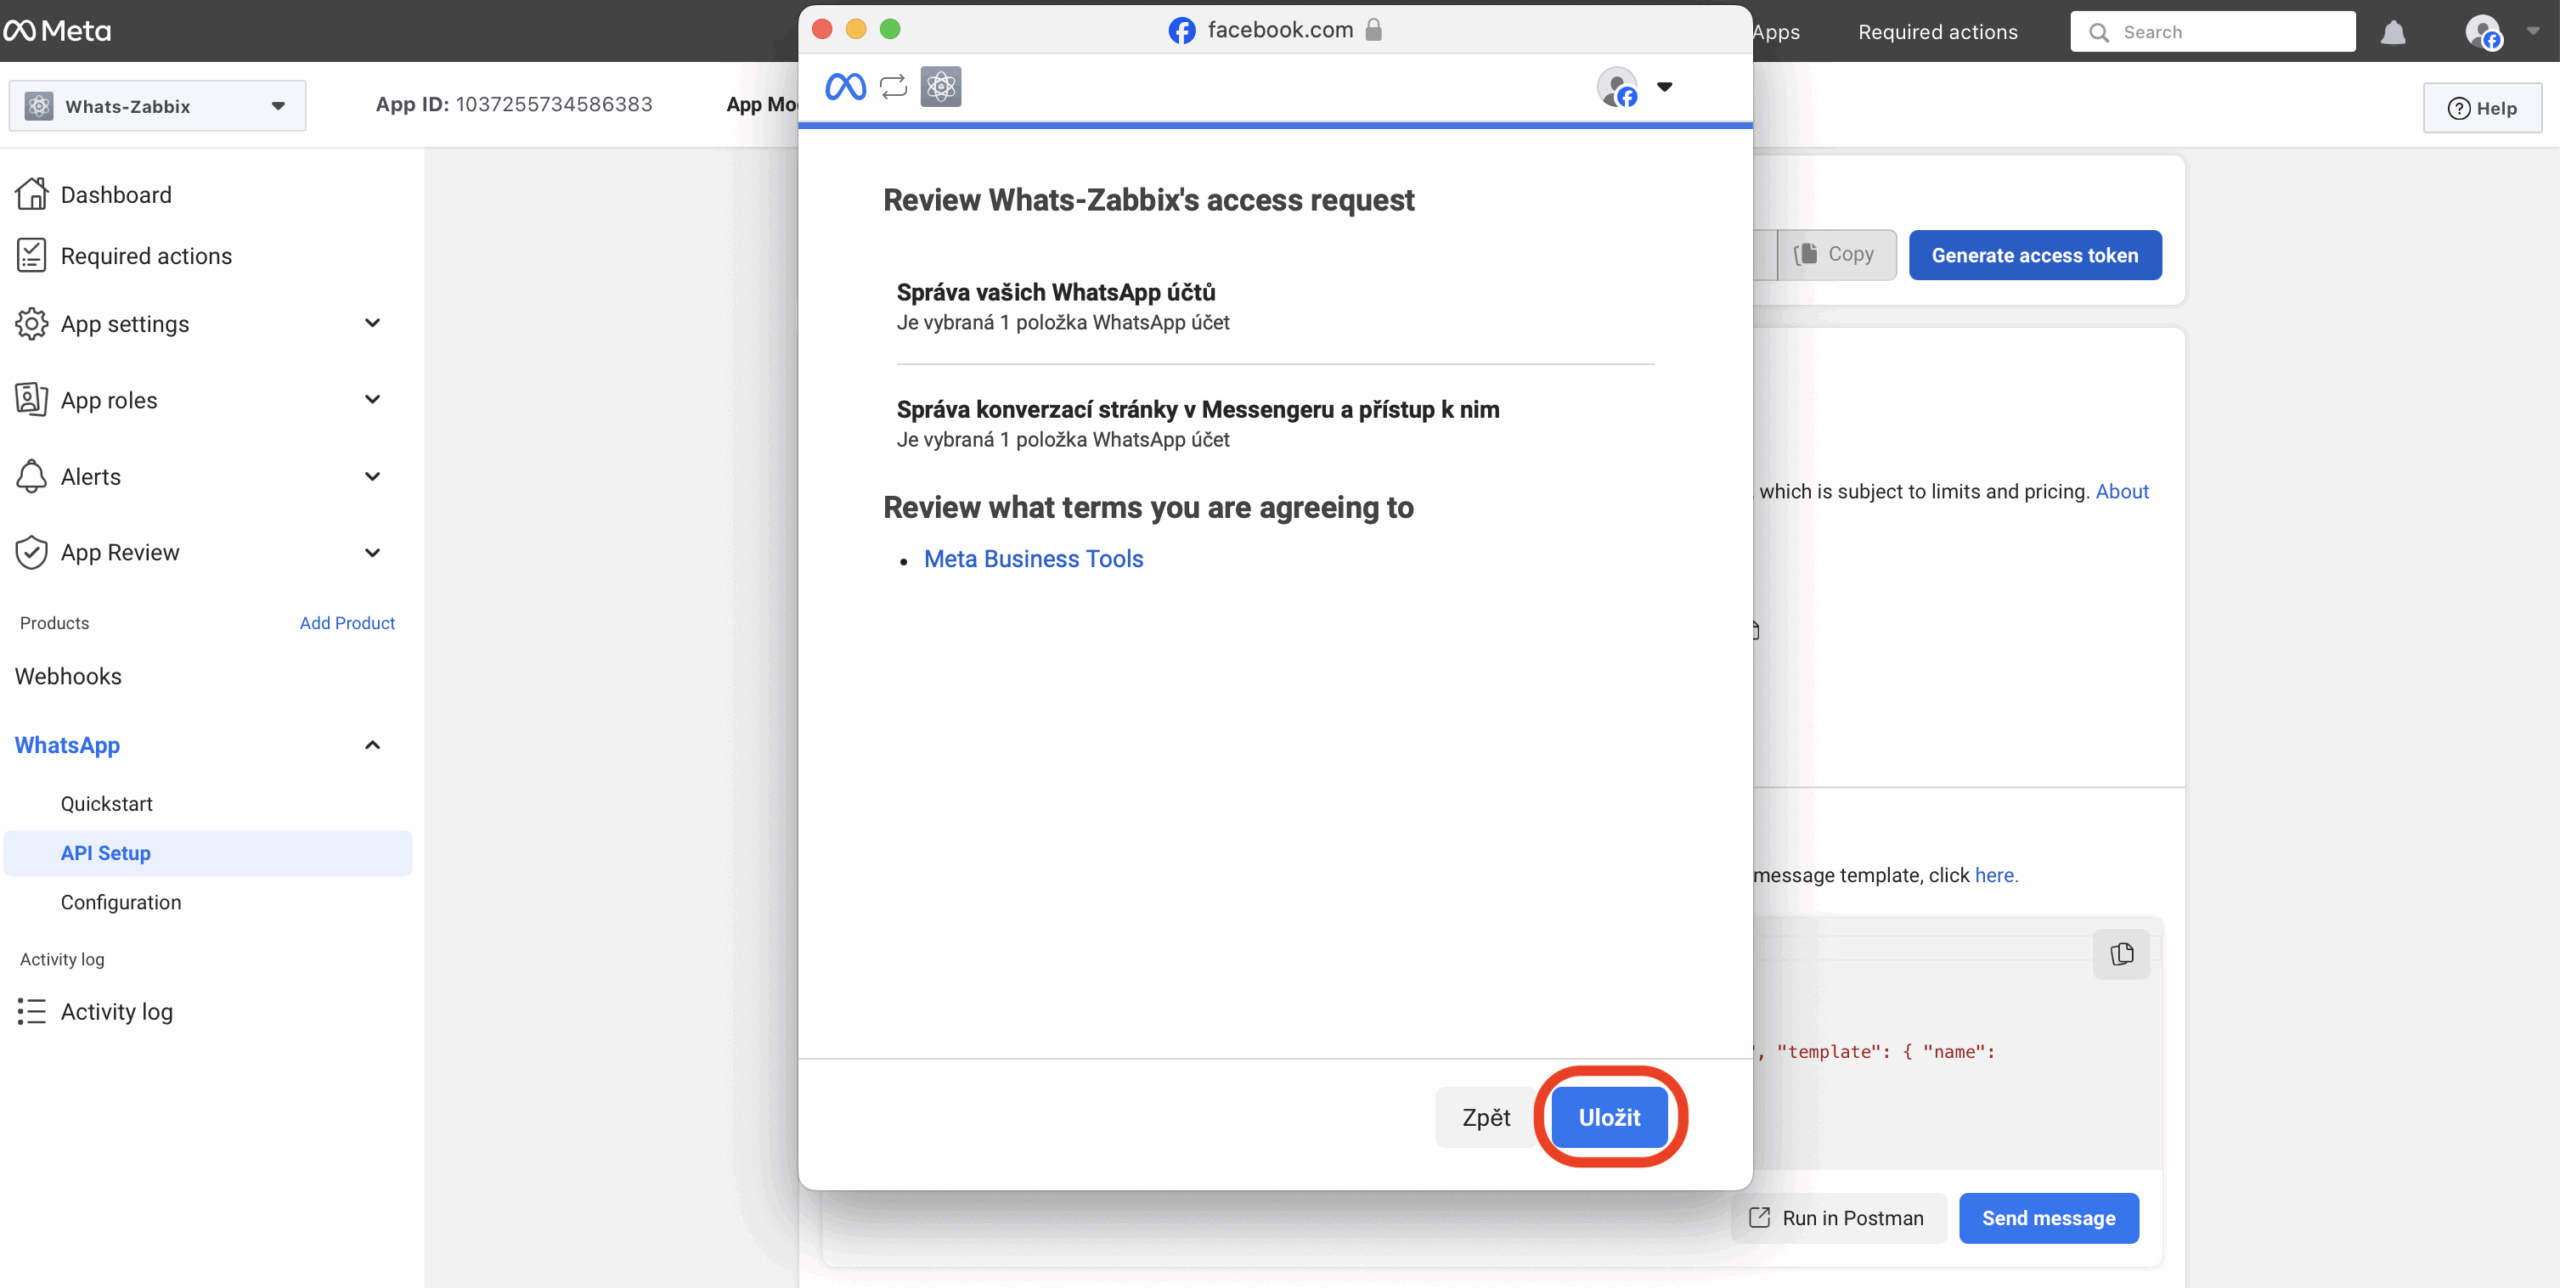
Wait until the operation completes, then close the window.
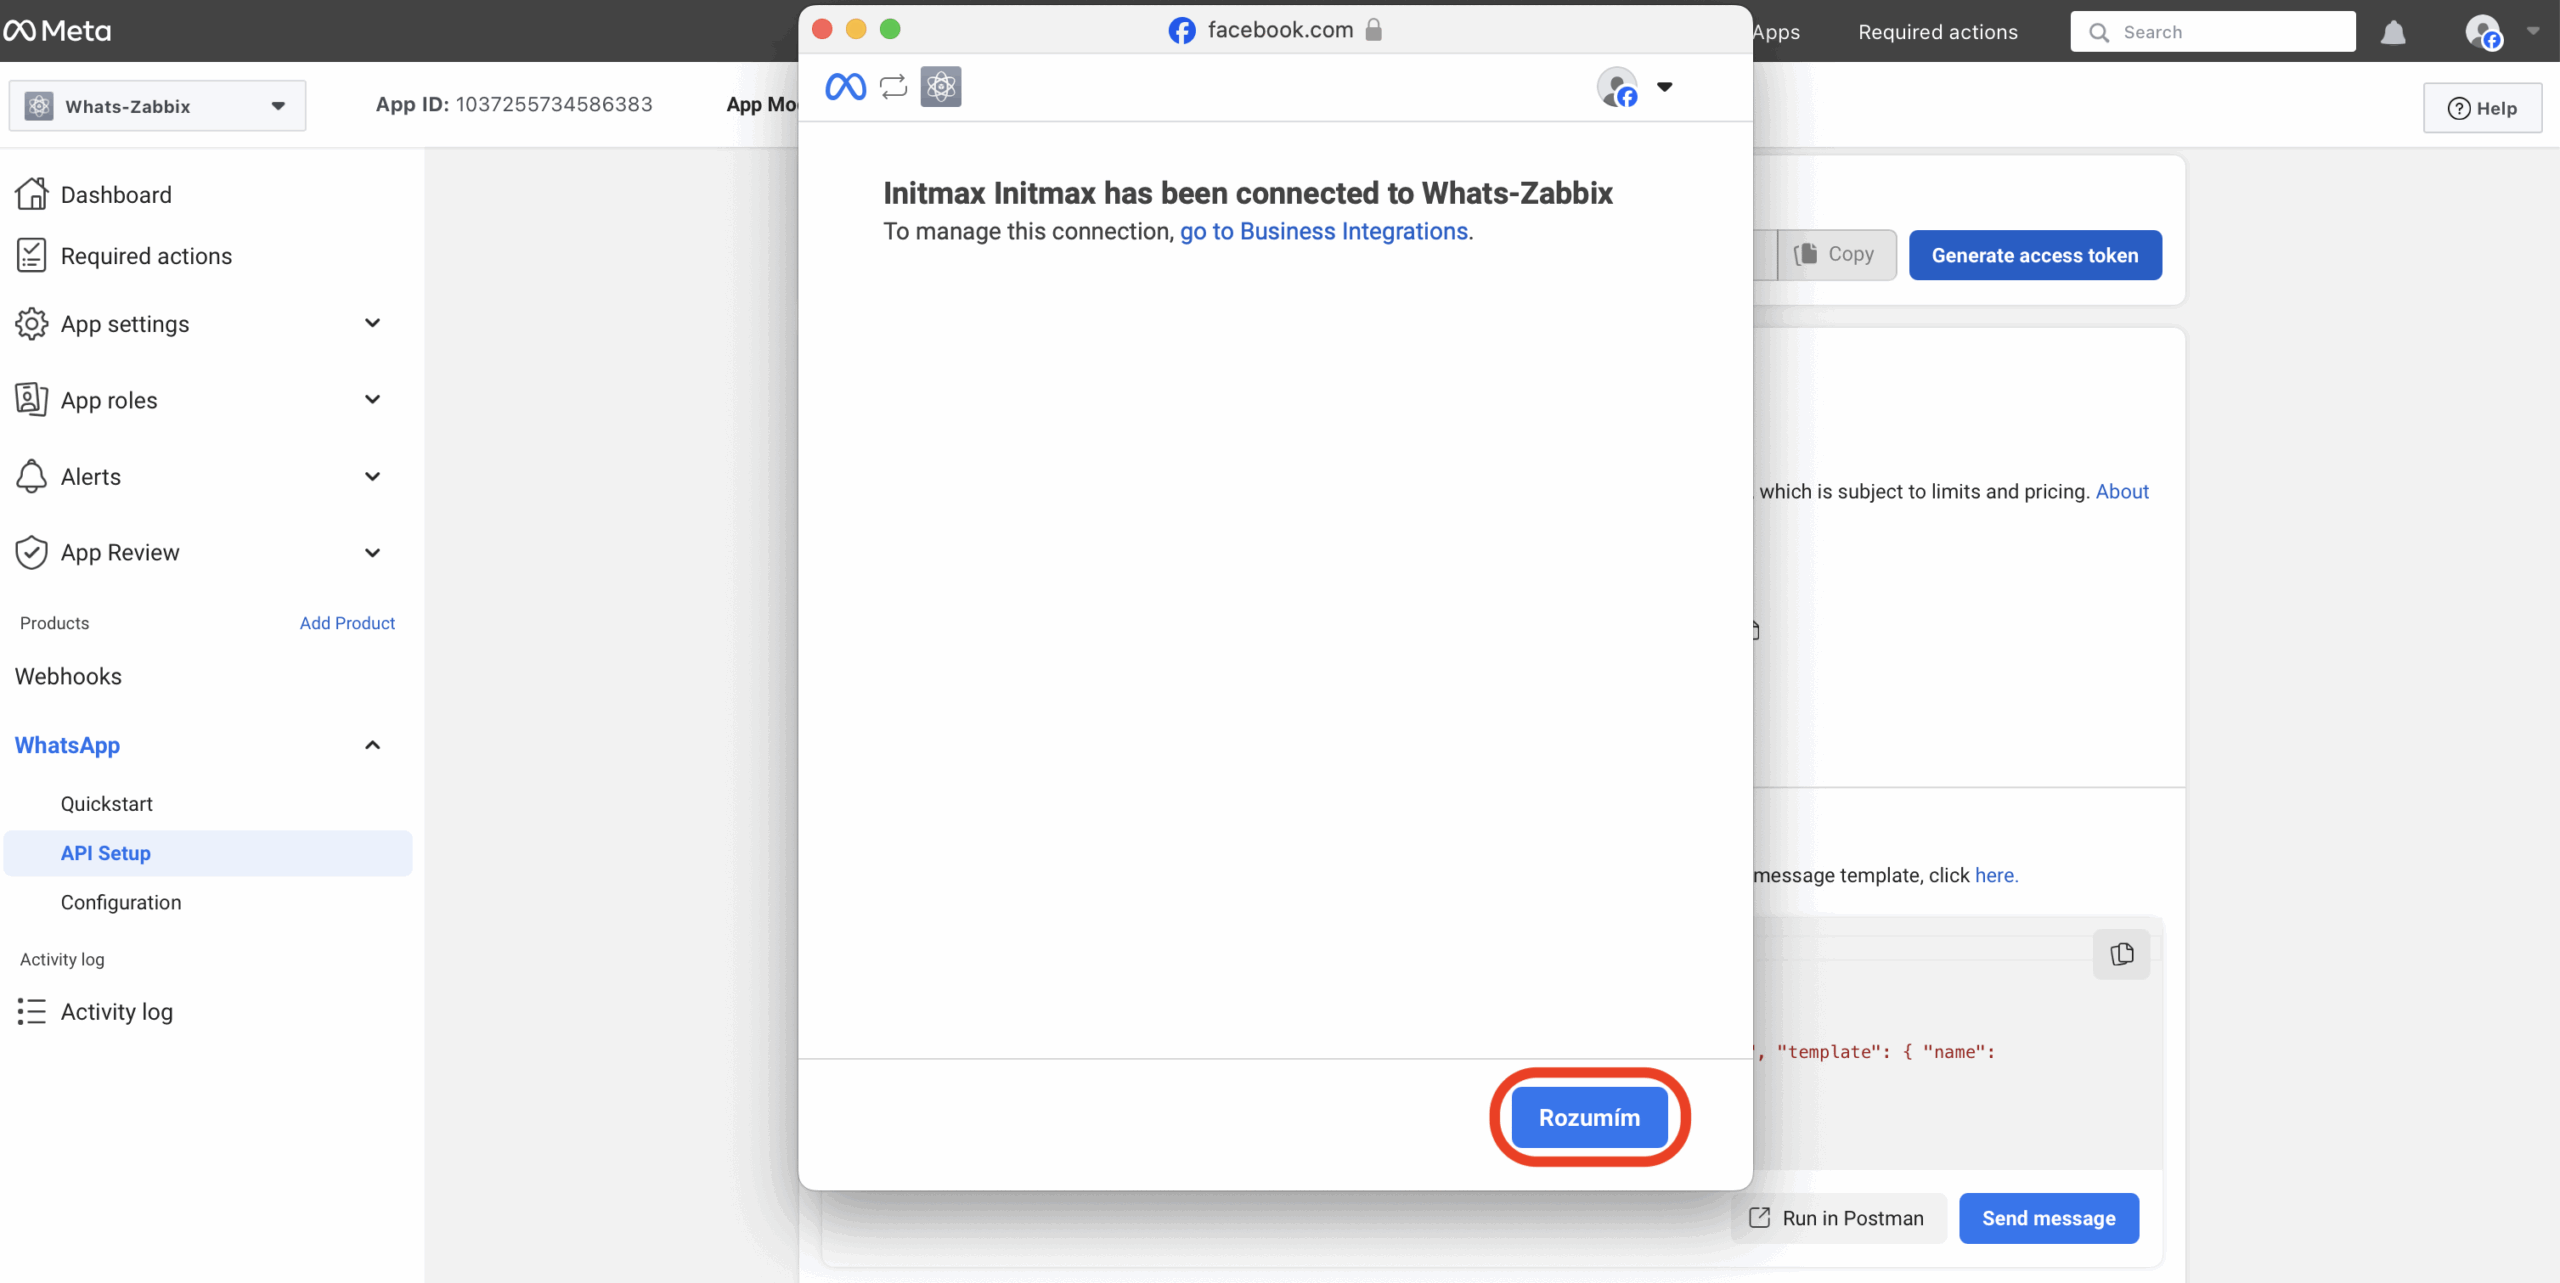
After linking your user account, the token is generated.
- The first line (Access Token) contains your token (remember, it’s valid only for 1 hour!).
- Your sending (Test number) phone number
- The recipient phone number (To) for the test notification
- The button (Send message) to send your test notification
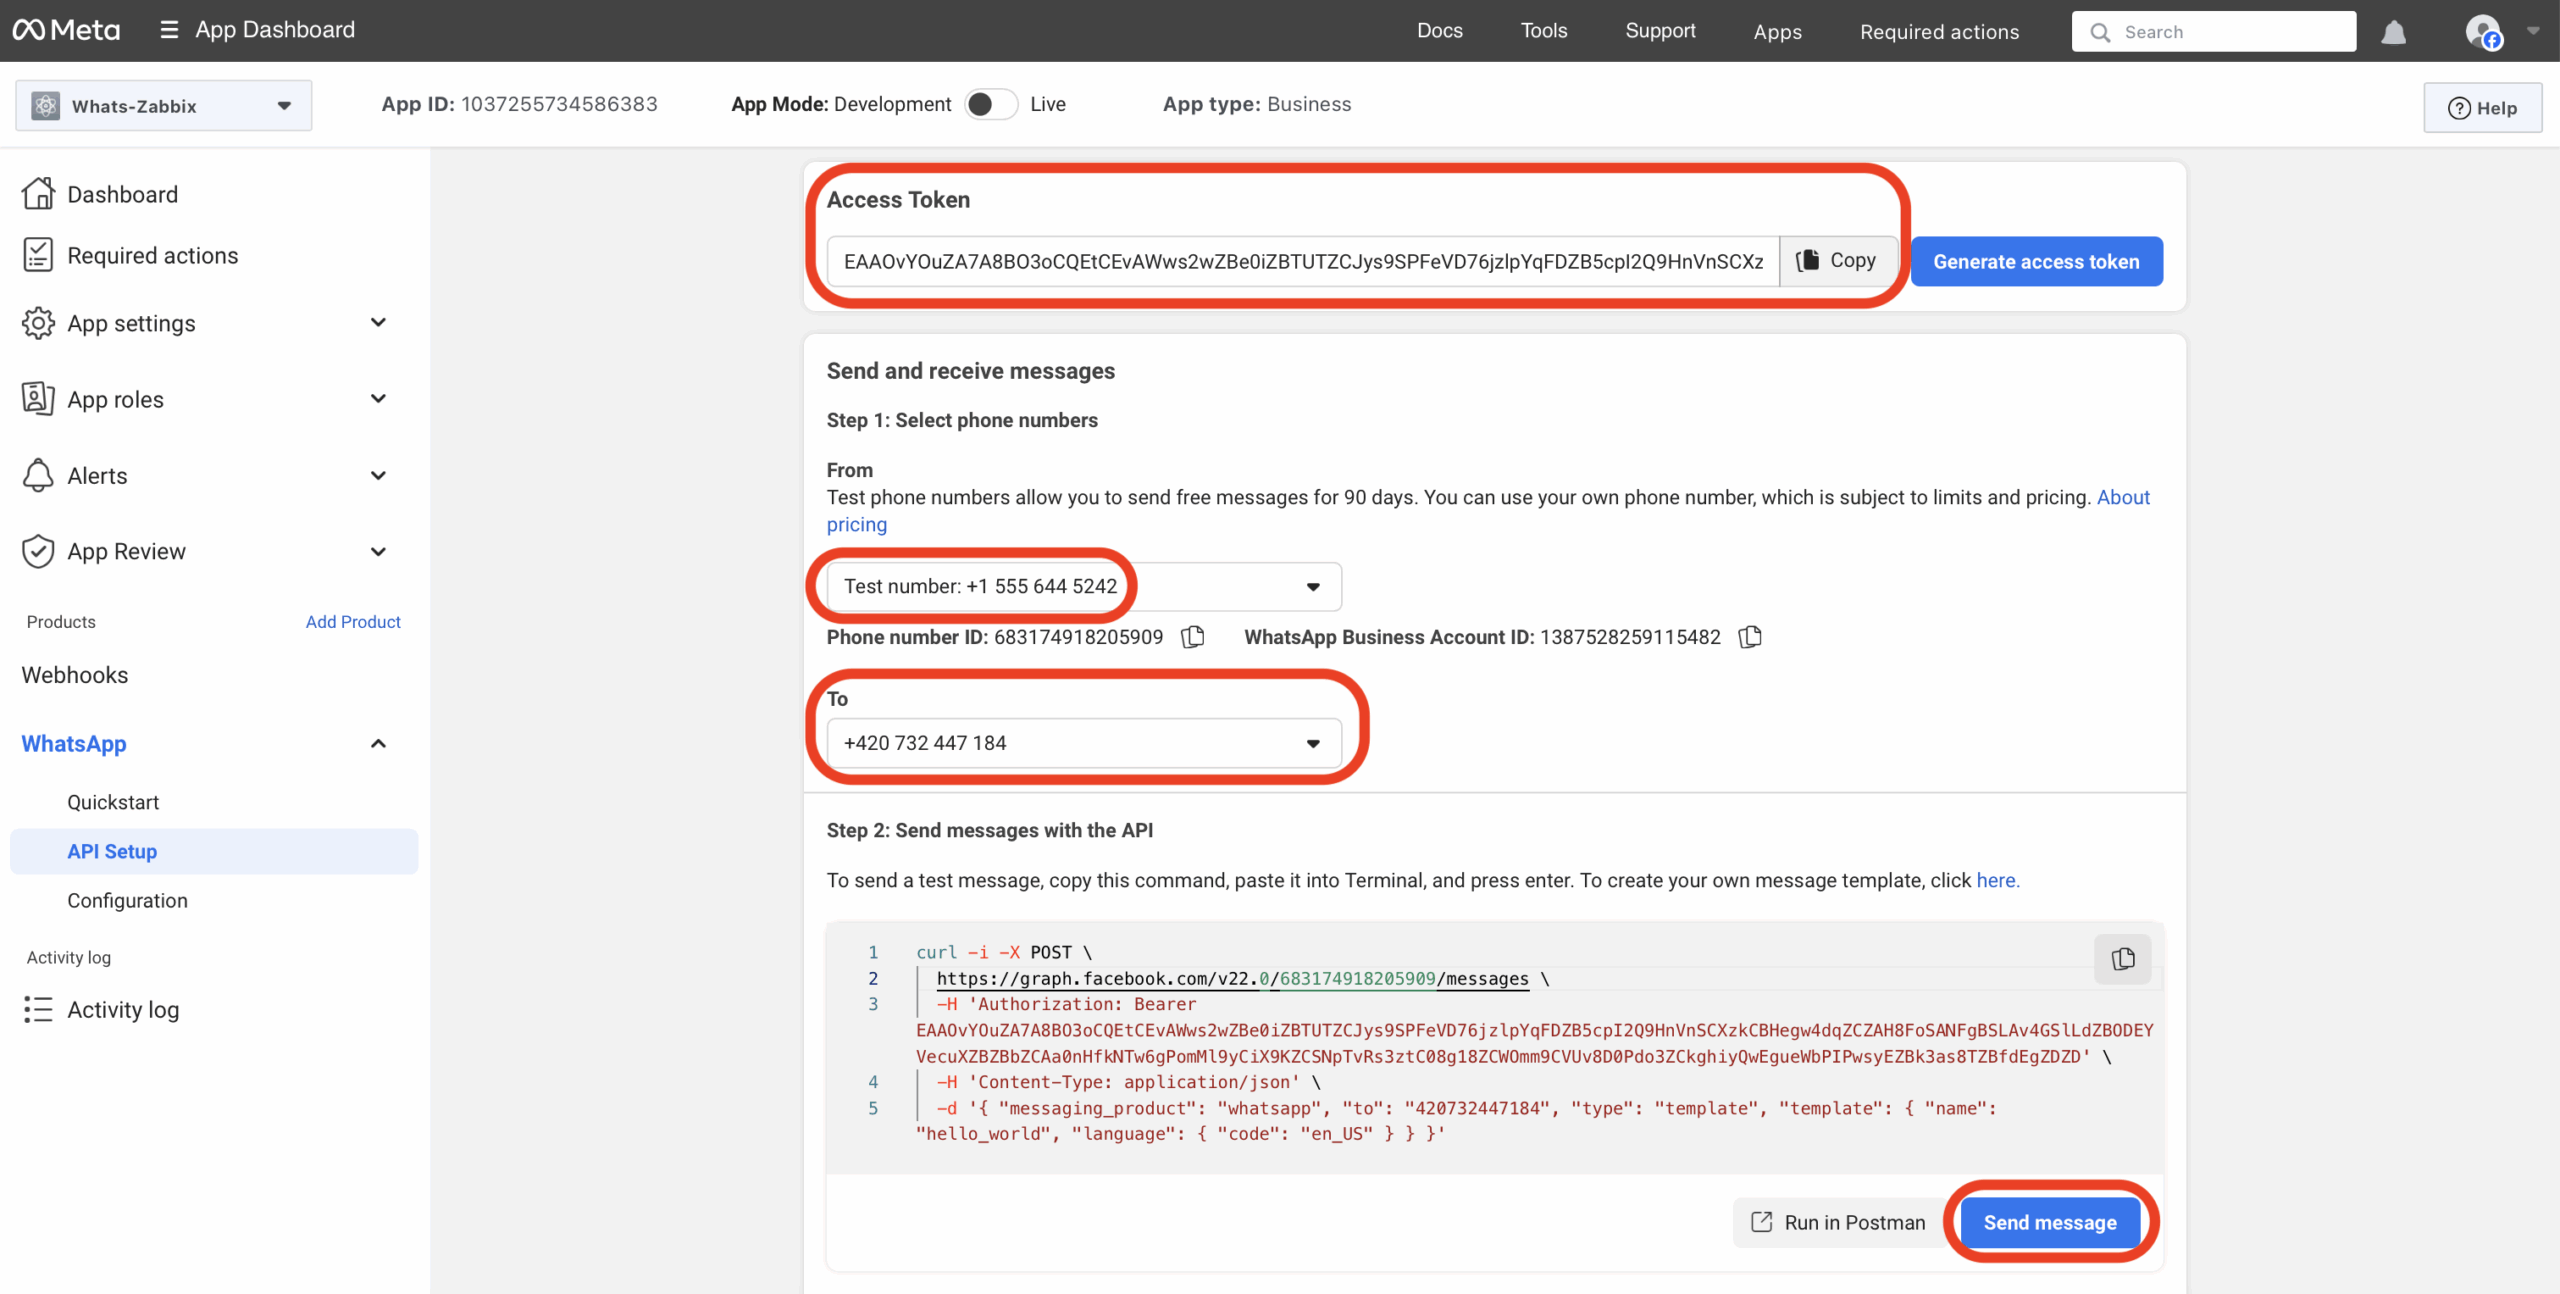
After verifying all fields, click the “Send message” button.
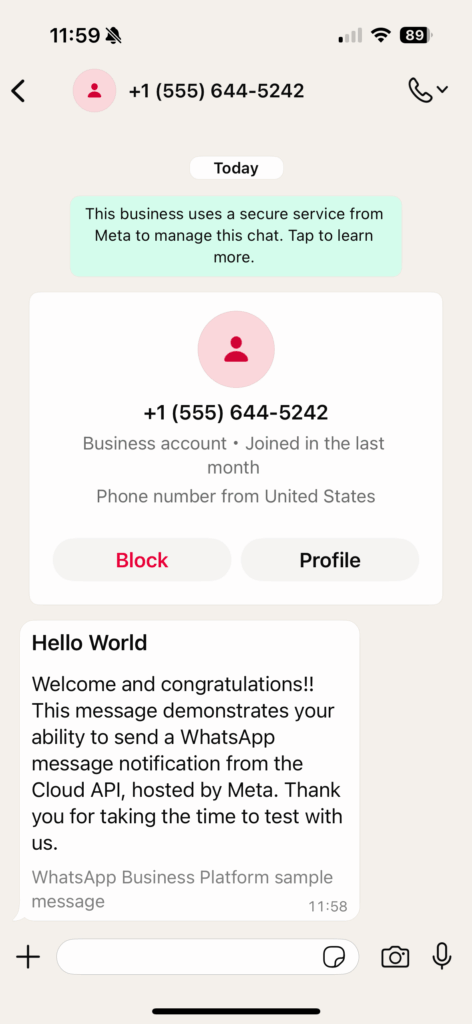
You should receive the test message within a few moments.
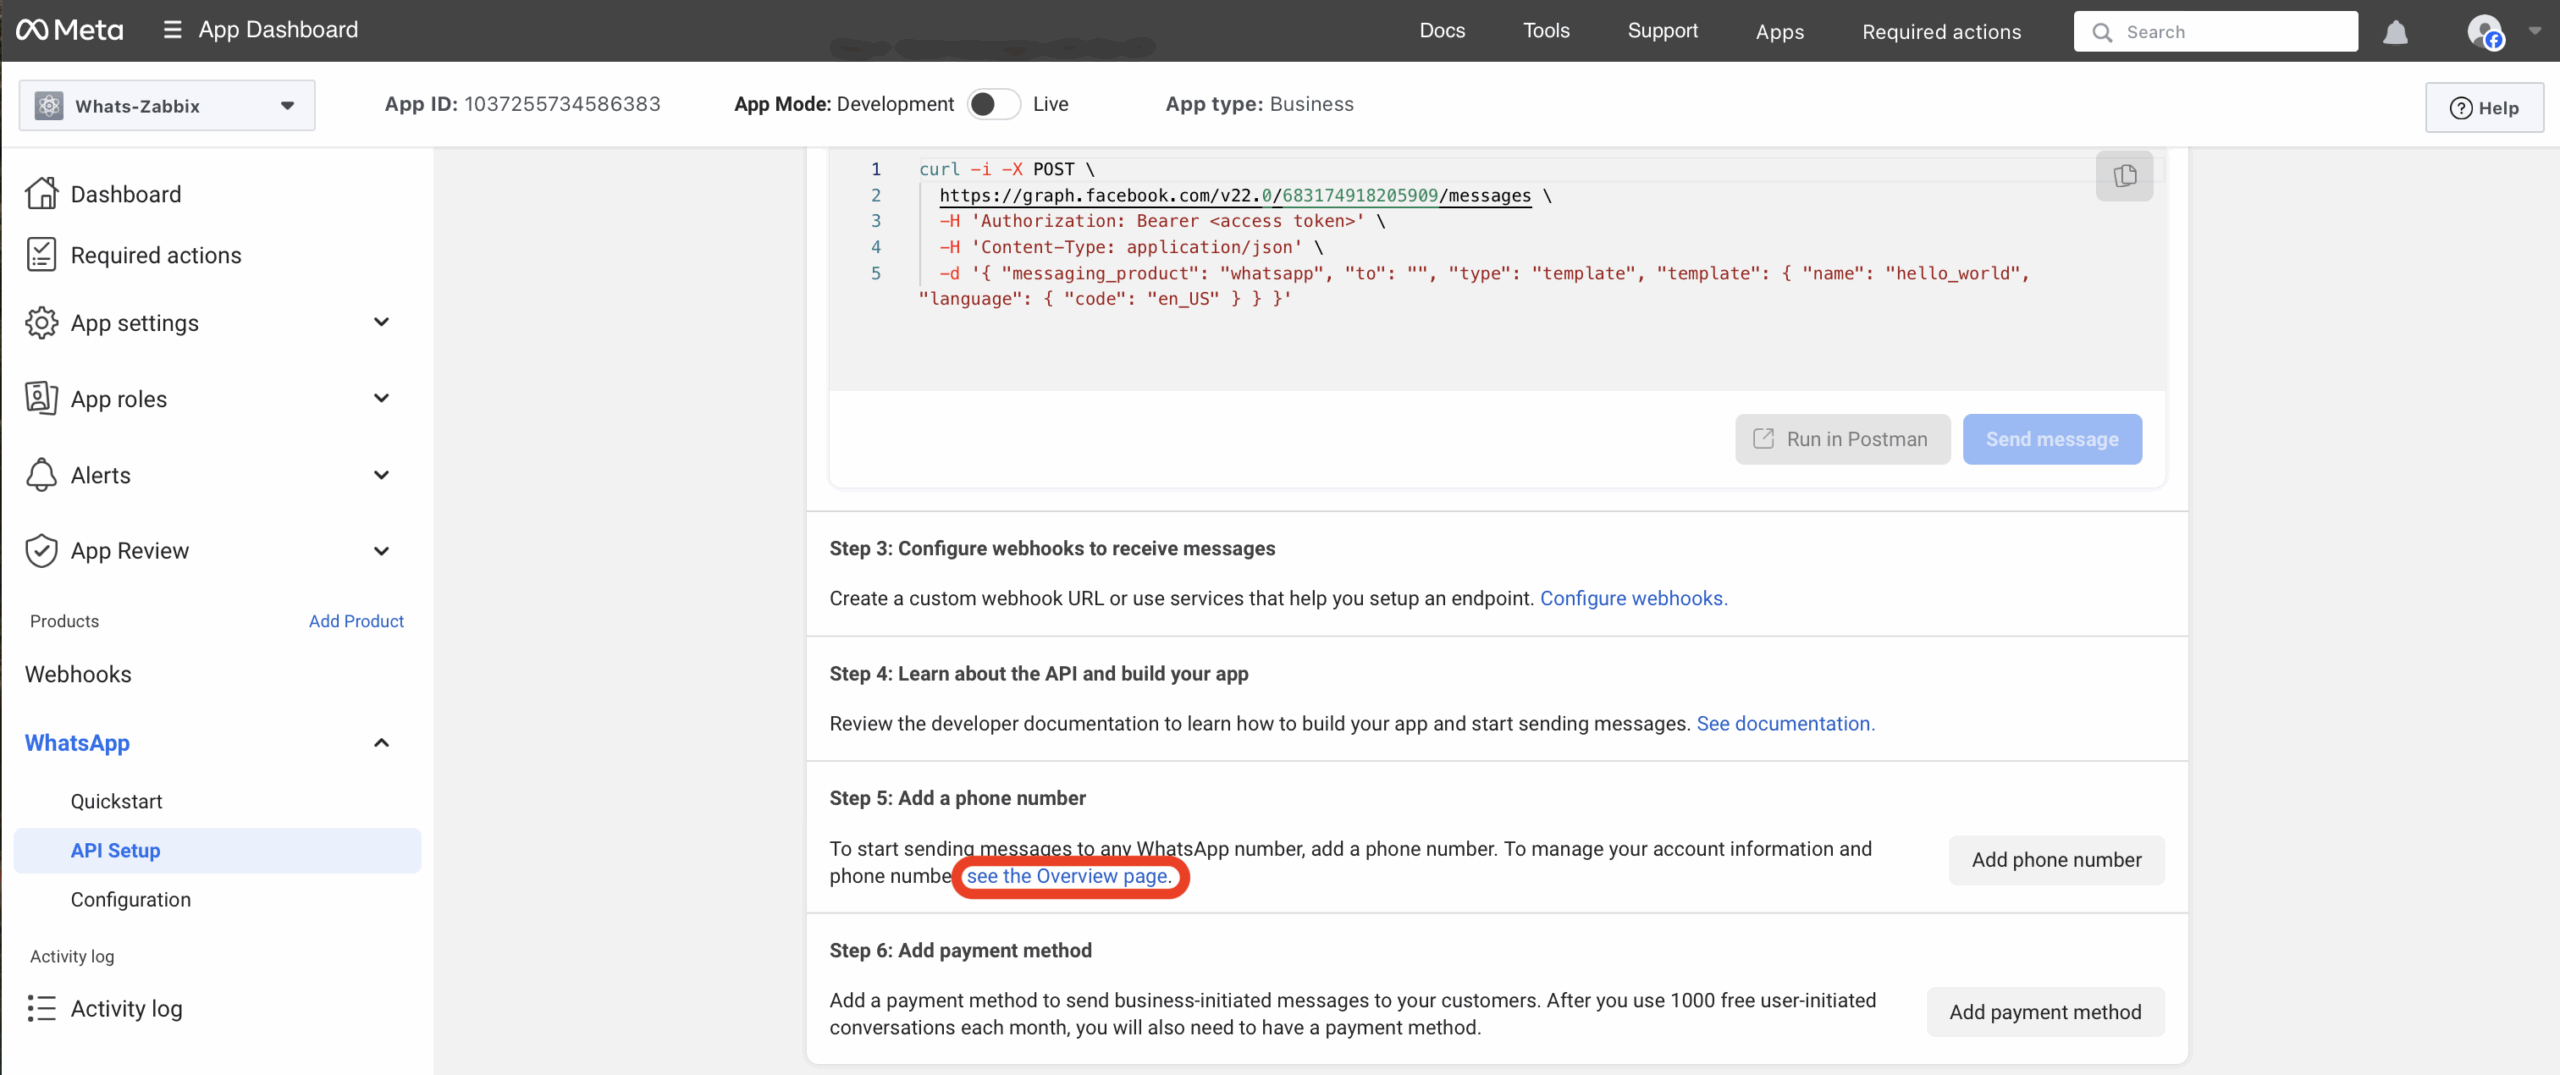
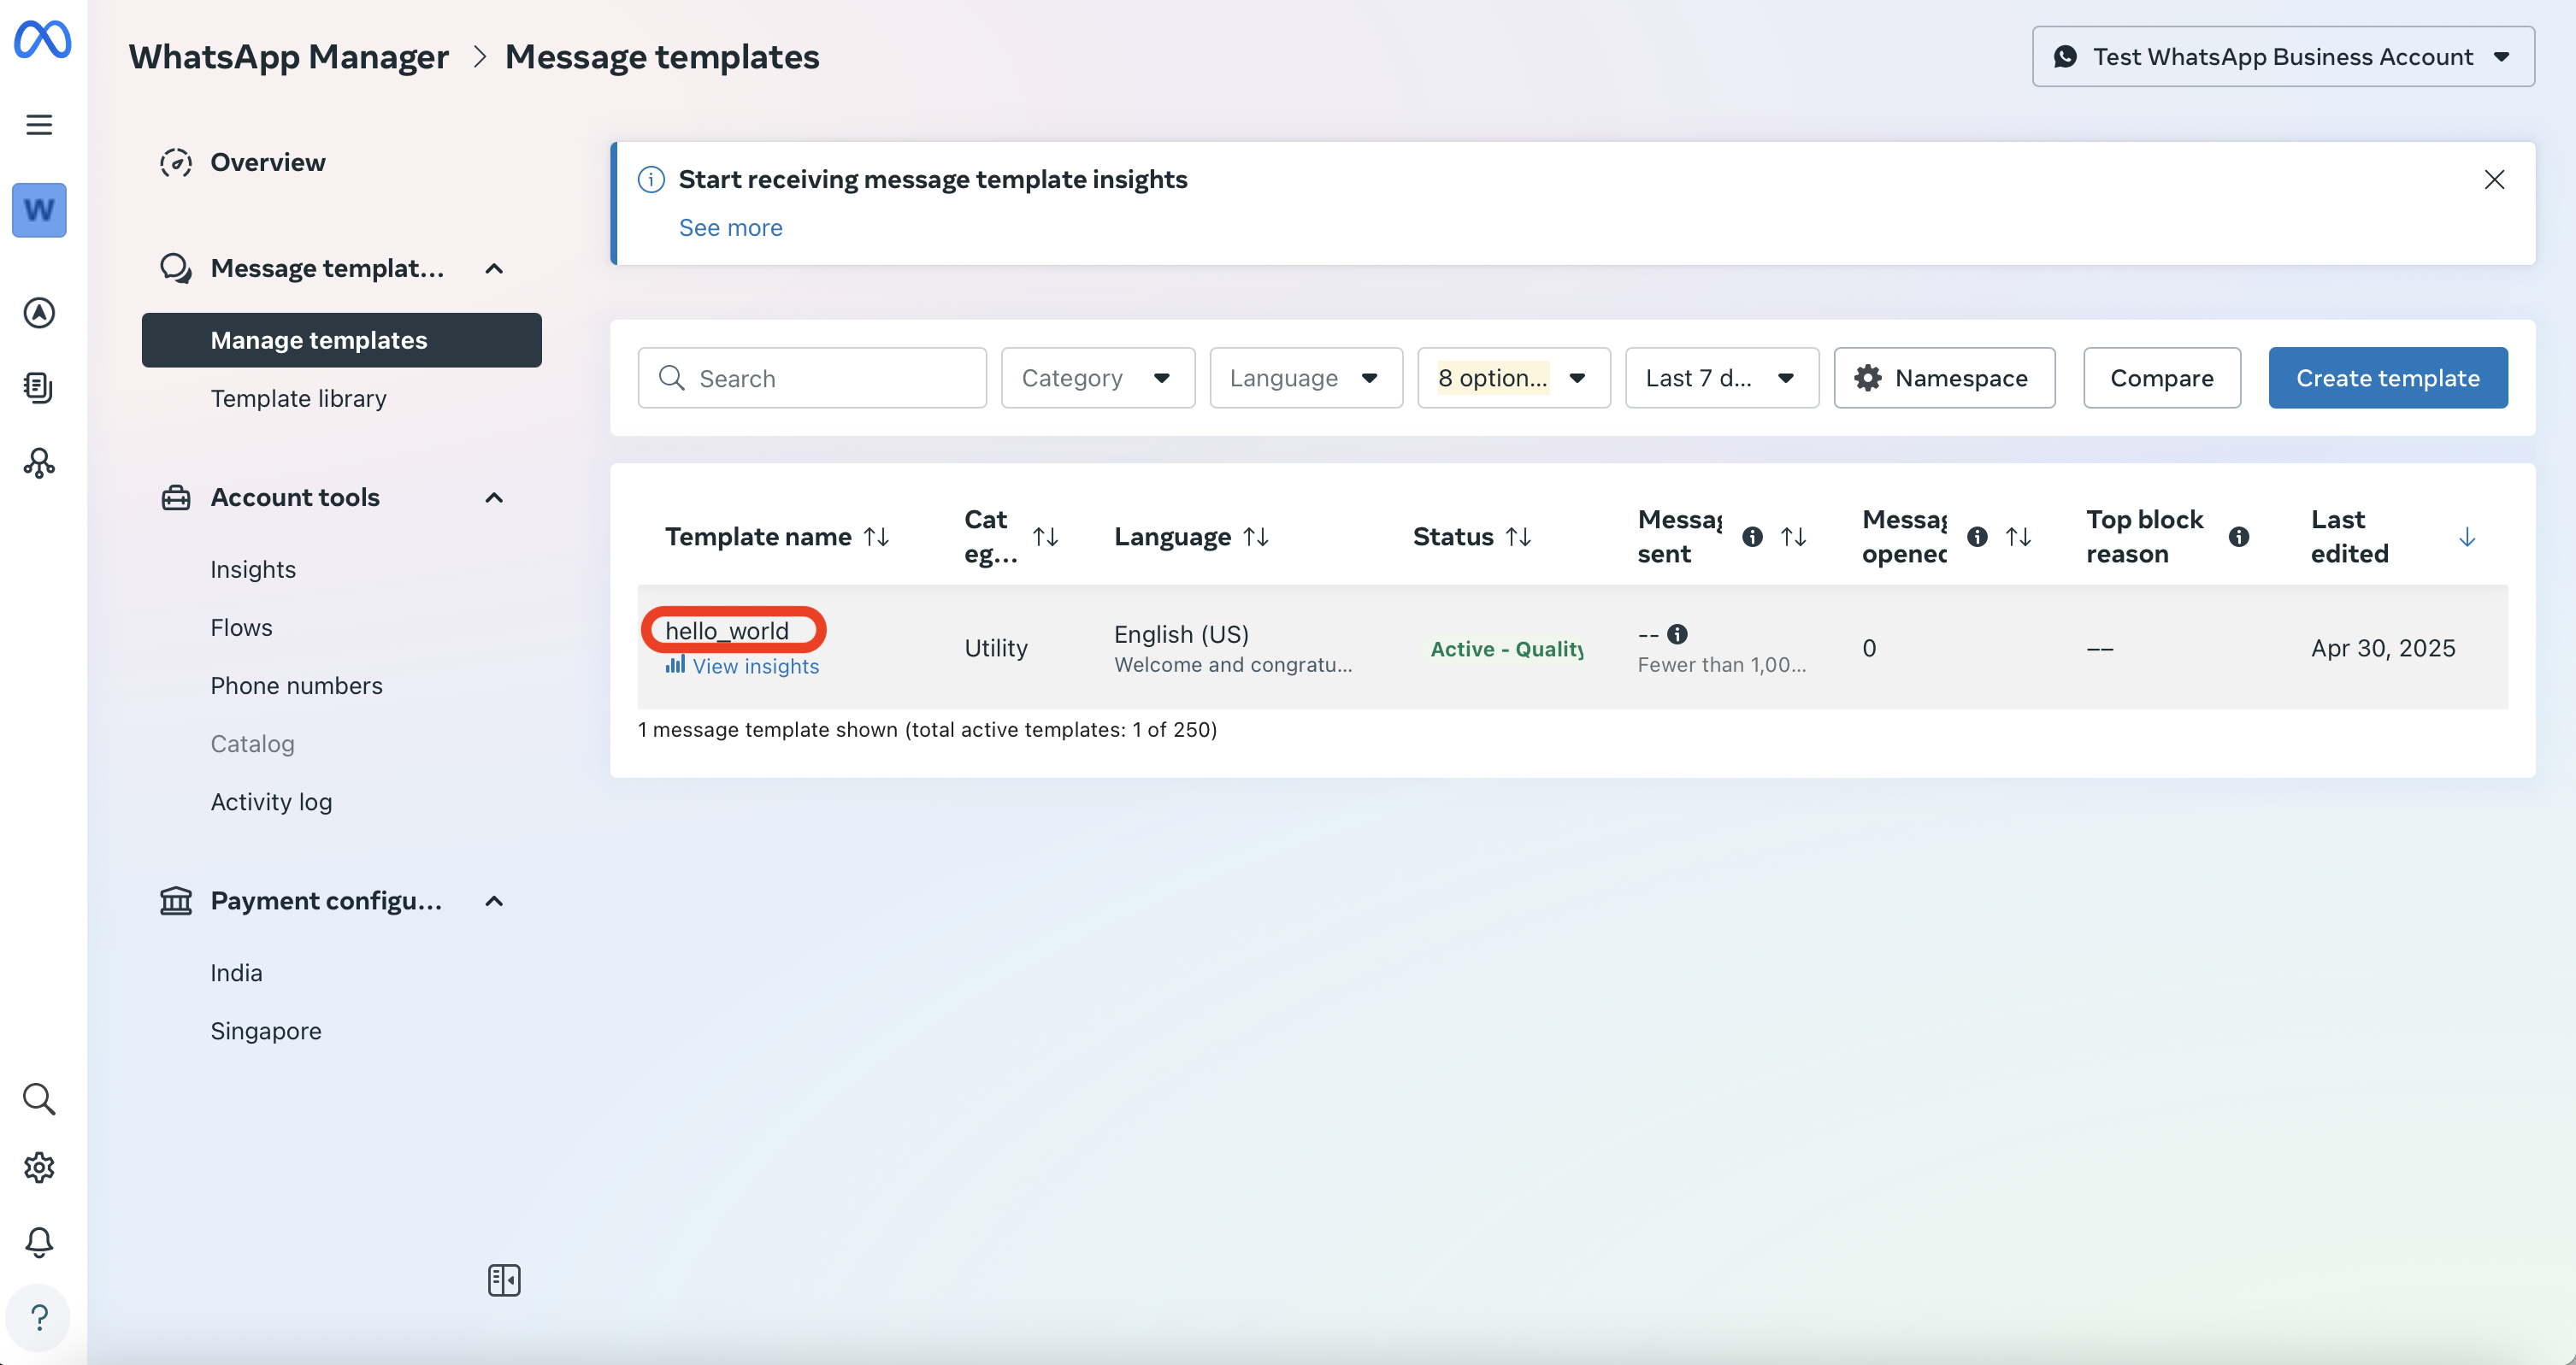
Editing the Meta Template “hello_world”
On the same page where you added phone numbers, scroll down to step 5, where you’ll find a blue link labeled “see the Overview page”. Open this link in a new window—this is the quickest way to access message template settings.
We use templates because the WhatsApp Cloud API doesn’t allow sending arbitrary messages to unverified phone numbers. By using templates, we predefine the appearance and structure of messages as a workaround.
For unverified (test) phone numbers, there’s only one available predefined template – “hello_world”. With a verified, production-level phone number, you can create custom templates tailored by severity, with color headers, or even special templates for problem resolution notifications.
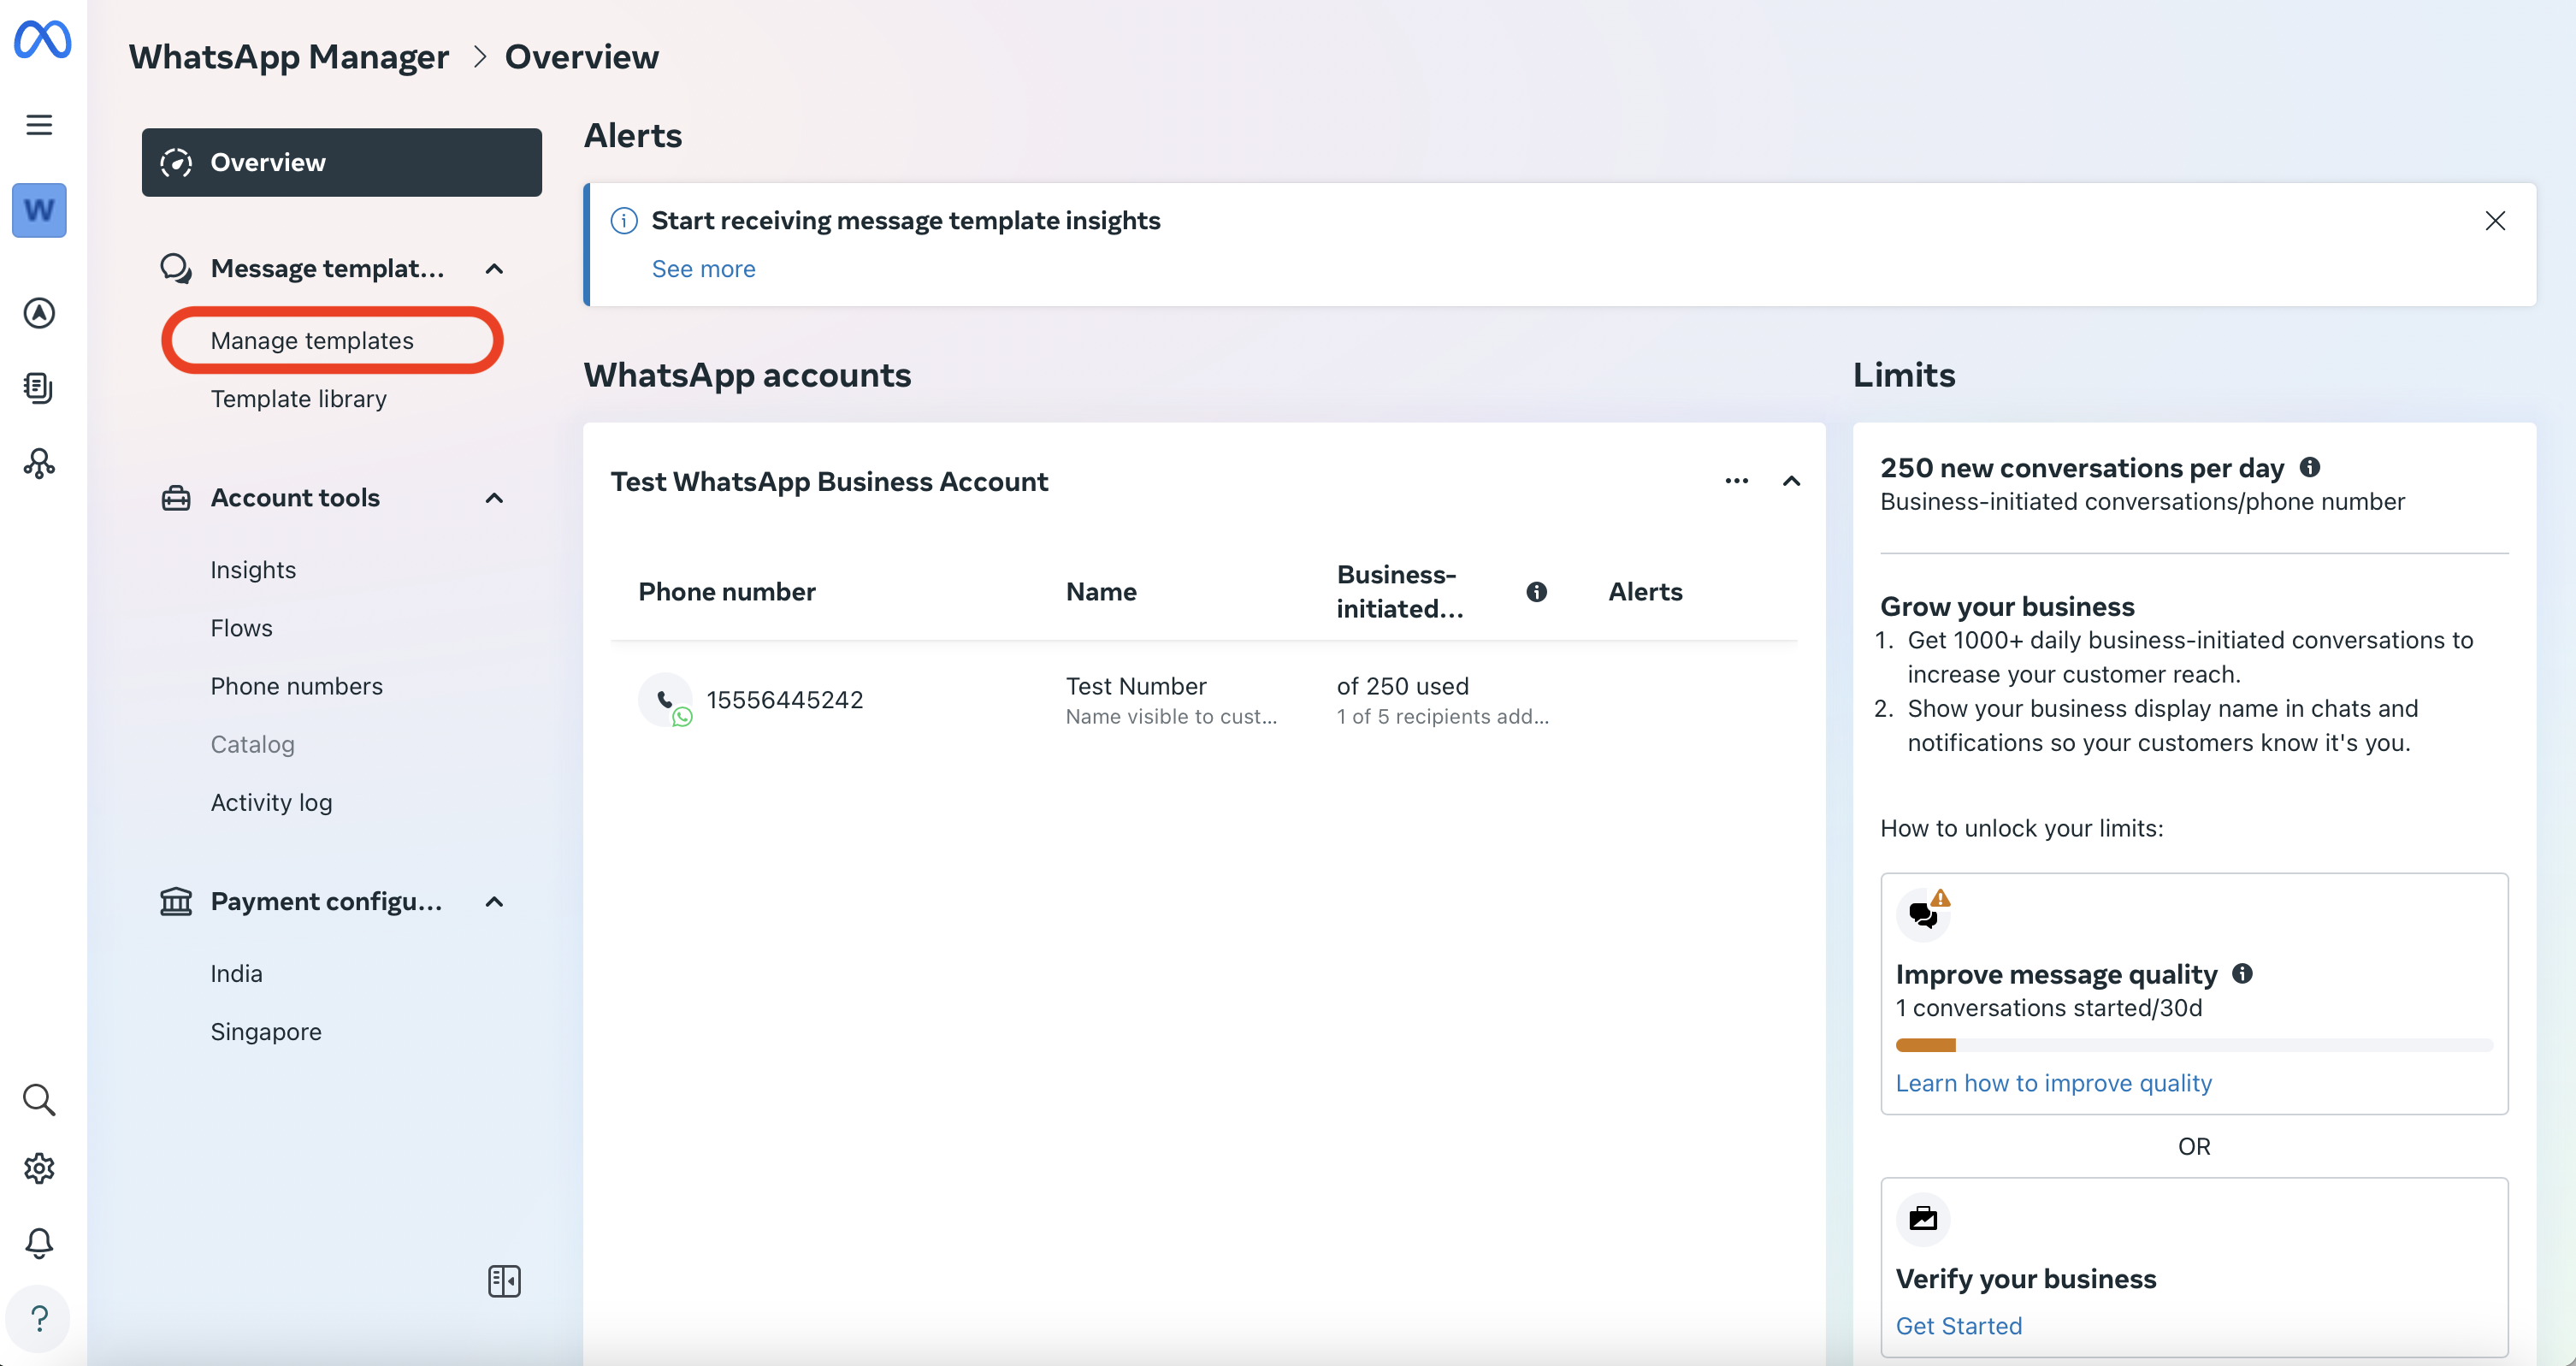
Here, click “Manage templates”.
Click on our template “hello_world”.
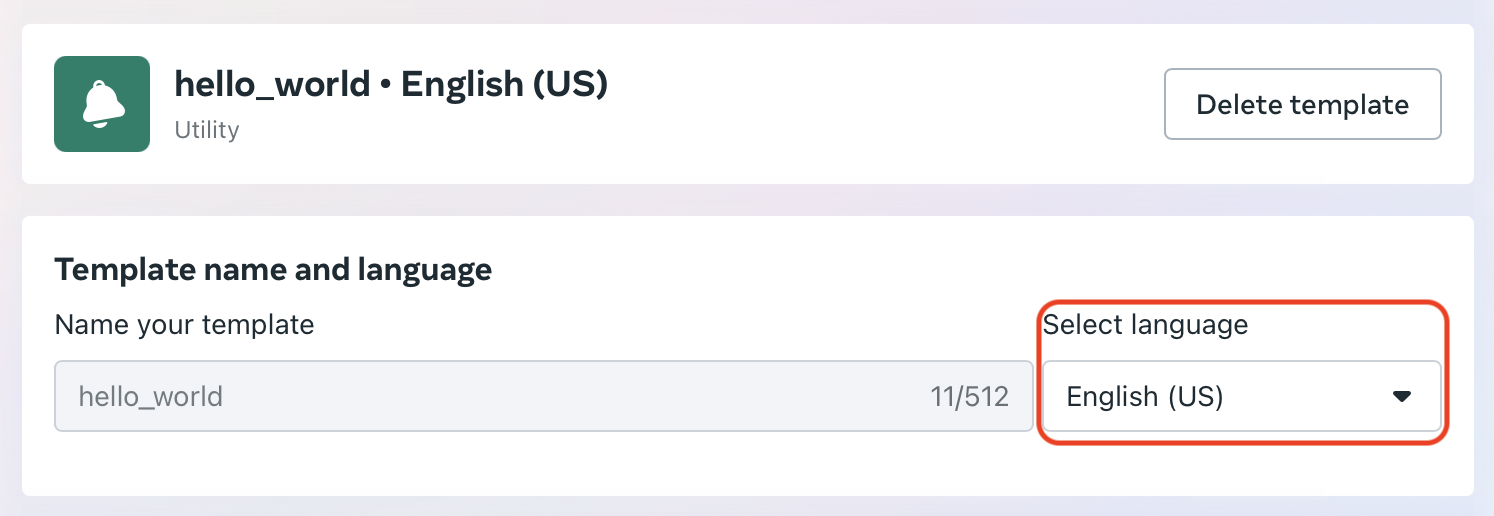
Click the “Edit template” button.

In the first section, verify—but do not change—the template language (“Select language”).
Next, we’ll fill out the “Header”, “Body”, and “Footer” sections.
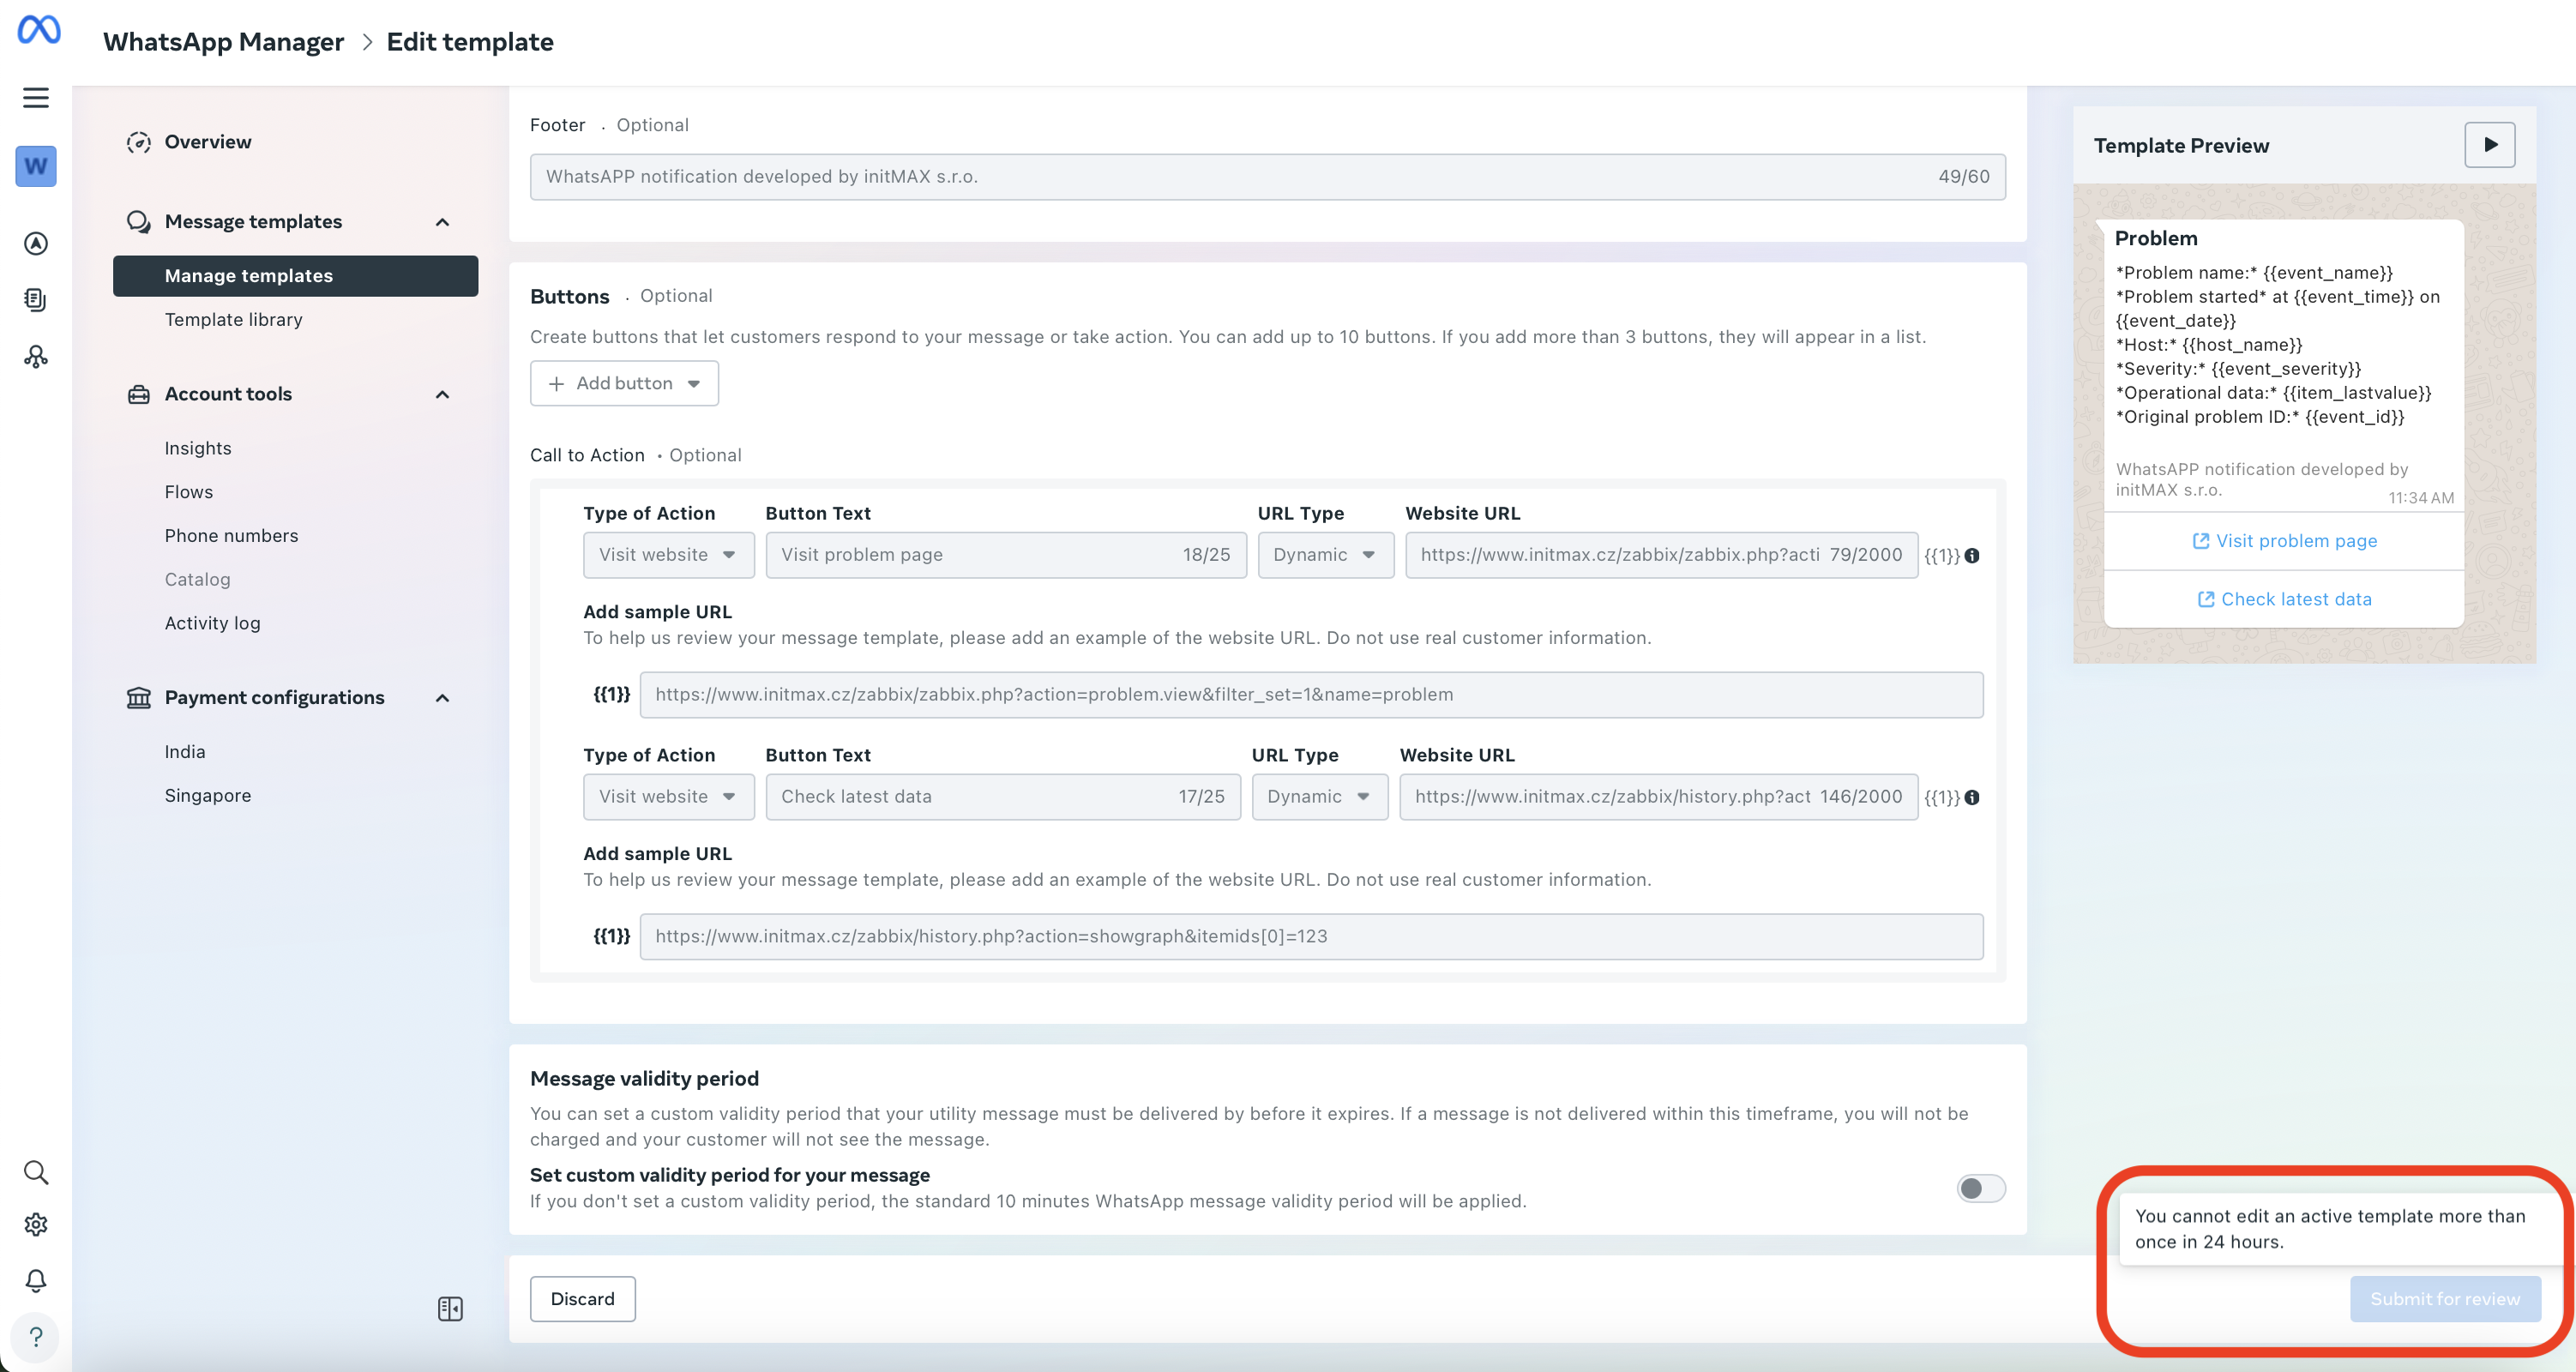
Caution: Be extremely careful here—templates can only be edited once every 24 hours! Use our provided example and modify only your Zabbix domain as necessary.
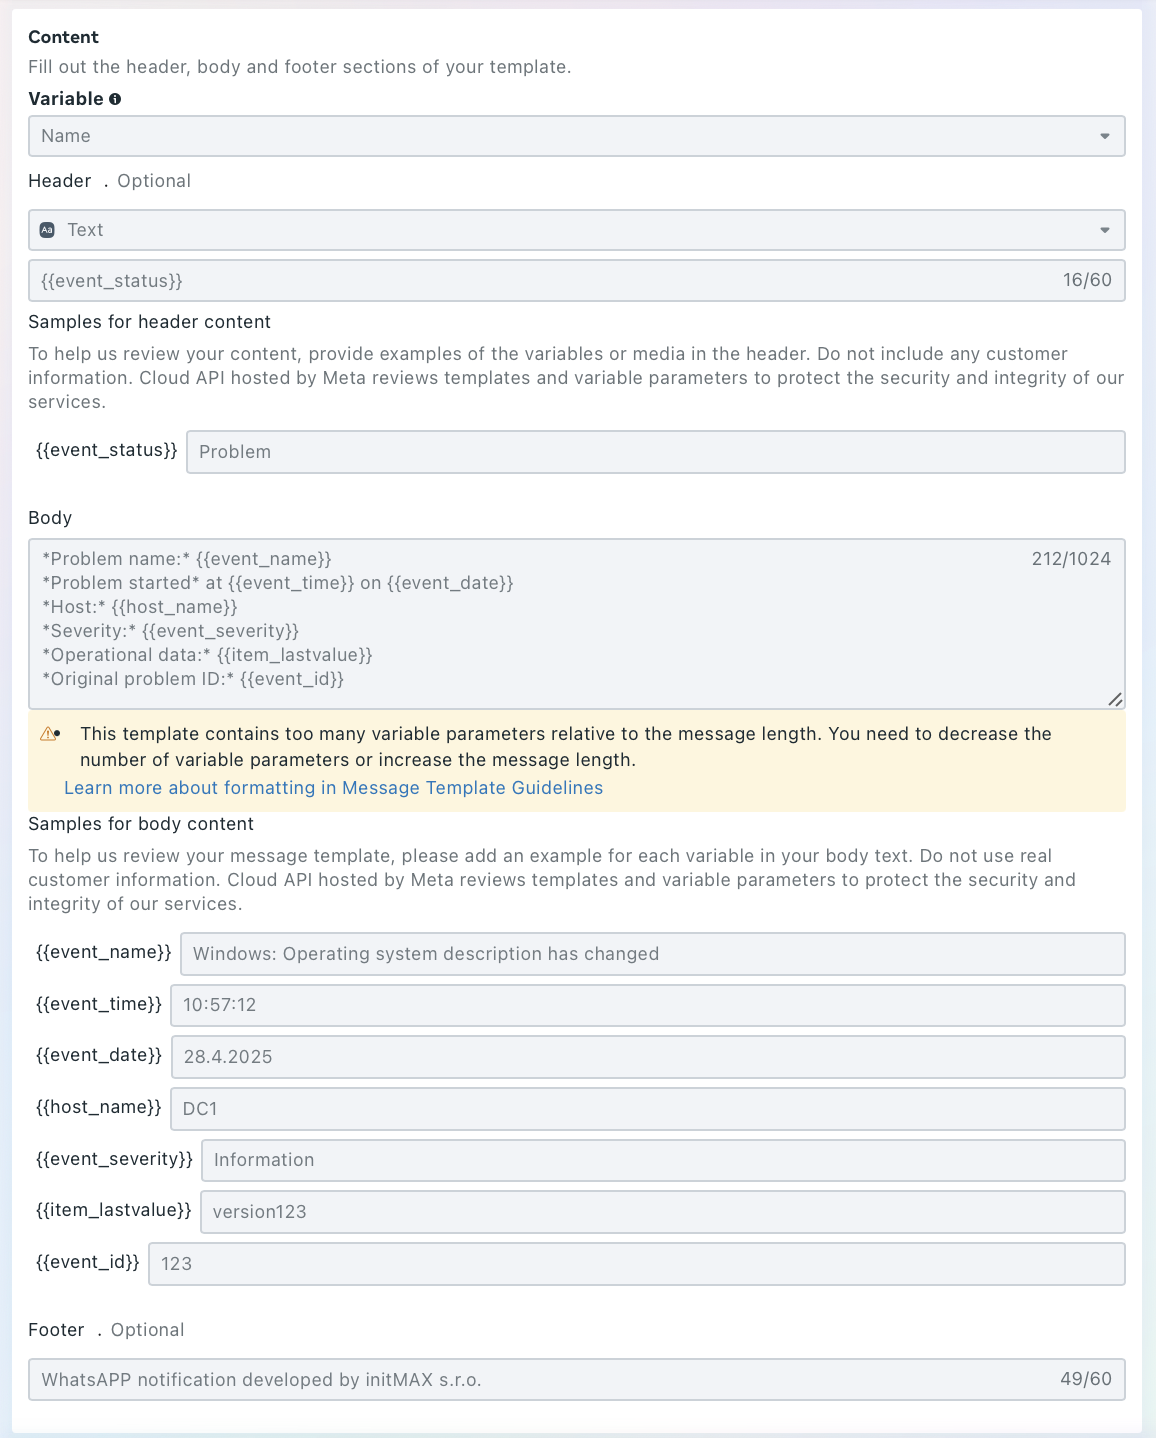
Set the variable type (“Variable”) to “Name”.
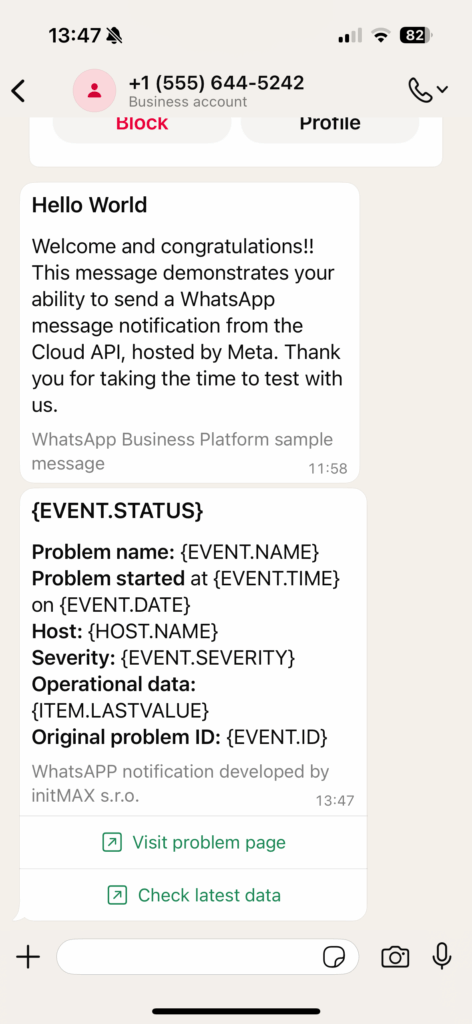
Content for the “Header” section:
{{event_status}}Content for the “Body” section:
*Problem name:* {{event_name}}
*Problem started* at {{event_time}} on {{event_date}}
*Host:* {{host_name}}
*Severity:* {{event_severity}}
*Operational data:* {{item_lastvalue}}
*Original problem ID:* {{event_id}}
Insert our sample data into the content example:
- {{event_name}} Windows: Operating system description has changed
- {{event_time}} 10:57:12
- {{event_date}} 28.4.2025
- {{host_name}} DC1
- {{event_severity}} Information
- {{item_lastvalue}} version123
- {{event_id}} 123
Content for the “Footer” section:
WhatsAPP notification developed by initMAX s.r.o.We’ll directly expand our template by adding a link to view the problem by its name, and another link to display the latest measured values.
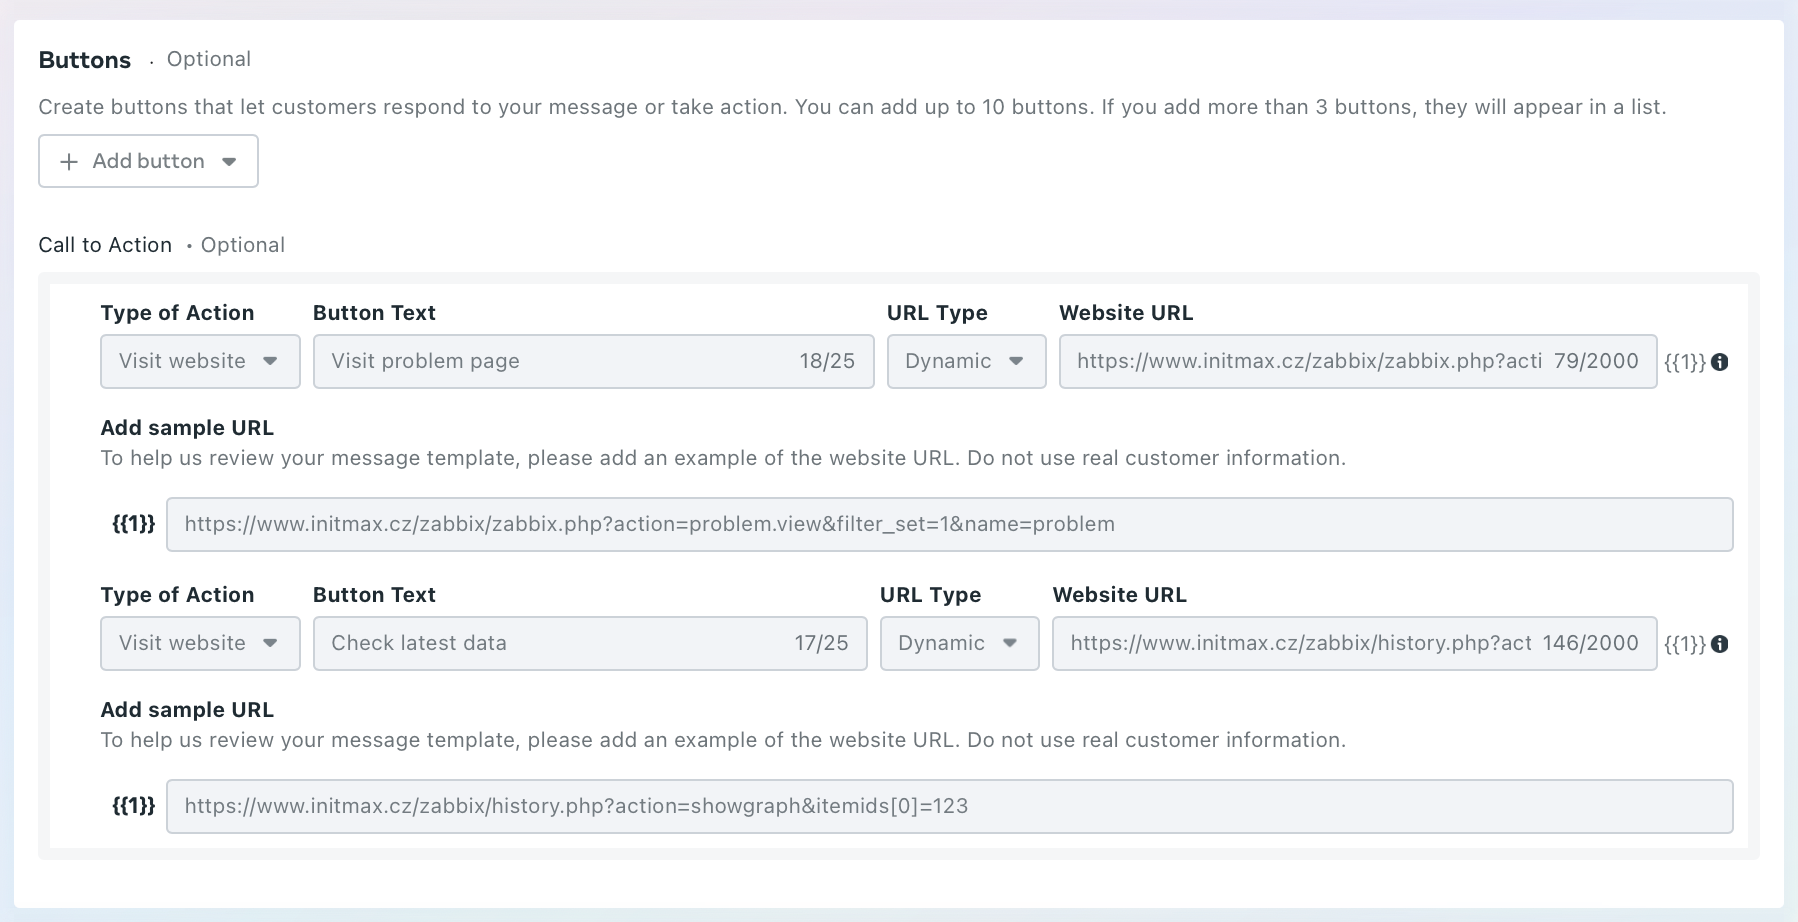
In the first link, enter the name “Visit problem page”. In the URL field, enter your link without the last parameter—Meta will automatically append this.
Note: Adjust the URL according to your own domain!
https://www.initmax.cz/zabbix/zabbix.php?action=problem.view&filter_set=1&name=- Example URL for reference: https://www.initmax.cz/zabbix/zabbix.php?action=problem.view&filter_set=1&name=problem
In the second link, enter the name “Check latest data”. Again, insert your URL without the last parameter—Meta will automatically append it.
Note: Adjust the URL according to your own domain!
https://www.initmax.cz/zabbix/history.php?action=showgraph&itemids%5B%5D=- Example URL for reference: https://www.initmax.cz/zabbix/history.php?action=showgraph&itemids%5B%5D=12344
In the right-hand corner of the screen, you’ll see a preview of the generated message. Please double-check everything carefully!

The final step is saving the templates. After saving, you won’t be able to edit them for the next 24 hours! Therefore, it’s essential to double-check everything carefully and ensure it’s correct the first time.
Generating a Long-term System Token
We’ve now set up and verified everything on the Meta side, so it’s time to move on to Zabbix. However, since we need a token that ideally doesn’t expire for our notifications, we’ll first generate a long-term token.
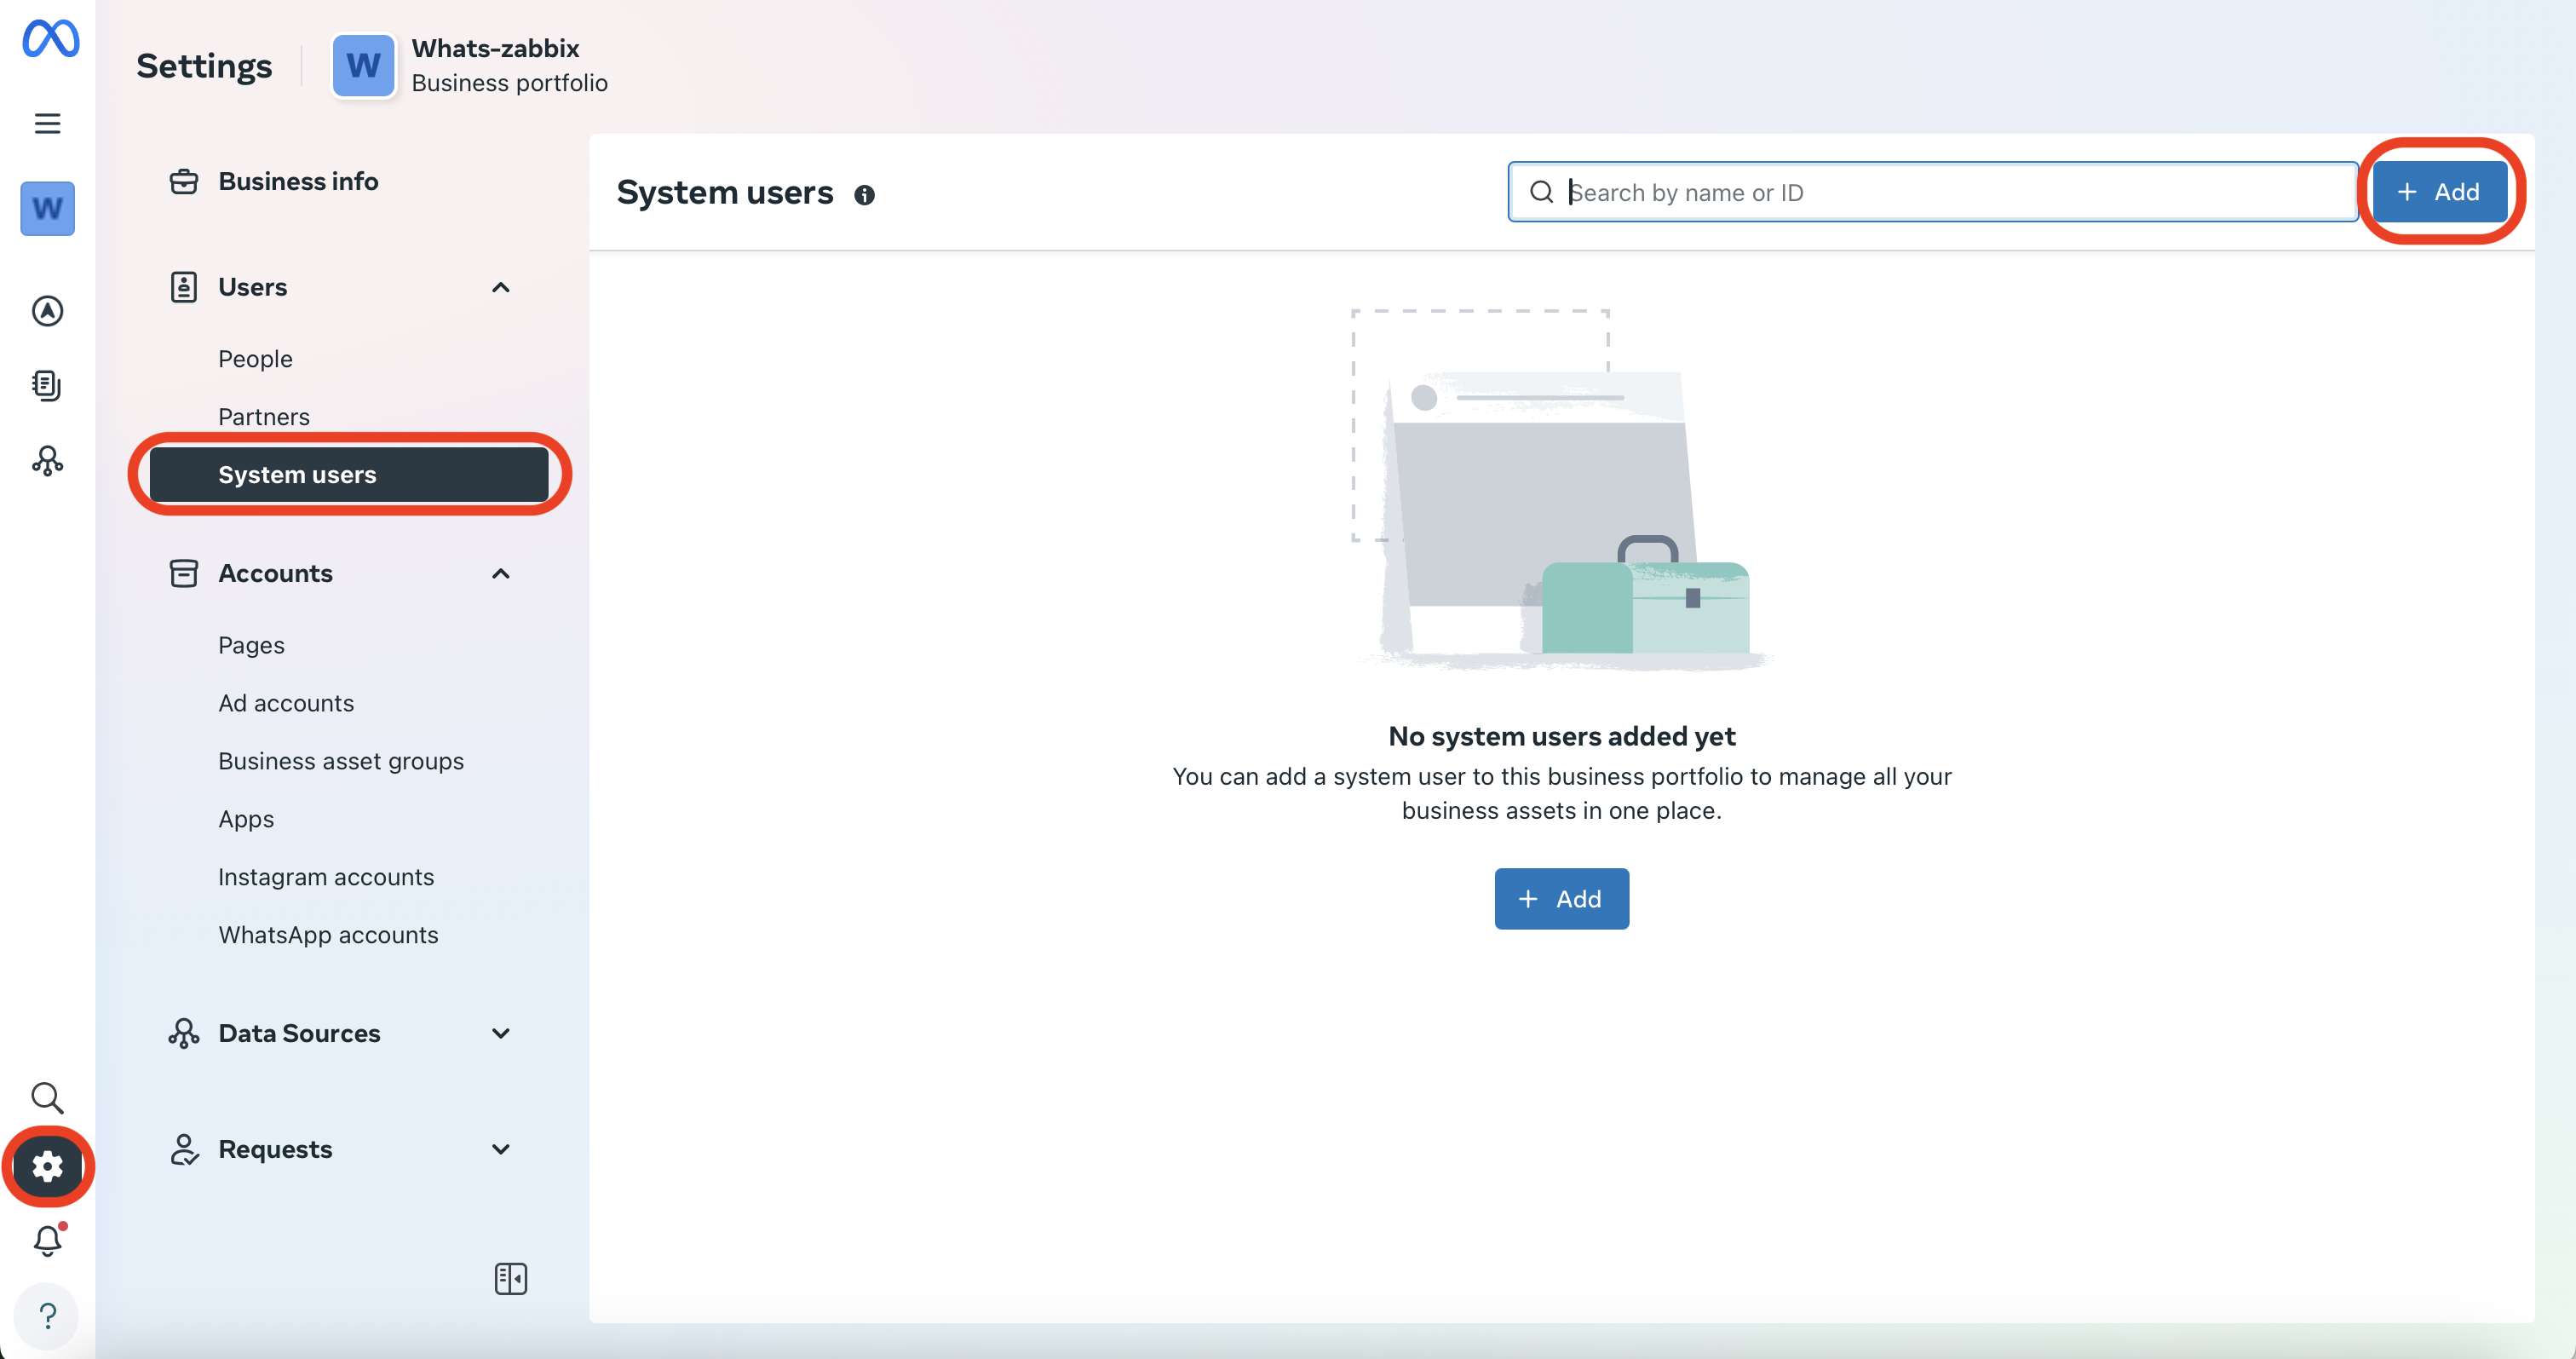
To do this, go to https://business.facebook.com/, then navigate to:
Settings → Users → System Users
Here, click the “+ Add” button.
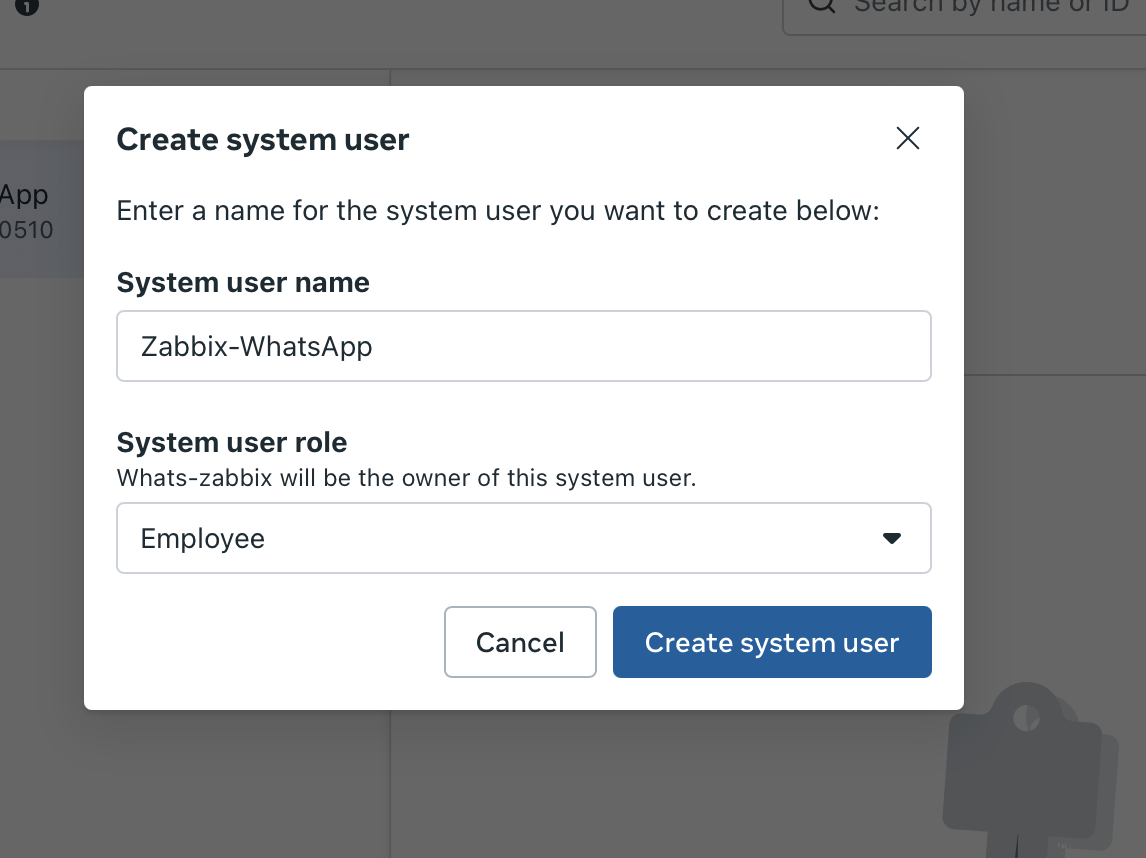
Here, create a new user. You can name it, for example, “Zabbix-WhatsApp”.
For the system role, choose “Employee” – do not grant administrative permissions!
After creating the user, we need to assign appropriate permissions for the app.
Set these permissions using the button with the three dots (“…”).
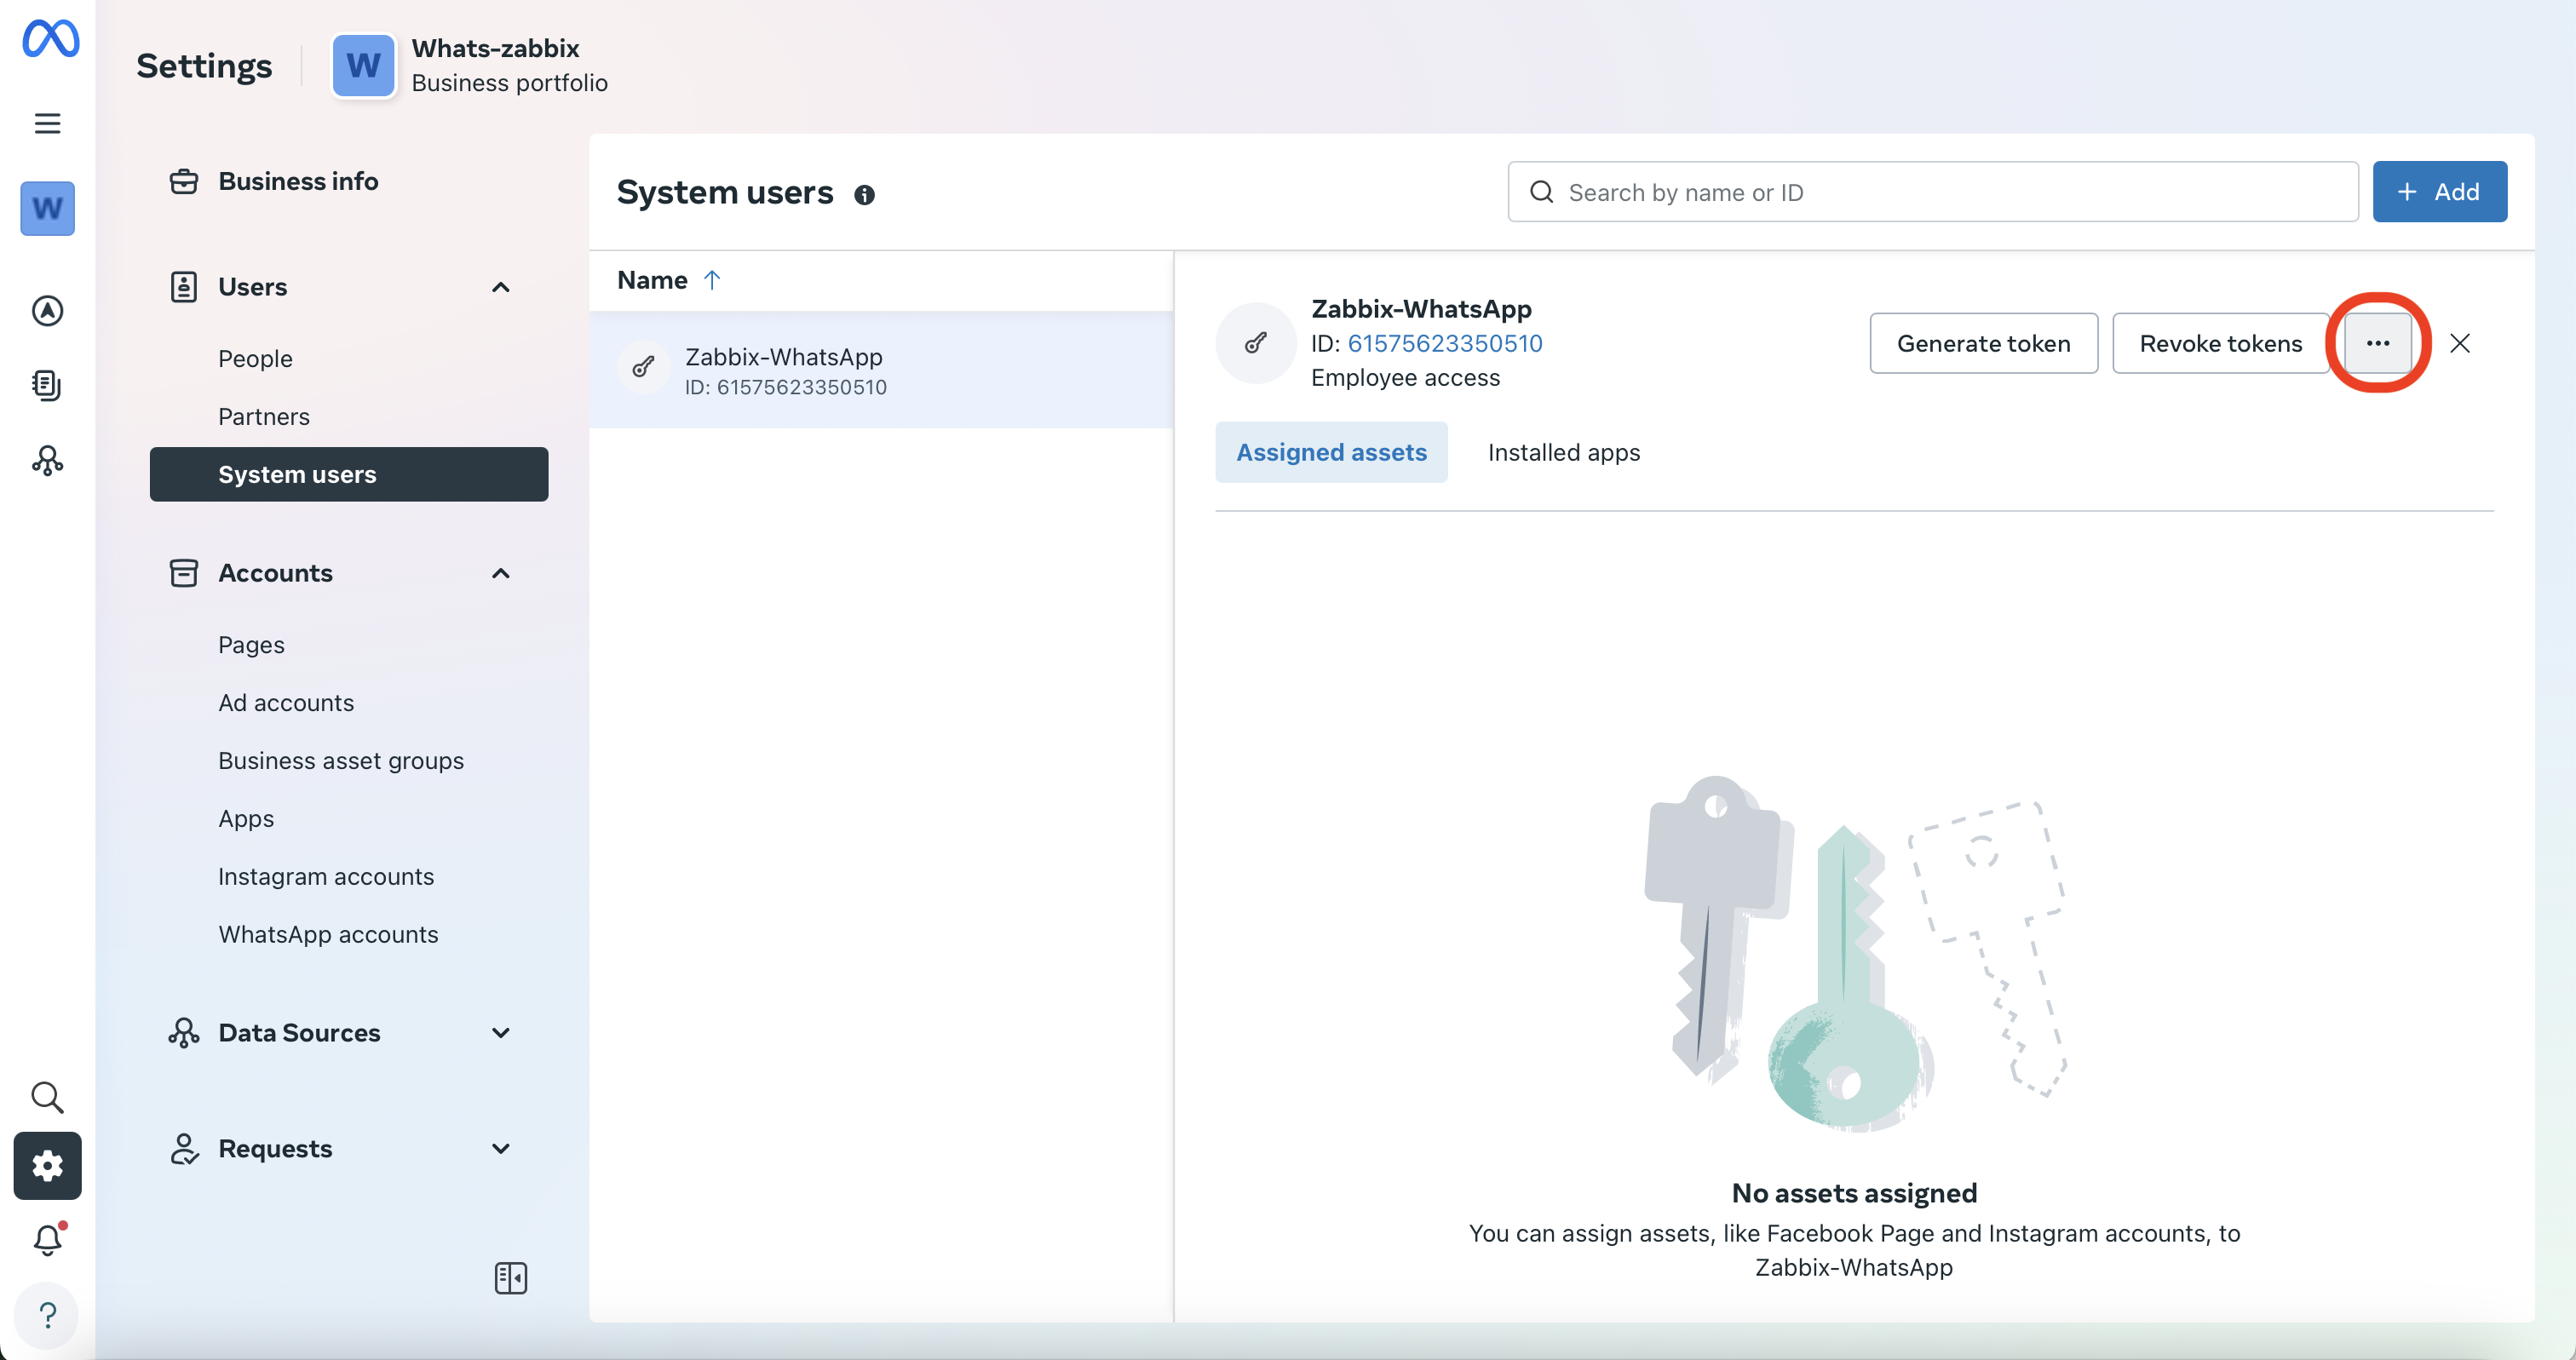
In the “Apps” section, select your application and set the maximum available permissions (during testing with lower-level permissions, the app didn’t function correctly).
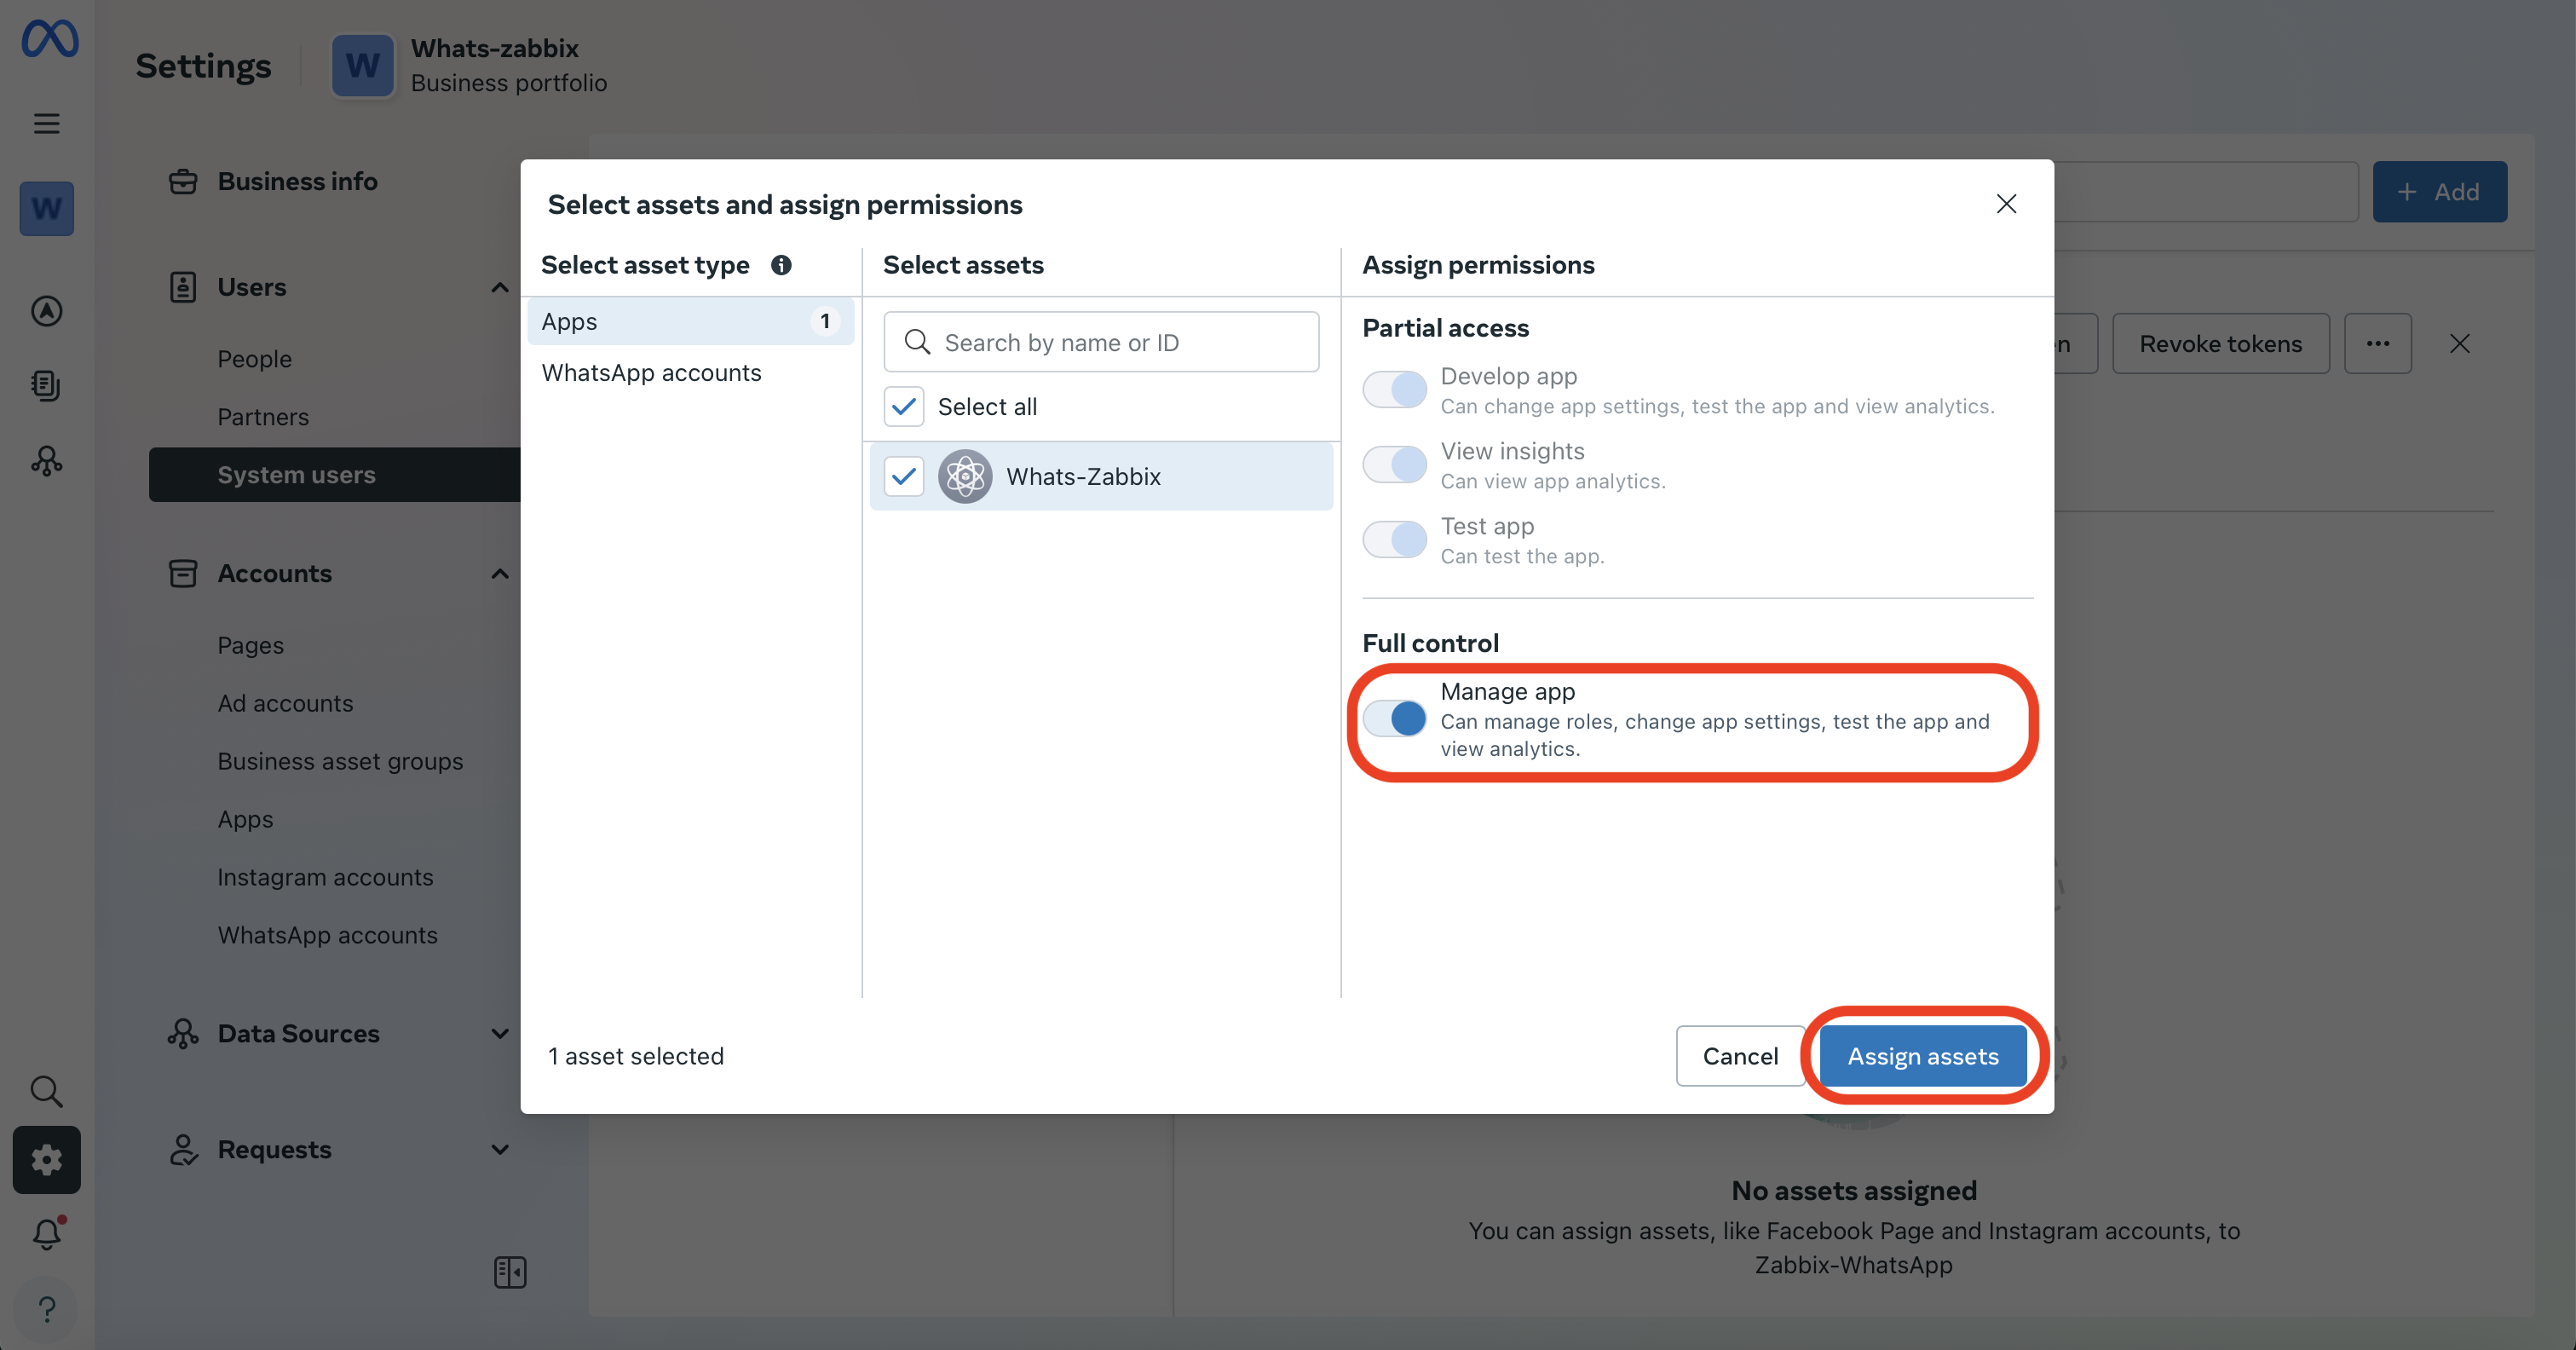
The same applies to the “WhatsApp accounts” section.

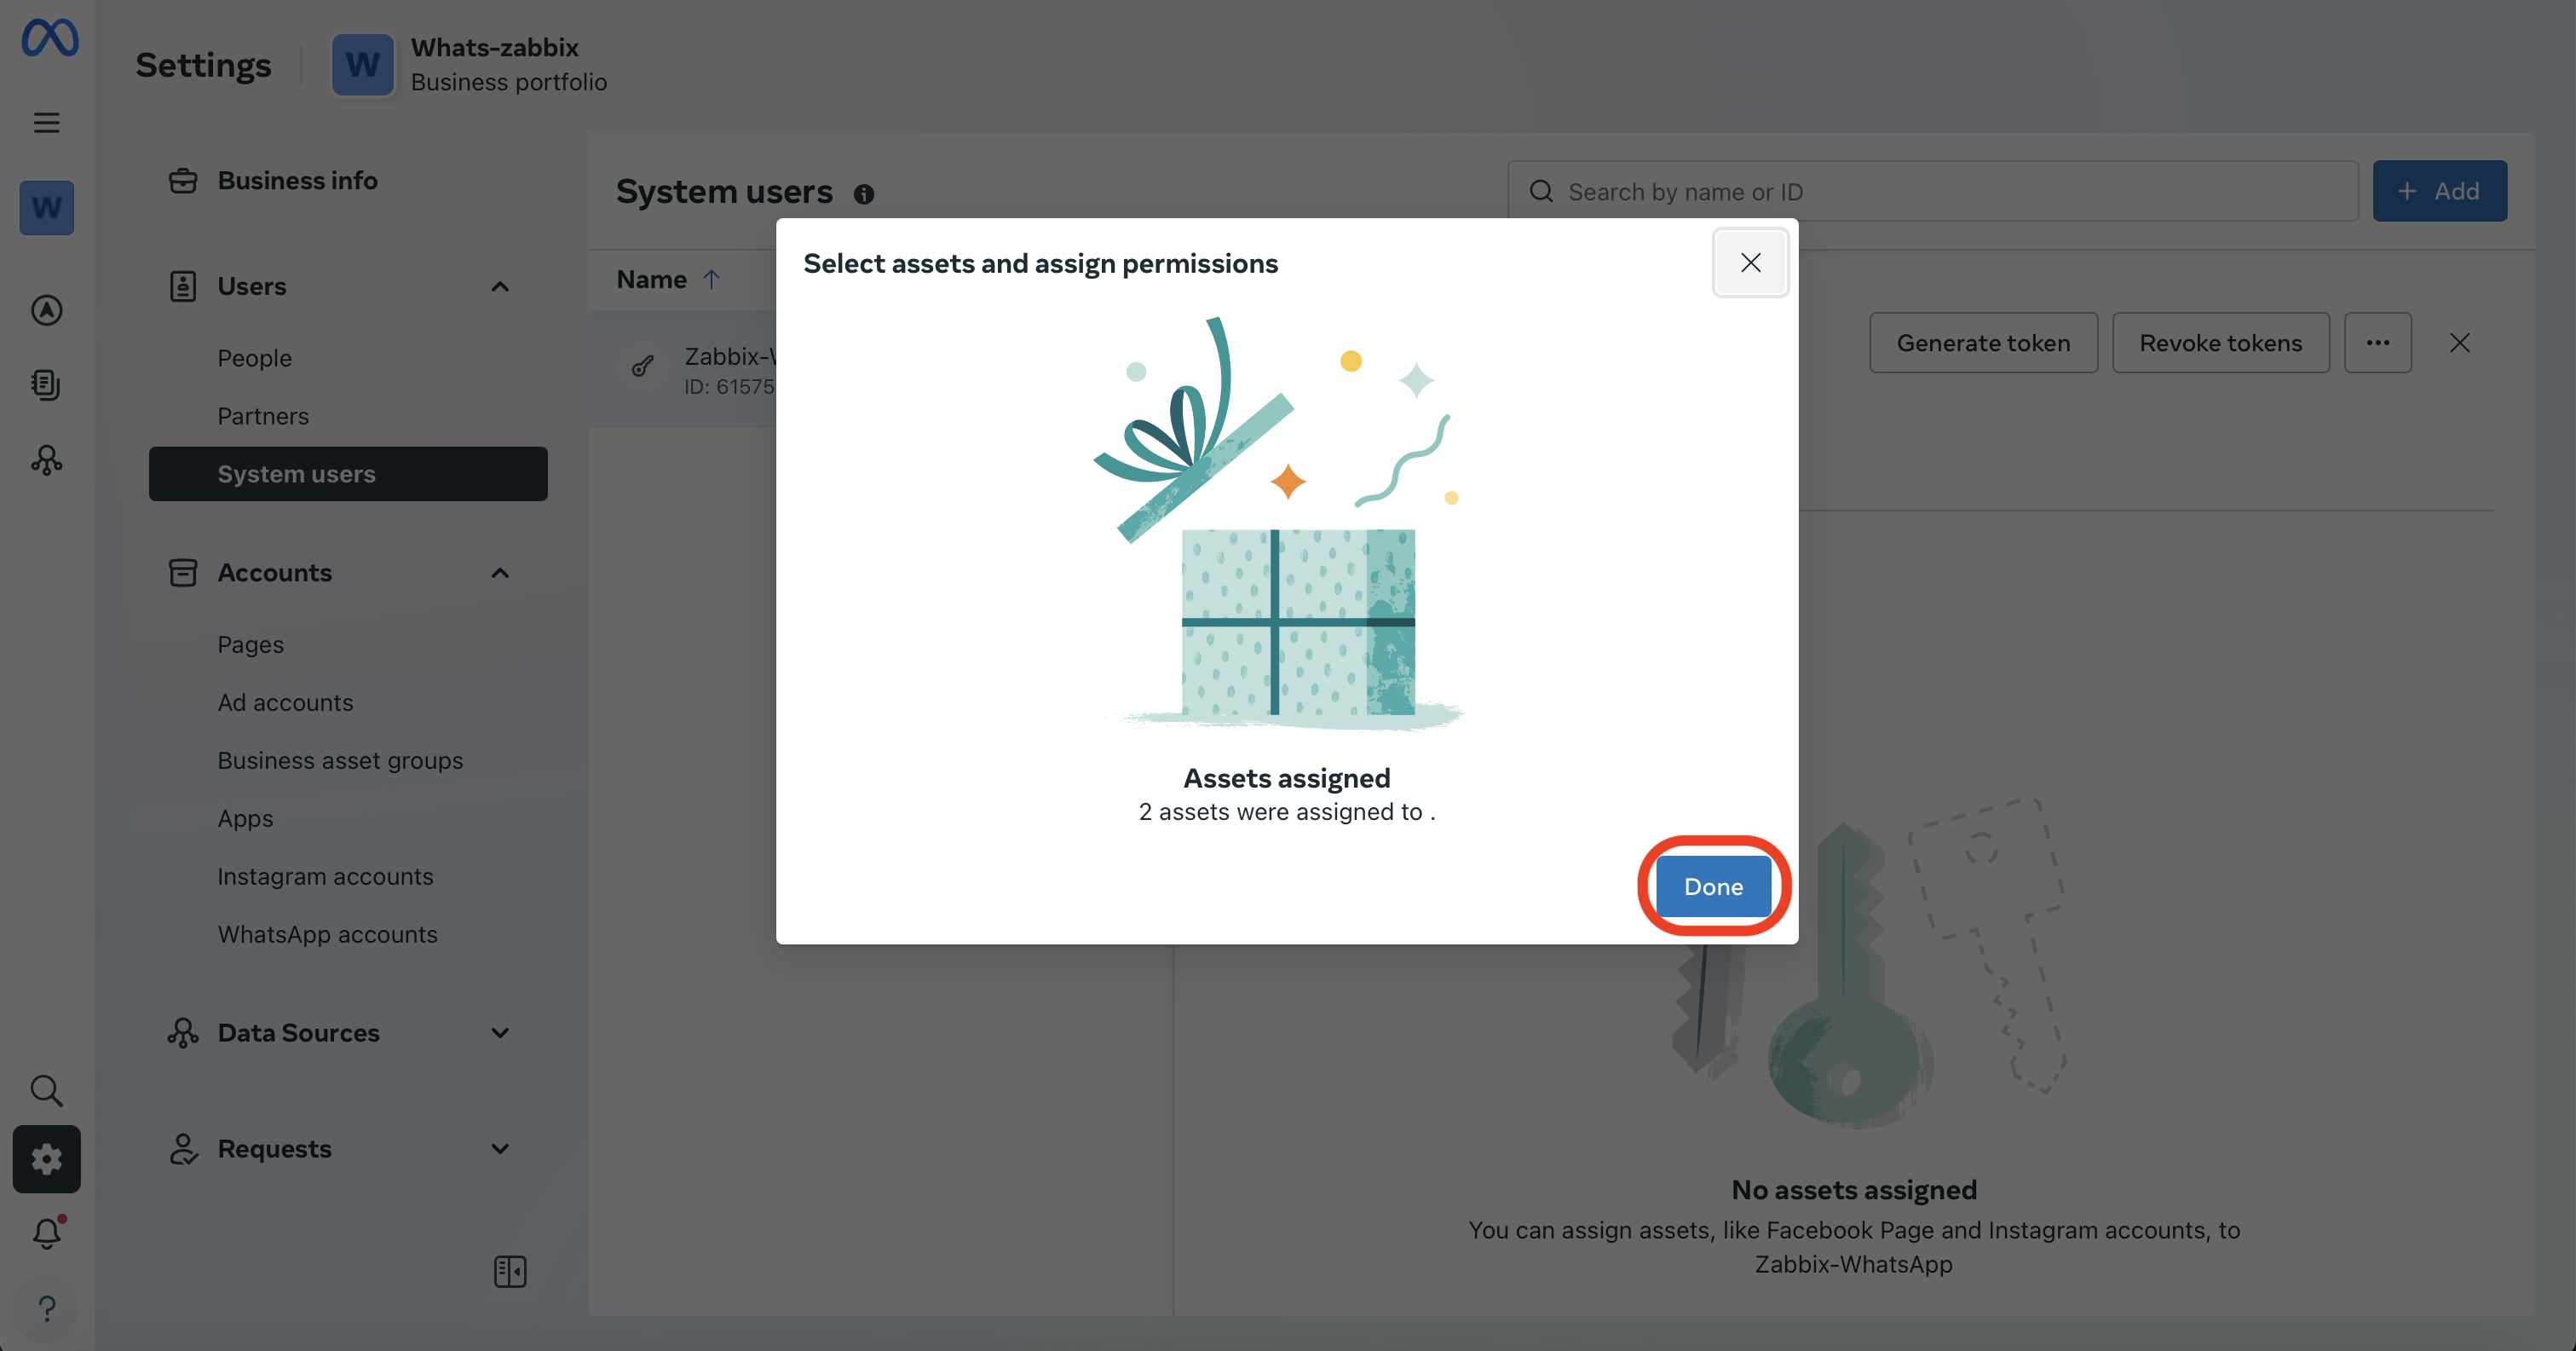
In the next window, wait for confirmation and then close it by clicking the “Done” button.
After assigning user permissions to the apps, finally click “Generate token”.
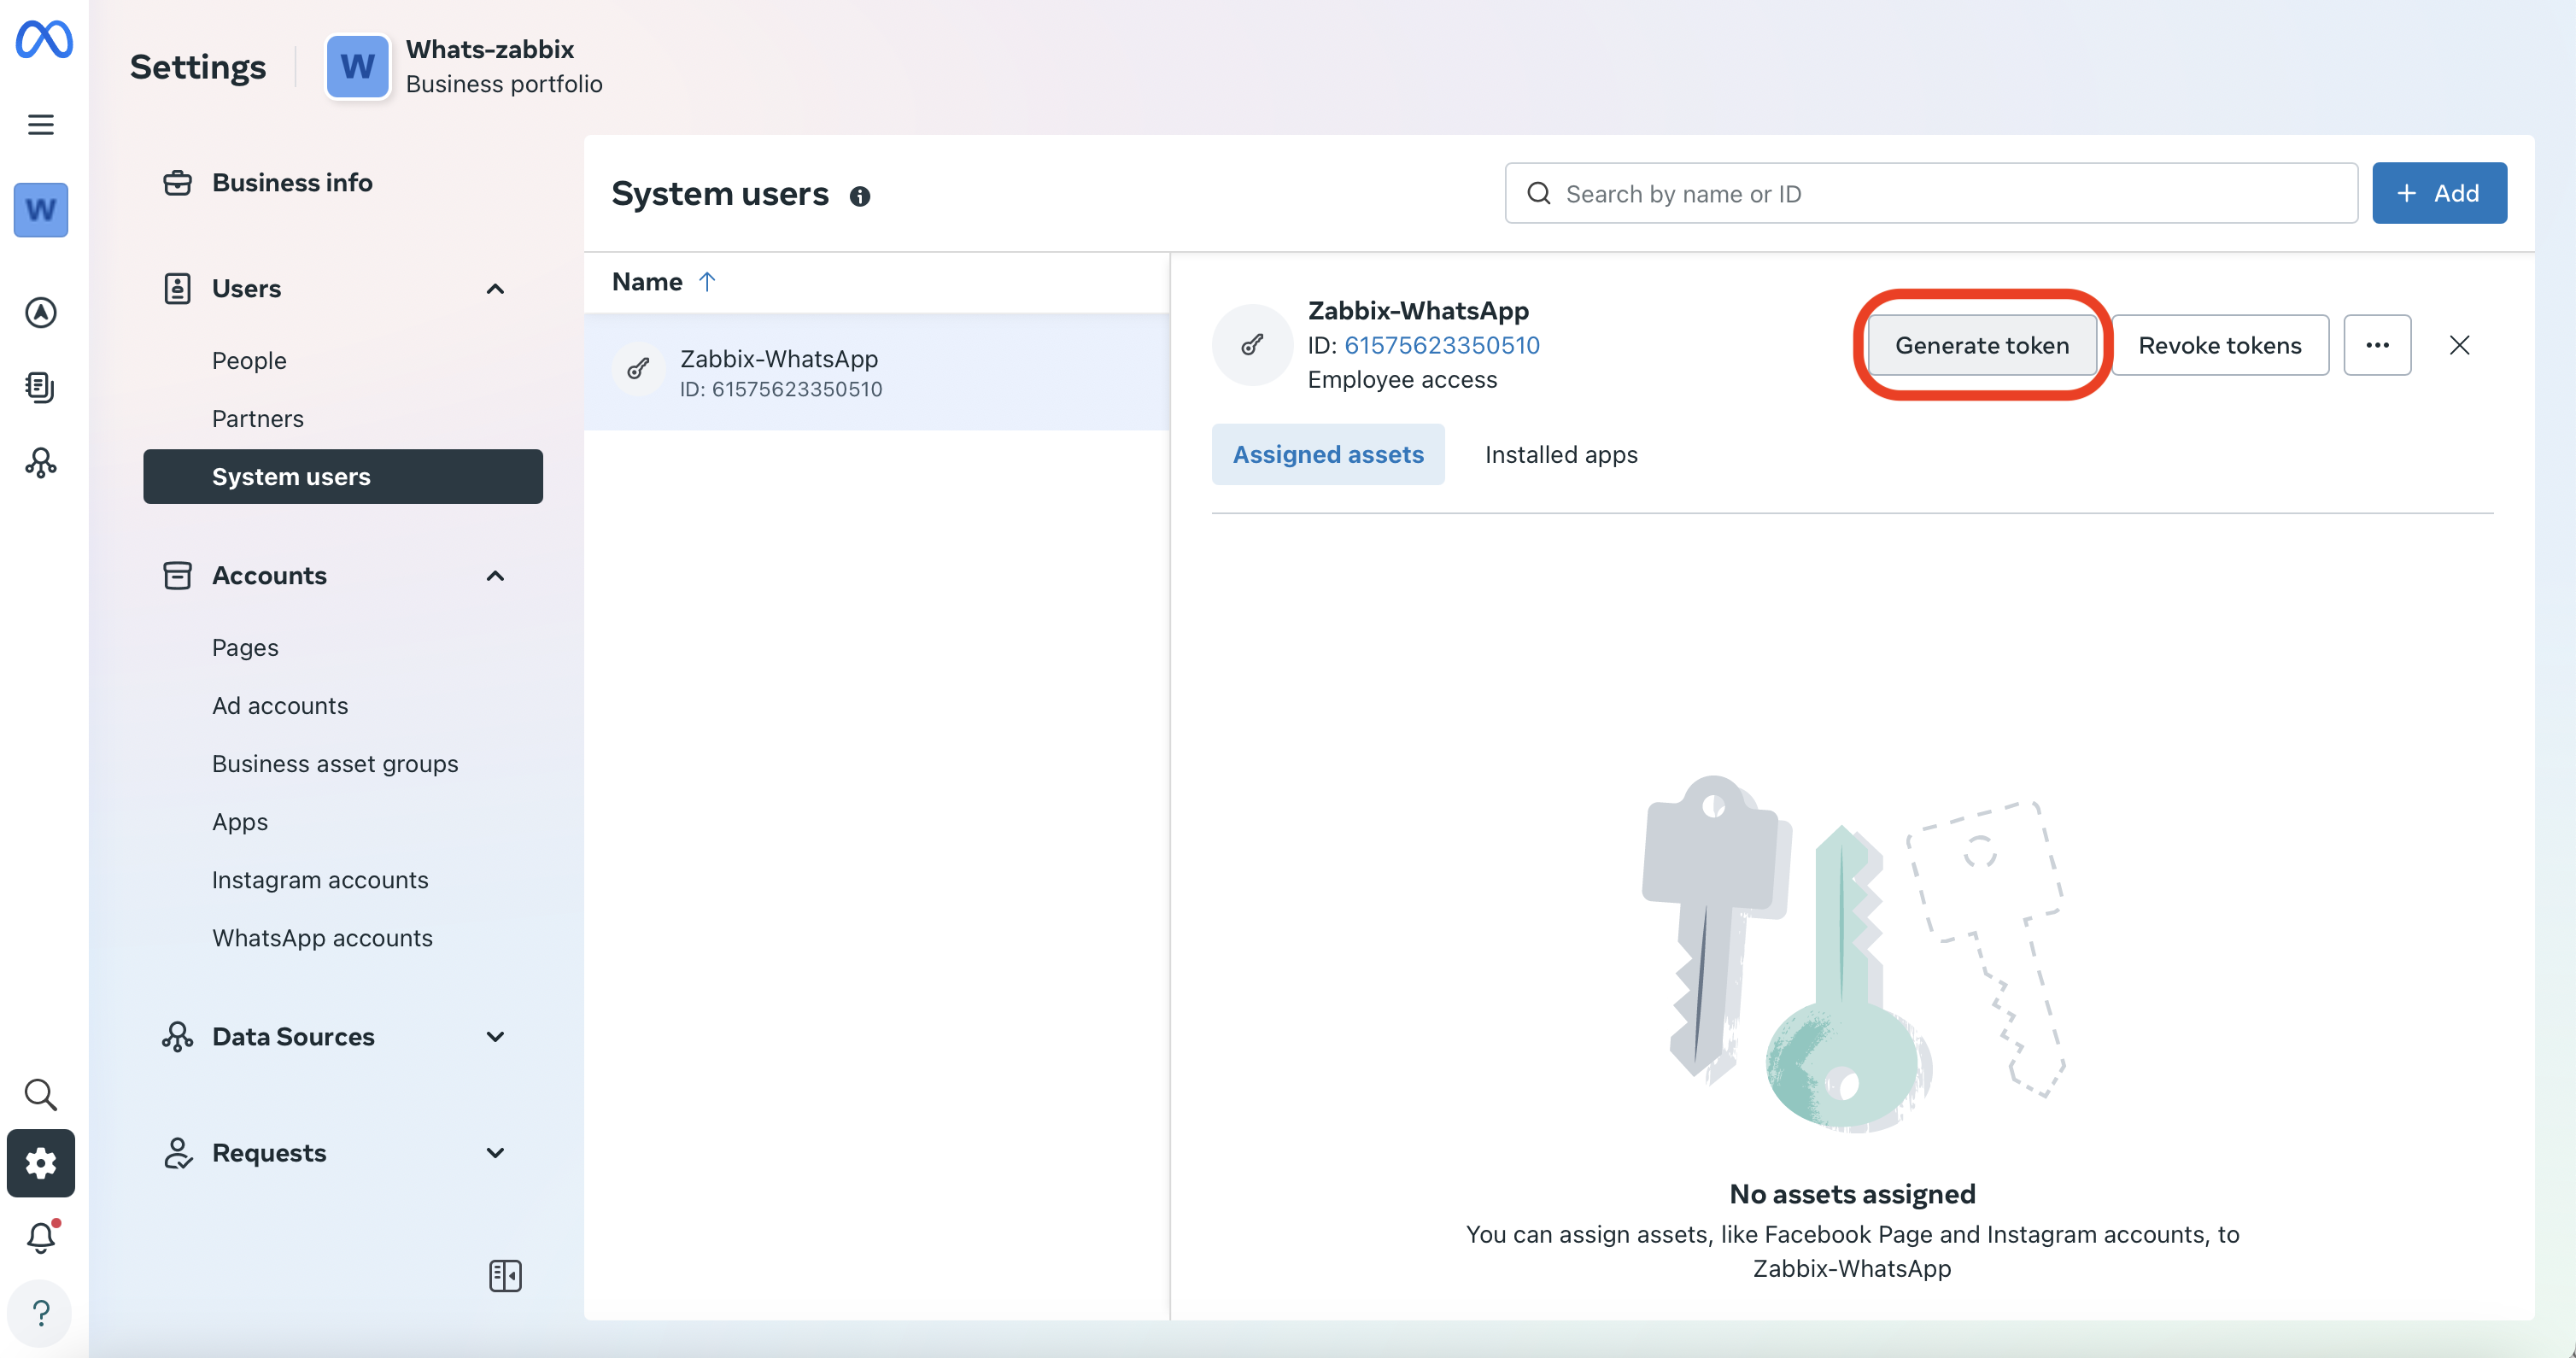
In the first step, select our WhatsApp application.

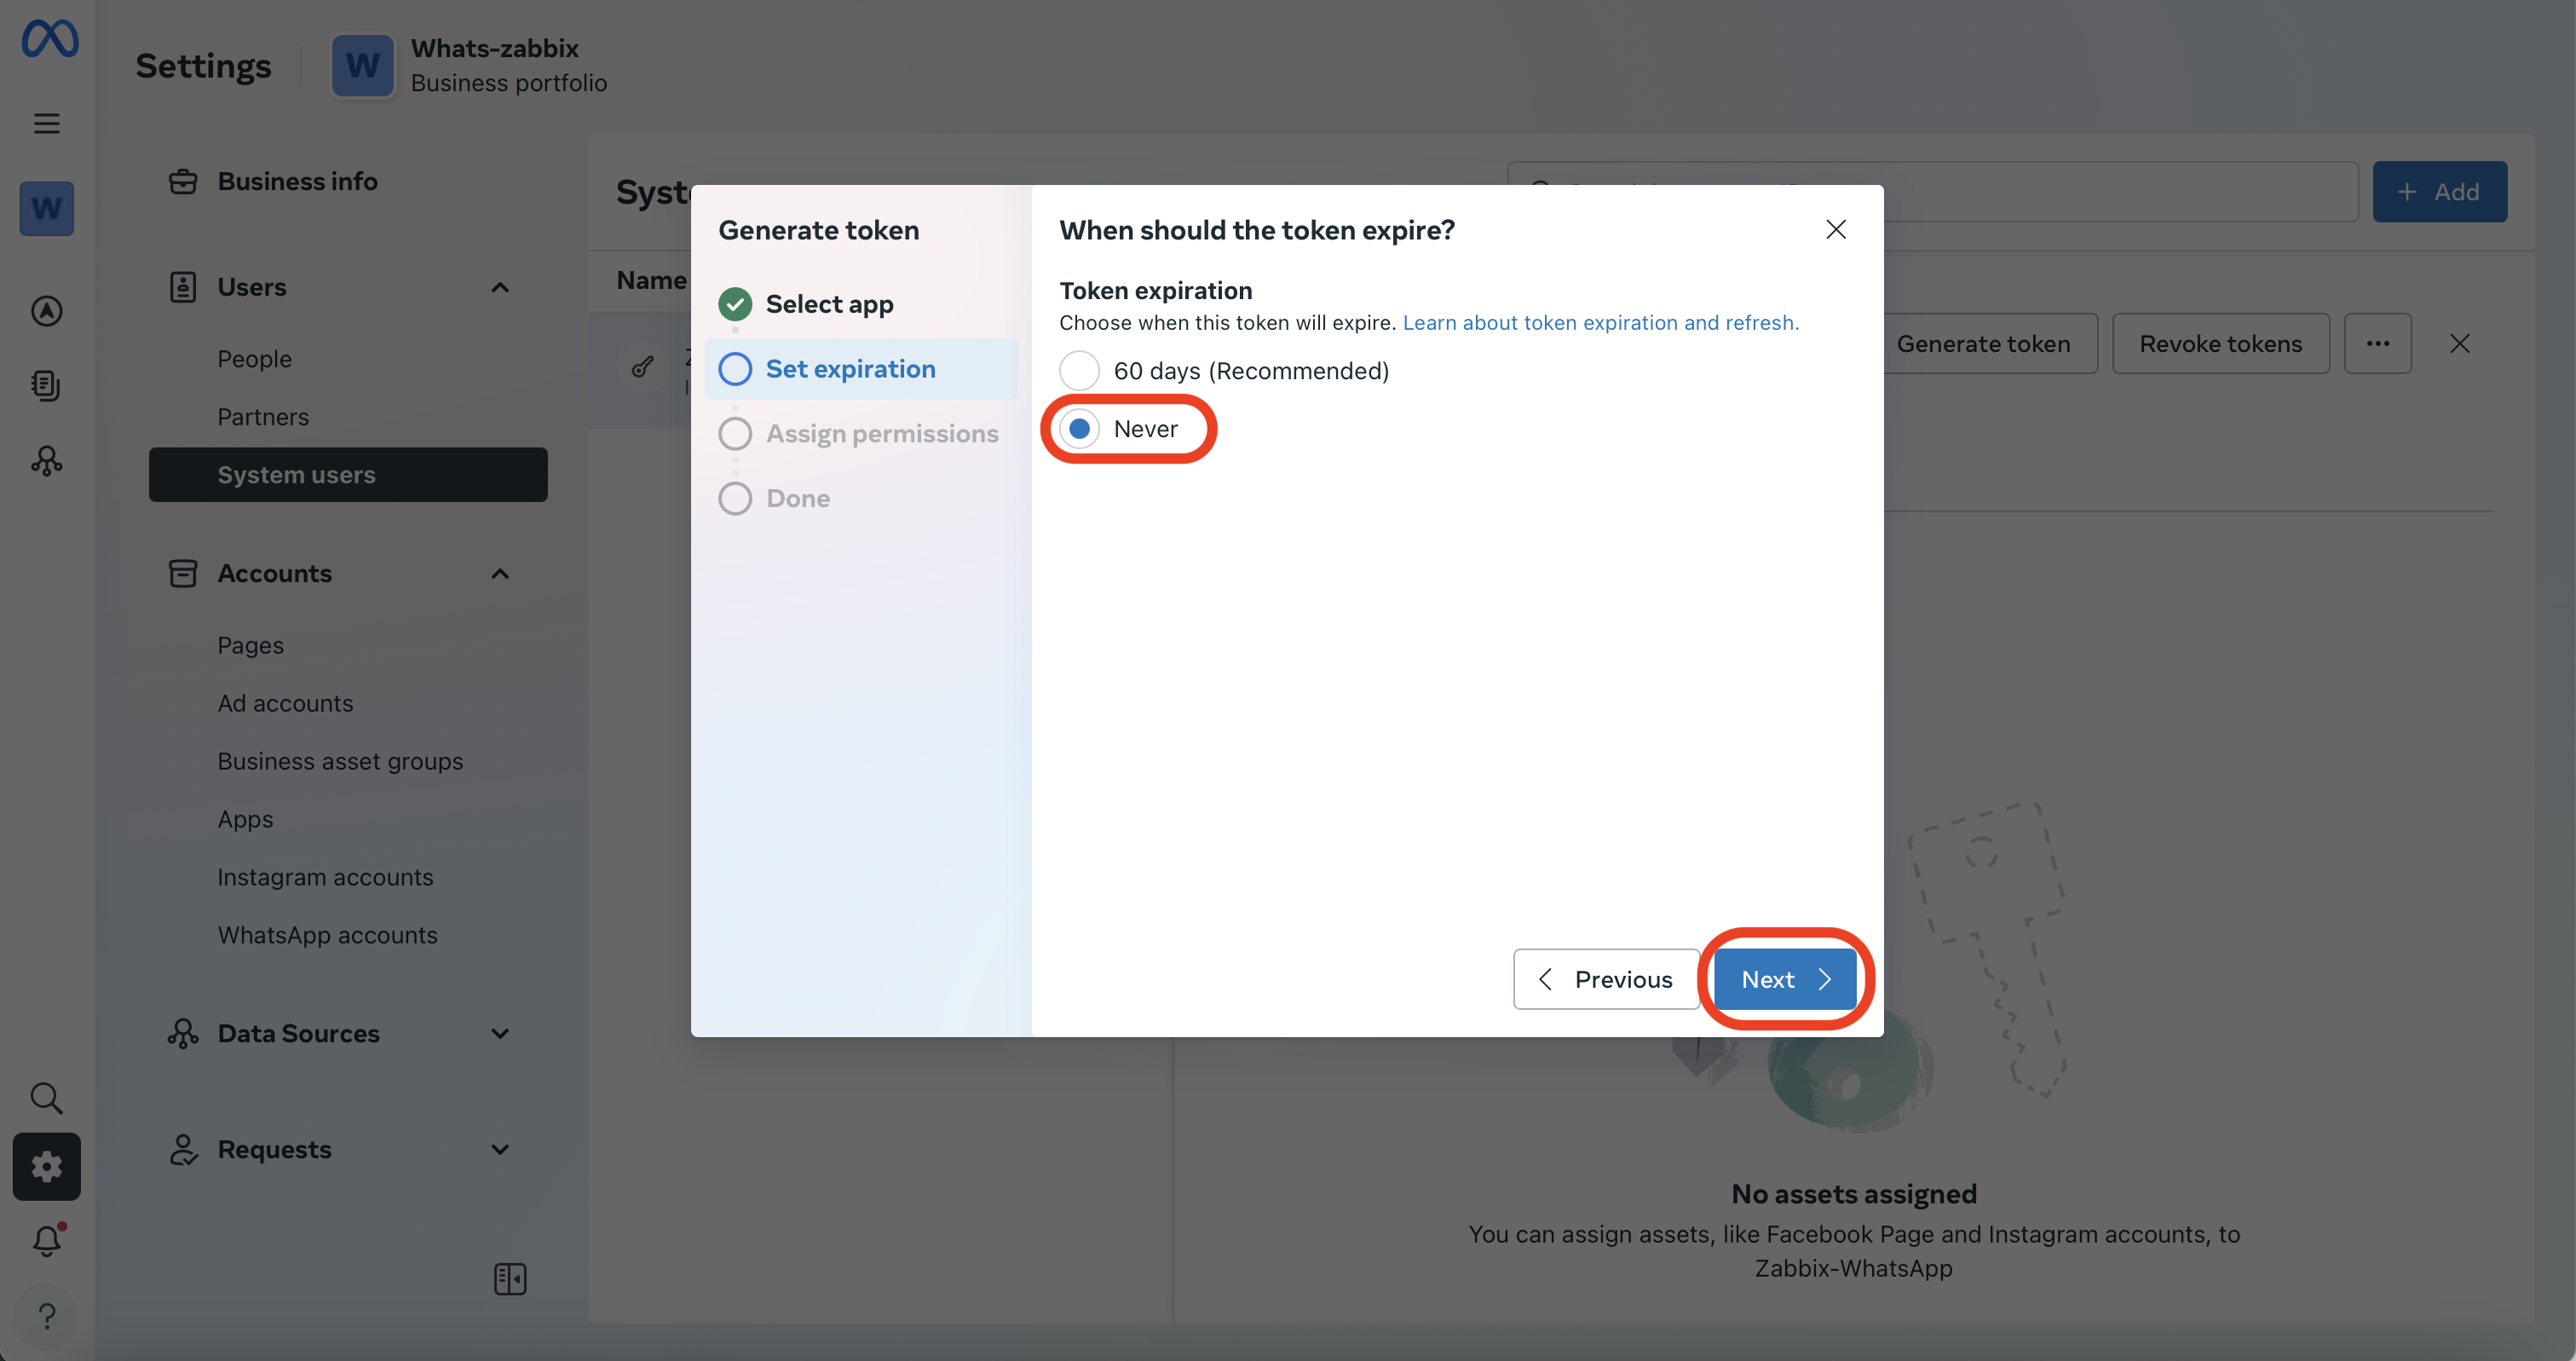
In the next step, set the token validity (“Token expiration”).
For secure and trouble-free operation, select “Never” (the token will never expire).
In the token permissions section, select only these two permissions:
- whatsapp_business_messaging
- whatsapp_business_management
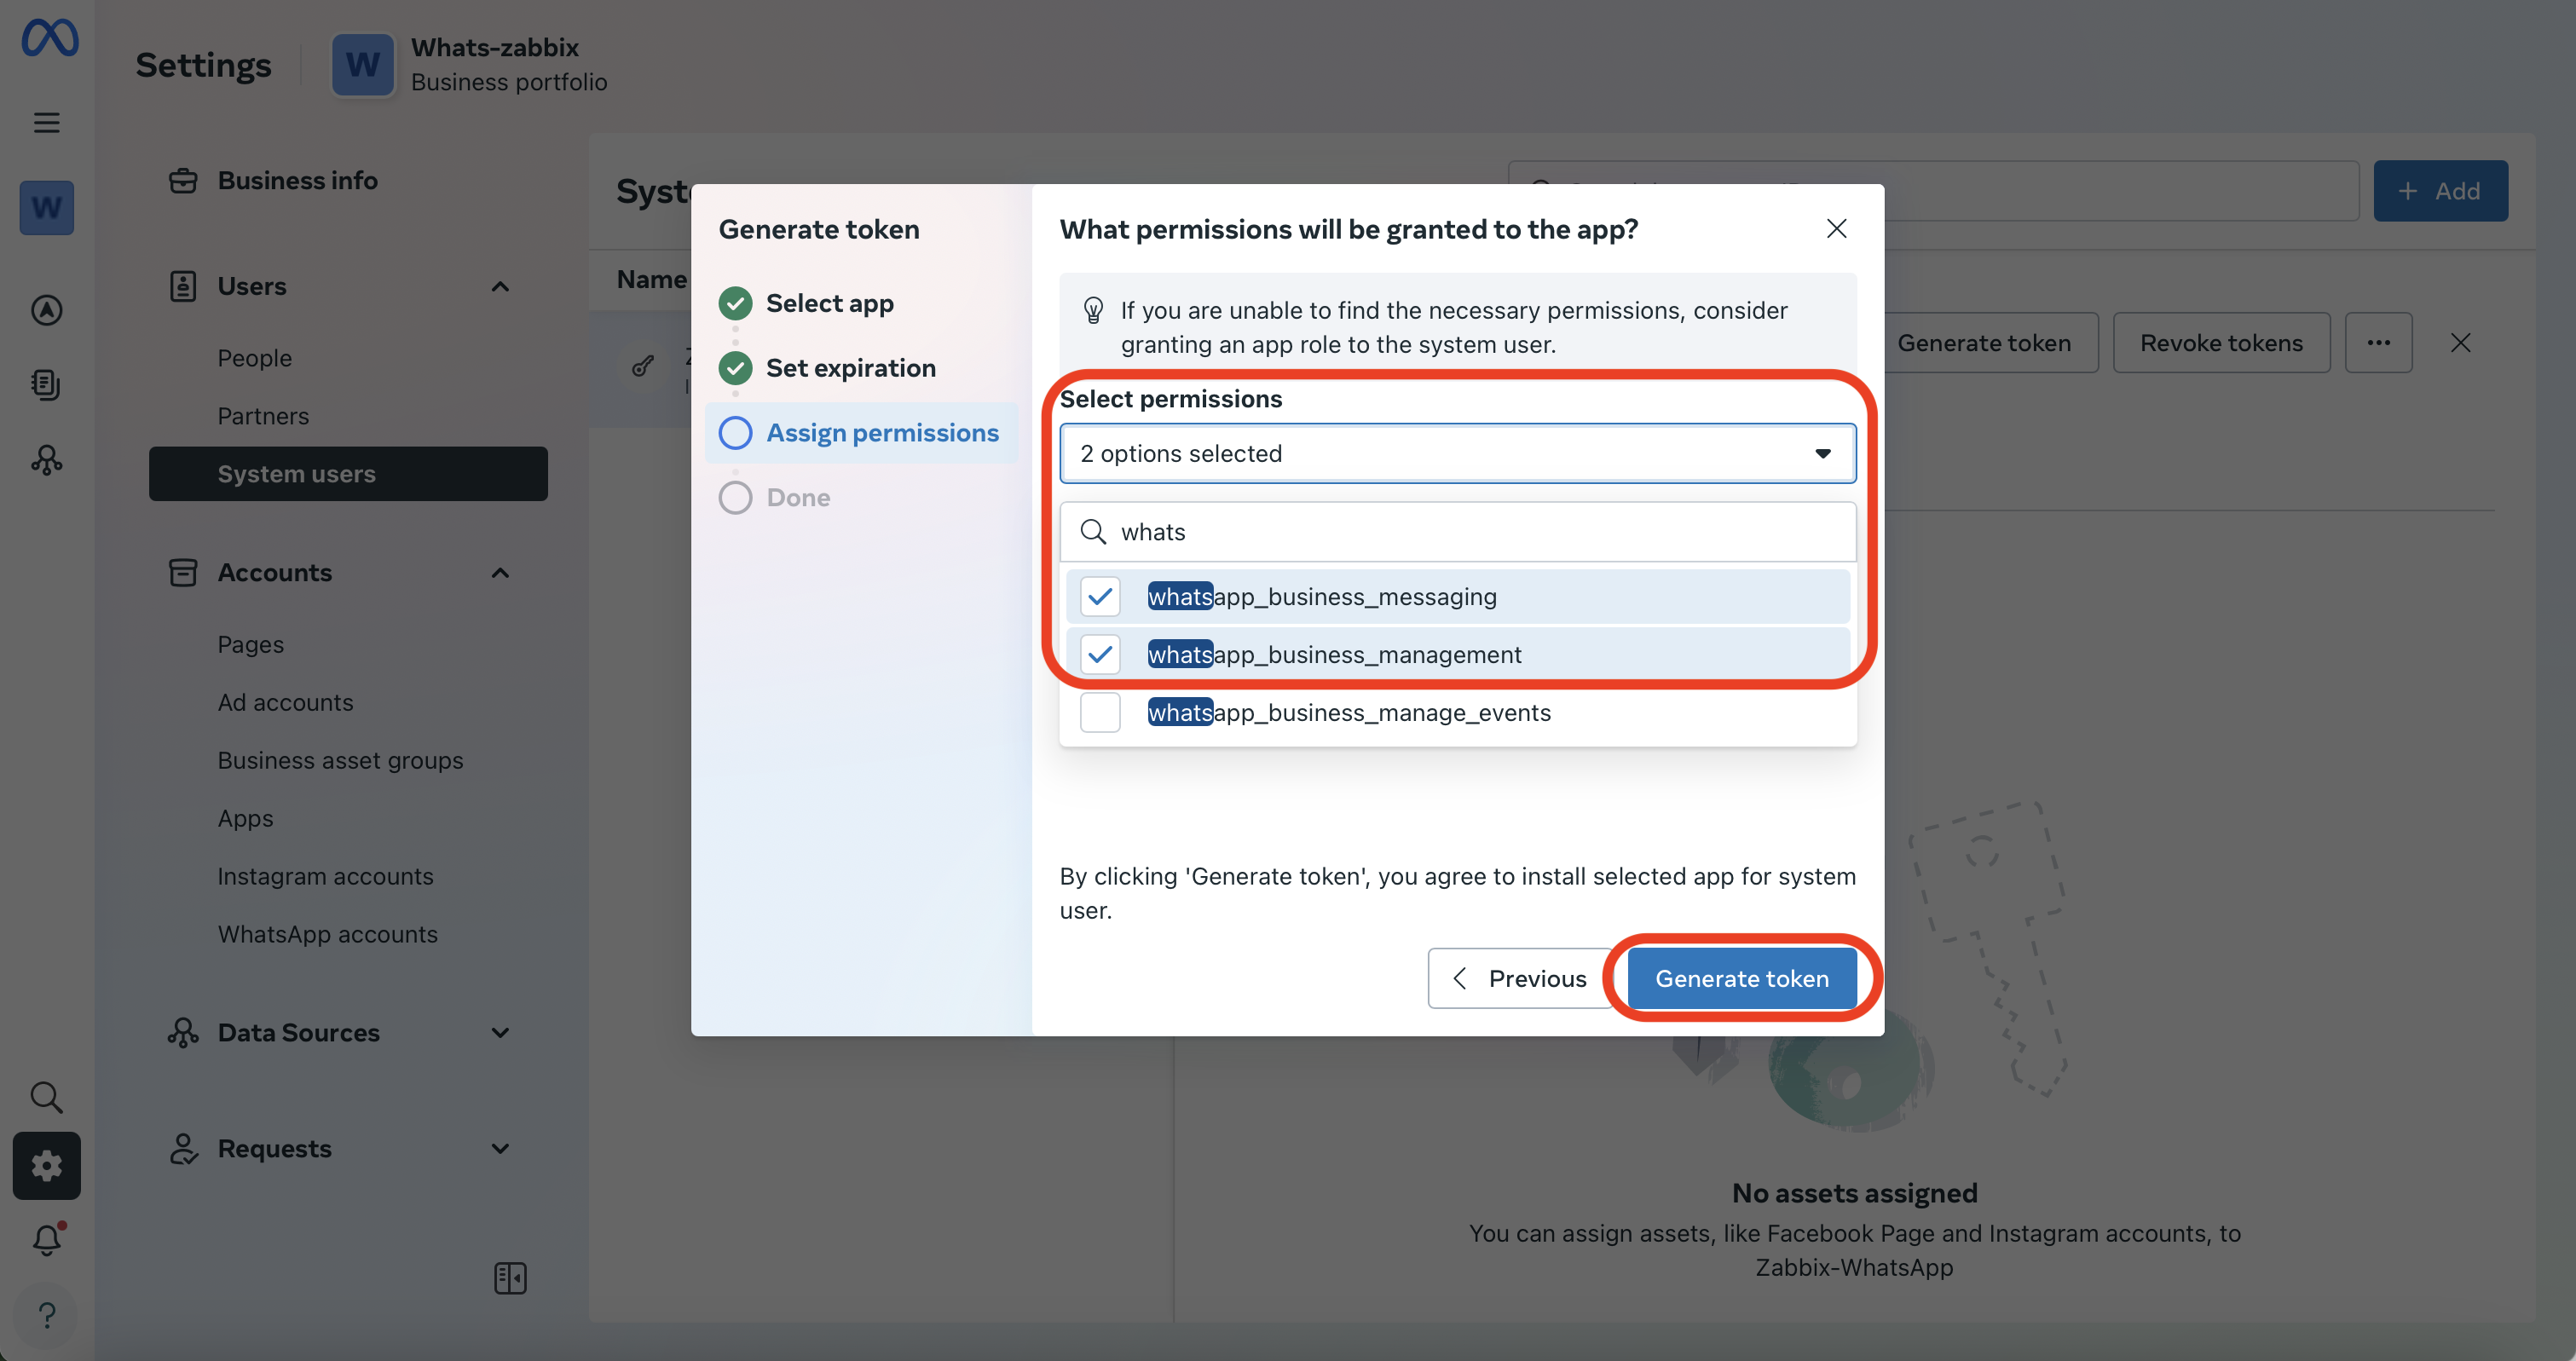
In the final step, your generated token will be displayed.
Make sure to store this token carefully, as you won’t be able to view it again—only regenerate a new one.
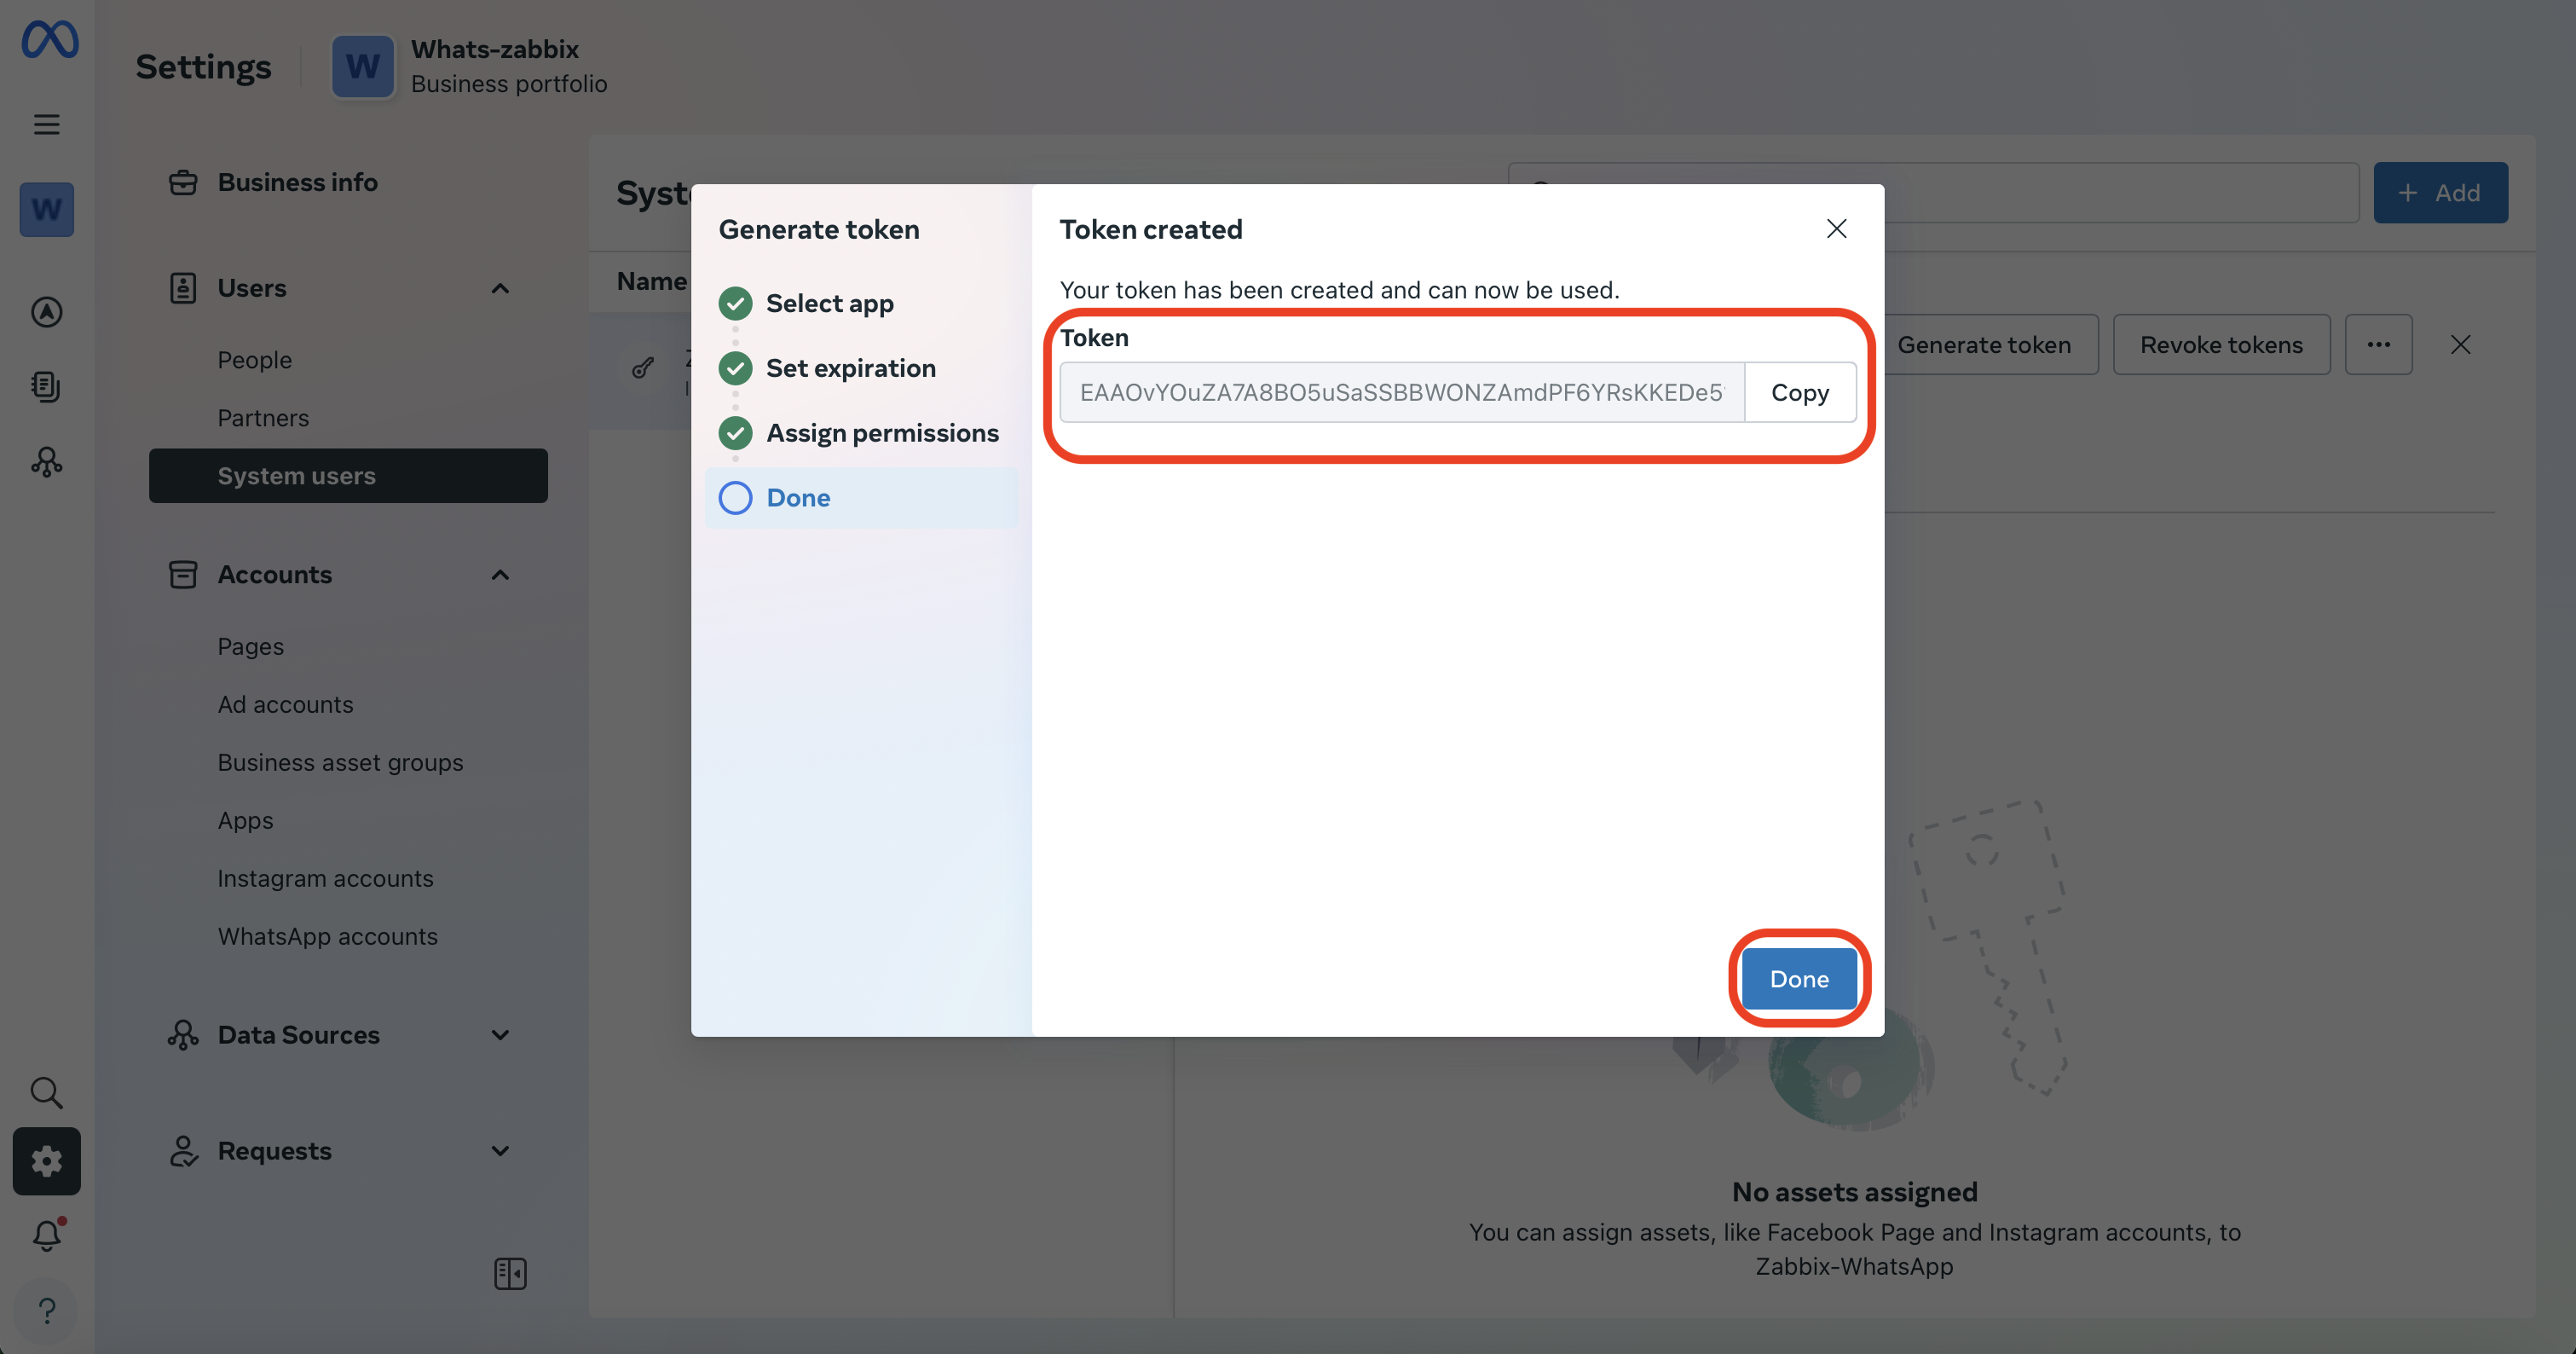
We’ll need this token as the second and final parameter for configuring the media type in Zabbix.
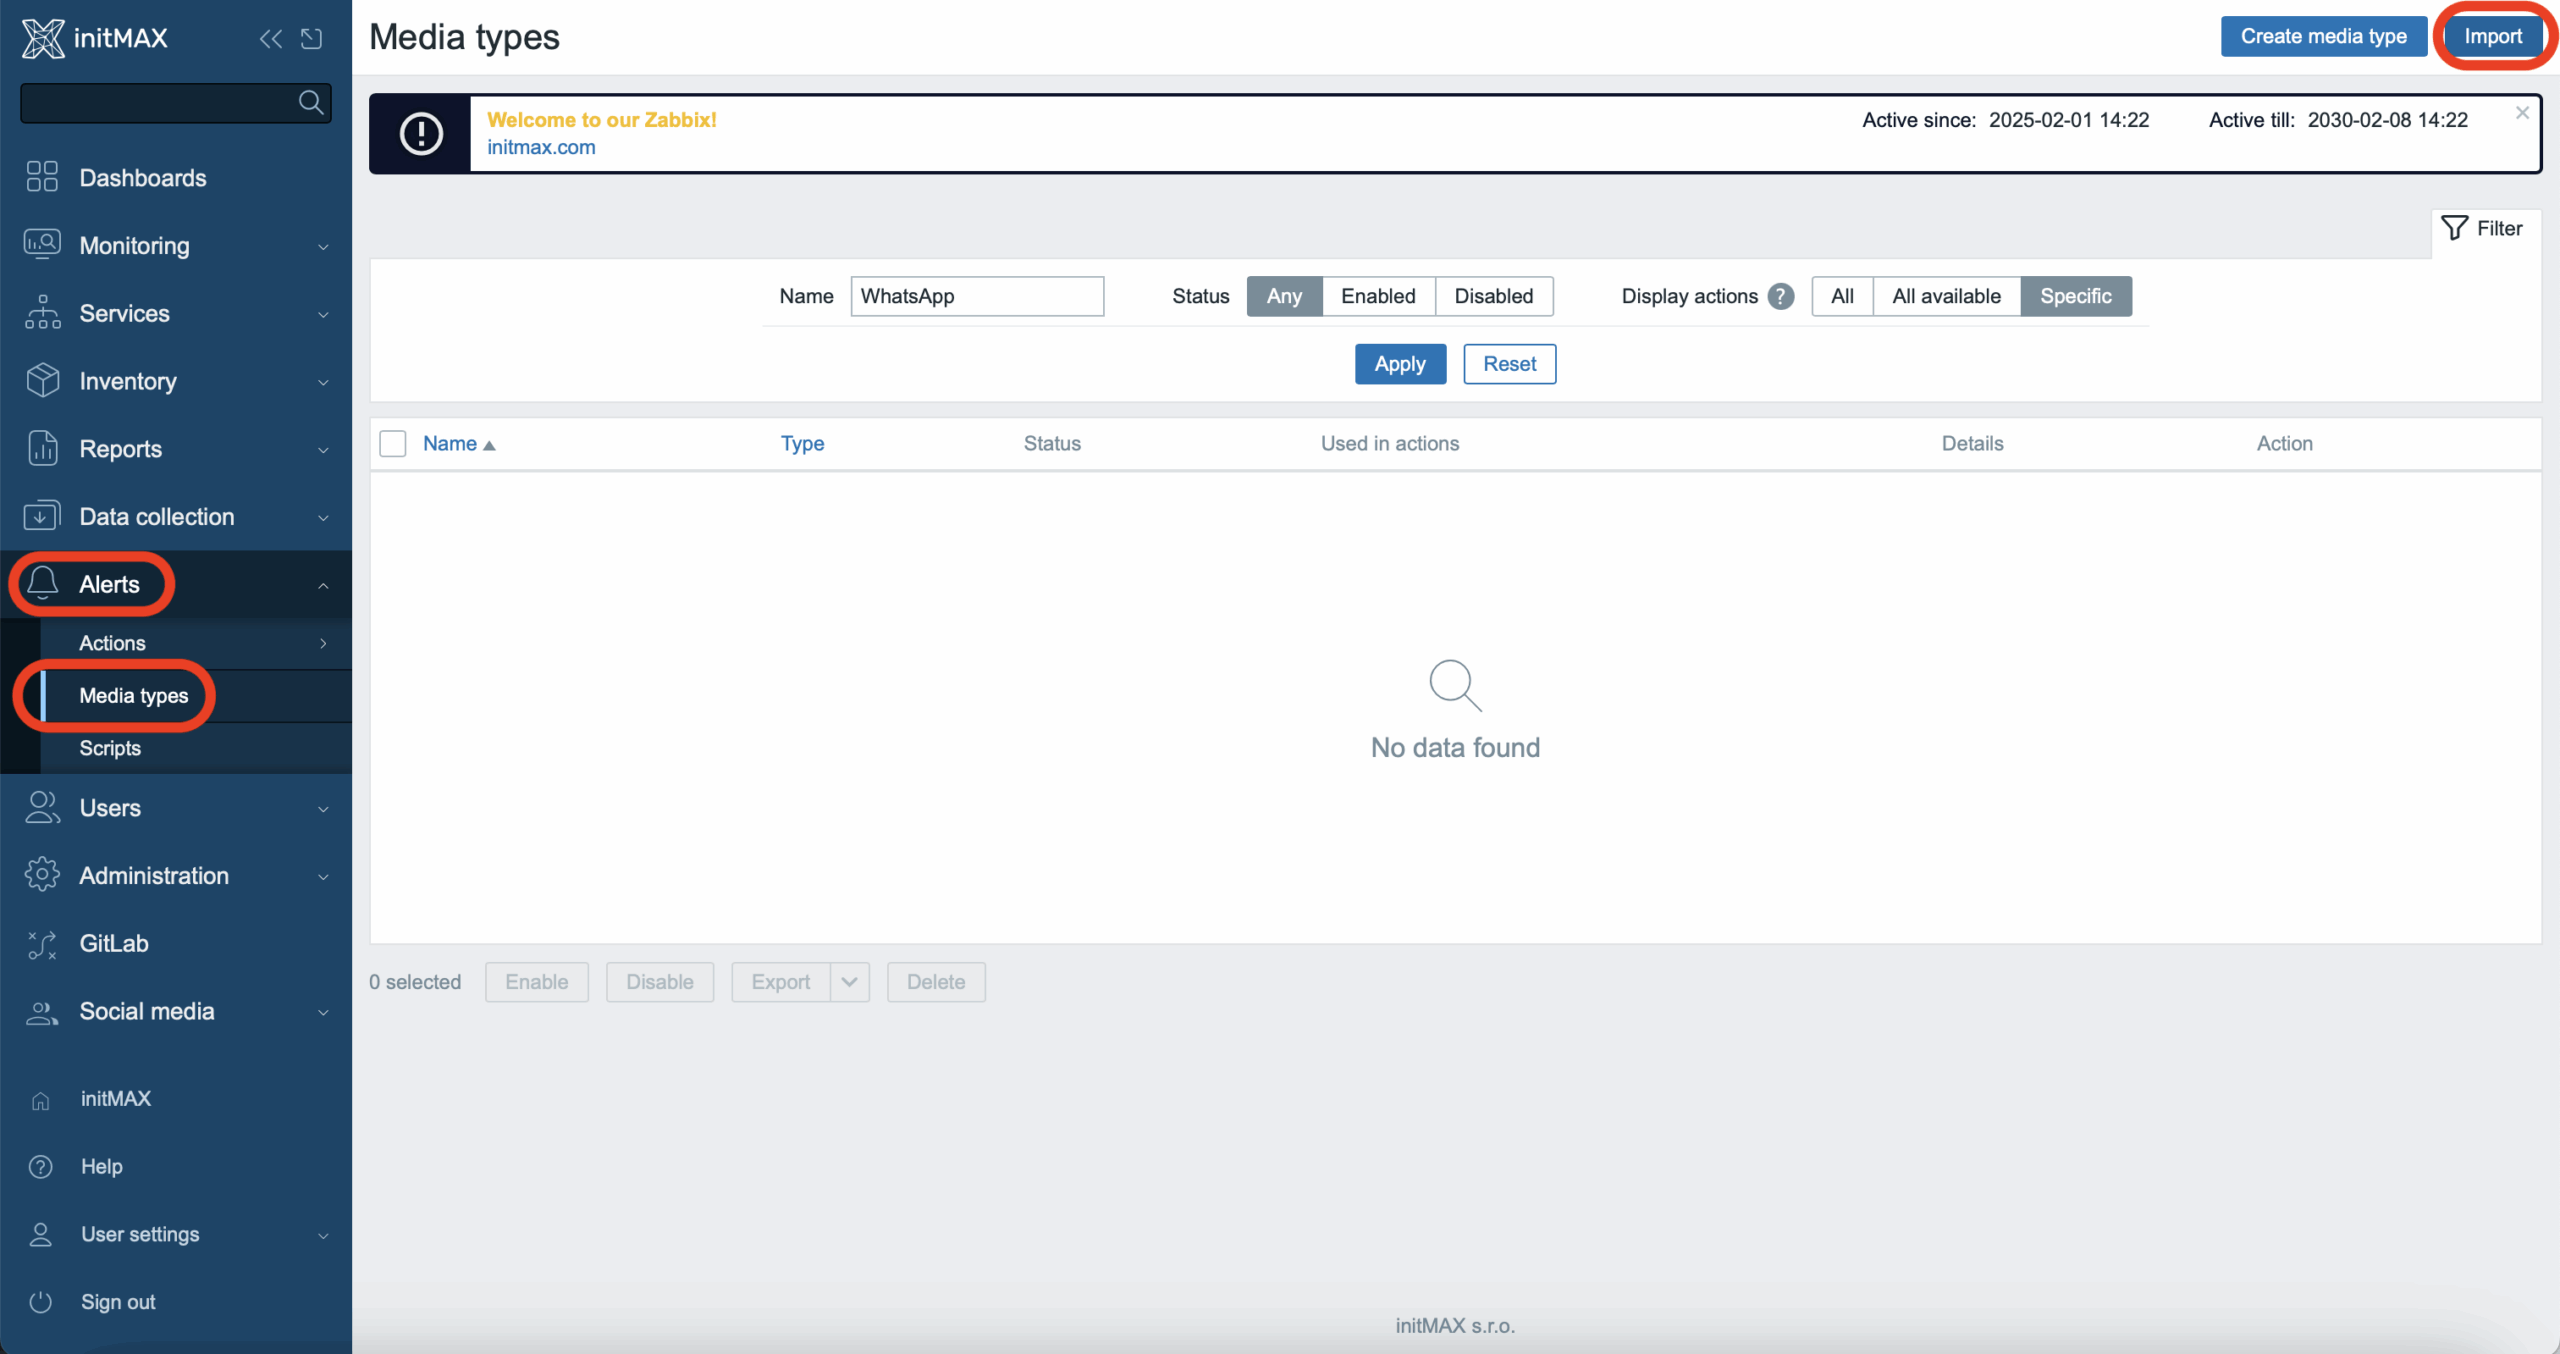
Importing the YAML Media Type into Zabbix
We’ve prepared a WhatsApp template for you. You can find it here:
https://git.initmax.cz/initMAX-Public/zabbix-templates
Then import the downloaded template into Zabbix:
Alerts → Media types → Import
Select the downloaded template and click “Import”.
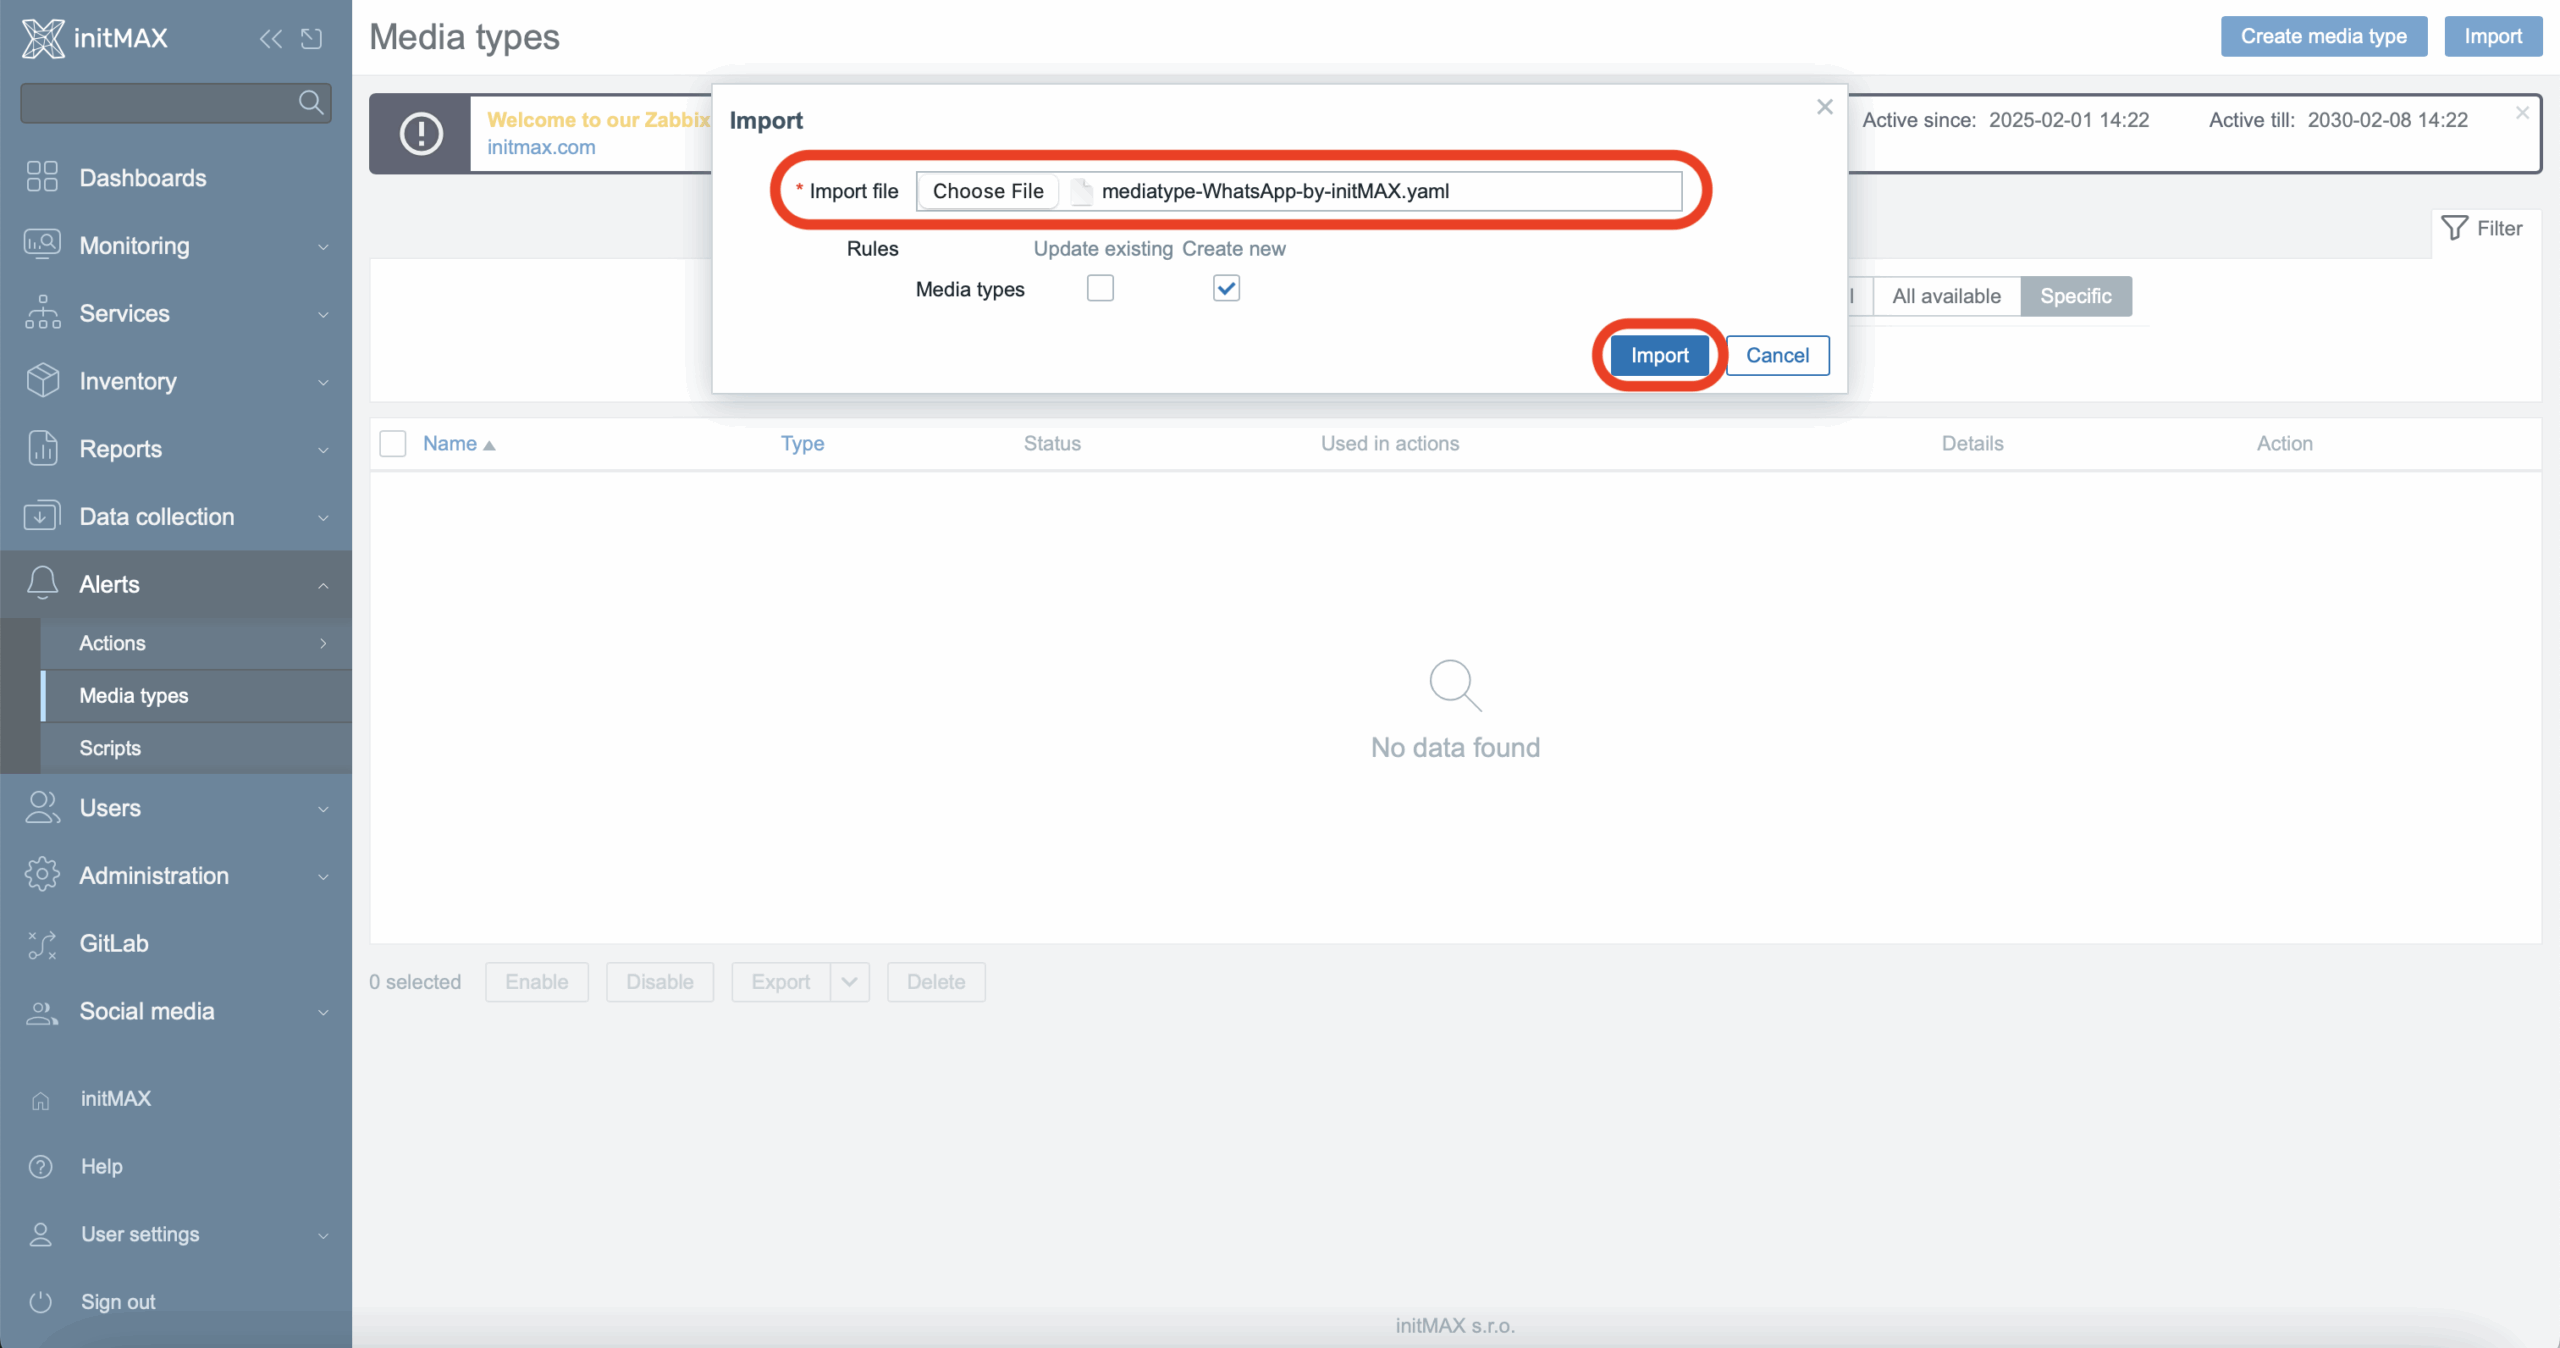
After a successful import, you’ll see the message “Imported successfully”.
Next, click on our imported template to finalize its configuration.

Here, you’ll need to fill out two parameters:
access_token: Insert your permanent token obtained earlier, in the section “Generating a Long-term System Token”.phone_number_id: Insert the numeric ID mentioned in the section “Adding Phone Numbers for Notifications”—this ID is located directly below your test phone number.
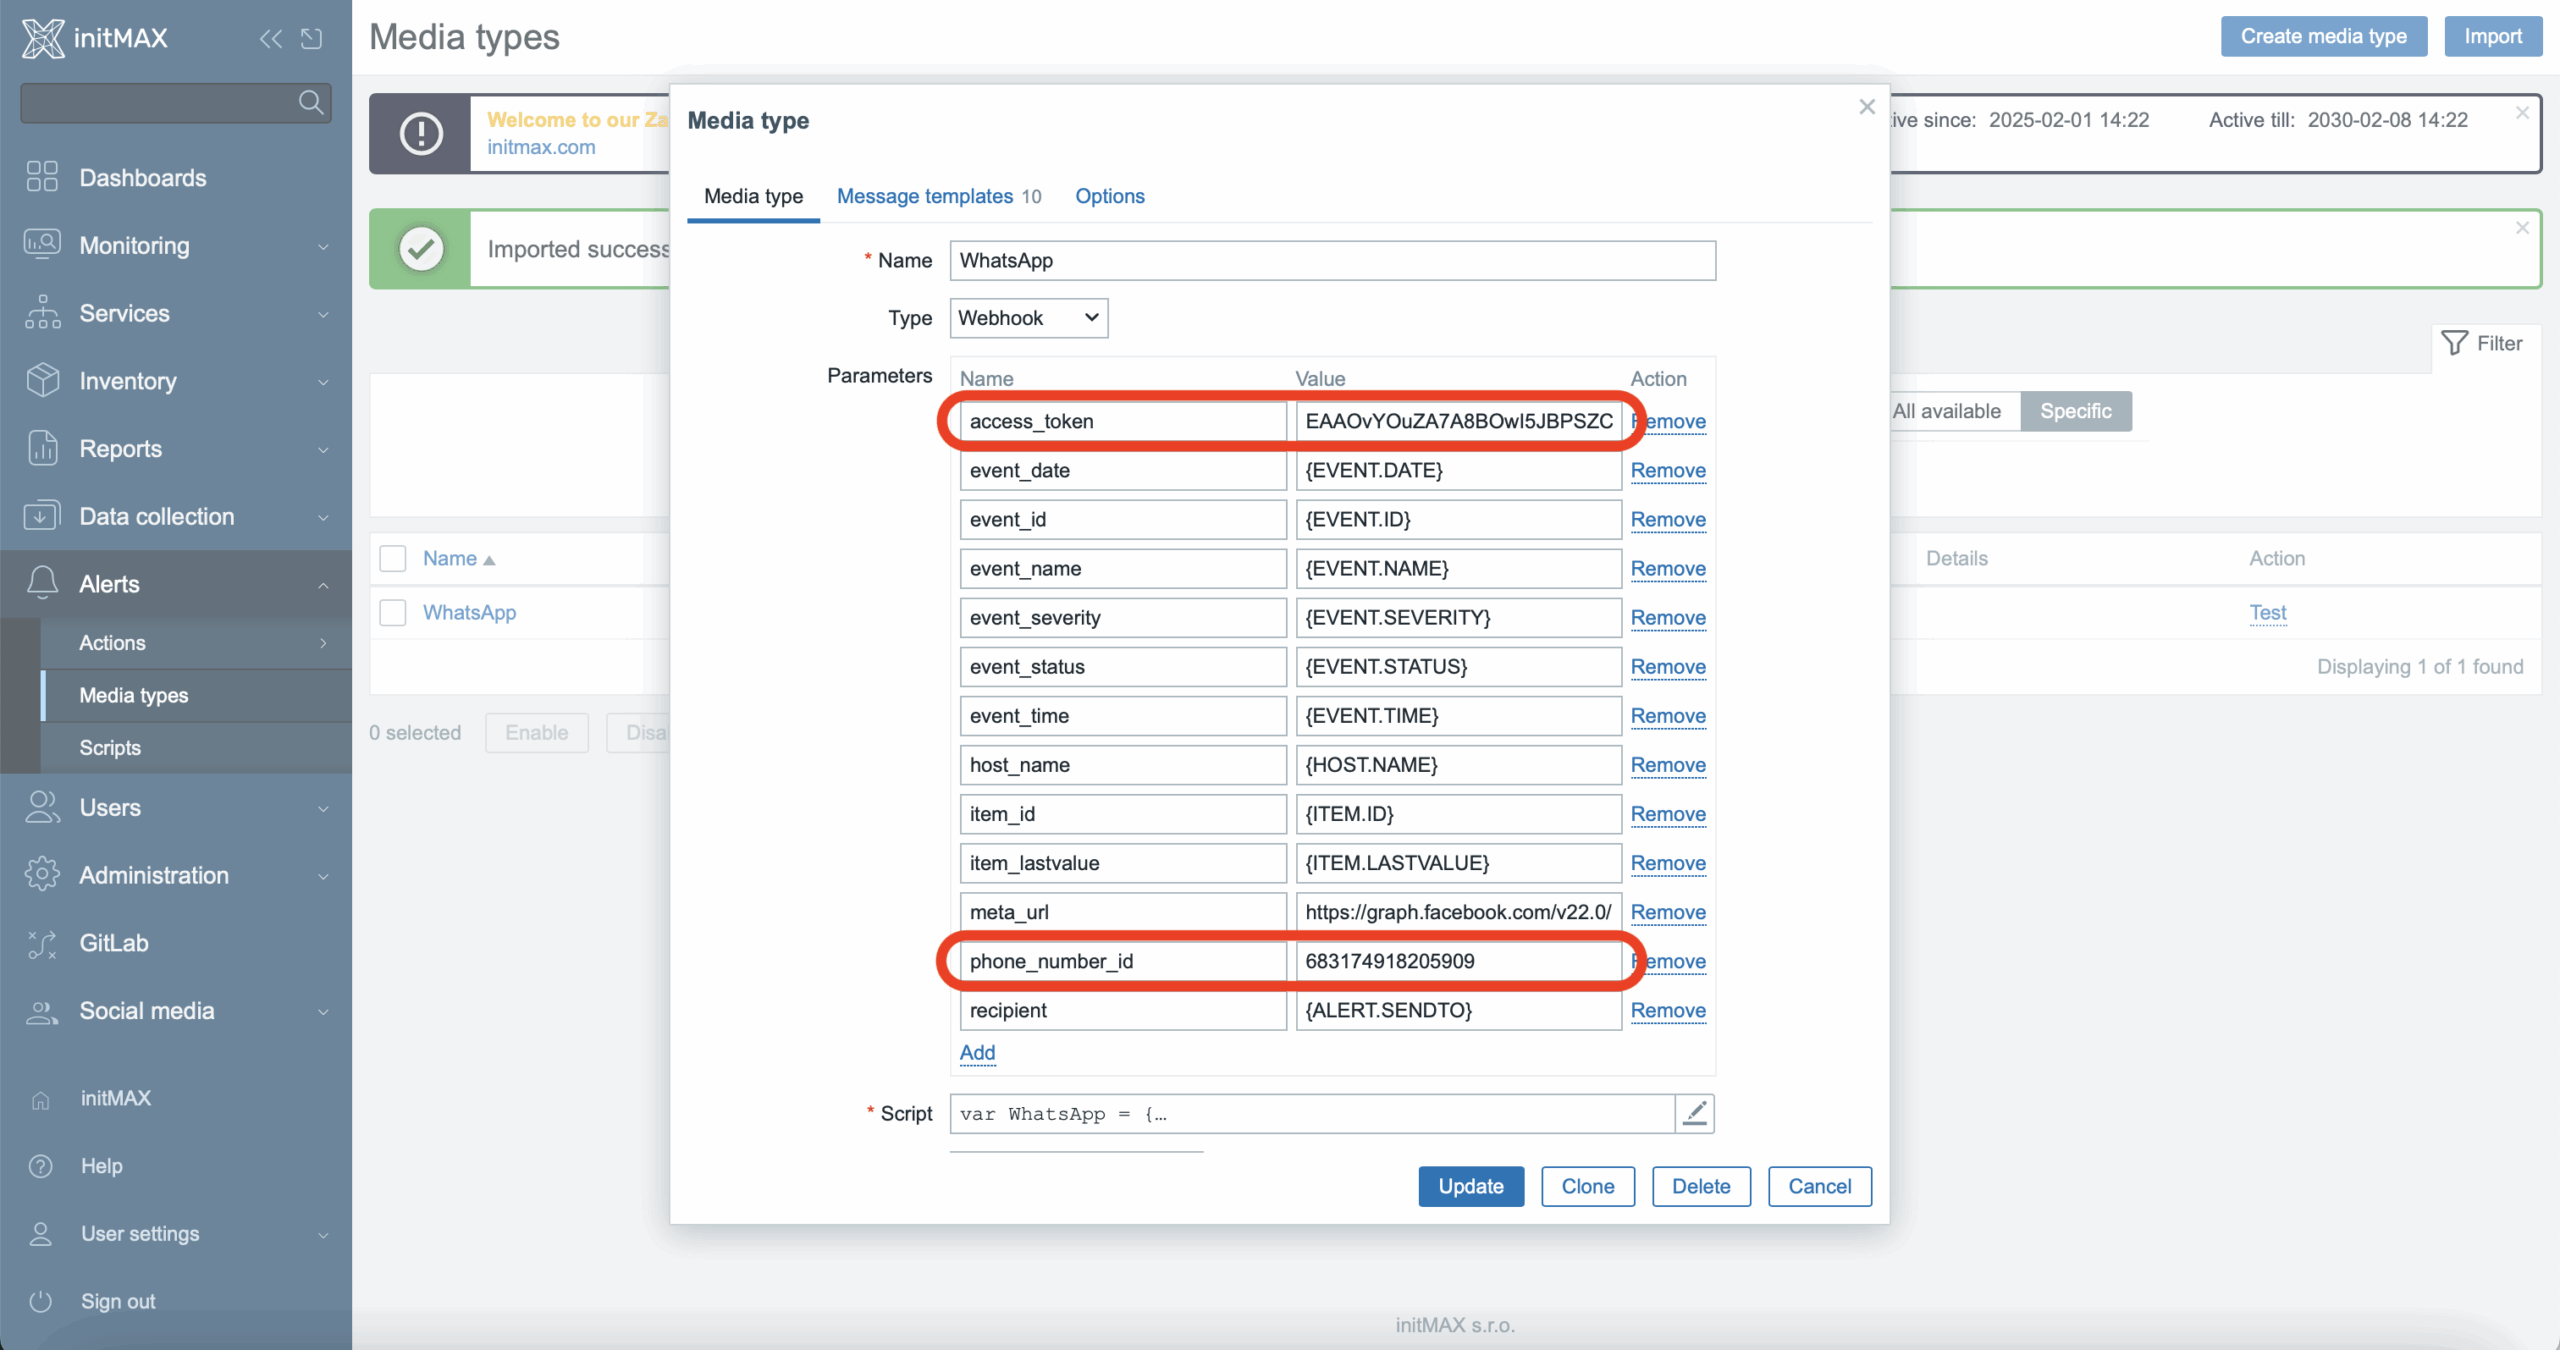
Then save the settings. You can now test your notification directly in Zabbix using the “Test” button.
Testing the Notification in Zabbix
We’ll use the test button directly available on our media type.
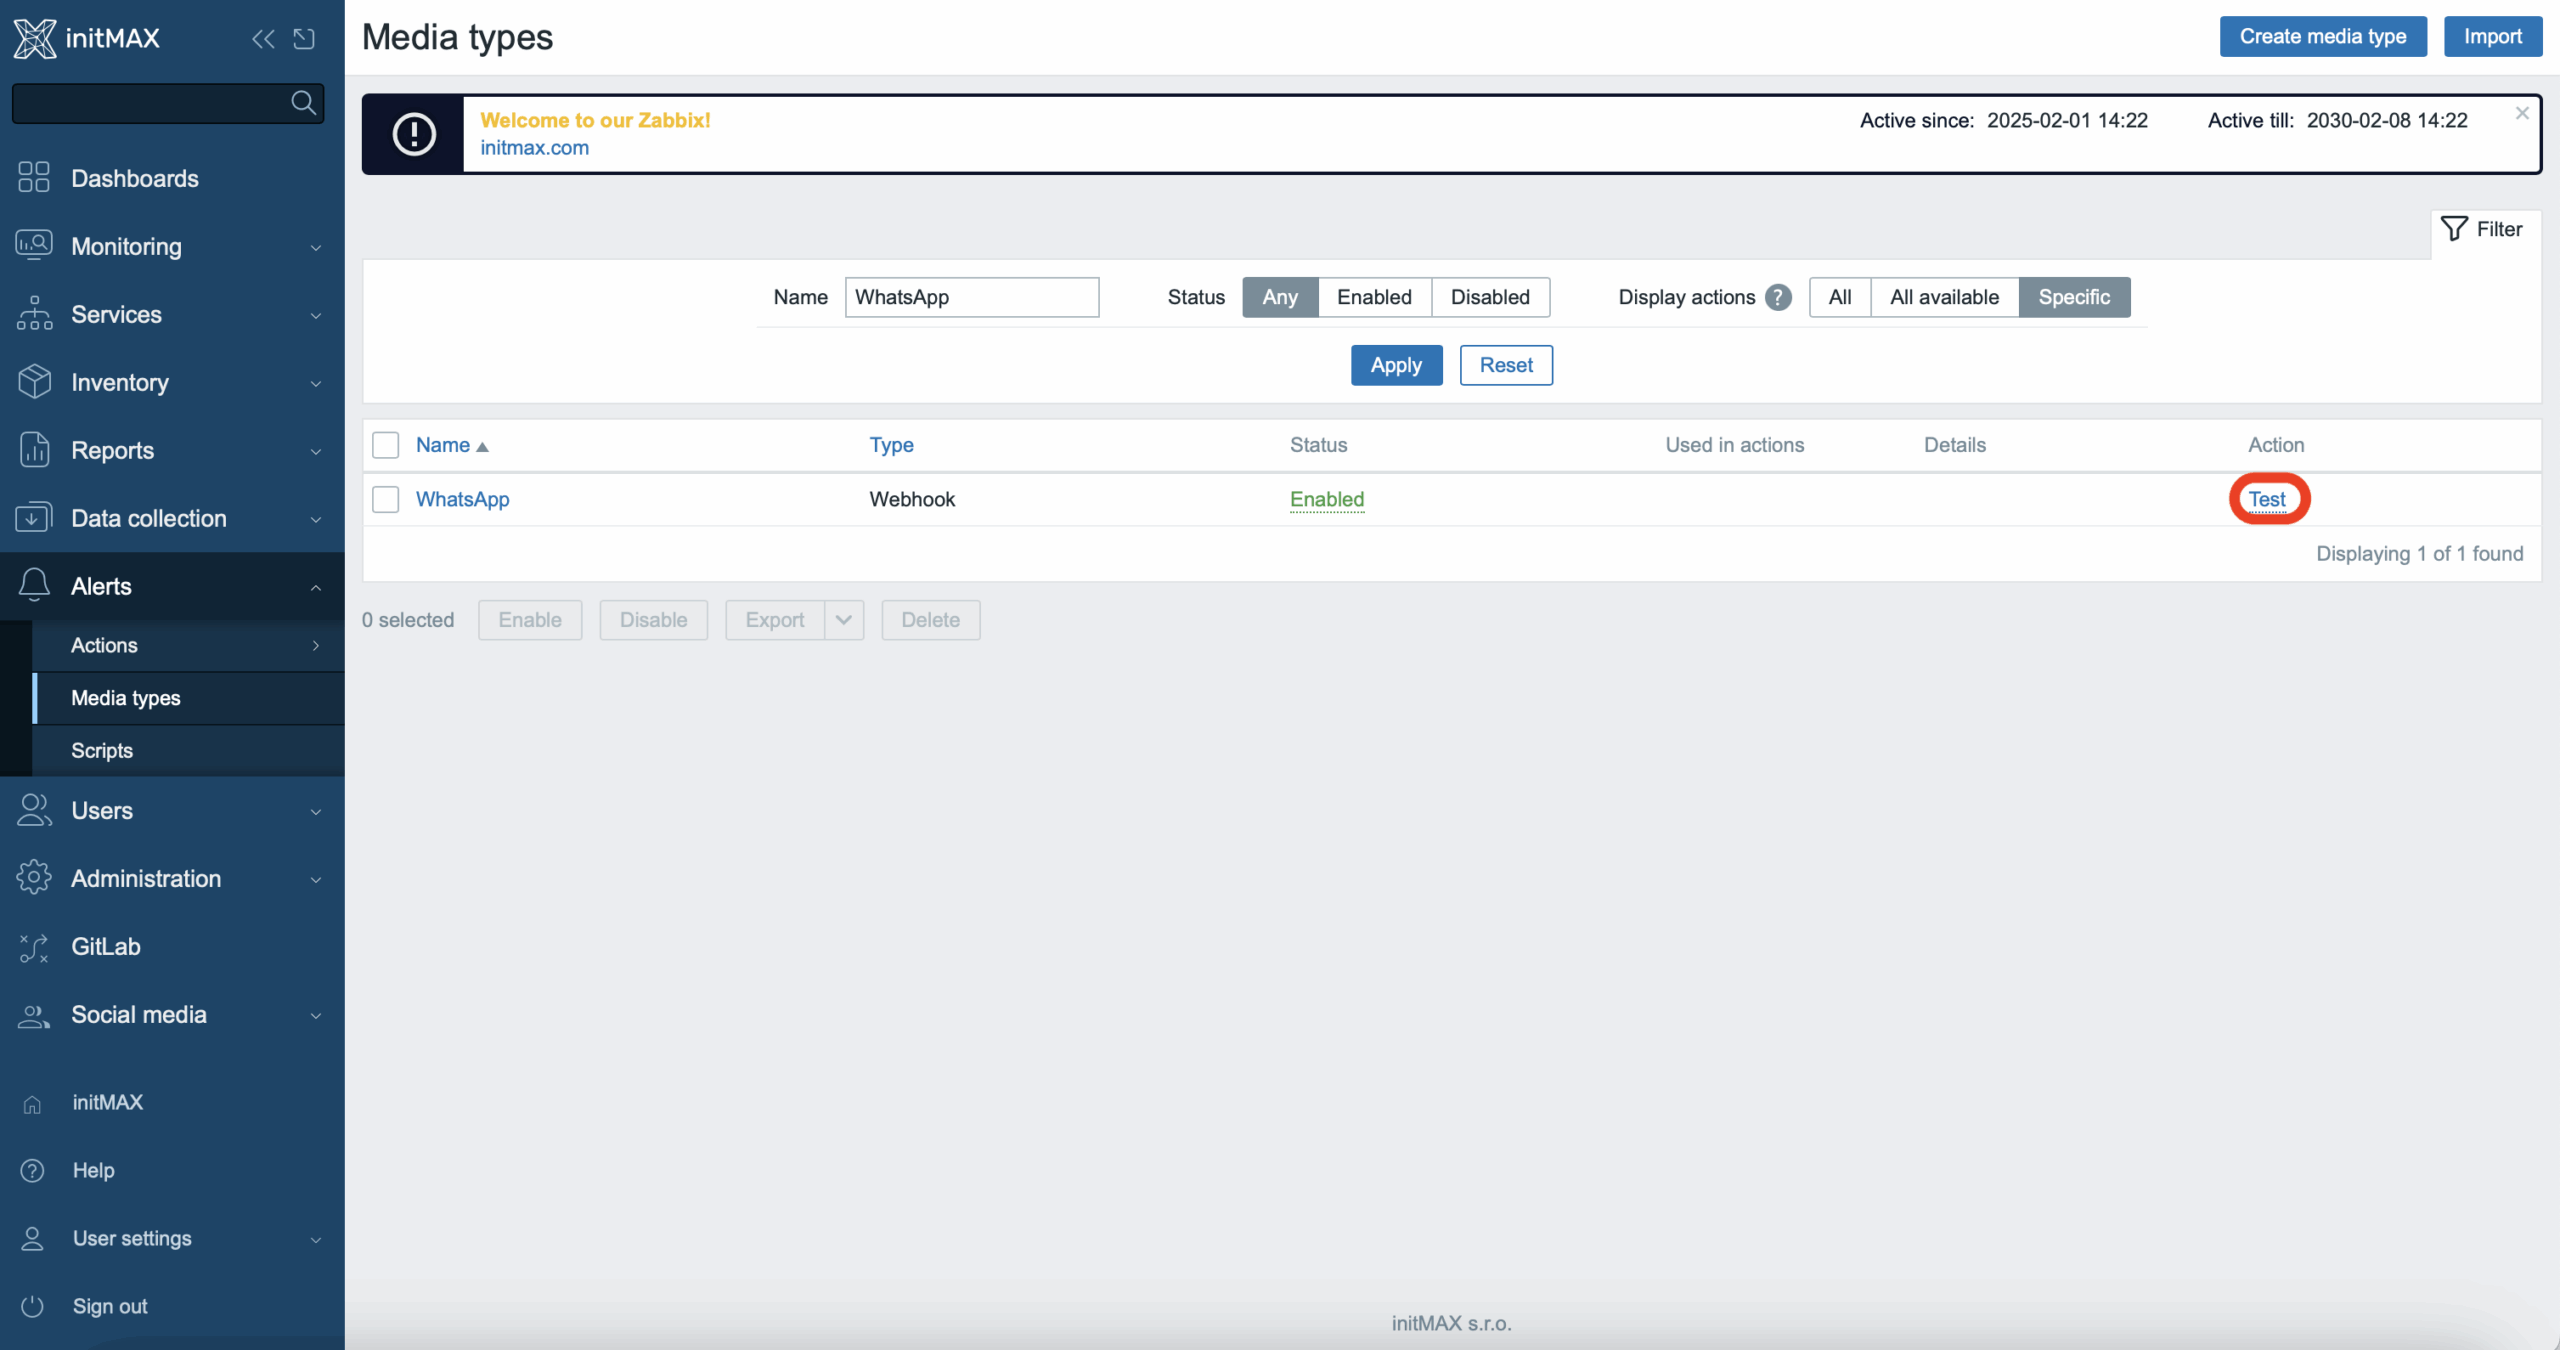
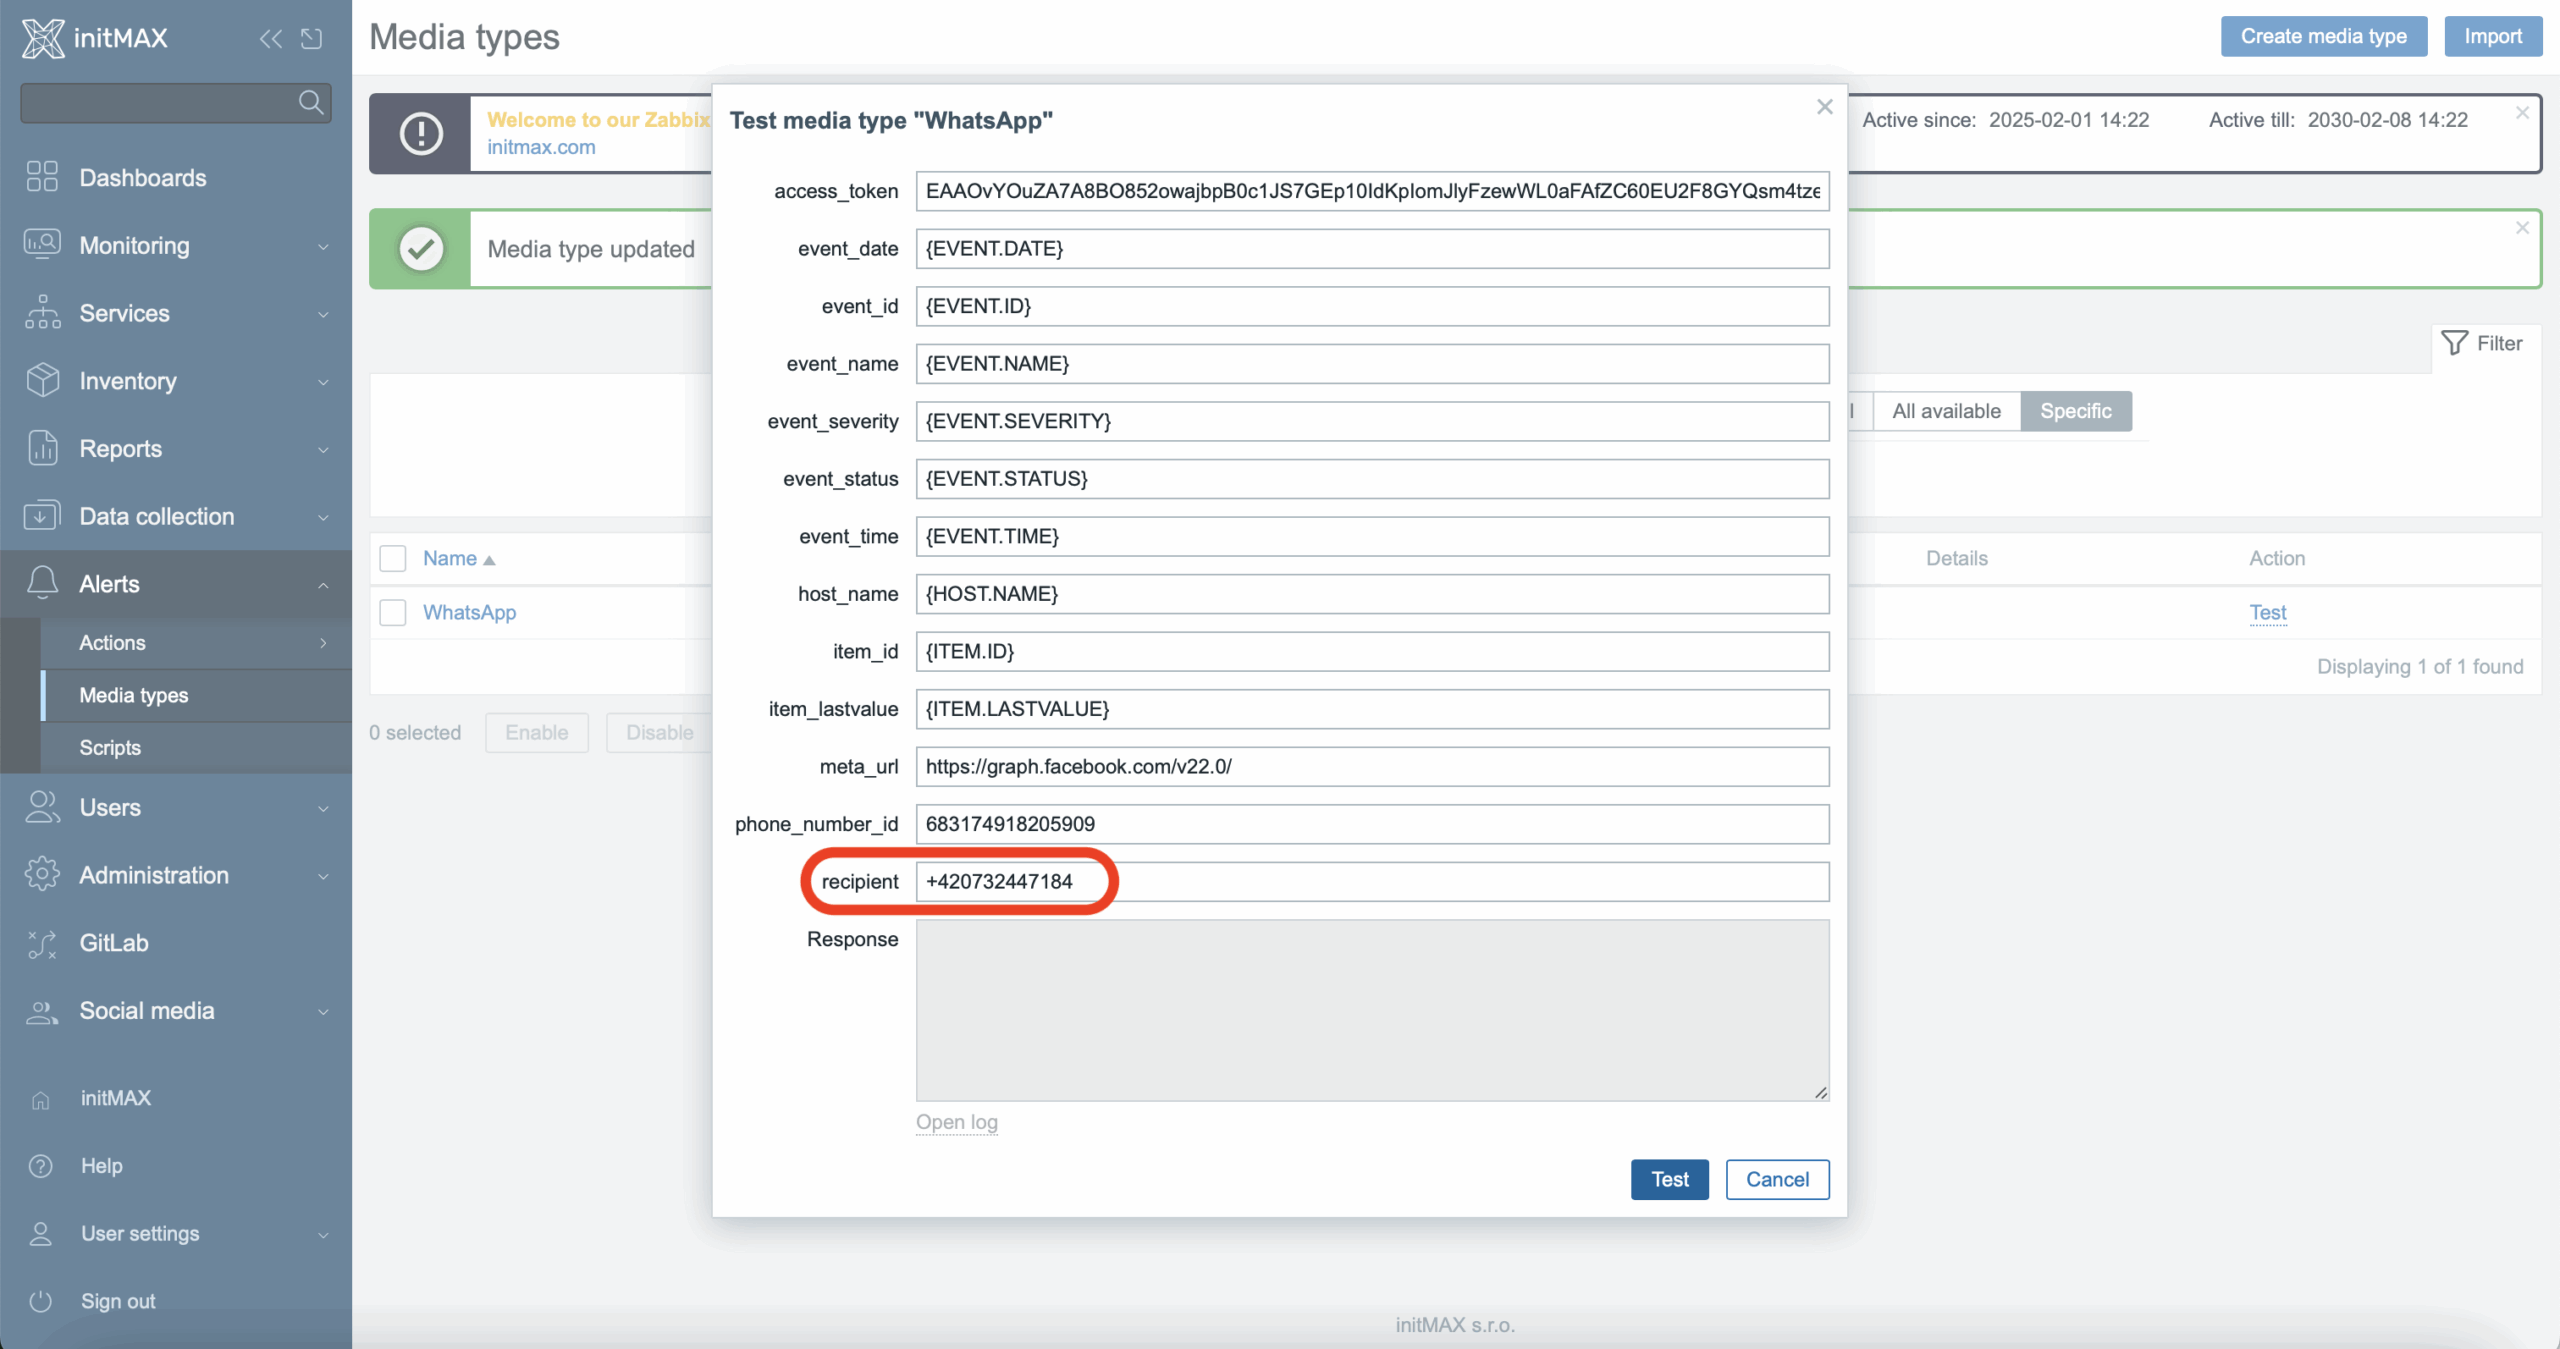
In the form, enter your phone number. This number must match the one added in the “Adding Phone Numbers for Notifications” section. Then click the “Test” button.
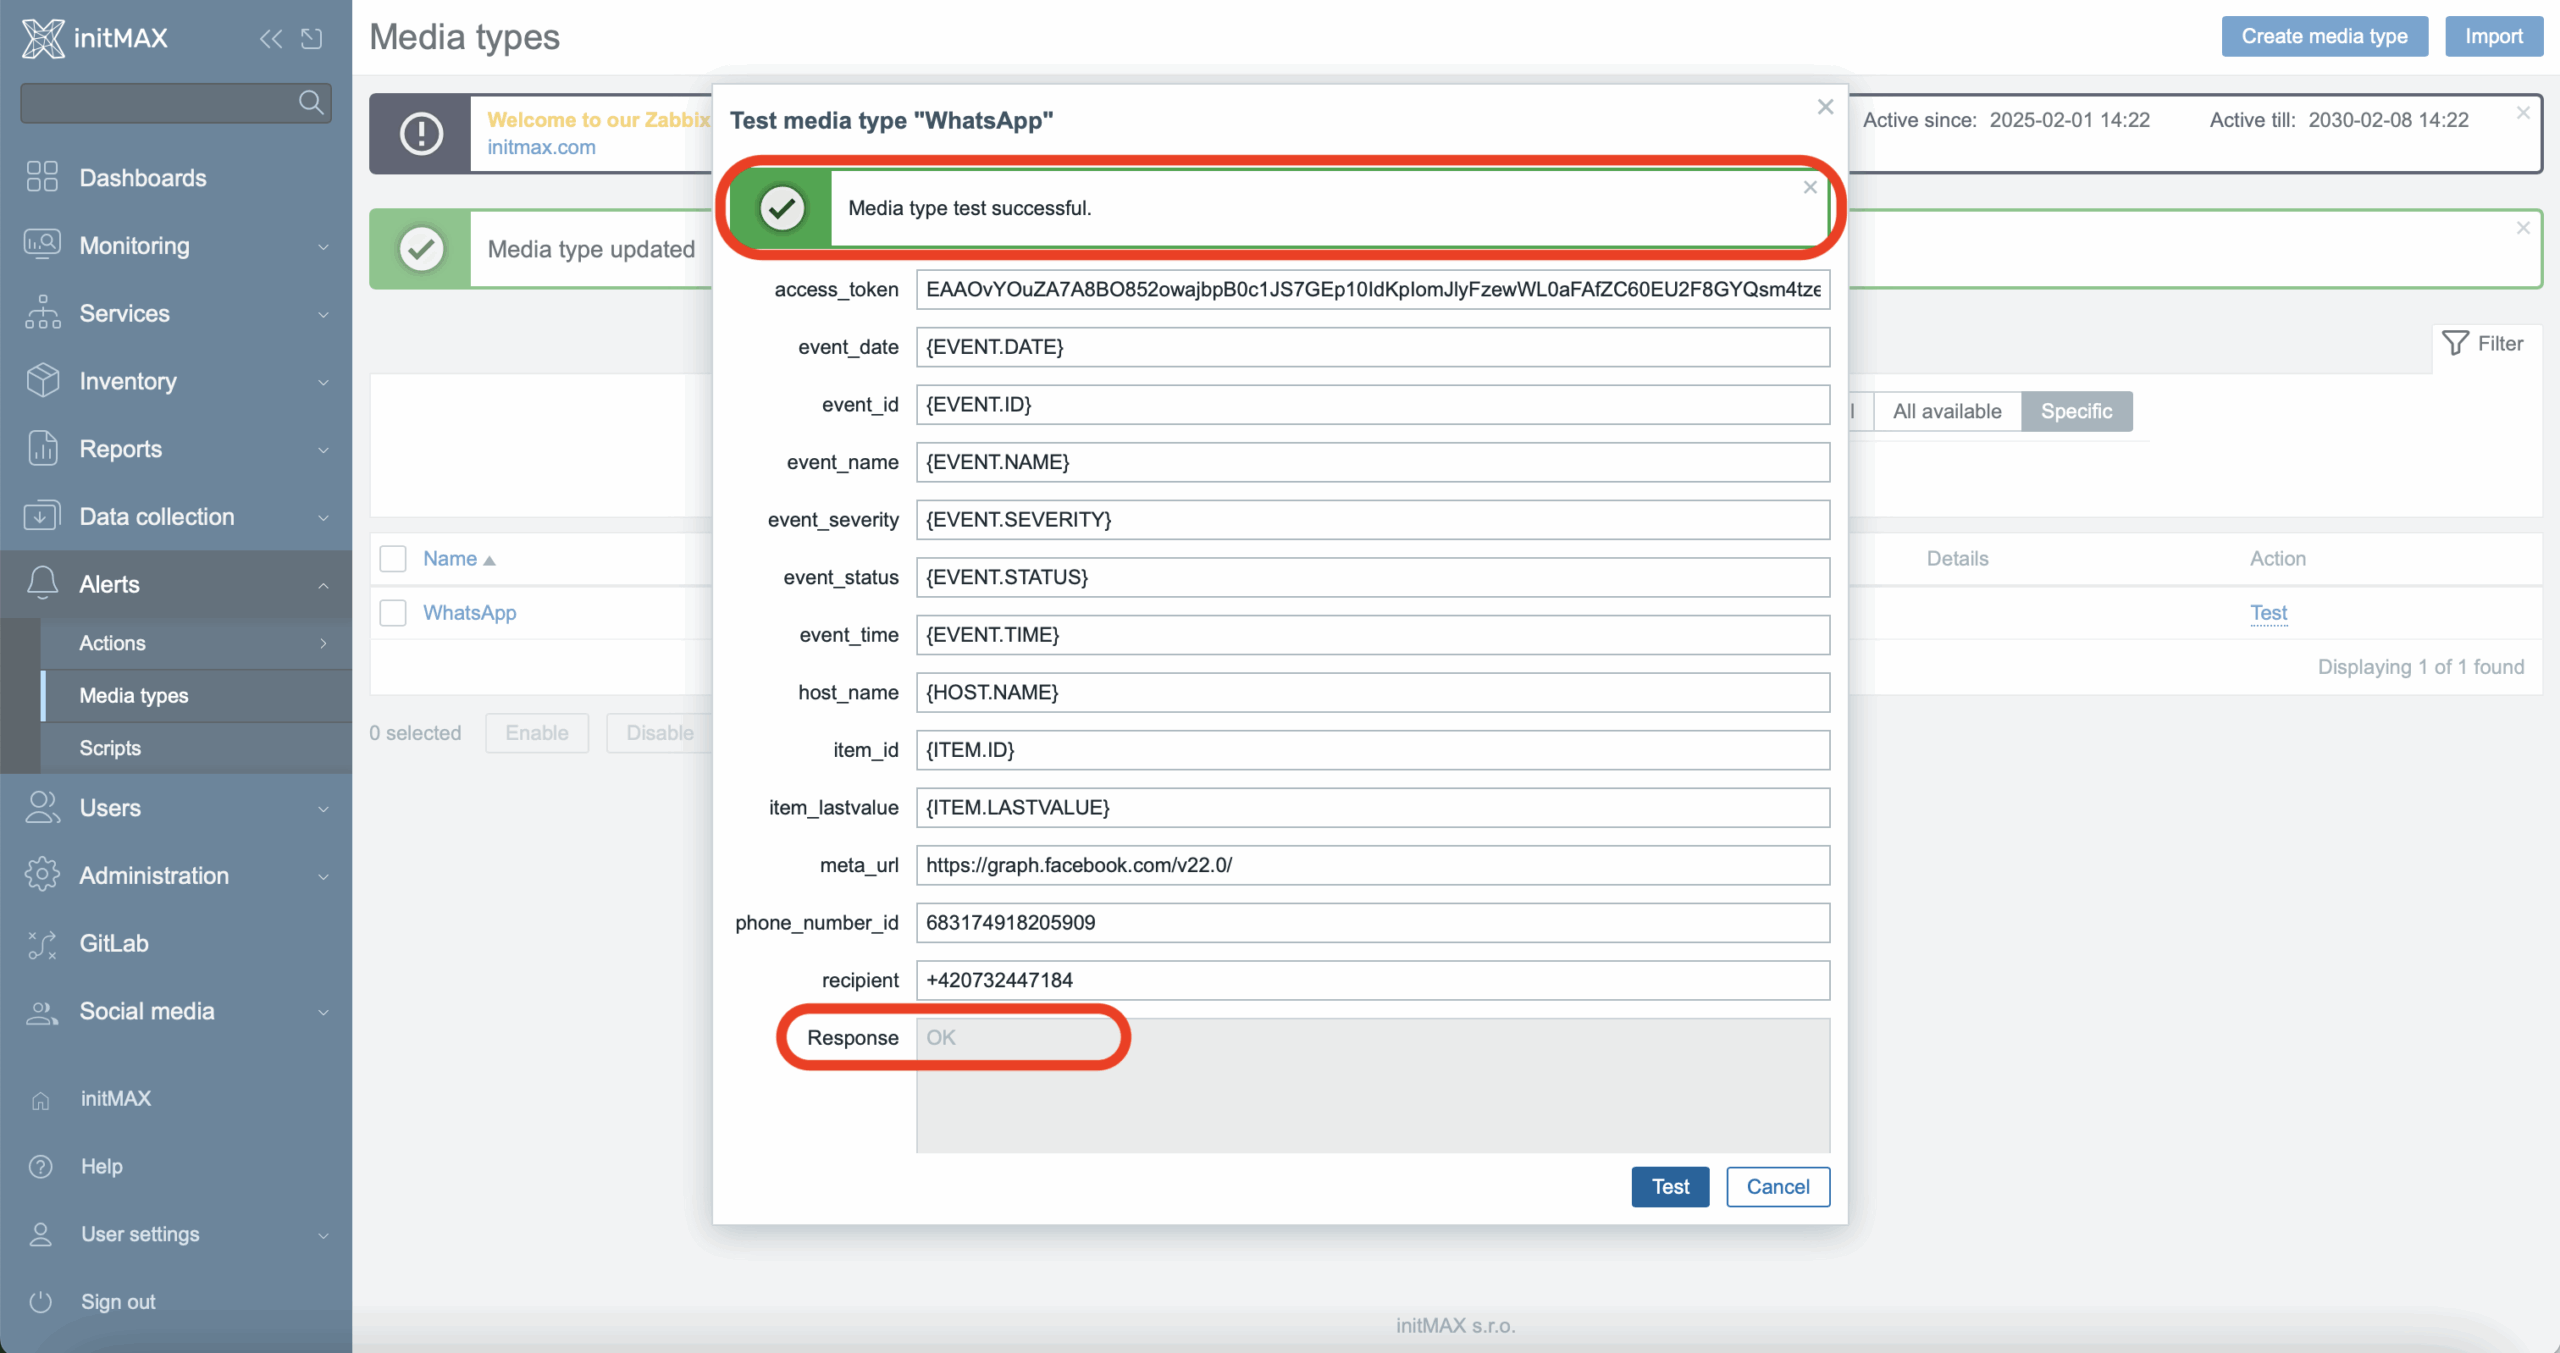
The output should display the message “Media type test successful.”, and at the bottom, you should see “Response: OK”.
Example of a received test notification with sample data. In the screenshot, you’ll see Zabbix built-in macros (e.g., {EVENT.NAME}, {HOST.NAME}) that are not populated. This is normal for a test message—these fields will be properly filled during real usage.
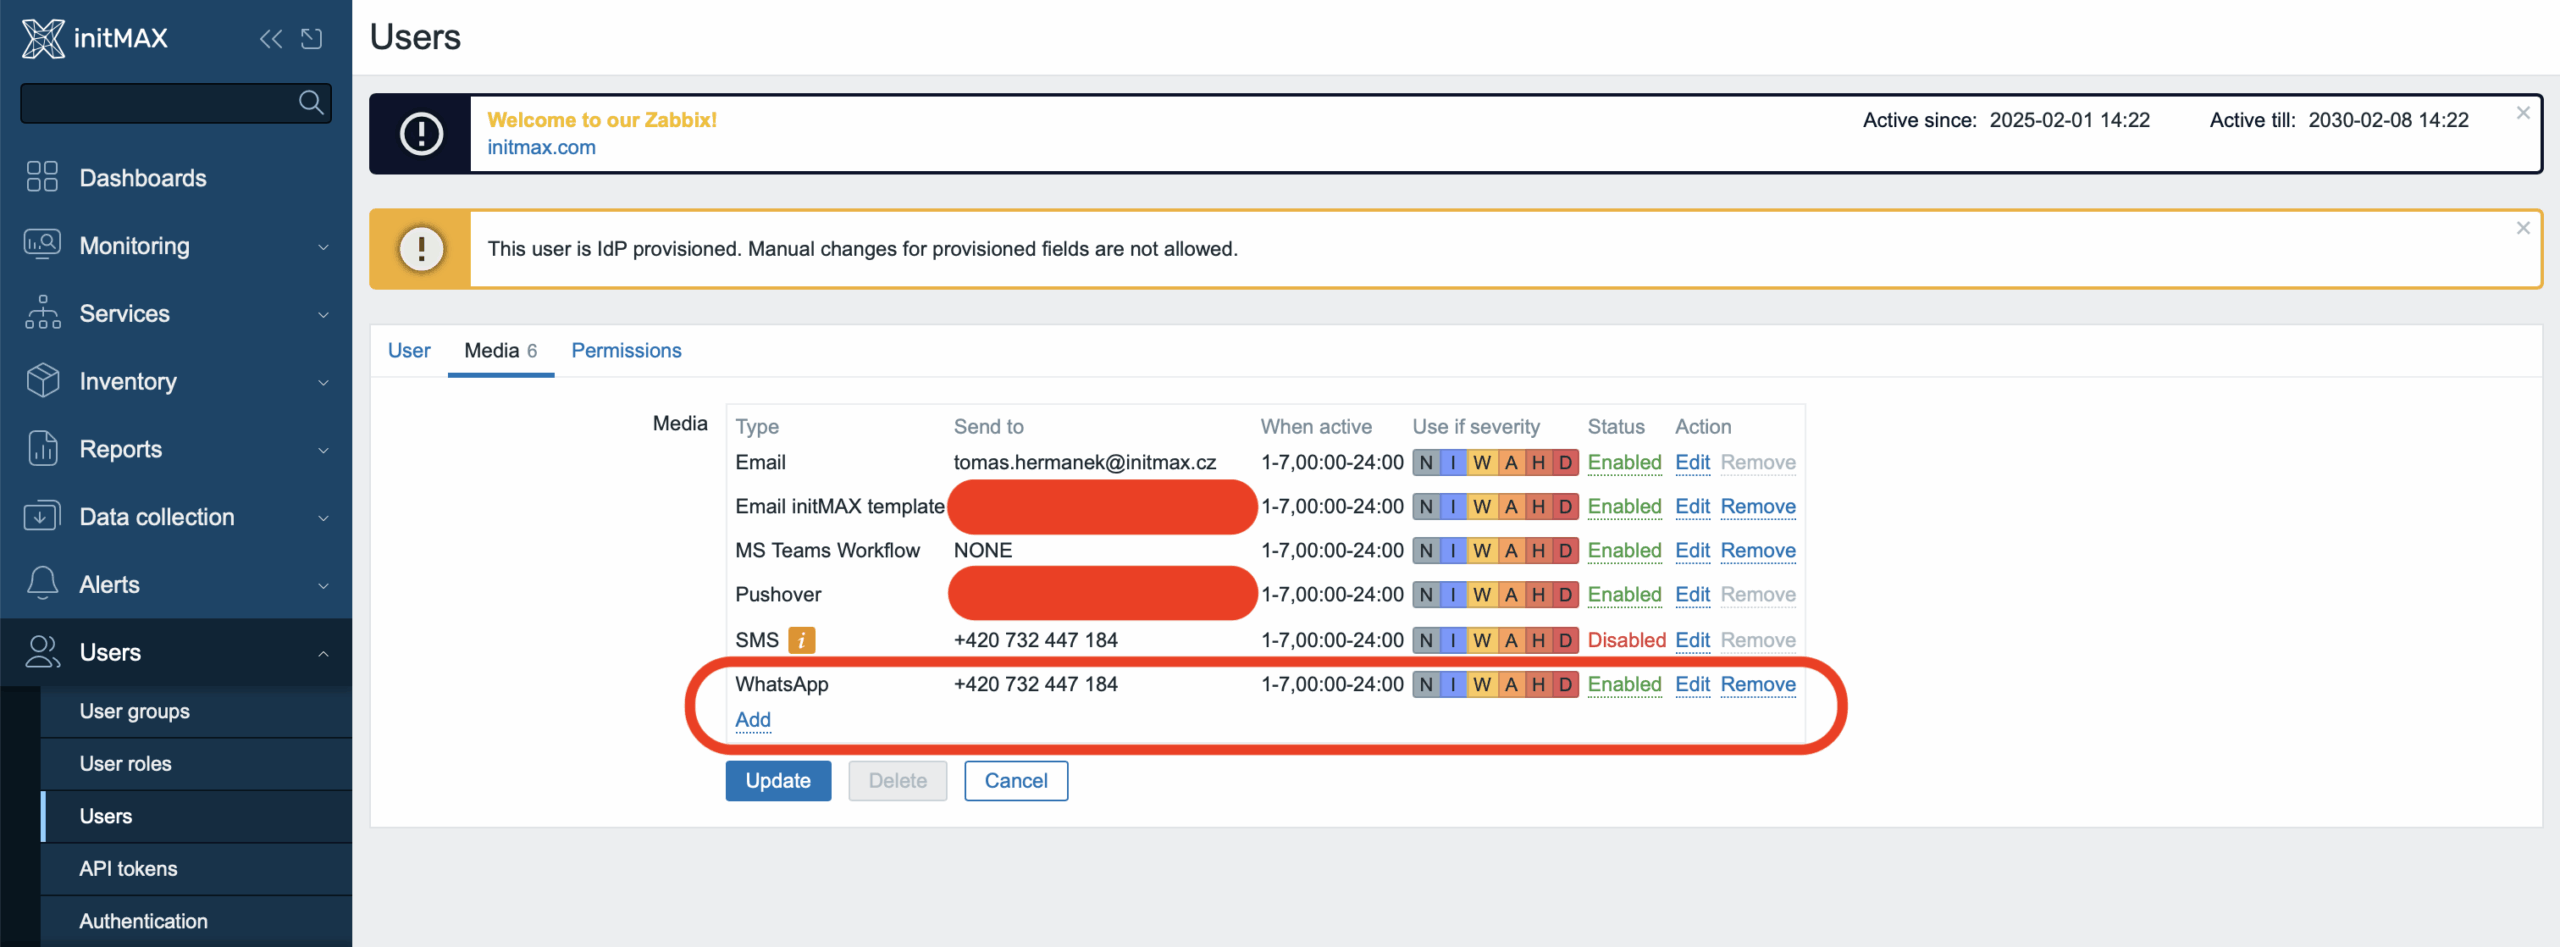
Usage with Users
Don’t forget to add the new media type to your users as the final step. In the free tier, it’s recommended to add media manually. While using JIT (Just-in-time provisioning) is possible, the limit of up to 5 phone numbers and the requirement to manually register and verify each number makes manual configuration the preferred approach.
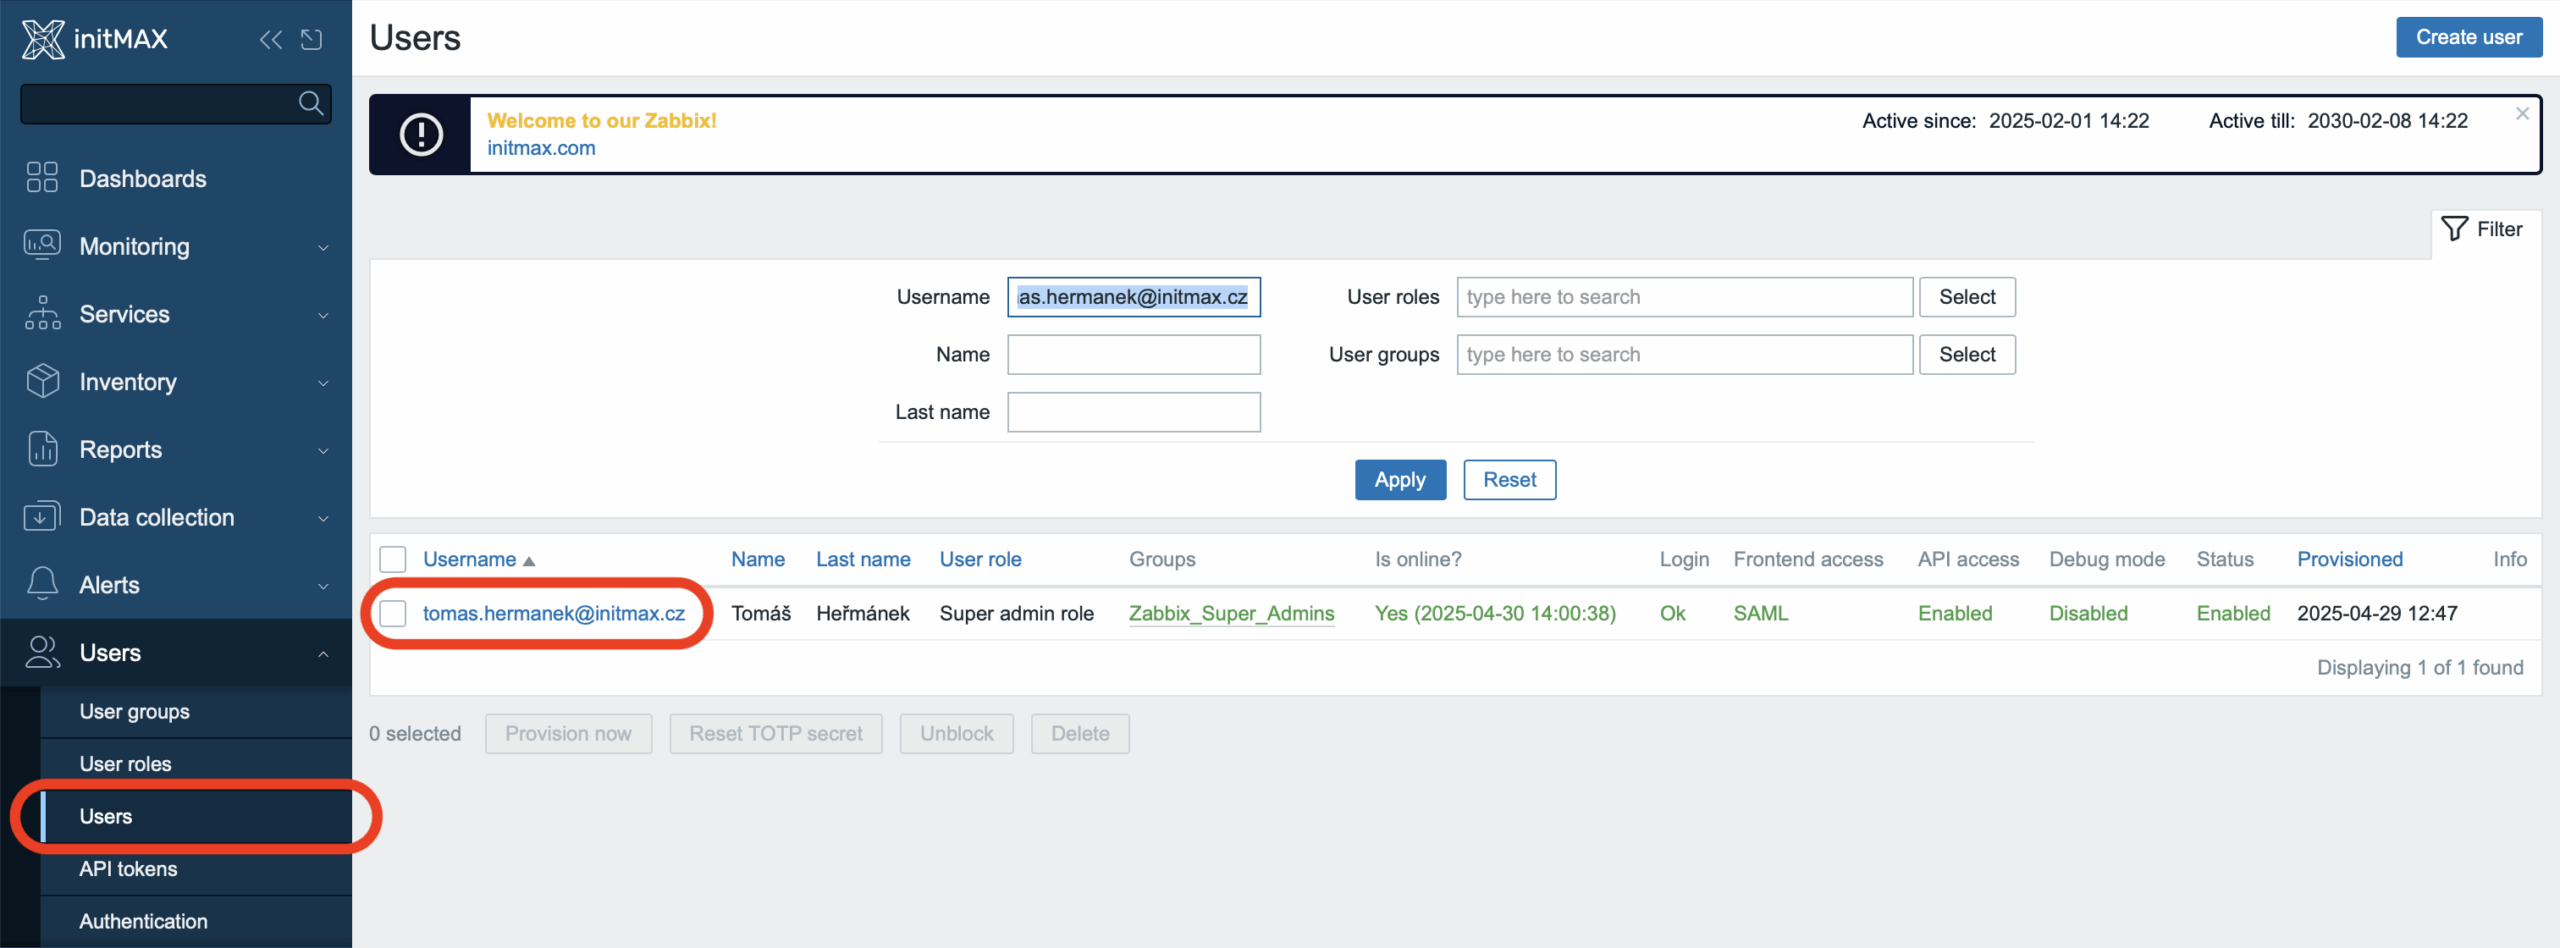
See an example of the configuration here. Remember always to enter phone numbers in the complete format, including the international country code (e.g., +420…).
Differences Between Free and Production Versions of WhatsApp Cloud API
| Feature / Limitation | Free Sandbox (Testing) | Production Version (Verified) |
|---|---|---|
| Phone number | Test number assigned by Meta | Your own verified business number |
| Number validity | Must renew every 90 days | Unlimited, no renewal needed |
| Number of notification recipients | Max. 5 numbers (each must be manually verified) | Unlimited number of numbers |
| Custom templates | Not possible; only predefined (“hello_world”) | Possible; custom templates including colored headers |
| Message limits | Low message limits | Higher message limits |
| Support from Meta | Limited (community, documentation) | Priority and faster support |
⚠️ What happens after 90 days with the test number?
The test number provided by Meta must be renewed every 90 days.
If you don’t renew it on time:
- You won’t be able to send or receive messages.
- You’ll need to re-activate (renew) the number directly within your Meta Developer account settings.
Recommendations:
- Regularly check the status of your test number.
- Ideally, switch to your own production number to avoid the need for regular renewals.
Give us a Like, share us, or follow us 😍
So you don’t miss anything: