In this article, we’ll take a detailed look at the fundamentals of SELinux, its proper integration with Zabbix, and how to effectively create custom SELinux policies to address common issues. We’ll also demonstrate how to monitor SELinux directly in Zabbix, which will help you enhance your system security and simplify day-to-day administration.
This guide is intended for RPM-based distributions (RHEL, CentOS, Rocky Linux, AlmaLinux, Fedora, …).
What is SELinux and how does it work?
SELinux (Security-Enhanced Linux) is a Linux security module that implements Mandatory Access Control (MAC). Unlike standard Discretionary Access Control (DAC), where users define permissions for their own files, MAC enforces security policies managed by the administrator, restricting the actions of programs and users based on clearly defined rules.
SELinux operates in three modes:
- Enforcing – policies are enforced, and access is actively blocked when rules are violated.
- Permissive – SELinux is active but does not block access; it only logs policy violations.
- Disabled – SELinux is completely turned off.
You can check the status of SELinux using the command:
sestatusExample output:
SELinux status:                 enabled
SELinuxfs mount:                /sys/fs/selinux
SELinux root directory:         /etc/selinux
Loaded policy name:             targeted
Current mode:                   enforcing
Mode from config file:          enforcing
Policy MLS status:              enabled
Policy deny_unknown status:     allowed
Max kernel policy version: 33- enabled – SELinux is active.
- enforcing – The policy is being enforced.
- targeted – The standard targeted policy is in use.
Zabbix package zabbix-selinux-policy
The zabbix-selinux-policy package contains specific SELinux rules required for smooth operation of the Zabbix server, proxy, and agent, without the need to disable SELinux. The package is available in the official Zabbix repository.
Package installation:
dnf install zabbix-selinux-policyTemporary SELinux deactivation
If you need to quickly disable SELinux, use:
setenforce 0- 0 means switching to Permissive mode (everything is allowed, violations are only logged).
- 1 means switching back to Enforcing mode (violations are both blocked and logged).
The change is valid only until the system is restarted. Check the current mode with:
getenforcePermanent SELinux deactivation
To permanently disable SELinux, edit /etc/selinux/config:
nano /etc/selinux/configChange:
SELINUX=enforcingto:
SELINUX=disabledReboot the system:
rebootRe-enabling SELinux and relabeling
To re-enable SELinux, it is recommended to first set the mode to permissive, verify that the policies are functioning correctly, and only then switch to enforcing mode. First, set:
SELINUX=permissiveThen set the relabel:
touch /.autorelabel
reboot
Create the .autorelabel file directly in /. This process will apply the correct SELinux contexts during the next reboot. A file’s context refers to metadata that determines which SELinux rules apply to it. If relabeling does not occur, files (such as /etc/passwd) may have incorrect or missing contexts, which can lead to issues like being unable to log in.
After verifying that permissive mode works as expected, you can switch to enforcing. First, update the configuration in /etc/selinux/config:
SELINUX=enforcingThis change will take effect after the system is restarted. To apply the change immediately without rebooting, use the command:
setenforce 1Creating custom SELinux policies
If SELinux blocks an operation of the zabbix_server application, you can identify it from the auditd logs:
grep AVC /var/log/audit/audit.log | grep zabbix_serverExample log entry:
type=AVC msg=audit(1743521737.355:209): avc: denied { name_bind } for pid=1620 comm="zabbix_server" src=10055 scontext=system_u:system_r:zabbix_t:s0 tcontext=system_u:object_r:unreserved_port_t:s0 tclass=tcp_socket permissive=0This error indicates that SELinux is preventing the Zabbix server from using port 10055. To create a rule that allows this action, install the audit2allow tool:
dnf install policycoreutils policycoreutils-python-utils -yCreate a policy for the Zabbix server
Run the command:
grep zabbix_server /var/log/audit/audit.log | audit2allow -m zabbix_server_policy > zabbix_server_policy.teWhat each part does:
grep zabbix_server /var/log/audit/audit.log: Filters audit logs to show only entries related to the Zabbix server.audit2allow -m zabbix_server_policy: Analyzes the input and generates a proposed SELinux policy module.
Example content of the zabbix_server_policy.te file:
module zabbix_server_policy 1.0;

require {
	type krb5_keytab_t;
	type unreserved_port_t;
	type zabbix_t;
	class dir search;
	class tcp_socket name_bind;
}

#============= zabbix_t ==============
allow zabbix_t krb5_keytab_t:dir search;

#!!!! This avc can be allowed using the boolean 'nis_enable
This file contains rules that allow the Zabbix server to:
- Use specific ports (e.g. unreserved ports),
- Search directories containing Kerberos key files (
krb5_keytab_t).
module zabbix_server_policy 1.0;
→ Module name and version.
require { ... }
→ The module requires access to the following:
krb5_keytab_t→ Kerberos key files (e.g./etc/krb5.keytab)unreserved_port_t→ standard (unreserved) network portszabbix_t→ Zabbix server processdir search→ allows directory traversaltcp_socket name_bind→ allows binding to a TCP port
allow zabbix_t krb5_keytab_t:dir search;
→ Zabbix is allowed to access the directory containing the Kerberos key.
#!!!! This avc can be allowed using the boolean 'nis_enable'
→ Comment: a similar permission could be granted by enabling the boolean nis_enable.
Security note:
This example also highlights a potential drawback of automatically generating rules using audit2allow.
It’s possible that, along with the necessary permissions, unwanted access—such as to Kerberos key files—may also be granted.
Therefore, it is crucial to carefully review and edit the output of audit2allow before compiling and applying the policy.
Next, compile and apply the rule:
checkmodule -M -m -o zabbix_server_policy.mod zabbix_server_policy.te
semodule_package -o zabbix_server_policy.pp -m zabbix_server_policy.mod
semodule -i zabbix_server_policy.pp
checkmodule -M -m: Compiles the.tefile into a.modmodule file.semodule_package: Converts the.modfile into a.pppolicy package.semodule -i: Installs the generated policy package into the SELinux system.
Verifying policy application:
semodule -l | grep zabbix_server_policyThe output should show the installed zabbix_server_policy, confirming that the policy has been successfully applied to the SELinux system.
To list SELinux policies, for example those related to Zabbix, use:
semodule -l | grep zabbixThis command displays all currently installed SELinux modules that contain “zabbix” in their name.
zabbix
zabbix_server_policy
If you want to see what rules are included in a specific SELinux module (e.g. zabbix_server_policy), you can use the following approach:
mkdir -p /tmp/policyview && \
cd /tmp/policyview && \
semodule --extract zabbix_server_policy && \
strings zabbix_server_policy.pp
Extending an existing SELinux policy with a new rule
If you later need to add another rule to an existing policy, edit the existing .te file (e.g. by adding another allow rule), then repeat the full process of compiling and applying the policy:
checkmodule -M -m -o zabbix_server_policy.mod zabbix_server_policy.te
semodule_package -o zabbix_server_policy.pp -m zabbix_server_policy.mod
semodule -i zabbix_server_policy.pp
SELinux automatically updates the existing policy with new rules without requiring the original policy to be removed.
grep zabbix_server /var/log/audit/audit.log | audit2allow -m zabbix_server_policy > zabbix_server_policy.teHow do I remove a custom SELinux policy?
Use the semodule command:
semodule -r zabbix_server_policyMonitoring SELinux AVC denials using Zabbix
To monitor SELinux, we first need permission to read the relevant log file. A secure approach is to redirect its contents to a separate file created specifically for this purpose and accessible by the Zabbix agent—rather than modifying permissions on the original system log files, thereby maintaining the system’s security standards.
AVC denial messages in the log look like this:
type=AVC msg=audit(1744268323.007:2345954): avc: denied { search } for pid=2102180 comm="zabbix_server" name="krb5" ...These messages are logged in the audit log:/var/log/audit/audit.log
We will specifically monitor these messages.
First, create a script that continuously monitors audit.log and filters out only AVC messages:
nano /usr/local/bin/selinux-denial-logger.shScript content:
#!/bin/bash

tail -F /var/log/audit/audit.log | grep --line-buffered -E "avc:\s+denied" >> /var/log/selinux_denials.log
Then set executable permissions for the script:
chmod +x /usr/local/bin/selinux-denial-logger.shAutomatically start the script using systemd
To ensure the created script runs automatically after system reboot and continues running in the background, you need to create a corresponding systemd service.
Create a new systemd service using the command:
nano /etc/systemd/system/selinux-denial-logger.serviceContent of the systemd service file:
[Unit]
Description=SELinux AVC Denial Logger by initMAX s.r.o.
After=auditd.service

[Service]
Type=simple
ExecStart=/usr/local/bin/selinux-denial-logger.sh
Restart=always
RestartSec=5

[Install]
WantedBy=multi-user.target
Enable and start the newly created service:
systemctl daemon-reload
systemctl enable selinux-denial-logger.service --now
Check that the service is running without issues:
systemctl status selinux-denial-logger.serviceLog rotation setup using logrotate
To ensure that the log file does not grow too large, it is recommended to use the logrotate tool for regular rotation.
Create a log rotation configuration using the command:
nano /etc/logrotate.d/selinux_denialsContent of the logrotate configuration:
/var/log/selinux_denials.log {
    weekly
    rotate 4
    missingok
    notifempty
    compress
    delaycompress
    create 0644 root root
    sharedscripts
    postrotate
        systemctl restart selinux-denial-logger.service > /dev/null 2>&1 || true
    endscript
}
This configuration ensures weekly log rotation, retains 4 weeks of history, compresses the logs, and restarts the service after each rotation to ensure logging continues to the correct file.
Template Import and Requirements
To monitor SELinux using Zabbix, we have prepared a custom SELinux template that can be easily imported into your Zabbix server.
Requirements
- Zabbix version: 7.0 or higher
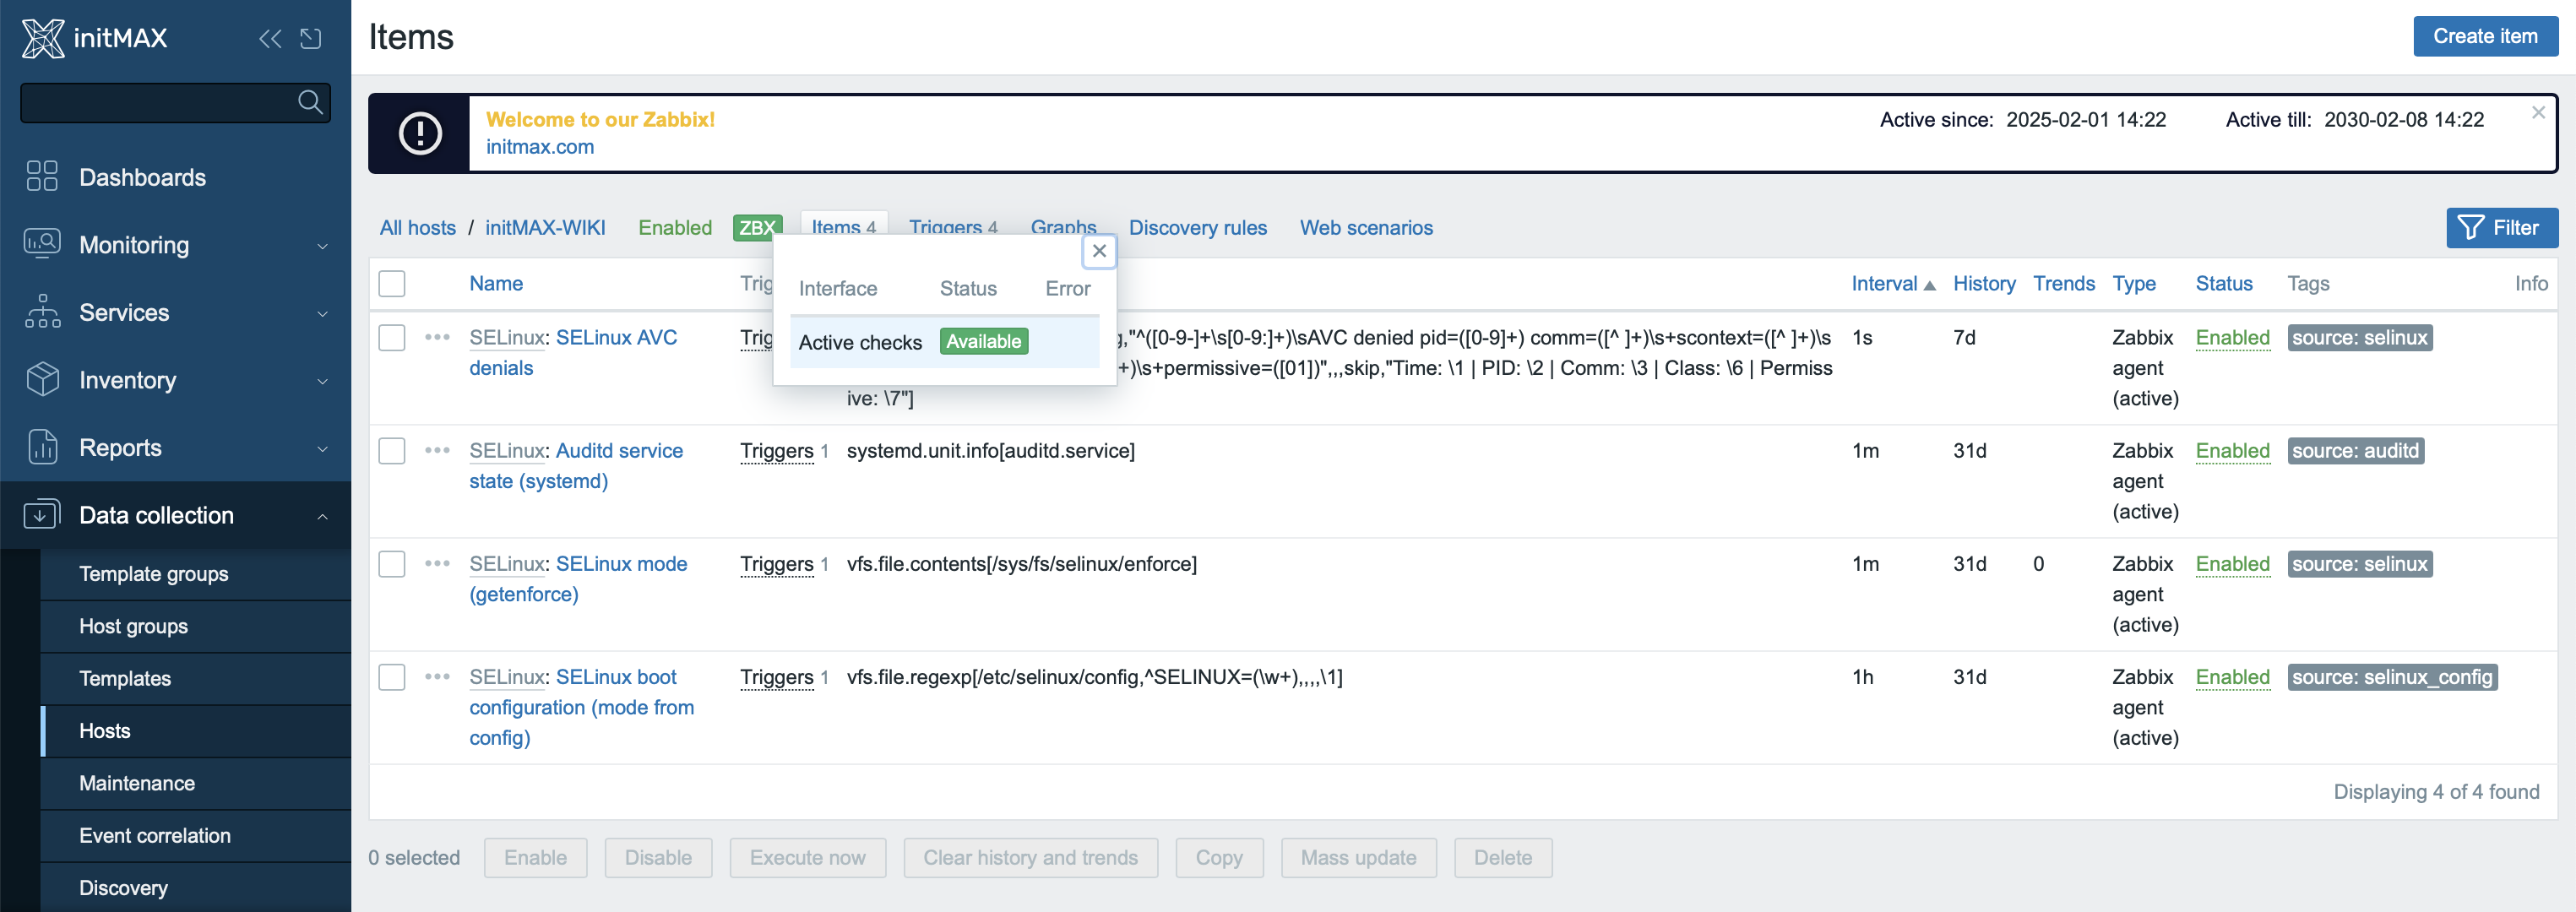
- Zabbix agent: it is recommended to use Zabbix Agent 2 (required for
systemd.unit.infoand easier integration) - Zabbix agent: to use
log*keys, the agent must run in active mode (active checks) - System with SELinux: e.g. RHEL, AlmaLinux, CentOS Stream, Fedora, etc.
- Agent: must have access to the following files (usually allowed by default):
/sys/fs/selinux/enforce/etc/selinux/config/var/log/selinux_denials.log– file generated by the external script (see above)
The template can be downloaded from our repository here: https://git.initmax.cz/initMAX-Public/zabbix-templates/-/tree/production/free/SELinux_by_Zabbix_Agent_2
Template Import
In the Zabbix frontend, go to Data collection → Templates.
Click on Import.
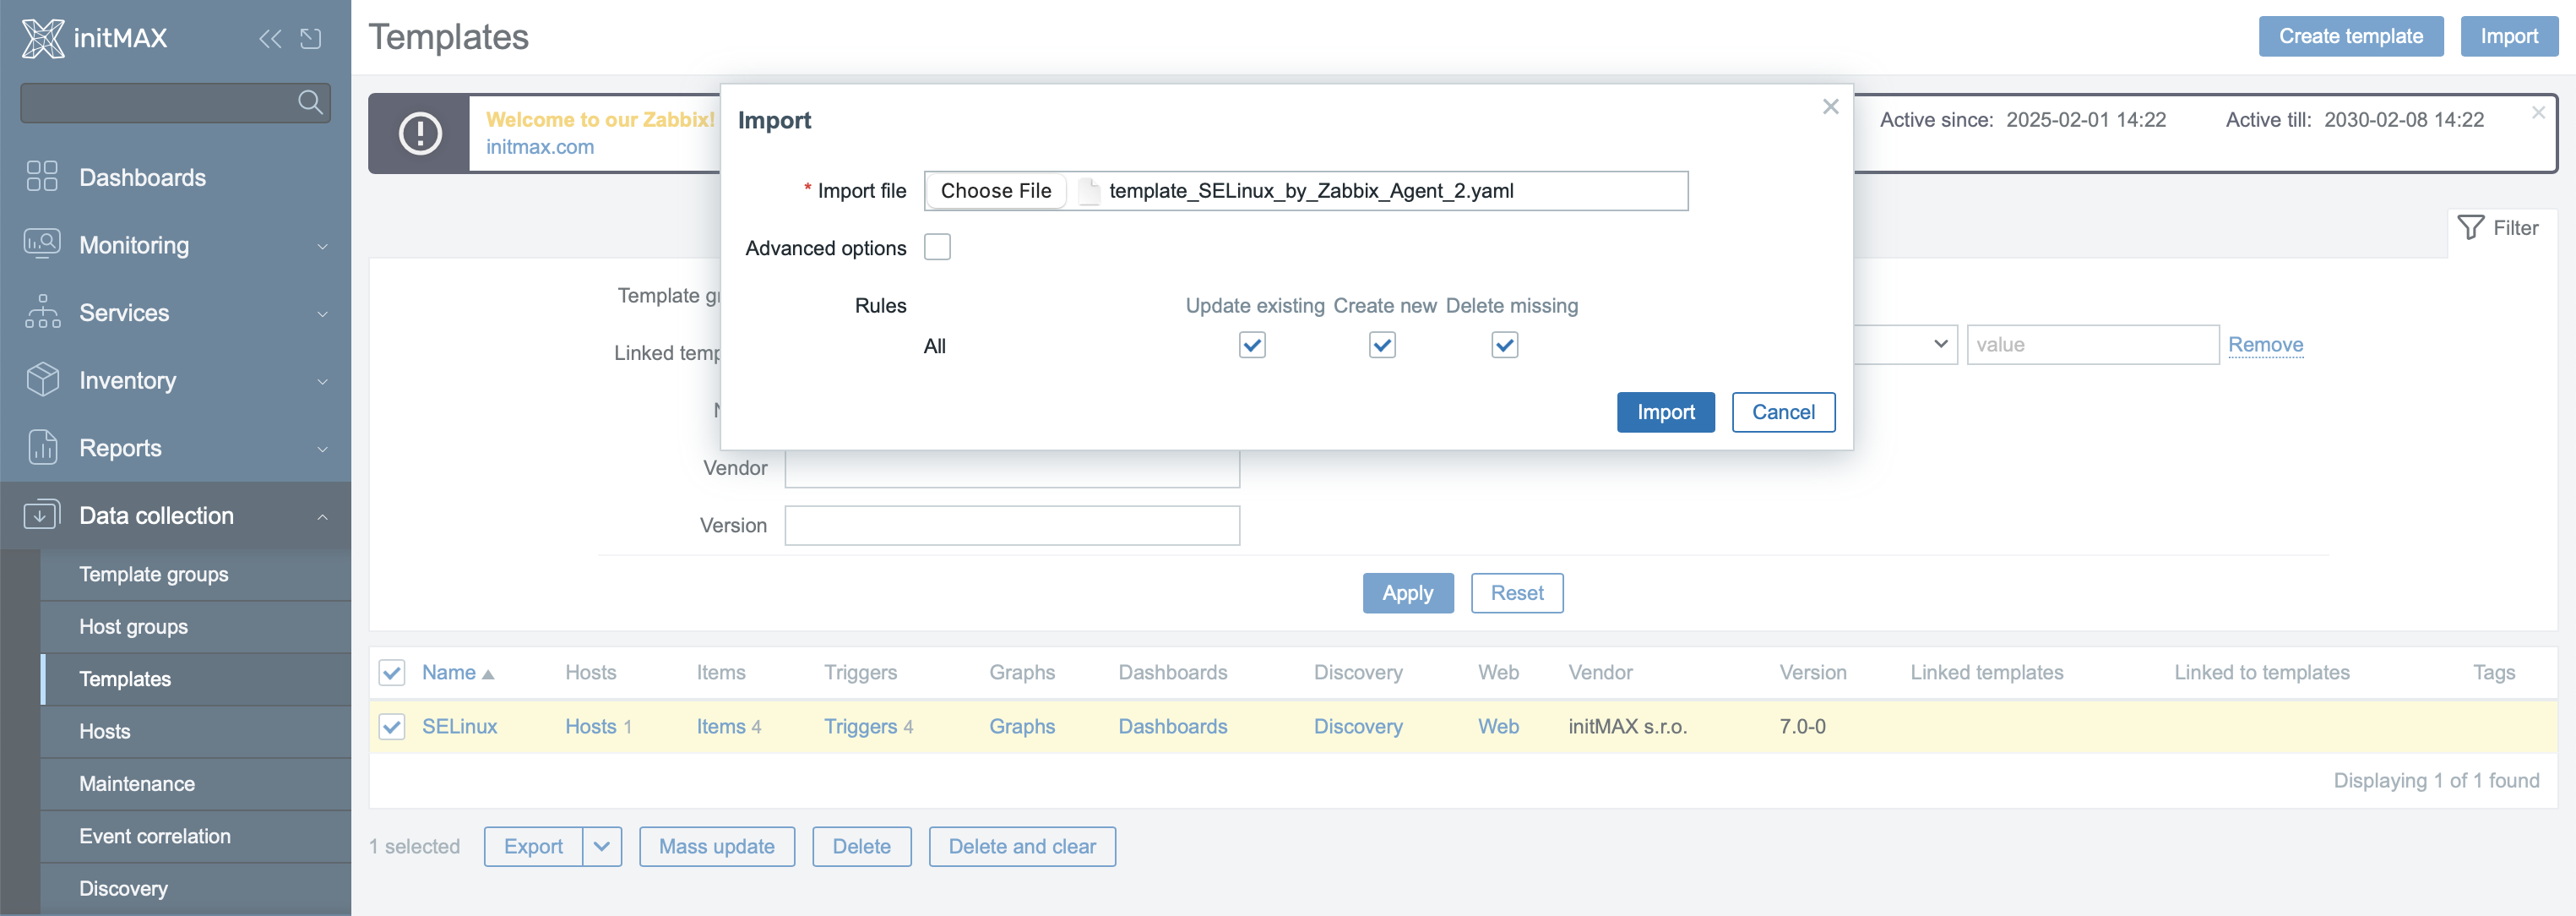
Select the file template_SELinux_by_Zabbix_Agent_2.yaml from our repository and confirm the import.
After importing, link the template to a host with active communication enabled—this is required for processing logs using log[*].
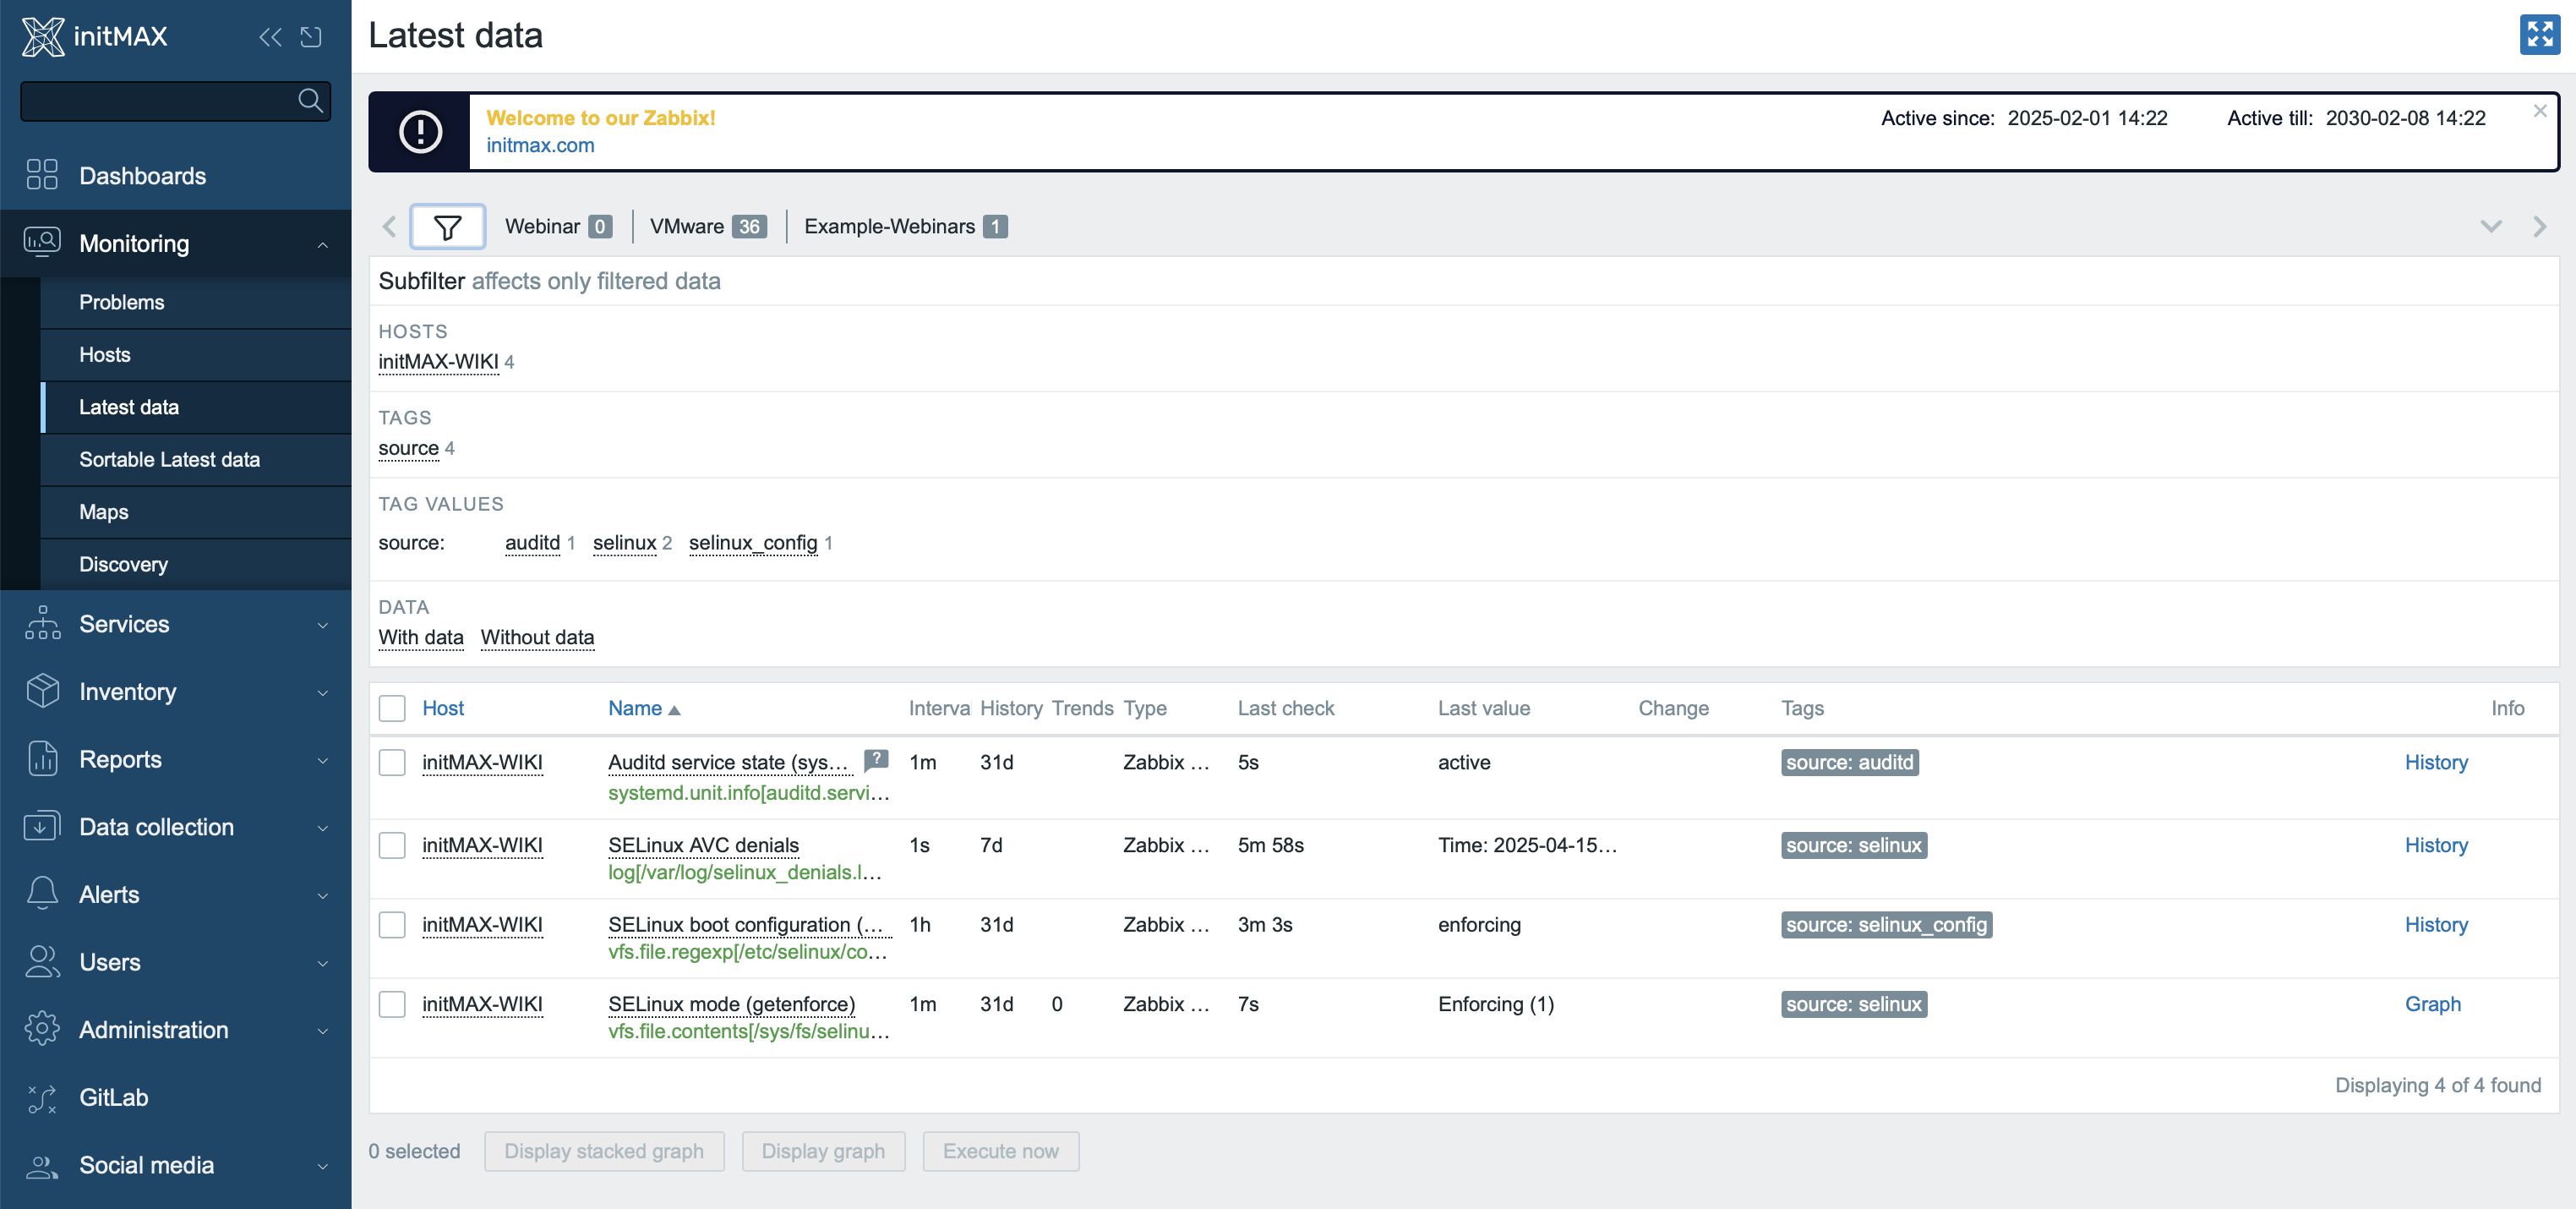
You can verify the configuration by going to Monitoring → Latest data for the corresponding host.
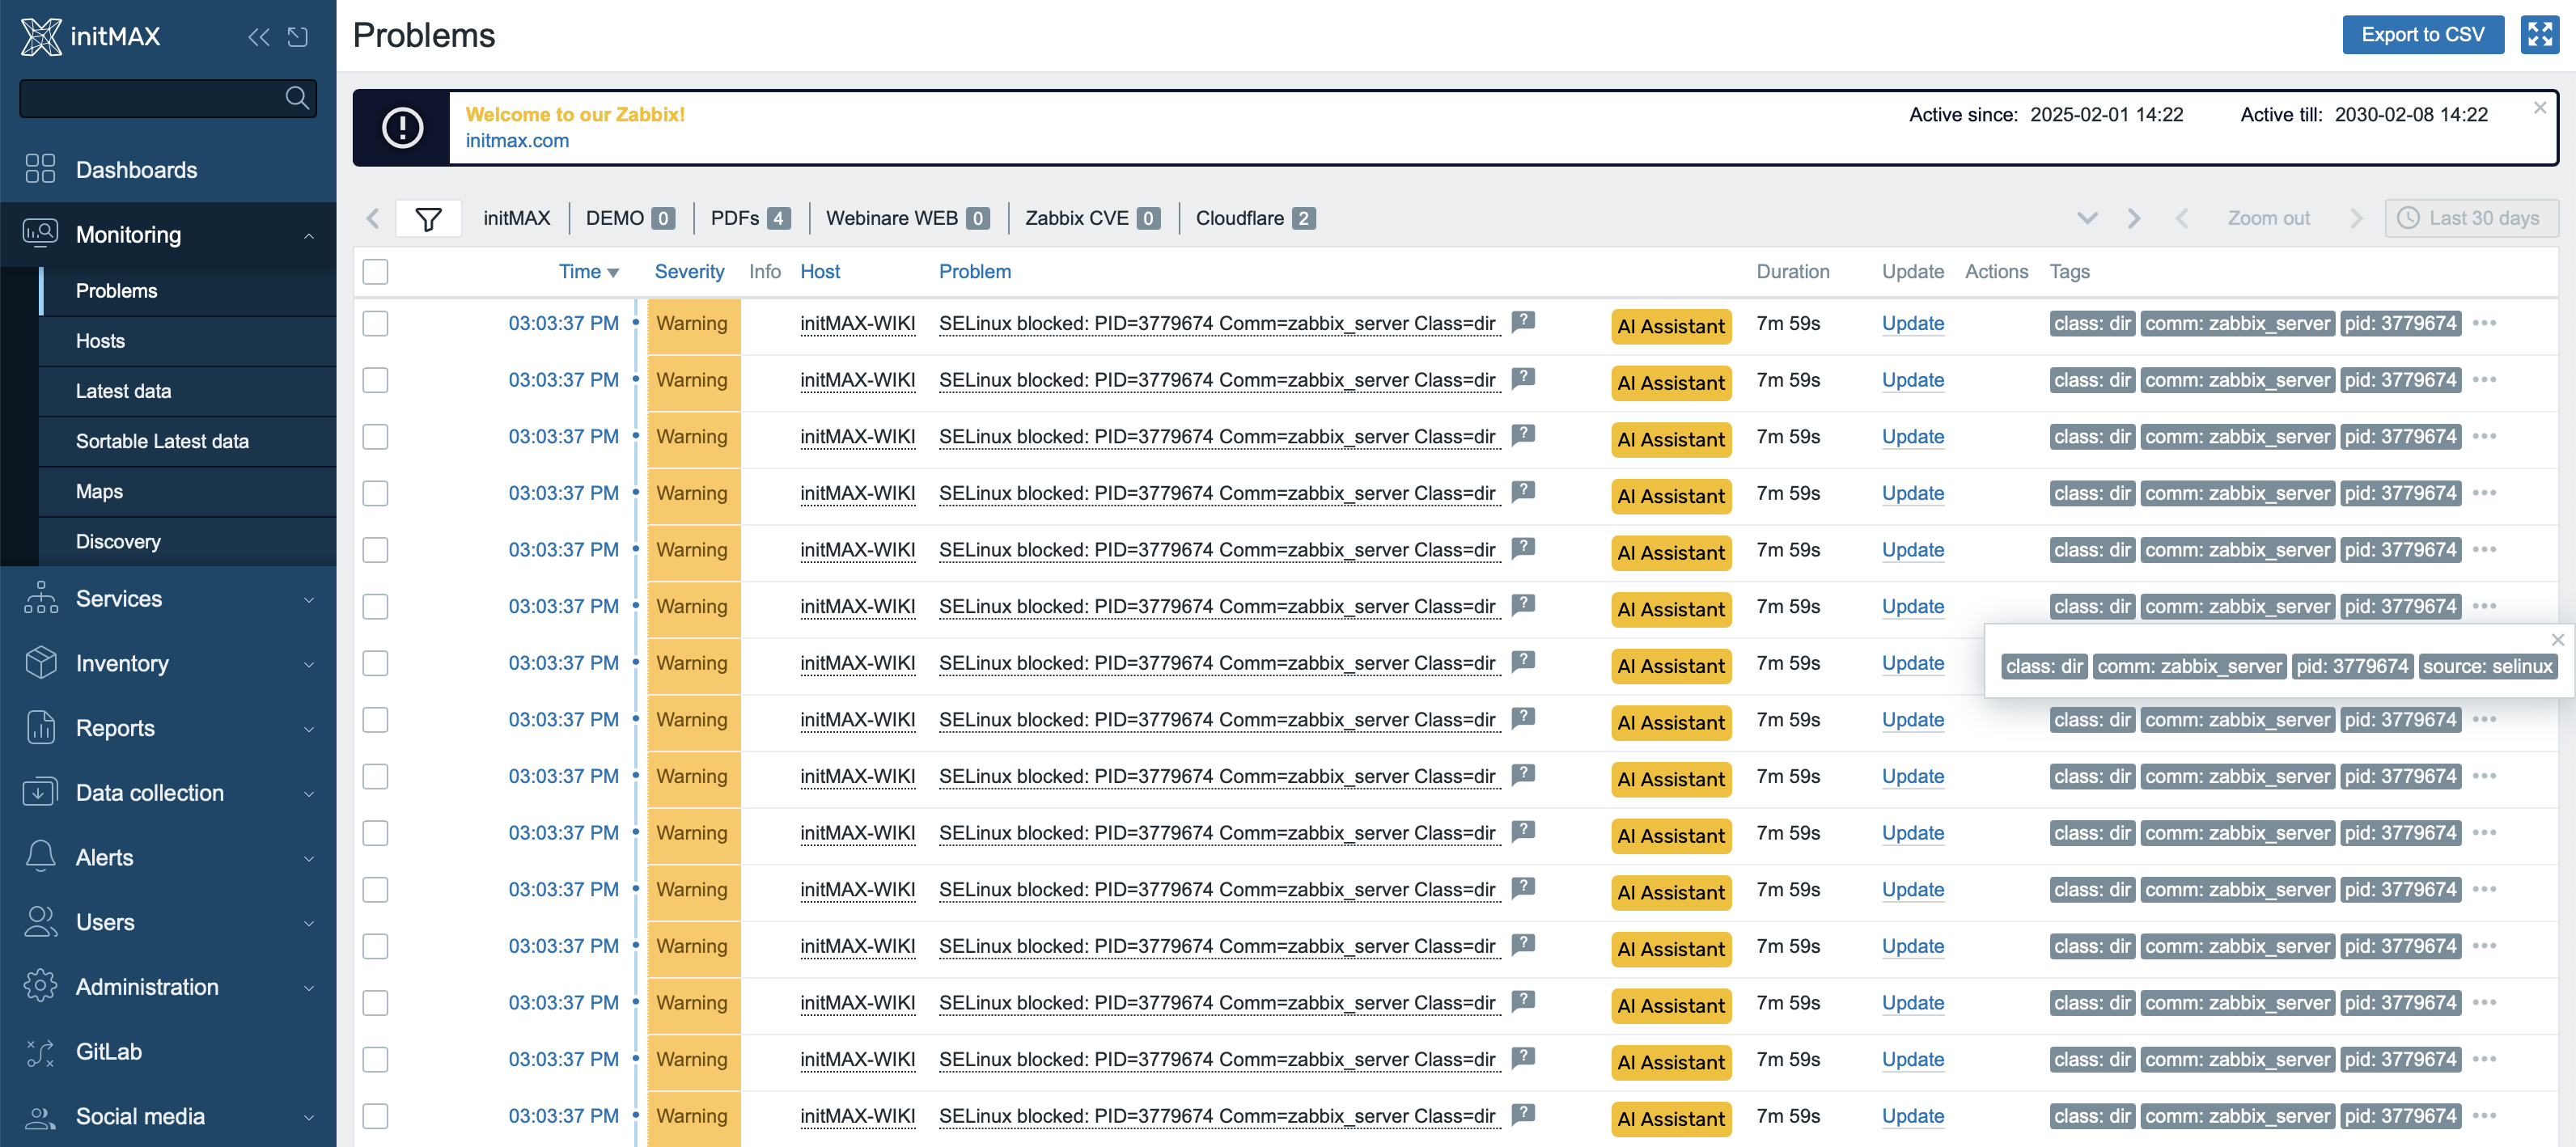
When a denial is detected, Zabbix creates a problem event. The event is automatically closed if no further denials occur within 30 minutes.
This time interval can be adjusted using the user macro {$TRIGGER.CLOSE.TIME}, either directly in the template or individually on the host level.
Each problem record includes the PID, process name (Comm), and object type (Class) in the title, making it easy to identify at a glance.
Tags such as comm, class, pid, and source are also attached to the event, allowing for efficient filtering, notification routing, and display in organized dashboards.
The image below shows how SELinux events appear in the “Monitoring → Problems” section.
Recommendation: SELinux is an important part of system security and it is generally not recommended to disable it. The zabbix-selinux-policy package resolves most common issues with Zabbix, but non-standard operations (such as custom ports or access to non-standard files) must be handled by the administrator using custom policies, as described above. We recommend investing time in understanding how SELinux works so you can manage security policies effectively.
Give us a Like, share us, or follow us 😍
So you don’t miss anything: