In this article, we will show you how to easily activate global frontend scripts in Zabbix and demonstrate three effective and easy-to-use examples.

Selection of the operating system
The guide includes instructions for RHEL platforms on version 9, where you only need to adjust the repositories if necessary. The guide for Debian is prepared for version 12, which is currently the latest supported version.
Enabling Global Scripts
Since Zabbix version 7.0, global frontend scripts are disabled by default for security reasons. This restriction is part of an effort to enhance the security of the Zabbix server environment. However, global scripts can significantly simplify management, so if you want to take advantage of their benefits, you must explicitly enable them.
By default, the Zabbix server configuration sets the value EnableGlobalScripts=0, which means this feature is disabled. If you attempt to run a script without enabling it, you will encounter the following error:
“Global script execution on Zabbix server is disabled by server configuration.”
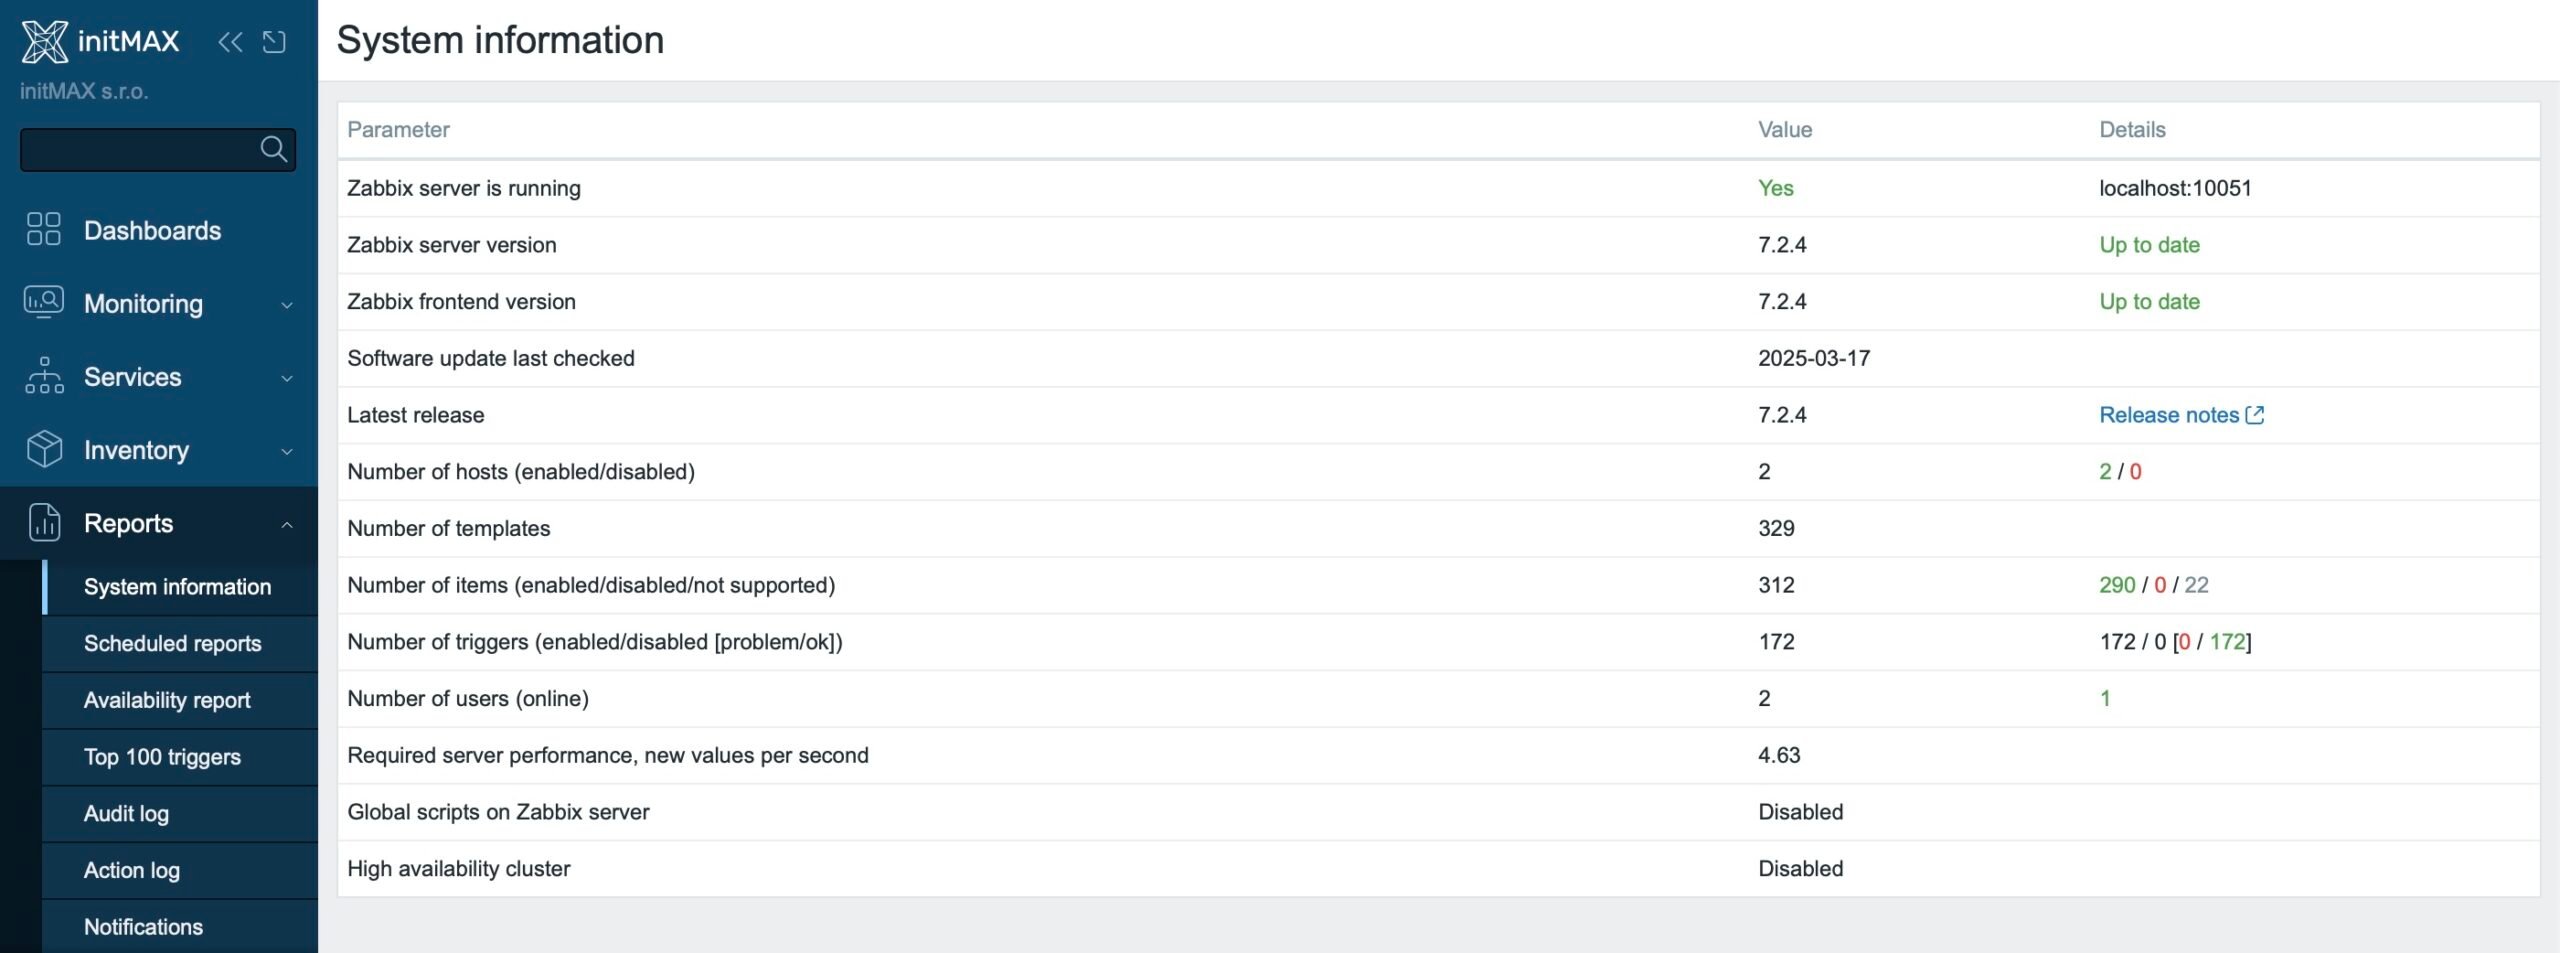
You can also check whether global scripts are enabled directly in the GUI under Reports → System information, in the “Global scripts on Zabbix server” field. If this setting is already enabled, the corresponding line will not appear in the output.
To enable global scripts, follow these steps:
Edit the Zabbix server configuration file using the following command:
nano /etc/zabbix/zabbix_server.confIn the file, locate the line with the value EnableGlobalScripts=0 and change it to:
EnableGlobalScripts=1This change enables the execution of global scripts.
Restart the Zabbix server service:
systemctl restart zabbix-serverAfter this step, you can start using global scripts in Zabbix.
Enabling Predefined Frontend Scripts (nmap and traceroute)
Zabbix includes several useful frontend scripts by default. However, they are often not functional right away due to missing system packages or insufficient permissions. We will show you how to enable two of these predefined scripts nmap and traceroute.
Installing Required Packages
On the Zabbix server or proxy, install the necessary packages:
Configuring Sudo Rules
To allow Zabbix to execute commands with elevated privileges (in this case, for the nmap tool), create a dedicated sudoers file, such as /etc/sudoers.d/zabbix_scripts, and add the following content:
nano /etc/sudoers.d/zabbix_scriptsAnd insert the following content:
zabbix ALL=(ALL) NOPASSWD: /usr/bin/nmapThis rule allows the zabbix user to execute the nmap command without requiring a password, ensuring the proper functionality of the script in the frontend interface.
Rules in the sudoers file define which commands users can run with root privileges without authentication. Additional commands can be added on separate lines in the same manner.
Save the file and verify the syntax with the following command:
visudo -cf /etc/sudoers.d/zabbix_scripts
If the verification completes without errors, you can now use the nmap and traceroute frontend scripts directly from the Zabbix interface.
Example 1 – Displaying the Zabbix Agent Configuration File
Now, we will demonstrate how to create a custom frontend script in the Zabbix GUI that retrieves the Zabbix agent configuration while distinguishing between agent versions. First, it is necessary to enable script execution on the Zabbix agent side.
Enabling Scripts in the Zabbix Agent Configuration (Agent and Agent 2)
On the remote host, modify the Zabbix agent configuration using the appropriate command based on the agent type:
- For the classic Zabbix agent:
nano /etc/zabbix/zabbix_agentd.conf- For the Zabbix agent 2:
nano /etc/zabbix/zabbix_agent2.confEnabling DenyKey
If this option is not yet enabled, you need to activate it first.
In the configuration file, locate and uncomment the line with DenyKey:
DenyKey=system.run[*]Before the DenyKey rule, insert the AllowKey rule, which allows the execution of only a specific script (never use a general rule with *, as it can pose a security risk):
AllowKey=system.run[pgrep -a 'zabbix_agent2' >/dev/null && { echo "==== Zabbix Agent 2 Configuration ===="; grep -Ev '^#|^$' /etc/zabbix/zabbix_agent2.conf; } ; pgrep -a 'zabbix_agentd' >/dev/null && { echo "==== Zabbix Agent (Classic) Configuration ===="; grep -Ev '^#|^$' /etc/zabbix/zabbix_agentd.conf; }]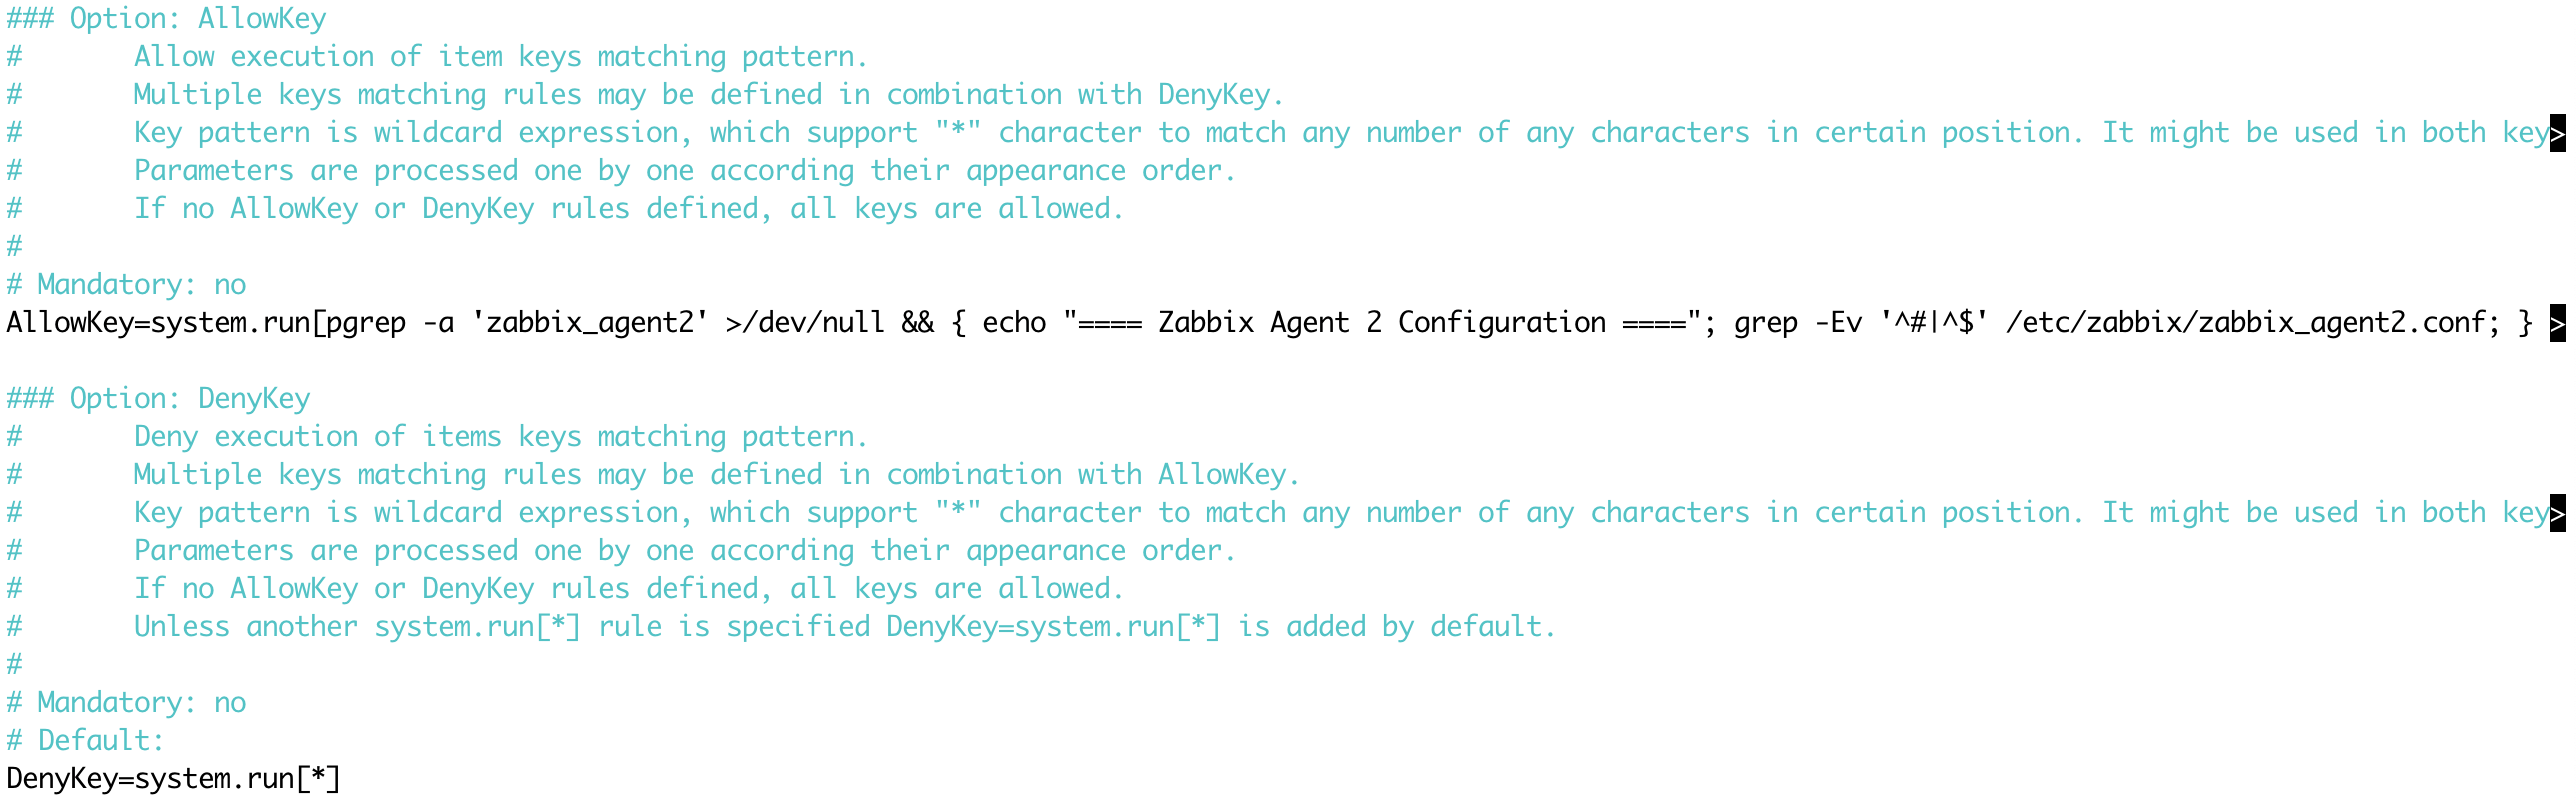
Then, restart the agent service based on the agent type:
- For the classic Zabbix agent:
systemctl restart zabbix-agent- For the Zabbix agent 2:
systemctl restart zabbix-agent2Creating a Script in the Frontend
Follow these steps:
- Go to Alerts → Scripts.
- Click on the Create script button.
- Fill in the fields:
- Name: For example, “Zabbix Agent Config”.
- Scope: Select “Manual host action”.
- Type: Select “Script”.
- Execute on: Select “Zabbix agent”.
- Commands: Insert the following command:
pgrep -a 'zabbix_agent2' >/dev/null && { echo "==== Zabbix Agent 2 Configuration ===="; grep -Ev '^#|^$' /etc/zabbix/zabbix_agent2.conf; } ; pgrep -a 'zabbix_agentd' >/dev/null && { echo "==== Zabbix Agent (Classic) Configuration ===="; grep -Ev '^#|^$' /etc/zabbix/zabbix_agentd.conf; }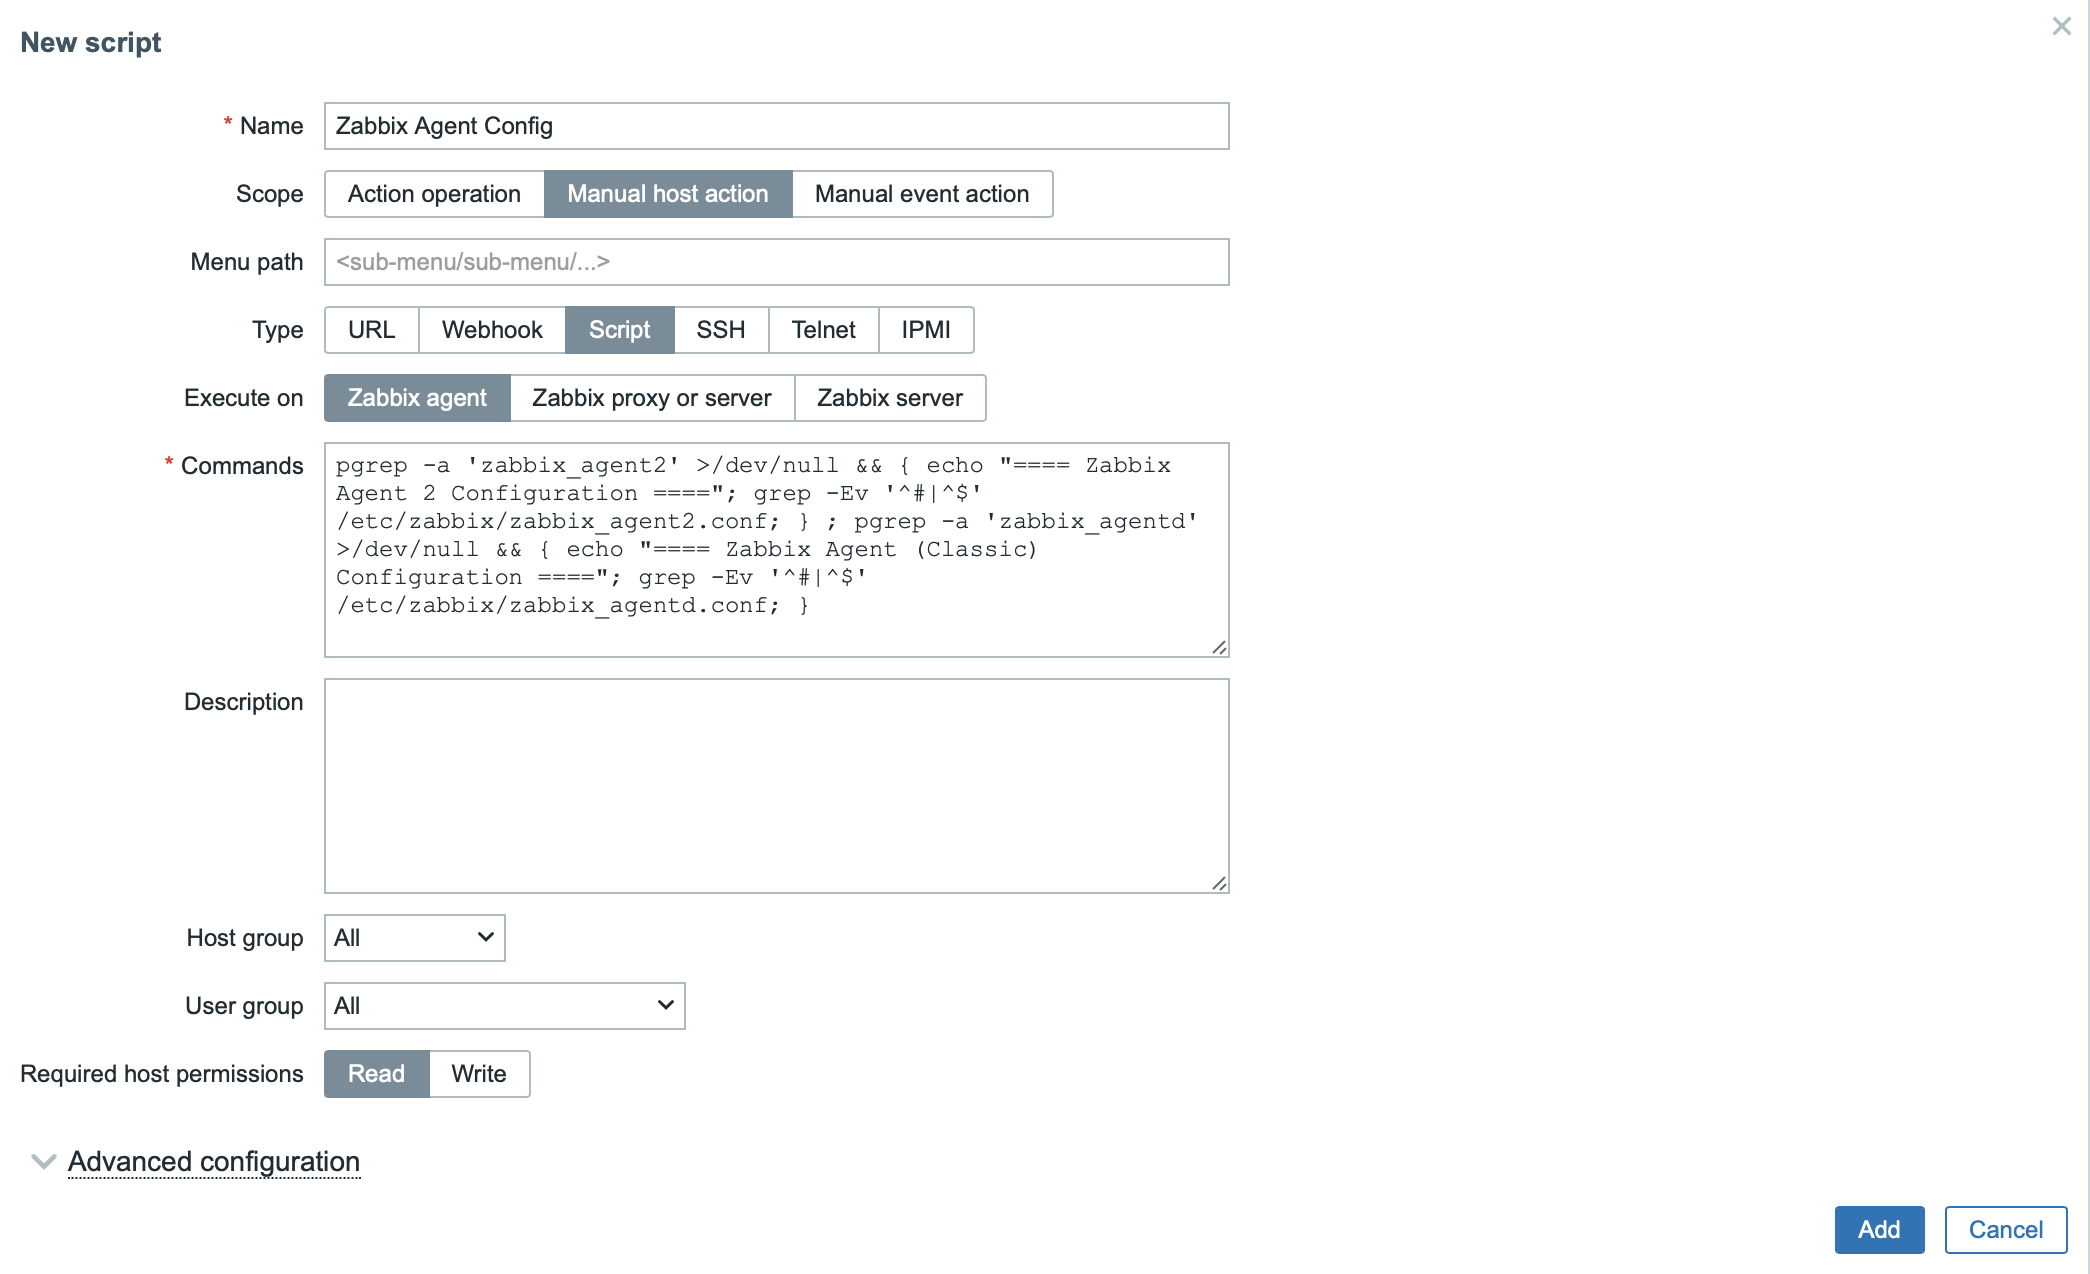
You can also (optionally) fill in the following settings:
- Description – A description of the script’s purpose.
- Host group – Restrict usage to specific host groups.
- User group – Restrict usage to specific user groups.
- Options for Required Host Permissions:
- Read – Users with “Read” permission on the host can execute the script.
- Write – The script can only be executed by users with “Write” permission on the host.
- Click Add.
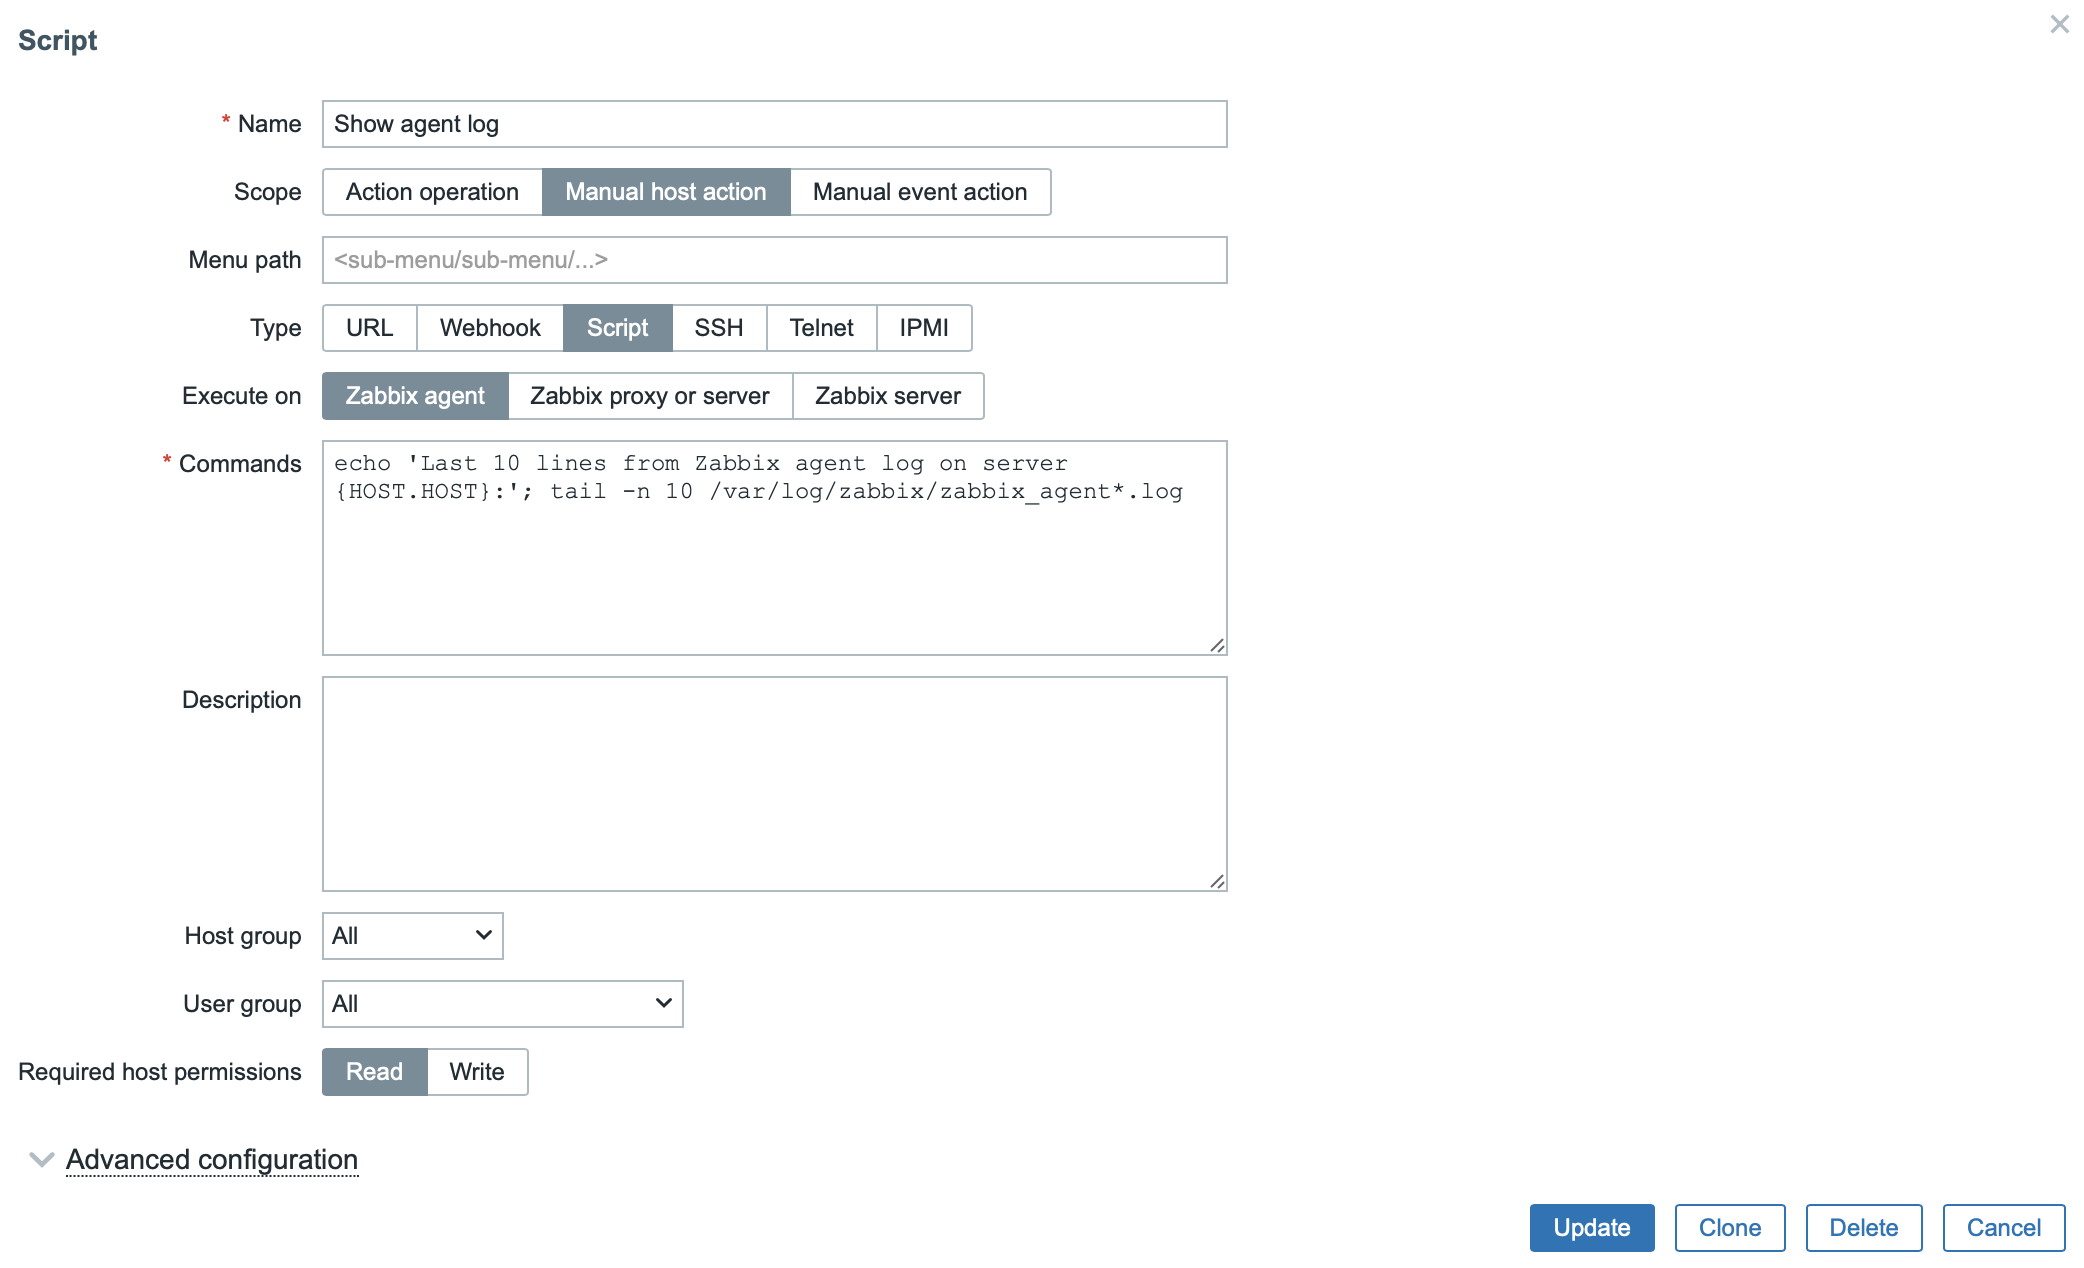
Example 2 – Displaying the Last 10 Lines of the Zabbix Agent Log
If you want to view the last 10 lines of the Zabbix agent log directly through the frontend, you can create this script:
On the remote host, modify the Zabbix agent configuration using the appropriate command based on the agent type:
- For the classic Zabbix agent:
nano /etc/zabbix/zabbix_agentd.conf- For the Zabbix agent 2:
nano /etc/zabbix/zabbix_agent2.confEnabling DenyKey
If this option is not yet enabled, you need to activate it first.
In the configuration file, locate and uncomment the line with DenyKey:
DenyKey=system.run[*]Before the DenyKey rule, insert the AllowKey rule, which allows the execution of only a specific script (never use a general rule with *, as it can pose a security risk):
AllowKey=system.run[echo 'Last 10 lines from Zabbix agent log on server *:'; tail -n 10 /var/log/zabbix/zabbix_agent*.log]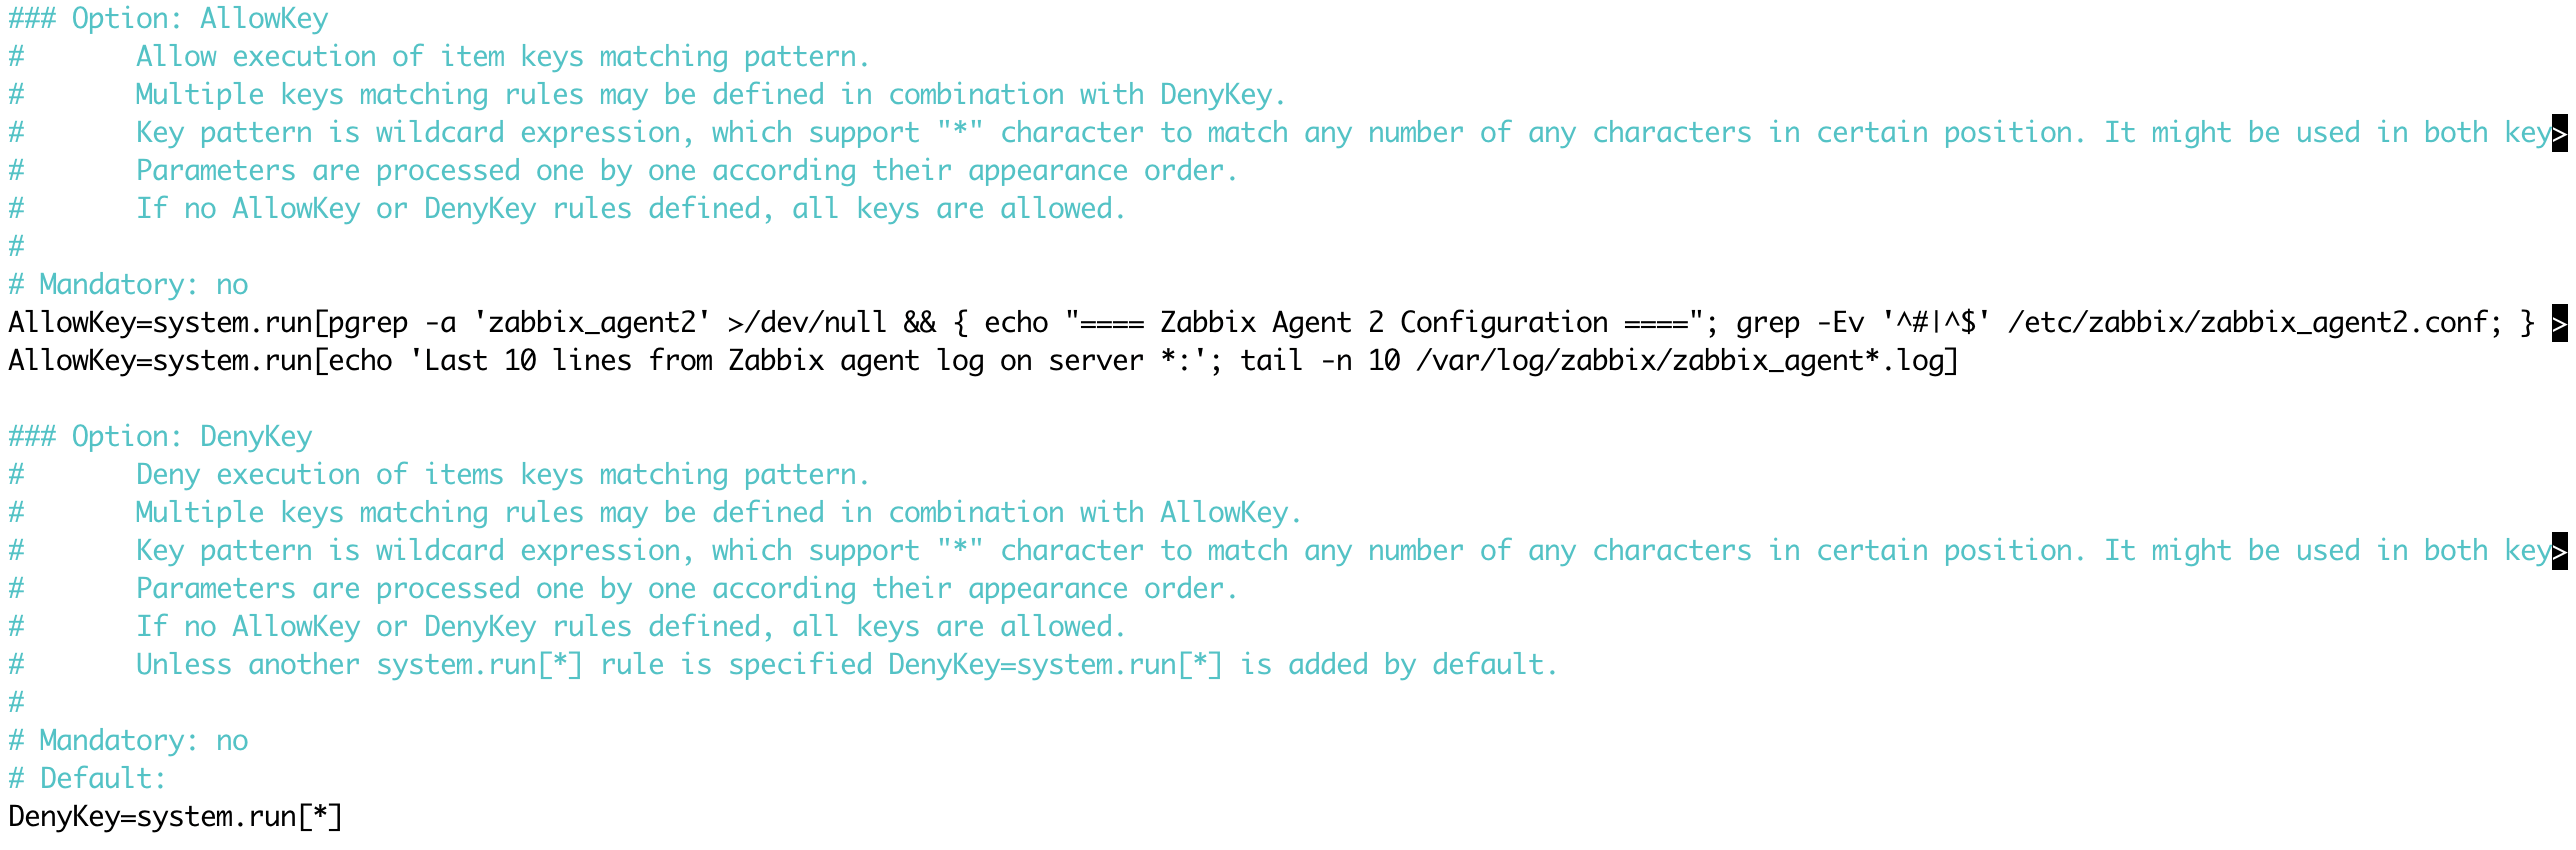
Then, restart the agent service based on the agent type:
- For the classic Zabbix agent:
systemctl restart zabbix-agent- For the Zabbix agent 2:
systemctl restart zabbix-agent2In the frontend, create a script with the following settings:
- Name: For example, “Show agent log”.
- Scope: Select “Manual host action”.
- Type: Select “Script”.
- Execute on: Select “Zabbix agent”.
- Commands: Insert the following command:
echo 'Last 10 lines from Zabbix agent log on server {HOST.HOST}:'; tail -n 10 /var/log/zabbix/zabbix_agent*.logOptionally, set a description, host group, or user group as needed.
Finally, click the Add button.
Example 3 – Enabling Application Restart via Zabbix Agent
Configuring Sudo Rules
To allow Zabbix to execute commands with elevated privileges (in this case, restarting the crond and rsyslog services), create a dedicated sudoers file, such as /etc/sudoers.d/zabbix_scripts, and insert the following content:
nano /etc/sudoers.d/zabbix_scriptsAnd insert the following content:
zabbix ALL=(ALL) NOPASSWD: /usr/bin/systemctl restart rsyslog
zabbix ALL=(ALL) NOPASSWD: /usr/bin/systemctl restart crond
These rules allow the zabbix user to execute restart commands without requiring a password.
Save the file and verify the syntax with the following command:
visudo -cf /etc/sudoers.d/zabbix_scriptsOn the remote host, modify the Zabbix agent configuration using the appropriate command based on the agent type:
- For the classic Zabbix agent:
nano /etc/zabbix/zabbix_agentd.conf- For the Zabbix agent 2:
nano /etc/zabbix/zabbix_agent2.confEnabling DenyKey
If this option is not yet enabled, you need to activate it first.
In the configuration file, locate and uncomment the line with DenyKey:
DenyKey=system.run[*]Before the DenyKey rule, insert the AllowKey rule, which allows the execution of only a specific script (never use a general rule with *, as it can pose a security risk):
AllowKey=system.run[sudo systemctl restart rsyslog && echo "Service * restarted successfully." || echo "Restart of service * failed."]
AllowKey=system.run[sudo systemctl restart crond && echo "Service * restarted successfully." || echo "Restart of service * failed."]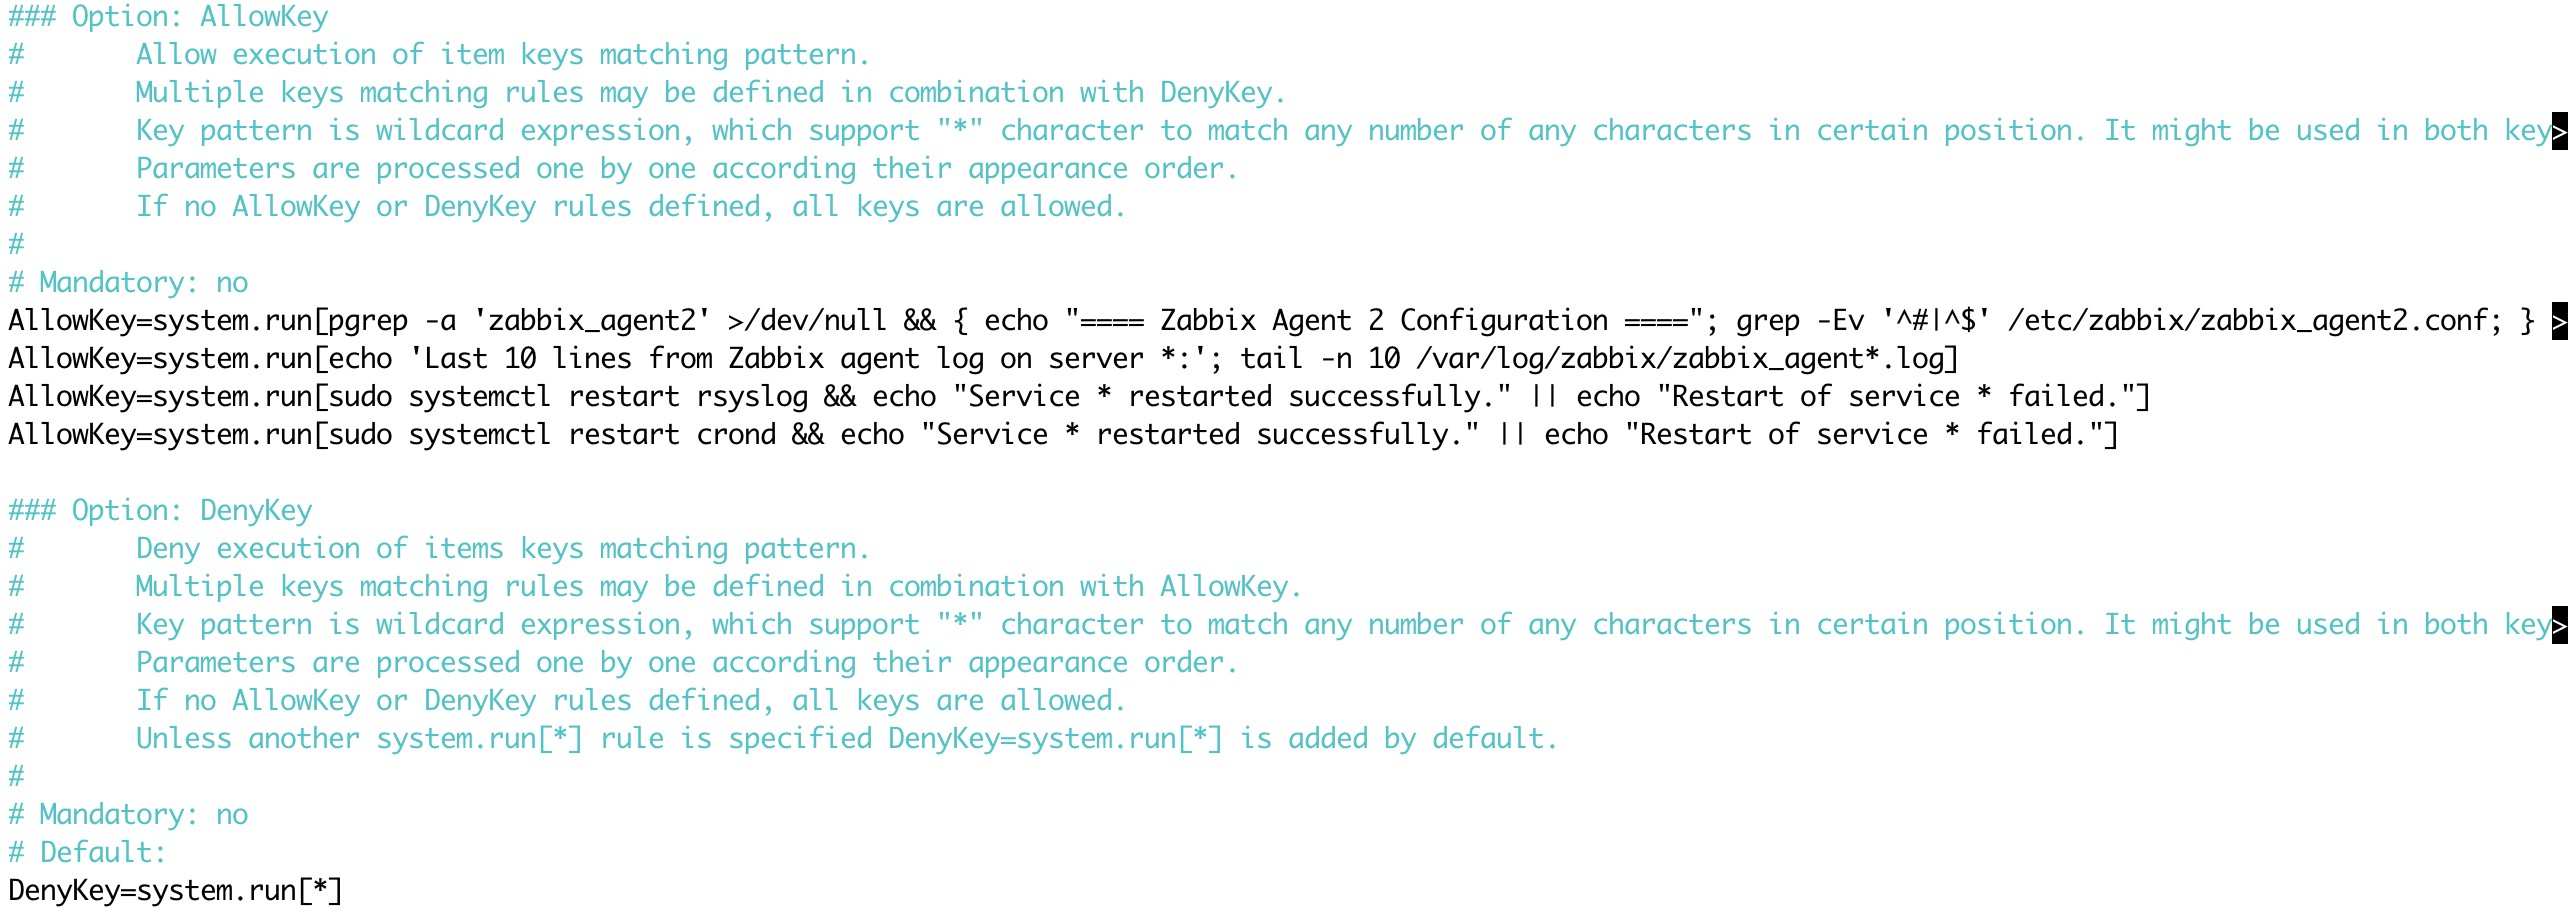
Then, restart the agent service based on the agent type:
- For the classic Zabbix agent:
systemctl restart zabbix-agent- For the Zabbix agent 2:
systemctl restart zabbix-agent2Creating a Script for Service Restart with Dropdown Selection
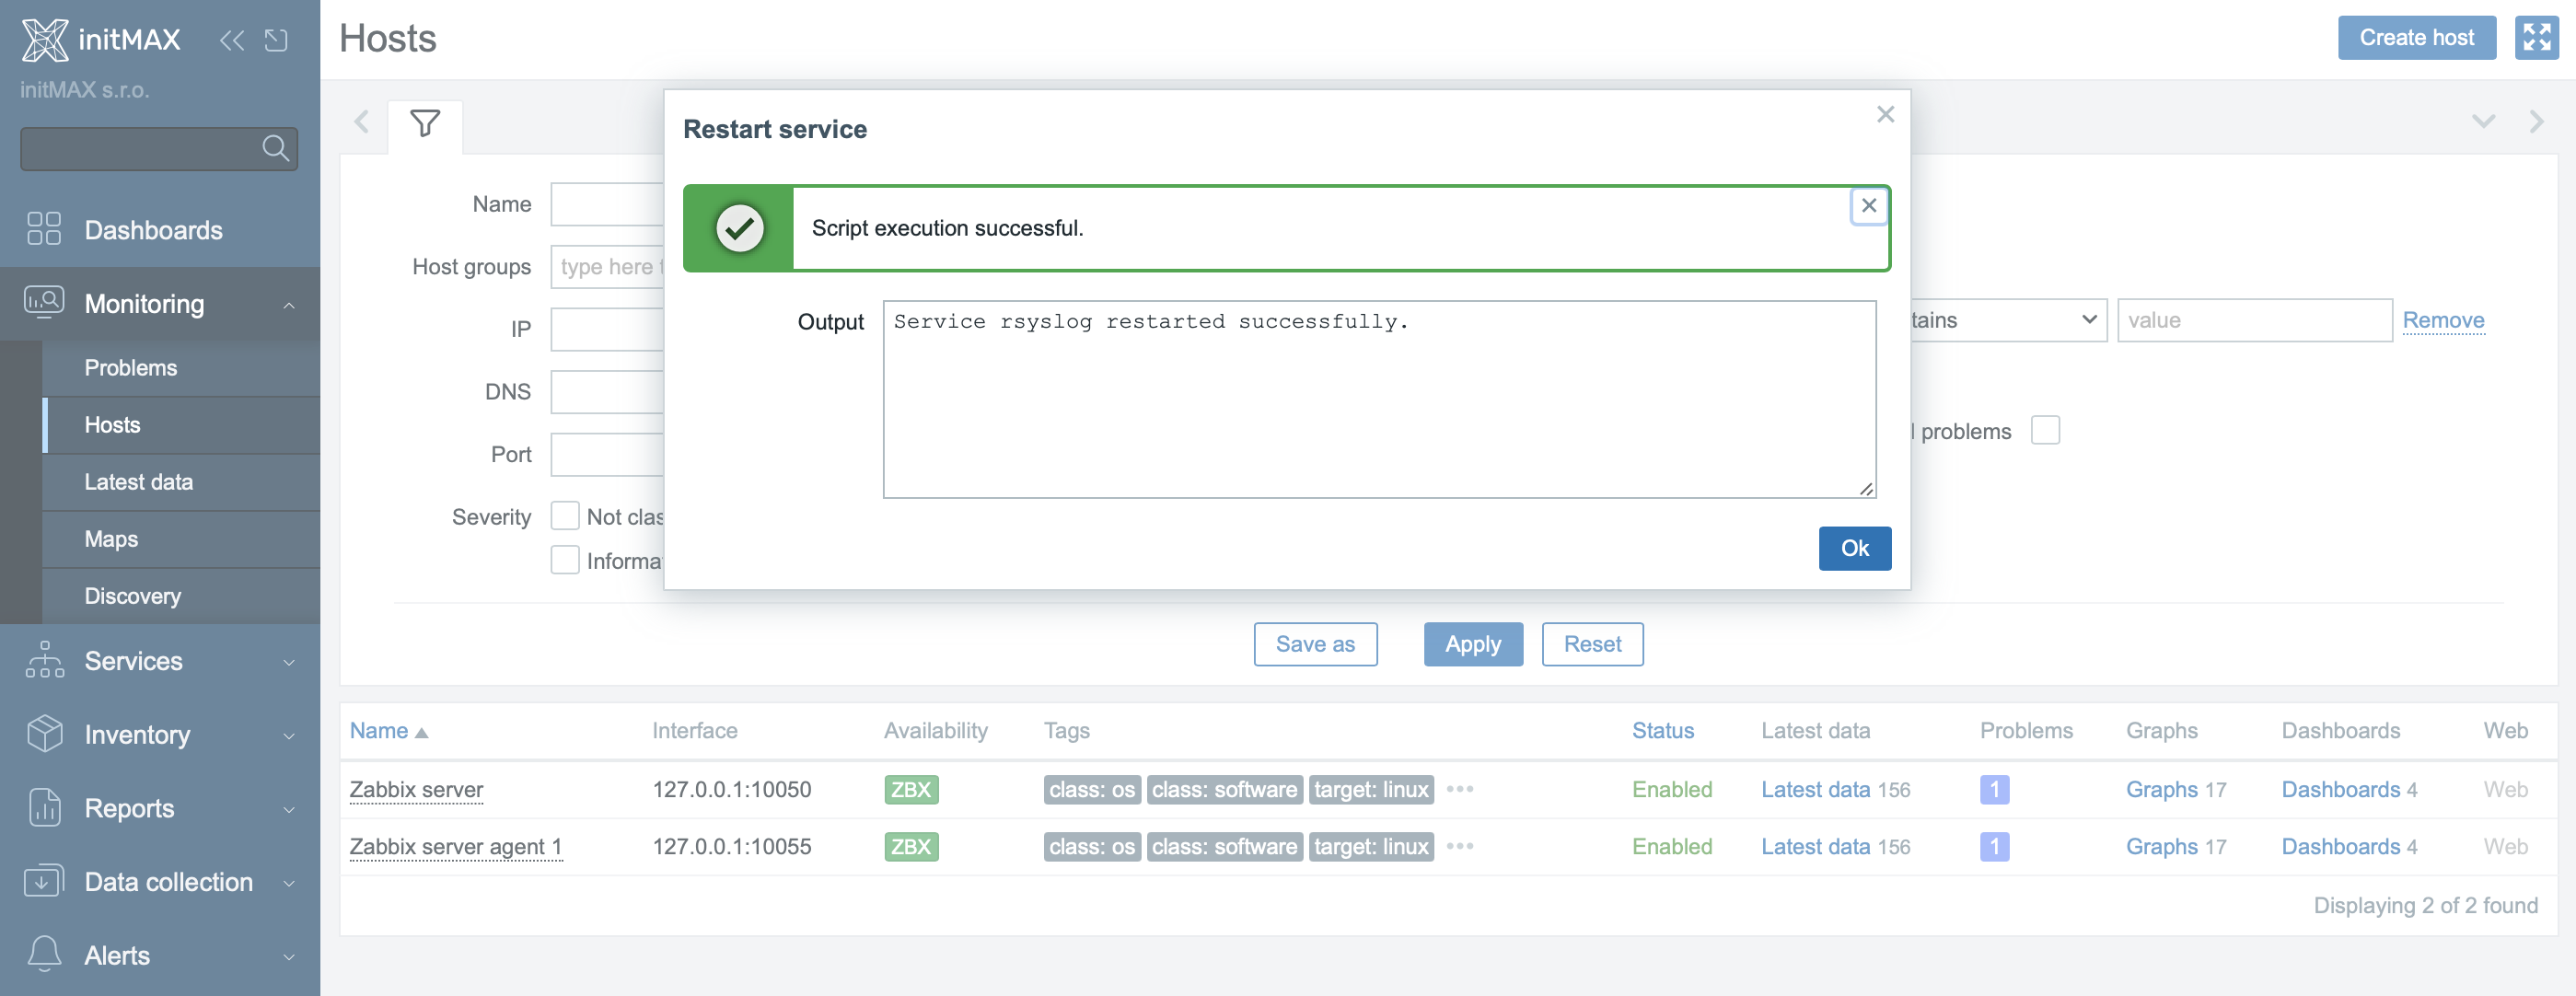
The new functionality in Zabbix 7.0 allows the use of user input with a dropdown menu. This enables users to select which service they want to restart (e.g., rsyslog or crond).
Steps to create the script:
- Go to Alerts → Scripts.
- Click the Create script button.
- Fill in the following fields:
- Name: “Restart service”.
- Scope: “Manual host action”.
- Type: “Script”.
- Execute on: “Zabbix agent”.
- Commands: Insert the following command:
sudo systemctl restart {MANUALINPUT} && echo "Service {MANUALINPUT} restarted successfully." || echo "Restart of service {MANUALINPUT} failed."Adding a Dropdown Menu
- Click on Advanced configuration.
- Check Enable user input.
- In the Input prompt field, enter: Service name.
- In Input type, select: Dropdown.
- In Dropdown options, enter:
- Enable user input: Check this option.
- Input prompt: “Service name”.
- Input type: Select Dropdown.
- Dropdown options: Enter rsyslog, crond.
- Click the Add button, and you can now use the new script directly from the GUI.
rsyslog,crond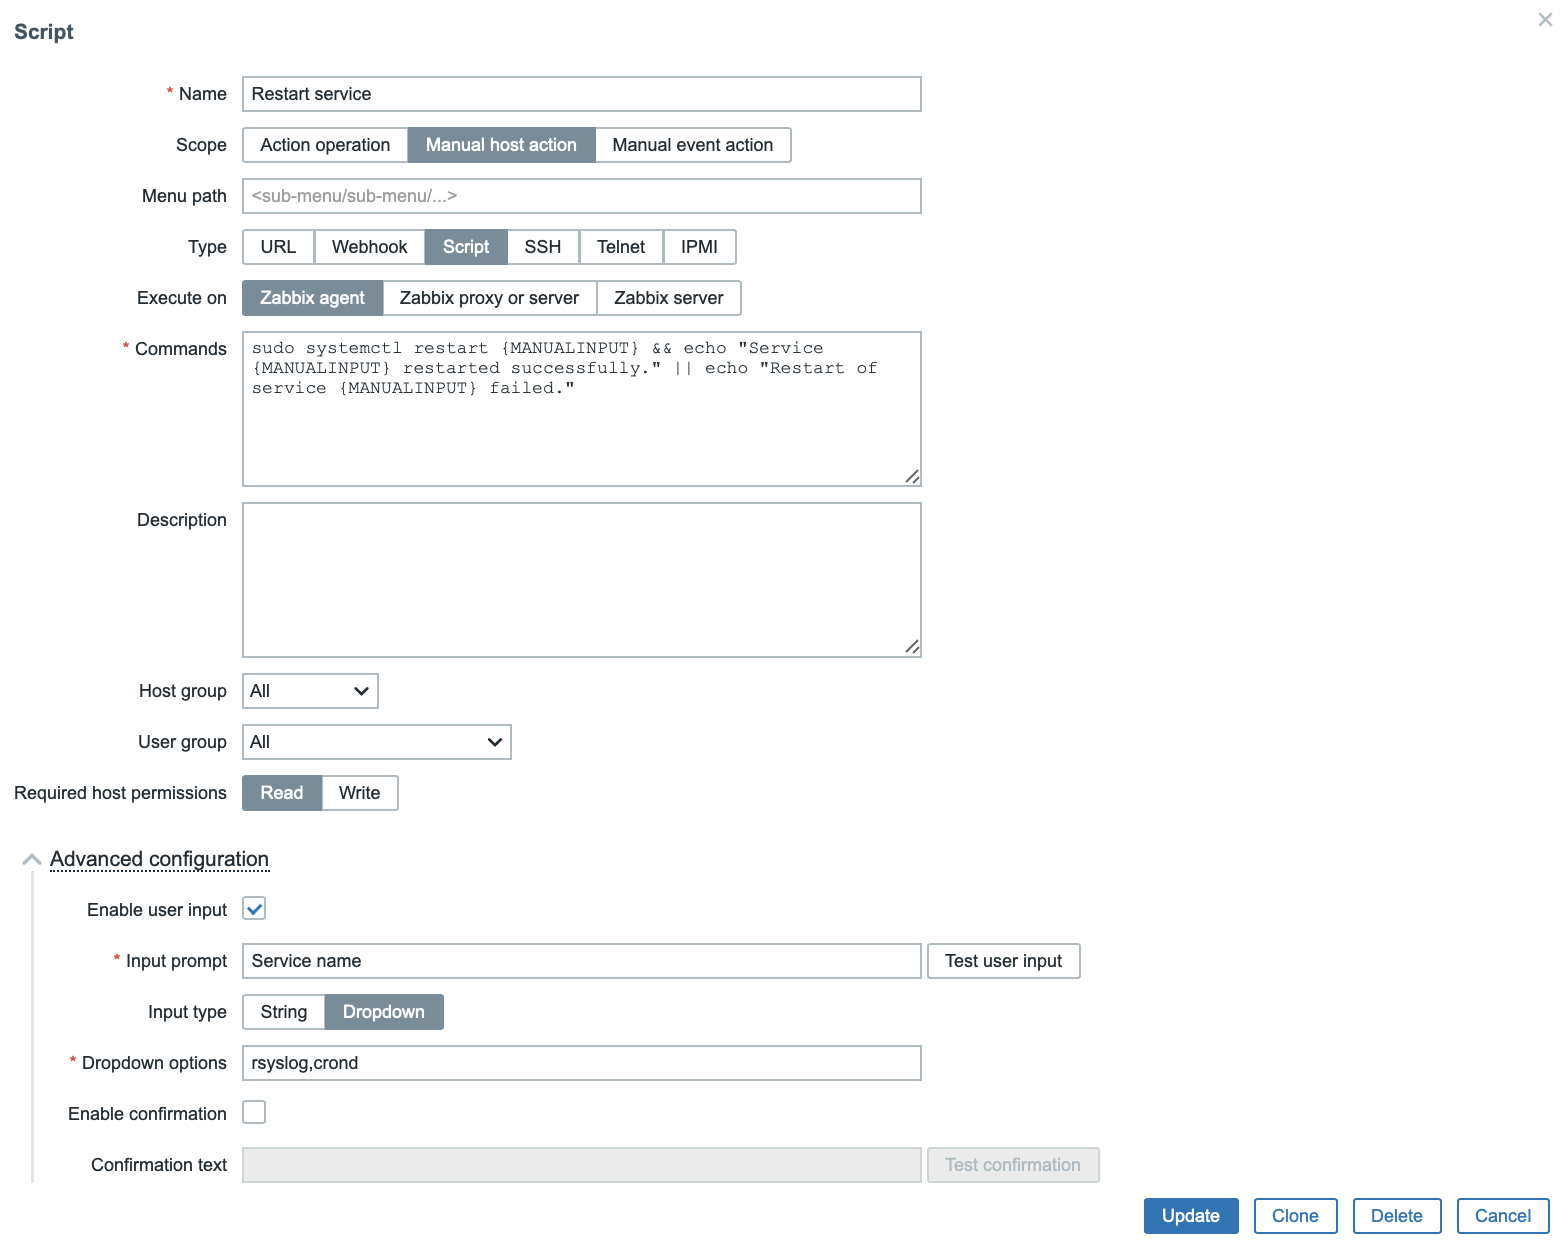
- Save the changes.
Example of Script Execution
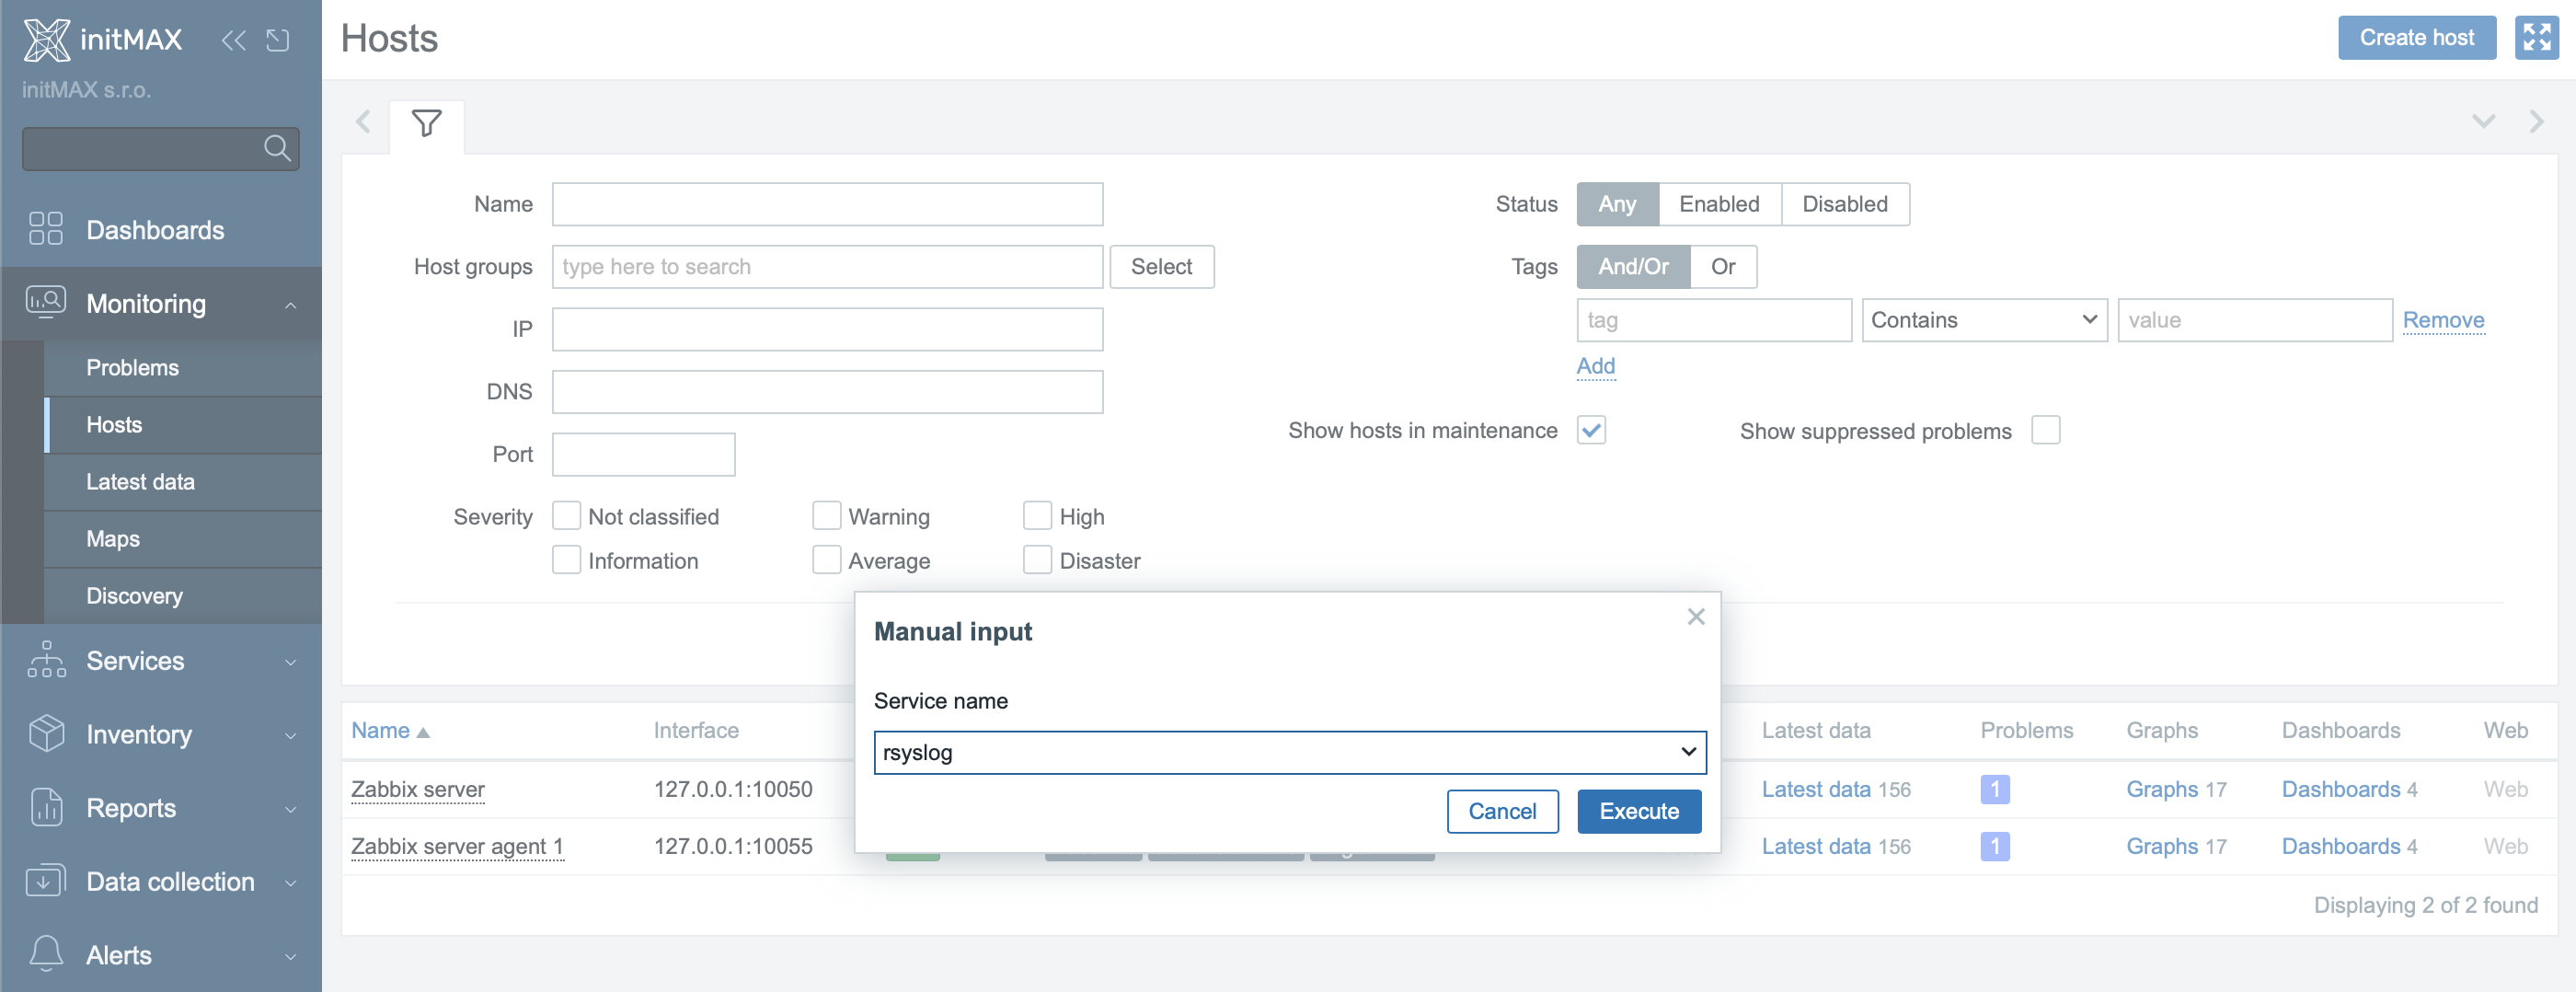
Once the scripts are created (Alerts → Scripts) and set as Manual host action, they will appear in the context menu when you left-click on a host in Monitoring → Hosts (see images). From there, you can select the specific script (e.g., Restart service or Show agent log).
Similarly, these scripts can be executed from maps—by clicking on the host icon, a menu with available actions will open. This provides quick access to host control directly from the overview or map.

Timeout Handling in Frontend Scripts
- Before version 7.0: Timeout was controlled by the Timeout= parameter in the configuration files of the Zabbix server (
zabbix_server.conf) and Zabbix agent (zabbix_agentd.conforzabbix_agent2.conf). The allowed range was 1-30 seconds, and it applied only to passive checks. - Since version 7.0: Timeout is now configured directly in the frontend and applies to both passive and active checks. The default value is 60 seconds, with an adjustable range of 1-300 seconds.
For active checks, it is also necessary to consider the refresh interval, which determines how often the agent loads a new configuration and thus the frequency of requests for new values. The default refresh interval is 5 seconds, which can affect timeout behavior.
Important: If the timeout is shorter than the refresh interval, the request for a check might never be executed. Therefore, it is essential to set values in alignment with this setting.
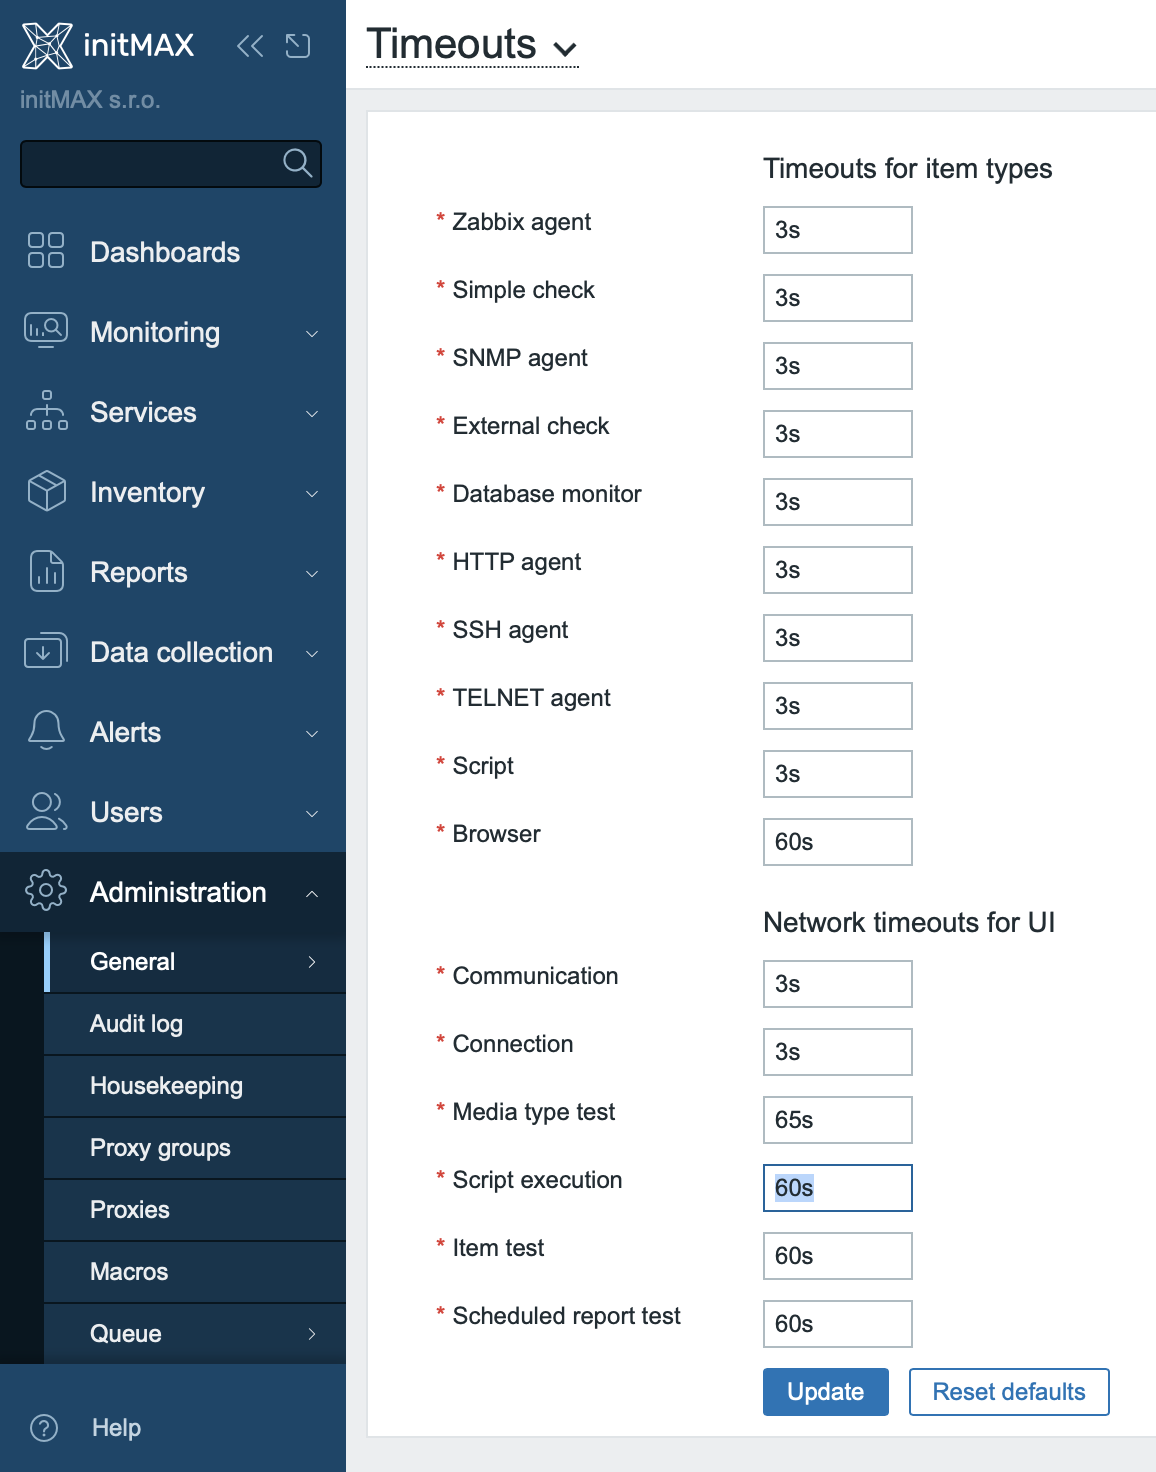
How to change the timeout in the frontend
- Go to Administration → General → Timeouts.
- Find the Script execution option.
- Change the value as needed (range 1-300 seconds).
- Click Update.
Wait vs. Nowait in system.run within action operations
Zabbix allows you to define whether a command executed via system.run in action scripts should run in Wait mode (default) or Nowait.
Difference Between Wait and Nowait
- Wait (default behavior) – The script runs, and Zabbix waits for its completion before proceeding with the next steps in the action.
- Nowait – The script starts, but Zabbix does not wait for its completion and immediately continues.
Where can Nowait be used?
- Nowait can only be used in action scripts (e.g., in the Action operations section in Zabbix).
- It cannot be used in regular frontend scripts, where Zabbix always waits for the result.
How to Properly Configure AllowKey for Nowait?
If a specific command is allowed in AllowKey, for example:
AllowKey=system.run[myscript.sh]…then the nowait variant will not work (system.run[myscript.sh,nowait]).
Correct Solution:
To use nowait, you must allow wildcard notation:
AllowKey=system.run[myscript.sh,*]Warning: If nowait is not allowed in the configuration, Zabbix may reject the execution of a script with this option.
When to Use Wait and When to Use Nowait?
- Wait (synchronous execution) – Suitable for short scripts where knowing the command result is necessary before executing further operations.
- Nowait (asynchronous execution) – Ideal for long-running tasks where waiting for the result is unnecessary (e.g., service restart, background script execution).
Quick Tips
- Security and Permissions
Ensure that user and host groups allowed to execute scripts are properly configured. Overly broad permissions can pose security risks. - SELinux / Firewall
If SELinux or a firewall is enabled, additional steps may be necessary (e.g., allowing required ports or modifying SELinux rules) to ensure scripts run without restrictions. - Backup and Logging
Before making changes to Zabbix configuration files, create a backup. If errors occur, check the Zabbix server or agent logs (typically in/var/log/zabbix/) to quickly diagnose potential issues. - Functionality Testing
After modifications and service restarts, always perform a test run of scripts to verify that all changes are correctly applied and scripts execute without errors. - Script Execution Timeout
If a script fails to execute or times out, check the timeout settings. You can adjust it in Administration → General → Timeouts (Script execution option). The default is 60 seconds, but for longer-running scripts, you may need to increase the value.
Give us a Like, share us, or follow us 😍
So you don’t miss anything: