This guide describes how to customize or completely hide the default login form in the Zabbix frontend. For a full rebranding of the Zabbix frontend (changing logos, footers, etc.), refer to the separate guide on Zabbix Frontend Rebranding.
Reasons for hiding the login form
- Security measure
- Restricting access to publicly available login
- Redirecting to a custom authentication system
Technical solution
Rebranding Zabbix can be performed without modifying the application’s source code. This approach ensures safety and compatibility with future Zabbix updates.
The entire process involves editing or creating the configuration file brand.conf.php, which should typically be located here:
For version 7.0 and earlier
/usr/share/zabbix/local/conf/brand.conf.phpFor version 7.2 and later
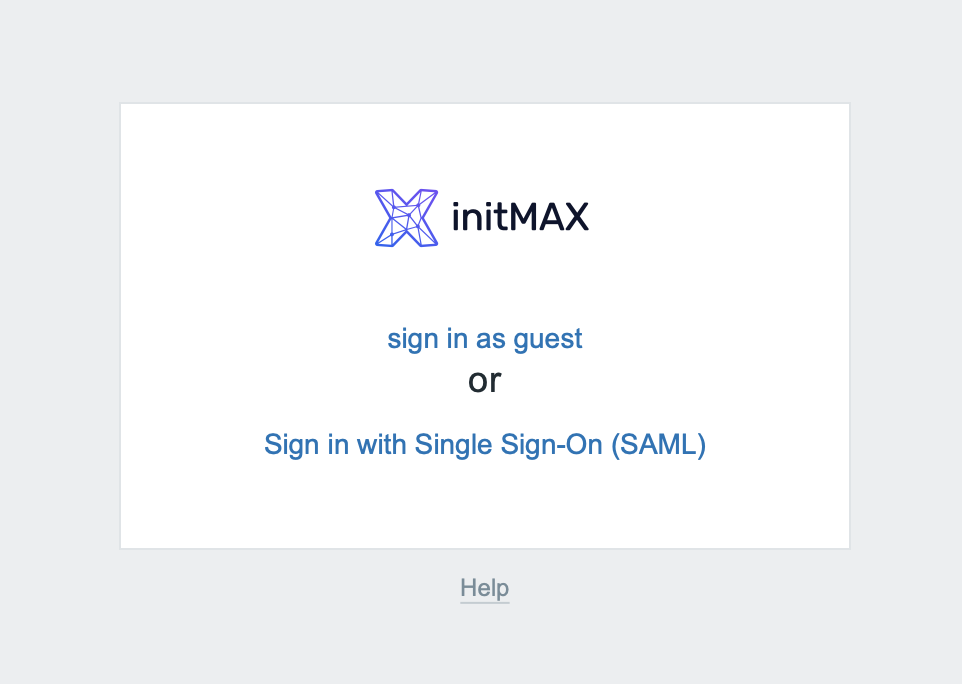
/usr/share/zabbix/ui/local/conf/brand.conf.phpExample 1 – Minimalist login – SAML or guest only
Example configuration for Zabbix, where the standard login form (username, password, and login button) is completely hidden, leaving only SAML or guest login options available. Ideal for environments with centralized identity management.
Note: This configuration assumes that you already have SAML authentication enabled and the guest account activated in Zabbix. If these prerequisites are not met, users will only see the logo without any login options.
Configuring brand.conf.php
Create or modify the brand.conf.php file:
For version 7.0 and earlier
sudo nano /usr/share/zabbix/local/conf/brand.conf.phpFor version 7.2 and later
sudo nano /usr/share/zabbix/ui/local/conf/brand.conf.phpExample file content:
<?php
// Check if the current page is the main login page (index.php)
$is_index = substr($_SERVER['SCRIPT_NAME'], -10) === '/index.php';
// Basic rebranding configuration array
$brand_conf = [
    // Custom branding options go here (logo, footer, help link) - Explained in another topic
];

// If the current page is not the main login page, return default branding
if (!$is_index) {
    return $brand_conf;
}

// CSS to hide standard login fields (username, password) and login button, leaving only guest/SAML login options visible
$css = <<<'CSS'
.signin-container form ul {
    li:has([name="name"]),
    li:has([name="password"]),
    li:has(#autologin),
    li:has(button[type="submit"]) {
        display: none !important;
    }
    li.sign-in-txt:has(a[href="index.php?enter=guest"]) { display: flex; flex-direction: column-reverse; }
    li.sign-in-txt a[href="index.php?enter=guest"] { width: fit-content; margin: 0 auto 10px; }
    li.sign-in-txt a[href="index.php?enter=guest"]:hover { width: fit-content; margin: 0 auto 9px; }
}
CSS;

// Inject custom CSS into the footer branding configuration
$brand_conf['BRAND_FOOTER'] = [$brand_conf['BRAND_FOOTER']??null, new CTag('style', true, $css)];

// Return the final branding configuration
return $brand_conf;
If needed, you can comment out individual parts using two forward slashes //.
What do the individual parts in the PHP code mean?
- $is_index – Checks if the user is currently viewing the main login page (
index.php) based on the URL. - $brand_conf – Array containing branding configuration (logos, footer, links).
- $css – Custom CSS styles to hide default login elements on the page.
- BRAND_FOOTER – Allows inserting custom content (such as styles or texts) into the page footer.
Setting permissions
Make sure files and directories have correct permissions and ownership (usually www-data or apache, depending on your web server configuration):
For version 7.0 and earlier
sudo chown www-data:www-data /usr/share/zabbix/local/conf/brand.conf.php
sudo chmod 644 /usr/share/zabbix/local/conf/brand.conf.php
For version 7.2 and later
sudo chown -R www-data:www-data /usr/share/zabbix/ui/local/conf/brand.conf.php
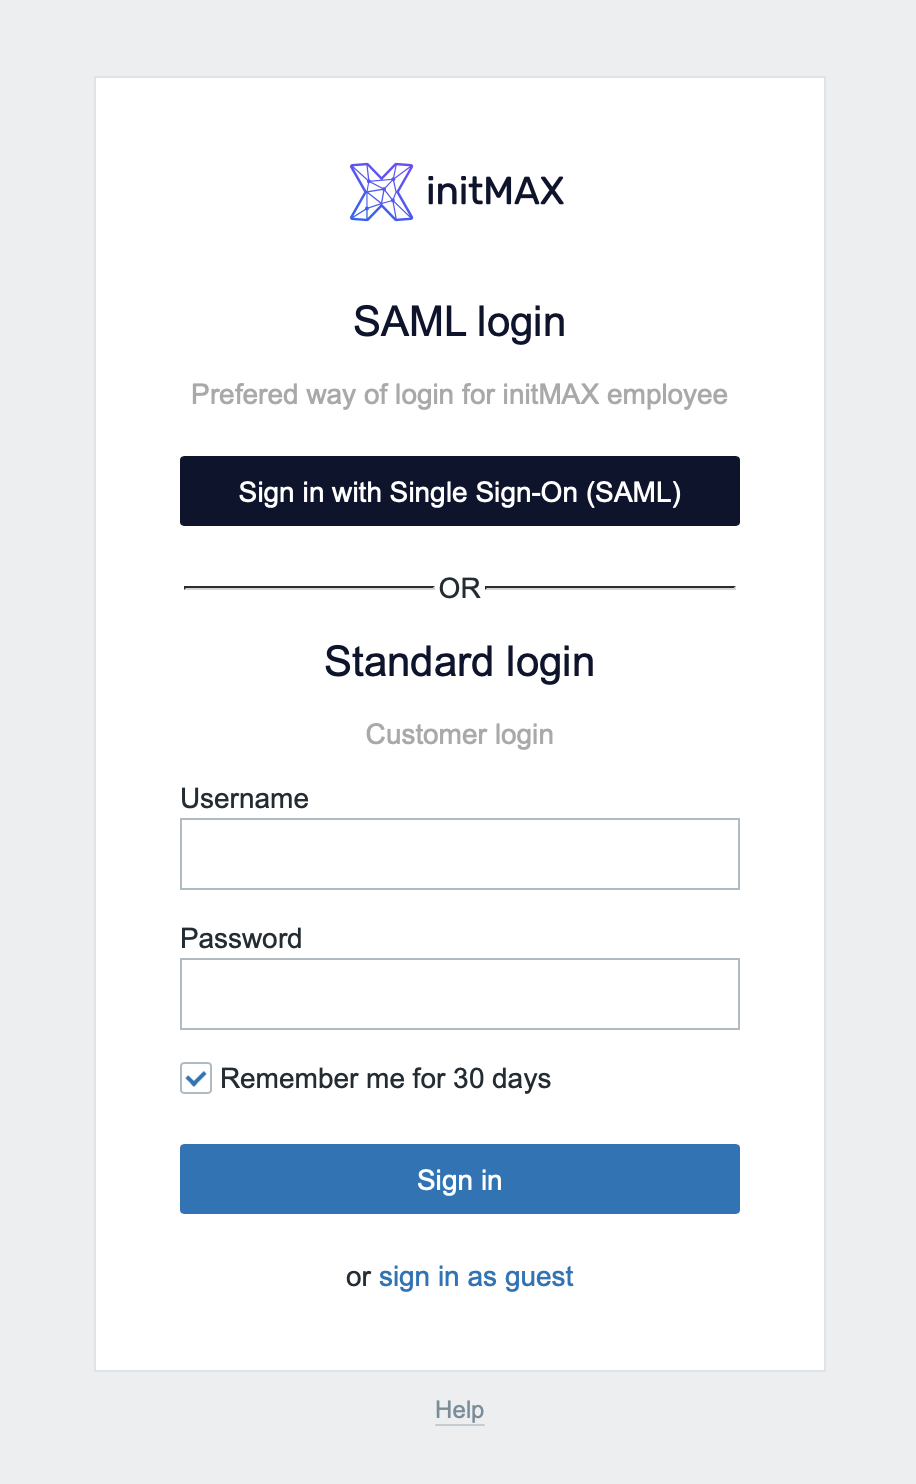
sudo chmod 644 /usr/share/zabbix/ui/local/conf/brand.conf.phpExample 2 – Customized branding with separate login options
This example demonstrates a more advanced customization of the Zabbix login page, including a custom logo, color distinction for different login methods, and additional informational texts. Ideal for organizations using multiple authentication methods simultaneously.
Configuring brand.conf.php
Create or modify the brand.conf.php file:
For version 7.0 and earlier
sudo nano /usr/share/zabbix/local/conf/brand.conf.phpFor version 7.2 and later
sudo nano /usr/share/zabbix/ui/local/conf/brand.conf.phpExample file content:
<?php
// Check if the current page is the main login page (index.php)
$is_index = substr($_SERVER['SCRIPT_NAME'], -10) === '/index.php';

// Basic rebranding configuration array
$brand_conf = [
    // Custom branding options go here (logo, footer, help link) - Explained in another topic
];

// If the current page is not the main login page, return default branding
if (!$is_index) {
    return $brand_conf;
}

$sso_url = (new CUrl('index_sso.php'))->setArgument('request', getRequest('request'))->getUrl();
// Customize footer branding by adding CSS and injecting custom HTML template and JS
$brand_conf['BRAND_FOOTER'] = [
    // Include existing footer branding content if set, otherwise null
    $brand_conf['BRAND_FOOTER'] ?? null,
    // Custom CSS to hide the original SAML login link
    new CTag('style', true, <<<'CSS'
.signin-container form ul {
    li.sign-in-txt:has(a[href="index_sso.php"]) { display: none; }
}
CSS),
    // HTML template to insert new login elements (SAML and standard login sections)
    (new CTag('template', true, [
        new CListItem((new CTag('h2', true, _('SAML login')))->addStyle('text-align:center; color:#0d142d;')),
        // Description text for SAML login (e.g., for company employees)
        new CListItem((new CDiv('Prefered way of login for initMAX employee'))->addStyle('text-align:center; color:#A9A9A9;')),
        // Button for SAML Single Sign-On login
        new CListItem((new CSimpleButton(_('Sign in with Single Sign-On (SAML)')))->onClick("window.location = '{$sso_url}'")->addStyle('background-color: #0d142d;border-color: #0d142d;')),
        // Divider line with "or" between login methods
        (new CListItem([
            (new CTag('hr'))->addStyle('width: 44%'),
            (new CSpan(_('or')))->addStyle('text-transform: uppercase;'),
            (new CTag('hr'))->addStyle('width: 44%'),
        ]))->addStyle('display: flex;'),
        // Title for Standard login section
        new CListItem((new CTag('h2', true, _('Standard login')))->addStyle('text-align:center; color:#0d142d;')),
        // Description text for standard login (e.g., for customers)
        new CListItem((new CDiv('Customer login'))->addStyle('text-align:center; color:#A9A9A9;')),
    ]))->setId('initmax-login-template'),
    // JavaScript code to insert the prepared HTML template elements into the existing login form
    new CTag('script', true, <<<'JS'
for (const el of [...document.querySelector('#initmax-login-template').content.children].reverse()) document.querySelector('form ul').prepend(el);
JS)
];

// Return the final branding configuration with all customizations applied
return $brand_conf;
If needed, you can comment out individual parts using two forward slashes //.
What do the individual parts in the PHP code mean?
$is_index– Checks if the user is currently viewing the main login page (index.php) based on the URL.$brand_conf– An array containing branding configurations (logo, footer, help links).$sso_url– Dynamically generated URL that redirects the user to the SAML Single Sign-On login page (index_sso.php).$css– Custom CSS styles to hide the original SAML login link on the login page.BRAND_FOOTER– Allows inserting custom content (e.g., styles, HTML templates, JavaScript) into the footer of the page. In this example, it adds new login sections.- HTML template – A prepared set of HTML elements defining two clearly separated login sections: SAML login (for employees) and Standard login (for customers).
- JavaScript – Inserts the prepared HTML elements from the template directly into the existing login form on the page.
Setting permissions
Make sure files and directories have correct permissions and ownership (usually www-data or apache, depending on your web server configuration):
For version 7.0 and earlier
sudo chown www-data:www-data /usr/share/zabbix/local/conf/brand.conf.php
sudo chmod 644 /usr/share/zabbix/local/conf/brand.conf.php
For version 7.2 and later
sudo chown -R www-data:www-data /usr/share/zabbix/ui/local/conf/brand.conf.php
sudo chmod 644 /usr/share/zabbix/ui/local/conf/brand.conf.php
Custom rebranding
You can find all the necessary steps in a separate guide on our wiki.
Give us a Like, share us, or follow us 😍
So you don’t miss anything: